2021 RAM PROMASTER CITY wheel size
[x] Cancel search: wheel sizePage 166 of 280
164SAFETY
The steering wheel hub trim cover and the
upper passenger side of the instrument panel
separate and fold out of the way as the air bags
inflate to their full size. The front air bags fully
inflate in less time than it takes to blink your
eyes. The front air bags then quickly deflate
while helping to restrain the driver and front
passenger.
Knee Impact Bolsters
The Knee Impact Bolsters help protect the
knees of the driver and front passenger, and
position the front occupants for improved
interaction with the front air bags.
Supplemental Driver Knee Air Bag
This vehicle is equipped with a Supplemental
Driver Knee Air Bag mounted in the instrument
panel below the steering column. The
Supplemental Driver Knee Air Bag provides enhanced protection during a frontal impact by
working together with the seat belts,
pretensioners, and front air bags.
Supplemental Side Air Bags
Supplemental Seat-Mounted Side Air Bags
(SABs)
This vehicle is equipped with Supplemental
Seat-Mounted Side Air Bags (SABs).
Supplemental Seat-Mounted Side Air Bags
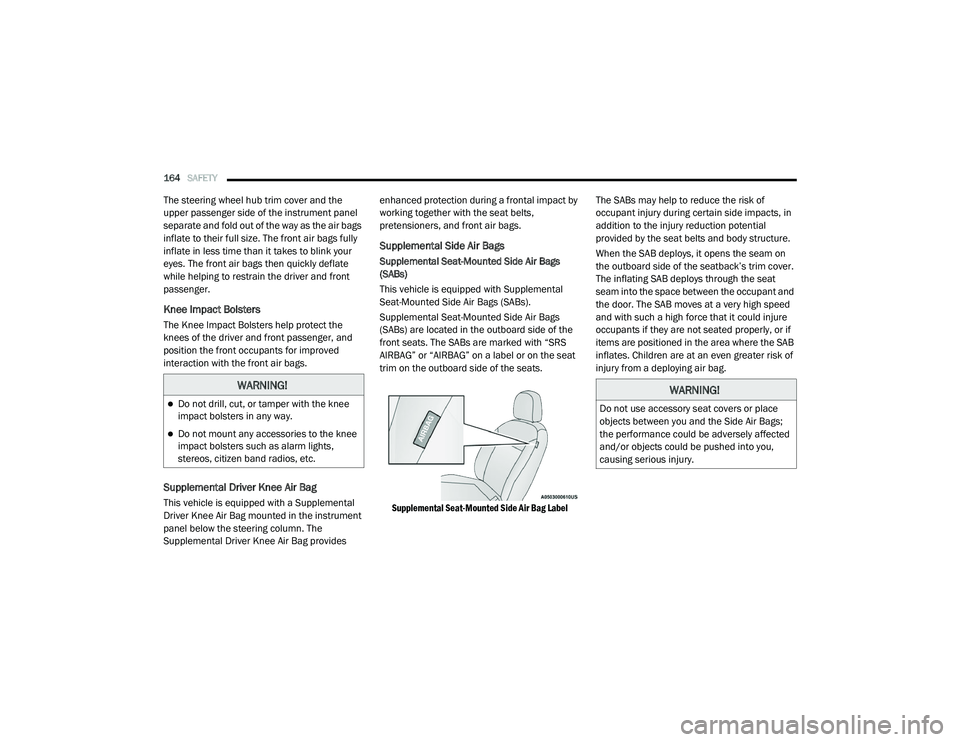
(SABs) are located in the outboard side of the
front seats. The SABs are marked with “SRS
AIRBAG” or “AIRBAG” on a label or on the seat
trim on the outboard side of the seats.
Supplemental Seat-Mounted Side Air Bag Label
The SABs may help to reduce the risk of
occupant injury during certain side impacts, in
addition to the injury reduction potential
provided by the seat belts and body structure.
When the SAB deploys, it opens the seam on
the outboard side of the seatback’s trim cover.
The inflating SAB deploys through the seat
seam into the space between the occupant and
the door. The SAB moves at a very high speed
and with such a high force that it could injure
occupants if they are not seated properly, or if
items are positioned in the area where the SAB
inflates. Children are at an even greater risk of
injury from a deploying air bag.
WARNING!
Do not drill, cut, or tamper with the knee
impact bolsters in any way.
Do not mount any accessories to the knee
impact bolsters such as alarm lights,
stereos, citizen band radios, etc.
WARNING!
Do not use accessory seat covers or place
objects between you and the Side Air Bags;
the performance could be adversely affected
and/or objects could be pushed into you,
causing serious injury.
21_VM_OM_EN_USC_t.book Page 164
Page 246 of 280

244SERVICING AND MAINTENANCE
Tire Repair
If your tire becomes damaged, it may be
repaired if it meets the following criteria:
The tire has not been driven on when flat.
The damage is only on the tread section of
your tire (sidewall damage is not repairable).
The puncture is no greater than a ¼ of an
inch (6 mm).
Consult an authorized tire dealer for tire repairs
and additional information.
Damaged Run Flat tires, or Run Flat tires that
have experienced a loss of pressure should be
replaced immediately with another Run Flat tire
of identical size and service description (Load
Index and Speed Symbol). Replace the tire
pressure sensor as well as it is not designed to
be reused.
Run Flat Tires — If Equipped
Run Flat tires allow you the capability to drive
50 miles (80 km) at 50 mph (80 km/h) after a
rapid loss of inflation pressure. This rapid loss
of inflation is referred to as the Run Flat mode.
A Run Flat mode occurs when the tire inflation
pressure is of/or below 14 psi (96 kPa). Once a
Run Flat tire reaches the run flat mode it has limited driving capabilities and needs to be
replaced immediately. A Run Flat tire is not
repairable. When a Run Flat tire is changed
after driving with under-inflated tire condition,
please replace the TPM sensor as it is not
designed to be reused when driven under Run
Flat mode 14 psi (96 kPa) condition.
NOTE:
TPM Sensor must be replaced after driving the
vehicle on a flat tire condition.
It is not recommended driving a vehicle loaded
at full capacity or to tow a trailer while a tire is in
the run flat mode.
For more information Ú
page 149.
Tire Spinning
When stuck in mud, sand, snow, or ice
conditions, do not spin your vehicle's wheels
above 30 mph (48 km/h) or for longer than
30 seconds continuously without stopping.
For further information Ú page 209.
Tread Wear Indicators
Tread wear indicators are in the original
equipment tires to help you in determining
when your tires should be replaced.
These indicators are molded into the bottom of
the tread grooves. They will appear as bands
when the tread depth becomes a 1/16 of an
inch (1.6 mm). When the tread is worn to the
tread wear indicators, the tire should be
replaced.
For further information Úpage 245.
WARNING!
Fast spinning tires can be dangerous. Forces
generated by excessive wheel speeds may
cause tire damage or failure. A tire could
explode and injure someone. Do not spin your
vehicle's wheels faster than 30 mph (48 km/h)
for more than 30 seconds continuously when
you are stuck, and do not let anyone near a
spinning wheel, no matter what the speed.
21_VM_OM_EN_USC_t.book Page 244
Page 247 of 280
SERVICING AND MAINTENANCE245
(Continued)
Life Of Tire
The service life of a tire is dependent upon
varying factors including, but not limited to:
Driving style.
Tire pressure - Improper cold tire inflation
pressures can cause uneven wear patterns
to develop across the tire tread. These
abnormal wear patterns will reduce tread life,
resulting in the need for earlier tire replace -
ment.
Distance driven.
Performance tires, tires with a speed rating of
V or higher, and Summer tires typically have
a reduced tread life. Rotation of these tires
per the vehicle scheduled maintenance is
highly recommended. NOTE:
Wheel valve stem must be replaced as well
when installing new tires due to wear and tear
in existing tires.
Keep dismounted tires in a cool, dry place with
as little exposure to light as possible. Protect
tires from contact with oil, grease, and gasoline.
Replacement Tires
The tires on your new vehicle provide a balance
of many characteristics. They should be
inspected regularly for wear and correct cold
tire inflation pressures. FCA strongly
recommends that you use tires equivalent to
the originals in size, quality and performance
when replacement is needed Ú
page 244.
Refer to the Tire and Loading Information
placard or the Vehicle Certification Label for the
size designation of your tire. The Load Index and
Speed Symbol for your tire will be found on the
original equipment tire sidewall.
For more information relating to the Load Index
and Speed Symbol of a tire Ú page 235.
It is recommended to replace the two front tires
or two rear tires as a pair. Replacing just one tire
can seriously affect your vehicle’s handling. If you ever replace a wheel, make sure that the
wheel’s specifications match those of the
original wheels.
It is recommended you contact an authorized
tire dealer or original equipment dealer with any
questions you may have on tire specifications or
capability. Failure to use equivalent
replacement tires may adversely affect the
safety, handling, and ride of your vehicle.
WARNING!
Tires and the spare tire should be replaced
after six years, regardless of the remaining
tread. Failure to follow this warning can result
in sudden tire failure. You could lose control
and have a collision resulting in serious injury
or death.
WARNING!
Do not use a tire, wheel size, load rating, or
speed rating other than that specified for
your vehicle. Some combinations of unap
-
proved tires and wheels may change
suspension dimensions and performance
characteristics, resulting in changes to
steering, handling, and braking of your
vehicle. This can cause unpredictable
handling and stress to steering and
suspension components. You could lose
control and have a collision resulting in
serious injury or death. Use only the tire and
wheel sizes with load ratings approved for
your vehicle.
8
21_VM_OM_EN_USC_t.book Page 245
Page 249 of 280
SERVICING AND MAINTENANCE247
Spare Tires — If Equipped
NOTE:
For vehicles equipped with Tire Service Kit
instead of a spare tire Úpage 202.
For restrictions when towing with a spare tire
designated for temporary emergency use
Ú page 80.
Spare Tire Matching Original Equipped Tire
And Wheel — If Equipped
Your vehicle may be equipped with a spare tire
and wheel equivalent in look and function to the
original equipment tire and wheel found on the
front or rear axle of your vehicle. This spare tire
may be used in the tire rotation for your vehicle.
If your vehicle has this option, refer to an
authorized tire dealer for the recommended tire
rotation pattern.
Compact Spare Tire — If Equipped
The compact spare is for temporary emergency
use only. You can identify if your vehicle is
equipped with a compact spare by looking at
the spare tire description on the Tire and
Loading Information Placard located on the
driver’s side door opening or on the sidewall of
the tire. Compact spare tire descriptions begin
with the letter “T” or “S” preceding the size
designation. Example: T145/80D18 103M.
T, S = Temporary Spare Tire
Since this tire has limited tread life, the original
equipment tire should be repaired (or replaced)
and reinstalled on your vehicle at the first
opportunity.
Do not install a wheel cover or attempt to mount
a conventional tire on the compact spare wheel,
since the wheel is designed specifically for the
compact spare tire. Do not install more than
one compact spare tire and wheel on the
vehicle at any given time.
Collapsible Spare Tire — If Equipped
The collapsible spare is for temporary
emergency use only. You can identify if your
vehicle is equipped with a collapsible spare by
looking at the spare tire description on the Tire
and Loading Information Placard located on the
driver’s side door opening or on the sidewall of
the tire.
Collapsible spare tire description example:
165/80-17 101P.
CAUTION!
Because of the reduced ground clearance, do
not take your vehicle through an automatic
car wash with a compact or limited use
temporary spare installed. Damage to the
vehicle may result.
WARNING!
Compact and collapsible spares are for
temporary emergency use only. With these
spares, do not drive more than 50 mph
(80 km/h). Temporary use spares have
limited tread life. When the tread is worn to
the tread wear indicators, the temporary use
spare tire needs to be replaced. Be sure to
follow the warnings, which apply to your
spare. Failure to do so could result in spare
tire failure and loss of vehicle control.
8
21_VM_OM_EN_USC_t.book Page 247
Page 250 of 280
248SERVICING AND MAINTENANCE
Since this tire has limited tread life, the original
equipment tire should be repaired (or replaced)
and reinstalled on your vehicle at the first
opportunity.
Inflate collapsible tire only after the wheel is
properly installed to the vehicle. Inflate the
collapsible tire using the electric air pump
before lowering the vehicle.
Do not install a wheel cover or attempt to mount
a conventional tire on the collapsible spare
wheel, since the wheel is designed specifically
for the collapsible spare tire.Full Size Spare — If Equipped
The full size spare is for temporary emergency
use only. This tire may look like the originally
equipped tire on the front or rear axle of your
vehicle, but it is not. This spare tire may have
limited tread life. When the tread is worn to the
tread wear indicators, the temporary use full
size spare tire needs to be replaced. Since it is
not the same as your original equipment tire,
replace (or repair) the original equipment tire
and reinstall on the vehicle at the first
opportunity.
Limited Use Spare — If Equipped
The limited use spare tire is for temporary
emergency use only. This tire is identified by a
label located on the limited use spare wheel.
This label contains the driving limitations for
this spare. This tire may look like the original
equipped tire on the front or rear axle of your
vehicle, but it is not. Installation of this limited
use spare tire affects vehicle handling. Since it
is not the same as your original equipment tire,
replace (or repair) the original equipment tire
and reinstall on the vehicle at the first
opportunity.
Wheel And Wheel Trim Care
All wheels and wheel trim, especially aluminum
and chrome plated wheels, should be cleaned
regularly using mild (neutral Ph) soap and water
to maintain their luster and to prevent
corrosion. Wash wheels with the same soap
solution recommended for the body of the
vehicle and remember to always wash when the
surfaces are not hot to the touch.
WARNING!
Compact and Collapsible spares are for
temporary emergency use only. With these
spares, do not drive more than 50 mph
(80 km/h). Temporary use spares have
limited tread life. When the tread is worn to
the tread wear indicators, the temporary use
spare tire needs to be replaced. Be sure to
follow the warnings, which apply to your
spare. Failure to do so could result in spare
tire failure and loss of vehicle control.
WARNING!
Limited use spares are for emergency use
only. Installation of this limited use spare tire
affects vehicle handling. With this tire, do not
drive more than the speed listed on the
limited use spare wheel. Keep inflated to the
cold tire inflation pressures listed on your Tire
and Loading Information Placard located on
the driver’s side B-Pillar or the rear edge of
the driver’s side door. Replace (or repair) the
original equipment tire at the first opportunity
and reinstall it on your vehicle. Failure to do
so could result in loss of vehicle control.
21_VM_OM_EN_USC_t.book Page 248
Page 257 of 280

255
TECHNICAL SPECIFICATIONS
VEHICLE IDENTIFICATION NUMBER
The Vehicle Identification Number (VIN) is found
on the left front corner of the instrument panel,
visible through the windshield.
Vehicle Identification Number
NOTE:
It is illegal to remove or alter the VIN.
BRAKE SYSTEM
Your vehicle is equipped with dual hydraulic
brake systems. If either of the two hydraulic
systems loses normal capability, the remaining
system will still function. However, there will be
some loss of overall braking effectiveness. You
may notice increased pedal travel during
application, greater pedal force required to slow
or stop, and potential activation of the “Brake
System Warning Light”.
In the event power assist is lost for any reason
(i.e., repeated brake applications with the
engine off), the brakes will still function.
However, the effort required to brake the
vehicle will be much greater than that required
with the power system operating.
WHEEL AND TIRE TORQUE SPECIFICATIONS
Proper lug nut/bolt torque is very important to
ensure that the wheel is properly mounted to
the vehicle. Any time a wheel has been removed
and reinstalled on the vehicle, the lug nuts/
bolts should be torqued using a properly
calibrated torque wrench using a six sided (hex)
deep wall socket.
Torque Specifications
**Use only authorized dealer recommended lug nuts/
bolts and clean or remove any dirt or oil before tightening.
Lug Nut/Bolt
Torque **Lug Nut/
Bolt SizeLug Nut/
Bolt Socket
Size
Steel Wheels Only
63 Ft-Lbs (86 N·m)
Aluminum Wheels
Only
89 Ft-Lbs
(120 N·m) M12 x 1.25 17 mm
9
21_VM_OM_EN_USC_t.book Page 255
Page 274 of 280
272
T
Telescoping Steering Column
.......................... 23Tie Down Hooks, Cargo.................................... 38Tilt Steering Column........................................ 23Tire And Loading Information Placard........... 239Tire Markings................................................. 234Tire Safety Information.................................. 234Tire Service Kit.............................................. 202Tires................................... 187, 242, 247, 250Aging (Life Of Tires)................................... 245Air Pressure............................................... 242Chains....................................................... 249Changing................................................... 194Compact Spare......................................... 247General Information........................ 242, 247High Speed................................................ 243Inflation Pressure...................................... 242Jacking...................................................... 194Life Of Tires............................................... 245Load Capacity............................................ 239Pressure Monitoring System (TPMS).. 53, 149Quality Grading.......................................... 250Radial........................................................ 243Replacement............................................. 245Rotation.................................................... 250Safety.............................................. 234, 242Sizes.......................................................... 235Snow Tires................................................. 246Spare Tires...................................... 247, 248Spinning.................................................... 244
Trailer Towing.............................................. 80Tread Wear Indicators.............................. 244Wheel Nut Torque..................................... 255To Open Hood.................................................. 37Tongue Weight/Trailer Weight......................... 79Towing............................................................. 77Disabled Vehicle....................................... 211Guide........................................................... 79Recreational................................................ 83Weight......................................................... 79Towing Behind A Motorhome........................... 83Traction............................................................ 84Traction Control............................................ 149Trailer Sway Control (TSC)............................. 149Trailer Towing.................................................. 77Hitches........................................................ 78Minimum Requirements.............................. 79Tips.............................................................. 82Trailer And Tongue Weight........................... 79Wiring.......................................................... 81Trailer Towing Guide........................................ 79Trailer Weight................................................... 79Transmission................................................... 63Automatic....................................62, 63, 231Fluid......................................................... 261Maintenance............................................ 231Transporting Pets.......................................... 184Tread Wear Indicators.................................. 244Trip Computer.................................................. 48Turn Signals..................................................... 55
U
Uconnect Phone Call Features
................................. 116Things You Should Know About Your Uconnect Phone................................... 119Uconnect Phone..........................111, 112, 113Answer Or Ignore An Incoming Call — Call Currently In Progress..................... 117Answer Or Ignore An Incoming Call — No Call Currently In Progress................ 117Bluetooth Communication Link................ 121Call Continuation...................................... 118Call Controls............................................. 116Call Termination....................................... 118Cancel Command..................................... 111Connecting To A Particular Mobile Phone Or Audio Device After Pairing................ 114Help Command......................................... 111Join Calls.................................................. 118Making A Phone Or Audio Device AFavorite................................................ 114Making A Second Call While Current Call Is In Progress................................. 118Managing Your Favorites.......................... 115Natural Speech......................................... 111Operation.................................................. 110Overview................................................... 109Pair (Link) Uconnect Phone To A Mobile Phone................................................... 112
21_VM_OM_EN_USC_t.book Page 272