2021 RAM PROMASTER CITY instrument panel
[x] Cancel search: instrument panelPage 39 of 280
GETTING TO KNOW YOUR VEHICLE37
HOOD
Opening
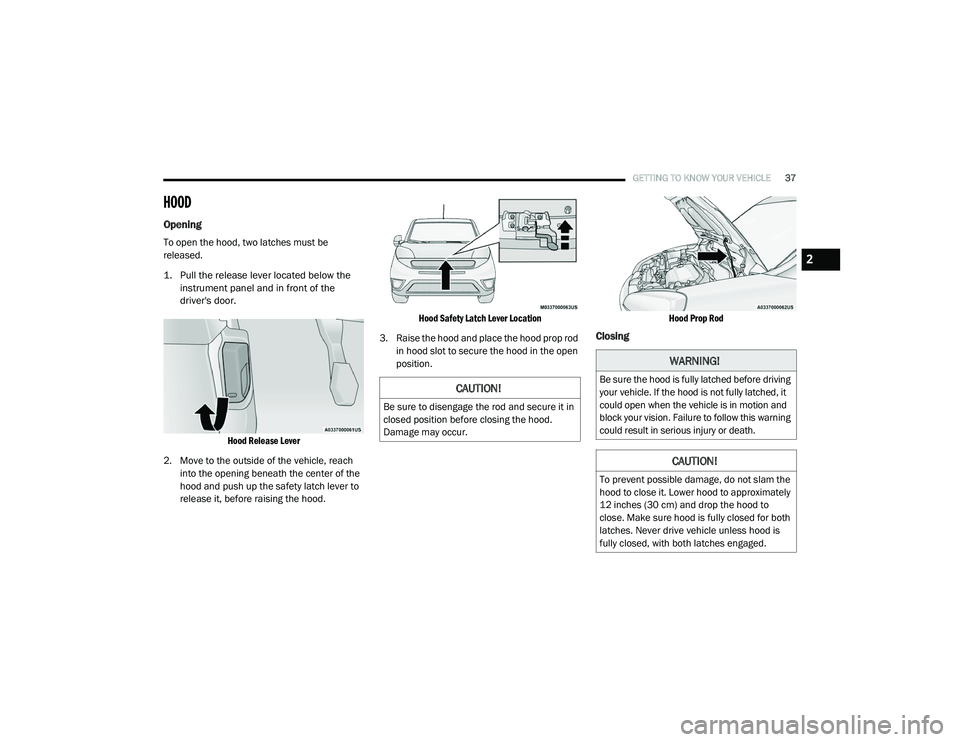
To open the hood, two latches must be
released.
1. Pull the release lever located below the
instrument panel and in front of the
driver's door.
Hood Release Lever
2. Move to the outside of the vehicle, reach into the opening beneath the center of the
hood and push up the safety latch lever to
release it, before raising the hood.
Hood Safety Latch Lever Location
3. Raise the hood and place the hood prop rod in hood slot to secure the hood in the open
position.
Hood Prop Rod
Closing
CAUTION!
Be sure to disengage the rod and secure it in
closed position before closing the hood.
Damage may occur.
WARNING!
Be sure the hood is fully latched before driving
your vehicle. If the hood is not fully latched, it
could open when the vehicle is in motion and
block your vision. Failure to follow this warning
could result in serious injury or death.
CAUTION!
To prevent possible damage, do not slam the
hood to close it. Lower hood to approximately
12 inches (30 cm) and drop the hood to
close. Make sure hood is fully closed for both
latches. Never drive vehicle unless hood is
fully closed, with both latches engaged.
2
21_VM_OM_EN_USC_t.book Page 37
Page 40 of 280
38GETTING TO KNOW YOUR VEHICLE
(Continued)
CARGO AREA FEATURES
Rear Cargo Tie-Downs
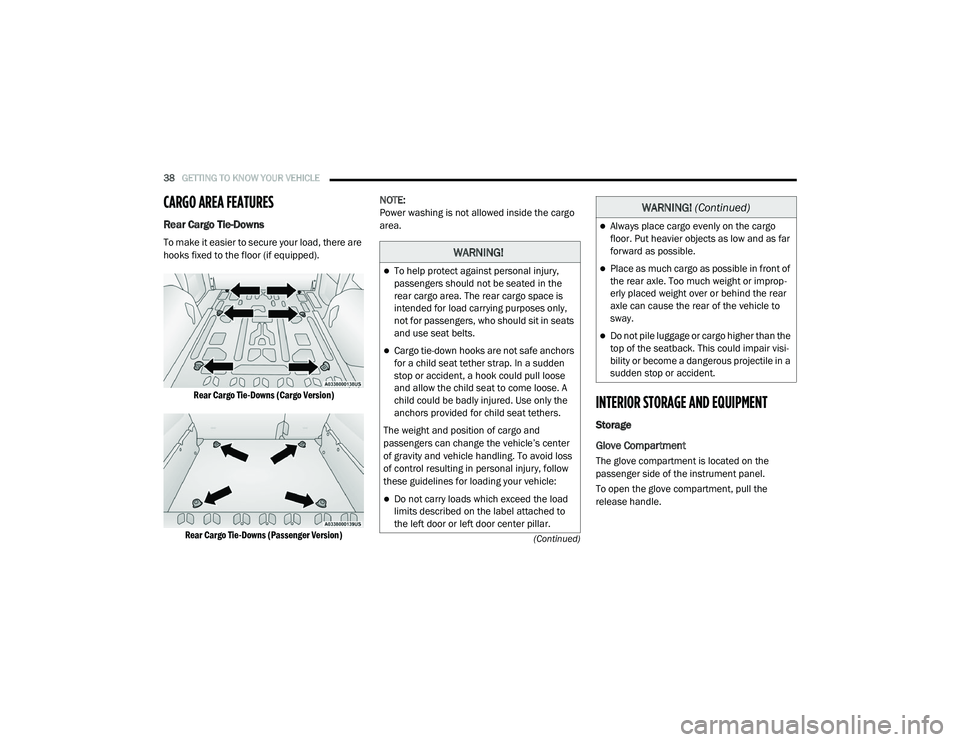
To make it easier to secure your load, there are
hooks fixed to the floor (if equipped).
Rear Cargo Tie-Downs (Cargo Version)
Rear Cargo Tie-Downs (Passenger Version)
NOTE:
Power washing is not allowed inside the cargo
area.
INTERIOR STORAGE AND EQUIPMENT
Storage
Glove Compartment
The glove compartment is located on the
passenger side of the instrument panel.
To open the glove compartment, pull the
release handle.
WARNING!
To help protect against personal injury,
passengers should not be seated in the
rear cargo area. The rear cargo space is
intended for load carrying purposes only,
not for passengers, who should sit in seats
and use seat belts.
Cargo tie-down hooks are not safe anchors
for a child seat tether strap. In a sudden
stop or accident, a hook could pull loose
and allow the child seat to come loose. A
child could be badly injured. Use only the
anchors provided for child seat tethers.
The weight and position of cargo and
passengers can change the vehicle’s center
of gravity and vehicle handling. To avoid loss
of control resulting in personal injury, follow
these guidelines for loading your vehicle:
Do not carry loads which exceed the load
limits described on the label attached to
the left door or left door center pillar.
Always place cargo evenly on the cargo
floor. Put heavier objects as low and as far
forward as possible.
Place as much cargo as possible in front of
the rear axle. Too much weight or improp -
erly placed weight over or behind the rear
axle can cause the rear of the vehicle to
sway.
Do not pile luggage or cargo higher than the
top of the seatback. This could impair visi-
bility or become a dangerous projectile in a
sudden stop or accident.
WARNING! (Continued)
21_VM_OM_EN_USC_t.book Page 38
Page 41 of 280
GETTING TO KNOW YOUR VEHICLE39
NOTE:
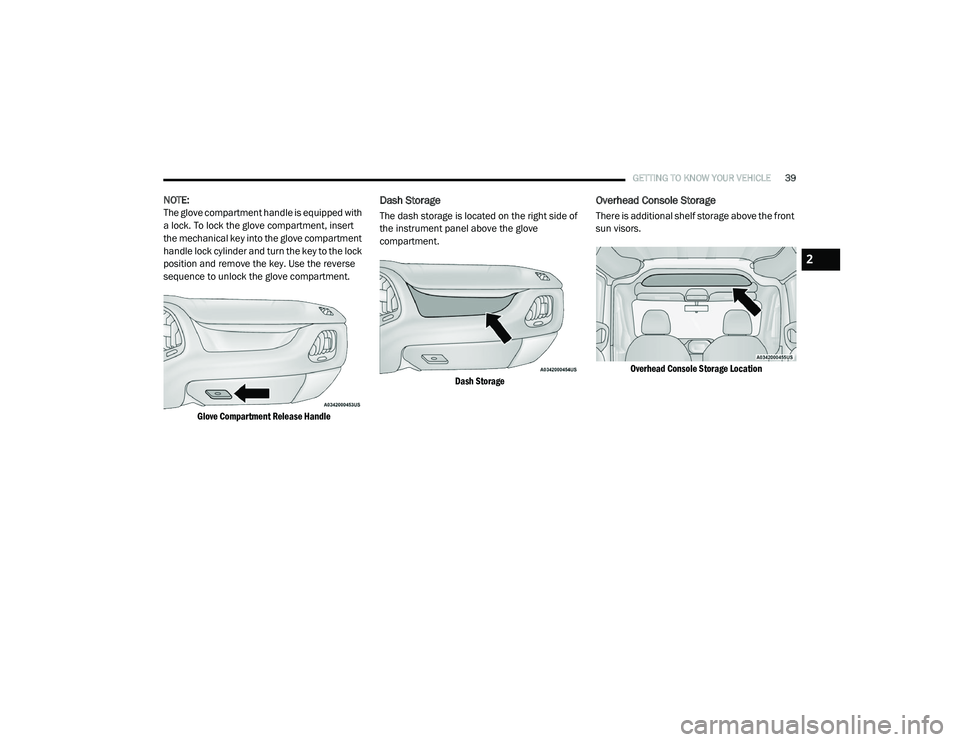
The glove compartment handle is equipped with
a lock. To lock the glove compartment, insert
the mechanical key into the glove compartment
handle lock cylinder and turn the key to the lock
position and remove the key. Use the reverse
sequence to unlock the glove compartment.
Glove Compartment Release Handle
Dash Storage
The dash storage is located on the right side of
the instrument panel above the glove
compartment.
Dash Storage
Overhead Console Storage
There is additional shelf storage above the front
sun visors.
Overhead Console Storage Location
2
21_VM_OM_EN_USC_t.book Page 39
Page 42 of 280
40GETTING TO KNOW YOUR VEHICLE
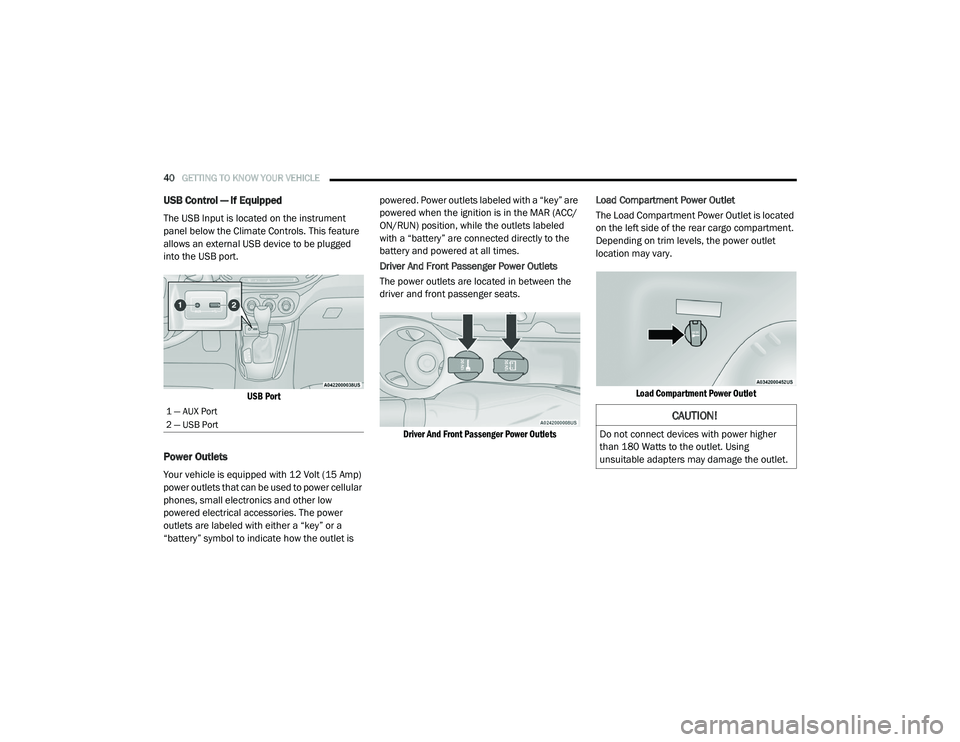
USB Control — If Equipped
The USB Input is located on the instrument
panel below the Climate Controls. This feature
allows an external USB device to be plugged
into the USB port.
USB Port
Power Outlets
Your vehicle is equipped with 12 Volt (15 Amp)
power outlets that can be used to power cellular
phones, small electronics and other low
powered electrical accessories. The power
outlets are labeled with either a “key” or a
“battery” symbol to indicate how the outlet is powered. Power outlets labeled with a “key” are
powered when the ignition is in the MAR (ACC/
ON/RUN) position, while the outlets labeled
with a “battery” are connected directly to the
battery and powered at all times.
Driver And Front Passenger Power Outlets
The power outlets are located in between the
driver and front passenger seats.
Driver And Front Passenger Power Outlets
Load Compartment Power Outlet
The Load Compartment Power Outlet is located
on the left side of the rear cargo compartment.
Depending on trim levels, the power outlet
location may vary.
Load Compartment Power Outlet
1 — AUX Port
2 — USB Port CAUTION!
Do not connect devices with power higher
than 180 Watts to the outlet. Using
unsuitable adapters may damage the outlet.
21_VM_OM_EN_USC_t.book Page 40
Page 45 of 280
43
GETTING TO KNOW YOUR INSTRUMENT PANEL
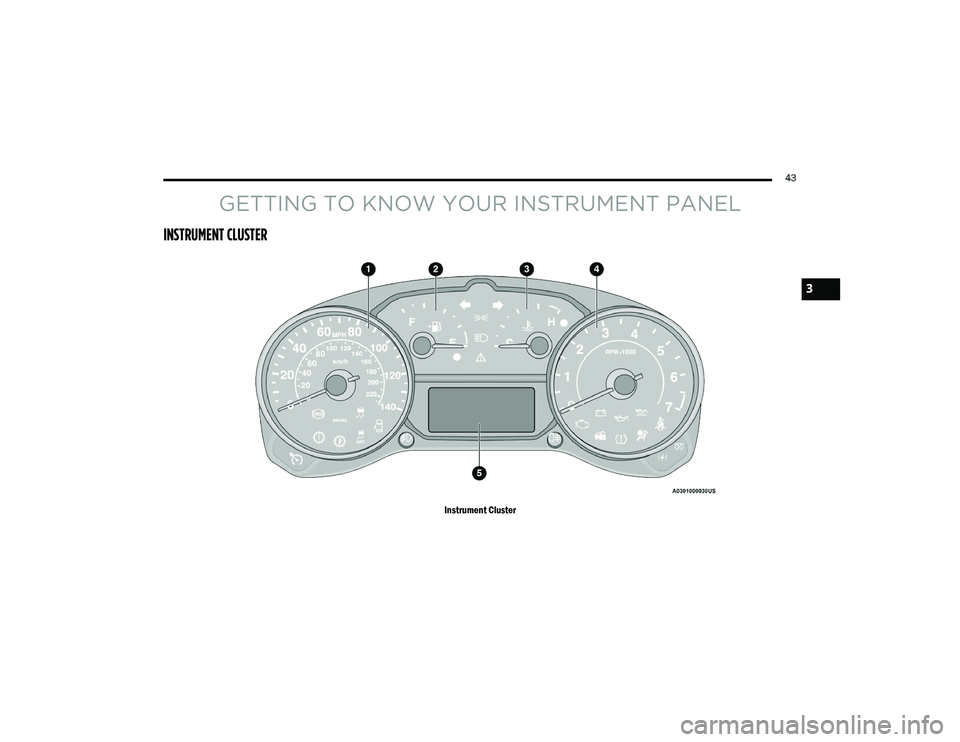
INSTRUMENT CLUSTER
Instrument Cluster
3
21_VM_OM_EN_USC_t.book Page 43
Page 46 of 280
44GETTING TO KNOW YOUR INSTRUMENT PANEL
Instrument Cluster Descriptions
1. Speedometer
Indicates vehicle speed.
2. Fuel Gauge
The pointer shows the level of fuel in the
fuel tank when the ignition switch is in
the ON/RUN position.
The fuel pump arrow symbol points
to the side of the vehicle where the
fuel door is located.
3. Temperature Gauge
The temperature gauge shows engine
coolant temperature. Any reading within
the normal range indicates that the
engine cooling system is operating satis -
factorily.
The pointer will likely indicate a higher
temperature when driving in hot weather
or up mountain grades. It should not be
allowed to exceed the upper limits of the
normal operating range. 4. Tachometer
Indicates the engine speed in revolutions
per minute (RPM x 1000).
5. Instrument Cluster Display
When the appropriate conditions exist,
this display shows the instrument cluster
display messages Ú page 44.
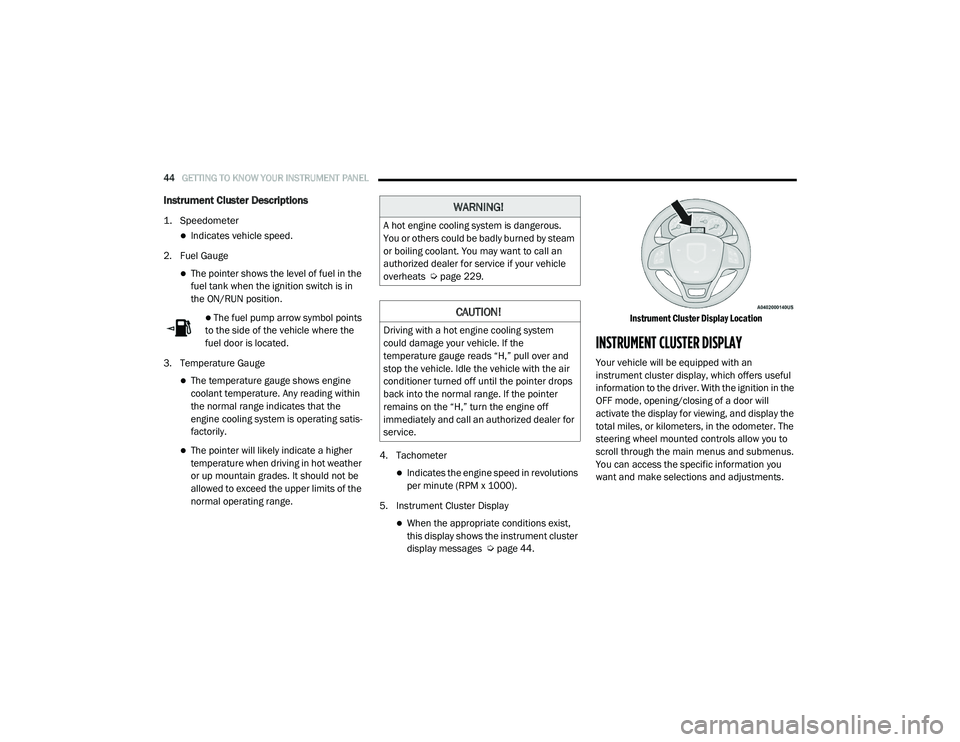
Instrument Cluster Display Location
INSTRUMENT CLUSTER DISPLAY
Your vehicle will be equipped with an
instrument cluster display, which offers useful
information to the driver. With the ignition in the
OFF mode, opening/closing of a door will
activate the display for viewing, and display the
total miles, or kilometers, in the odometer. The
steering wheel mounted controls allow you to
scroll through the main menus and submenus.
You can access the specific information you
want and make selections and adjustments.
WARNING!
A hot engine cooling system is dangerous.
You or others could be badly burned by steam
or boiling coolant. You may want to call an
authorized dealer for service if your vehicle
overheats Ú
page 229.
CAUTION!
Driving with a hot engine cooling system
could damage your vehicle. If the
temperature gauge reads “H,” pull over and
stop the vehicle. Idle the vehicle with the air
conditioner turned off until the pointer drops
back into the normal range. If the pointer
remains on the “H,” turn the engine off
immediately and call an authorized dealer for
service.
21_VM_OM_EN_USC_t.book Page 44
Page 47 of 280
GETTING TO KNOW YOUR INSTRUMENT PANEL45
Location And Controls
The instrument cluster display features a driver
interactive display that is located in the
instrument cluster.
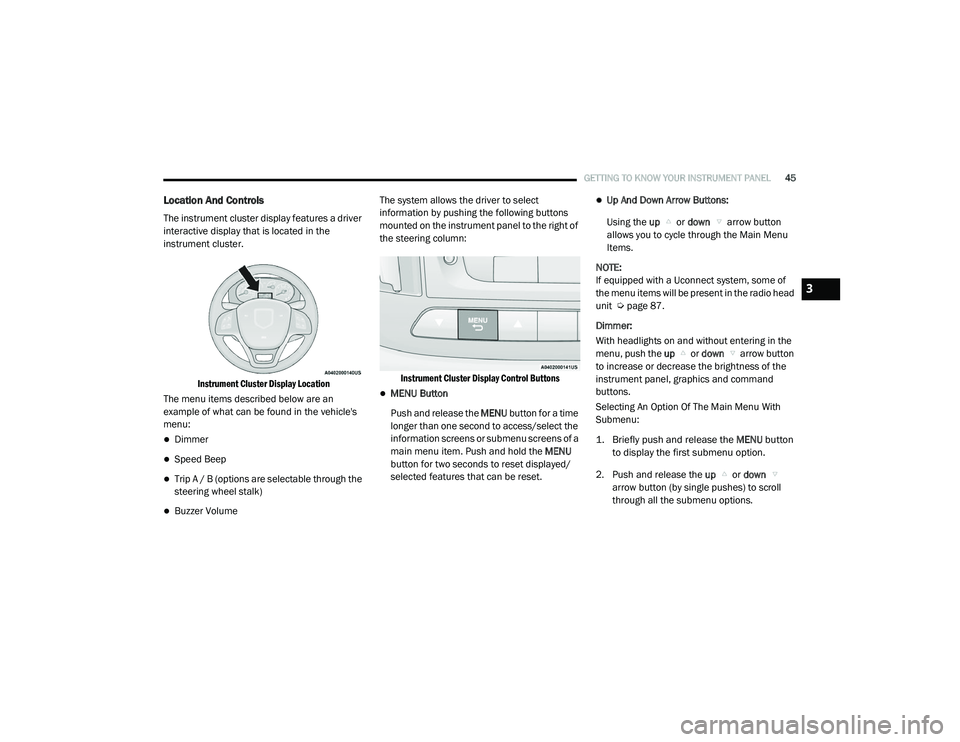
Instrument Cluster Display Location
The menu items described below are an
example of what can be found in the vehicle's
menu:
Dimmer
Speed Beep
Trip A / B (options are selectable through the
steering wheel stalk)
Buzzer Volume The system allows the driver to select
information by pushing the following buttons
mounted on the instrument panel to the right of
the steering column:
Instrument Cluster Display Control Buttons
MENU Button
Push and release the MENU button for a time
longer than one second to access/select the
information screens or submenu screens of a
main menu item. Push and hold the MENU
button for two seconds to reset displayed/
selected features that can be reset.
Up And Down Arrow Buttons:
Using the up or down arrow button
allows you to cycle through the Main Menu
Items.
NOTE:
If equipped with a Uconnect system, some of
the menu items will be present in the radio head
unit Ú page 87.
Dimmer:
With headlights on and without entering in the
menu, push the up or down arrow button
to increase or decrease the brightness of the
instrument panel, graphics and command
buttons.
Selecting An Option Of The Main Menu With
Submenu:
1. Briefly push and release the
MENU
button
to display the first submenu option.
2. Push and release the up or down
arrow button (by single pushes) to scroll
through all the submenu options.
3
21_VM_OM_EN_USC_t.book Page 45
Page 48 of 280
46GETTING TO KNOW YOUR INSTRUMENT PANEL
3. Briefly push and release the MENU button
to select the displayed submenu option and
to open the relevant setup menu.
4. Push and release the up or down
arrow button (by single pushes) to select the
new setting for this submenu option.
5. Briefly push and release the MENU button
to store the new setting and go back to the
previously selected submenu option.
6. Push and hold the MENU button to return to
the main menu (short hold) or the main
screen (longer hold).
Change Engine Oil — If Equipped
Your vehicle may be equipped with an engine oil
change indicator system. The “Change Engine
Oil” message will display in the instrument
cluster display. The engine oil change indicator
system is duty cycle based, which means the
engine oil change interval may fluctuate,
dependent upon your personal driving style. Unless reset, this message will continue to
display each time you turn the ignition switch to
the ON/RUN position. To turn off the message
temporarily, push and release the
MENU
button. To reset the oil change indicator system
(after performing the scheduled maintenance),
refer to the following procedure.
1. Turn the ignition switch to the ON position (do not start the engine).
2. Fully push the accelerator pedal slowly, three times, within 10 seconds.
3. Turn the ignition switch to the OFF/LOCK position.
NOTE:
If the indicator message illuminates when you
start the vehicle, the oil change indicator
system did not reset. If necessary, repeat this
procedure.
Instrument Cluster Display Menu Items
Speed Beep
This function is used to set a speed limit (MPH
or km/h); the driver is alerted when this limit is
exceeded.
To set the desired speed limit:
1. Push the
MENU
button briefly. The display
will show the wording (SPEED BEEP) and
the unit (MPH) or (km/h) previously set.
2. If the function is on, push and release the up or down arrow button to select the
required speed limit and then push MENU
to confirm.
NOTE:
The speed may be set in the range from 20 to
125 mph (30 to 200 km/h) according to the previously chosen unit.
The setting will increase/decrease by five units
each time the up or down arrow button is
pushed. Hold down the up or down arrow
button to automatically increase/decrease the
setting rapidly. Complete the adjustment when
you approach the desired value.
21_VM_OM_EN_USC_t.book Page 46