2021 RAM PROMASTER CITY cruise control
[x] Cancel search: cruise controlPage 5 of 280

3
INSTRUMENT CLUSTER DISPLAY ......................44 Location And Controls ................................. 45
Change Engine Oil — If Equipped................ 46
Instrument Cluster Display Menu Items..... 46
TRIP COMPUTER ...................................................47
Trip Button.................................................... 48
Trip Functions ............................................. 48
Values Displayed ......................................... 49
WARNING LIGHTS AND MESSAGES ..................49
Red Warning Lights...................................... 49
Yellow Warning Lights ................................. 52
Green Indicator Lights ................................. 55
Blue Indicator Lights .................................... 56
ONBOARD DIAGNOSTIC SYSTEM — OBD II .......56
Onboard Diagnostic System (OBD II)
Cybersecurity................................................ 56
EMISSIONS INSPECTION AND MAINTENANCE
PROGRAMS ...........................................................57
STARTING AND OPERATING
STARTING THE ENGINE .......................................58
Automatic Transmission .............................. 58
Normal Starting ............................................ 58
Cold Weather Operation ............................. 58
Extended Park Starting................................ 58
If Engine Fails To Start ................................ 59
After Starting ................................................ 59
ENGINE BLOCK HEATER — IF EQUIPPED ...........59
ENGINE BREAK-IN RECOMMENDATIONS .........60
PARKING BRAKE .................................................60 AUTOMATIC TRANSMISSION ............................. 62
Key Ignition Park Interlock .......................... 62
Brake/Transmission Shift Interlock (BTSI)
System ......................................................... 63 Nine-Speed Automatic Transmission ........ 63
POWER STEERING .............................................. 67
Power Steering Fluid Check ....................... 68
CRUISE CONTROL — IF EQUIPPED ..................... 68
To Activate.................................................... 69
To Set A Desired Speed............................... 69
To Vary The Speed Setting .......................... 69
To Accelerate For Passing ........................... 69
To Resume Speed ....................................... 70
To Deactivate .............................................. 70
PARKSENSE REAR PARK ASSIST —
IF EQUIPPED ......................................................... 70
ParkSense Rear Park Assist Sensors ......... 70
ParkSense Rear Park Assist Alerts ............. 71
ParkSense Rear Park Assist Failure
Indications.................................................... 72 Cleaning The ParkSense Rear Park Assist
System .......................................................... 72 ParkSense Rear Park Assist System Usage
Precautions .................................................. 72
PARKVIEW REAR BACK UP CAMERA ............... 73
REFUELING THE VEHICLE ................................... 74 VEHICLE LOADING ................................................75
Vehicle Certification Label .......................... 75
Gross Vehicle Weight Rating (GVWR) ......... 76
Gross Axle Weight Rating (GAWR) ............. 76
Tire Size ........................................................ 76
Rim Size ....................................................... 76
Inflation Pressure ........................................ 76
Curb Weight ................................................. 76
Overloading .................................................. 76
Loading......................................................... 76
TRAILER TOWING .................................................77
Common Towing Definitions ....................... 77
Trailer Hitch Classification .......................... 78
Trailer Towing Weights (Maximum Trailer
Weight Ratings) ........................................... 79 Trailer And Tongue Weight ......................... 79
Towing Requirements ................................ 79
Towing Tips ................................................. 82
RECREATIONAL TOWING (BEHIND
MOTORHOME) ......................................................83
Towing This Vehicle Behind Another
Vehicle .......................................................... 83 Recreational Towing — Automatic
Transmission................................................ 83
DRIVING TIPS ........................................................84
Driving On Slippery Surfaces ..................... 84
Driving Through Water ............................... 84
21_VM_OM_EN_USC_t.book Page 3
Page 11 of 280

9
Yellow Warning Lights
Anti-Lock Brake System (ABS) Warning Light Úpage 52
Low Fuel Warning Light Úpage 52
Generic Warning Light Úpage 52
Tire Pressure Monitoring System (TPMS) Warning Light Ú page 53
Vehicle Security Warning Light Úpage 54
Engine Check/Malfunction Indicator Warning Light (MIL)
Ú page 54
Electronic Stability Control (ESC) Warning Light — If Equipped Ú page 55
Electronic Stability Control (ESC) OFF Warning Light — If Equipped Úpage 55
Green Indicator Lights
Turn Signal Indicator Lights
Úpage 55
Park/Headlight On Indicator Light Úpage 55
Front Fog Indicator Light — If Equipped Úpage 55
Cruise Control Indicator Light — If Equipped Úpage 55
Blue Indicator Lights
High Beam Indicator Light
Úpage 56
1
21_VM_OM_EN_USC_t.book Page 9
Page 57 of 280

GETTING TO KNOW YOUR INSTRUMENT PANEL55
Electronic Stability Control (ESC) Warning
Light — If Equipped
The ESC Indicator Light in the
instrument cluster will come on when
the ignition is placed in the ON/RUN
or MAR/ON/RUN position, and when
ESC is activated. It should go out with the
engine running. If the ESC Indicator Light comes
on continuously with the engine running, a
malfunction has been detected in the ESC
system. If this light remains on after several
ignition cycles, and the vehicle has been driven
several miles (kilometers) at speeds greater
than 30 mph (48 km/h), see your authorized
dealer as soon as possible to have the problem
diagnosed and corrected.
The ESC OFF Indicator Light and the ESC Indi -
cator Light come on momentarily each time
the ignition is placed in the ON/RUN or MAR/
ON/RUN position.
Each time the ignition is turned to ON/RUN or
MAR/ON/RUN, the ESC system will be on,
even if it was turned off previously.
The ESC system will make buzzing or clicking
sounds when it is active. This is normal; the
sounds will stop when ESC becomes inactive.
This light will come on when the vehicle is in
an ESC event.
Electronic Stability Control (ESC) OFF
Warning Light — If Equipped
This warning light indicates the ESC is
off.
Each time the ignition is turned to ON/RUN or
ACC/ON/RUN, the ESC system will be on, even
if it was turned off previously.
Green Indicator Lights
Turn Signal Indicator Lights
When the left or right turn signal is
activated, the turn signal indicator will
flash independently and the
corresponding exterior turn signal
lamps will flash. Turn signals can be activated
when the multifunction lever is moved down
(left) or up (right). NOTE:
A continuous chime will sound if the vehicle is
driven more than 1 mile (1.6 km) with either
turn signal on.
Check for an inoperative outside light bulb if
either indicator flashes at a rapid rate.
Park/Headlight On Indicator Light
This indicator light will illuminate
when the park lights or headlights are
turned on Ú
page 27.
Front Fog Indicator Light — If Equipped
This indicator light will illuminate
when the front fog lights are on
Úpage 27.
Cruise Control Indicator Light — If Equipped
This indicator light will illuminate
when the cruise control is activated
Úpage 68.
NOTE:
There will be no change in the indicator light
when the desired speed is set.
3
21_VM_OM_EN_USC_t.book Page 55
Page 70 of 280

68STARTING AND OPERATING
NOTE:
Increased noise levels at the end of the
steering wheel travel are considered normal
and do not indicate that there is a problem
with the power steering system.
Upon initial start-up in cold weather, the
power steering pump may make noise for a
short amount of time. This is due to the cold,
thick fluid in the steering system. This noise
should be considered normal, and it does not
in any way damage the steering system.
Power Steering Fluid Check
Checking the power steering fluid level at a
defined service interval is not required. The fluid
should only be checked if a leak is suspected,
abnormal noises are apparent, and/or the
system is not functioning as anticipated. Coordinate inspection efforts through an
authorized dealer.
If necessary, add fluid to restore to the proper
indicated level. With a clean cloth, wipe any
spilled fluid from all surfaces Ú
page 261.
CRUISE CONTROL — IF EQUIPPED
When engaged, the Cruise Control takes over
accelerator operations at speeds greater than
25 mph (40 km/h).
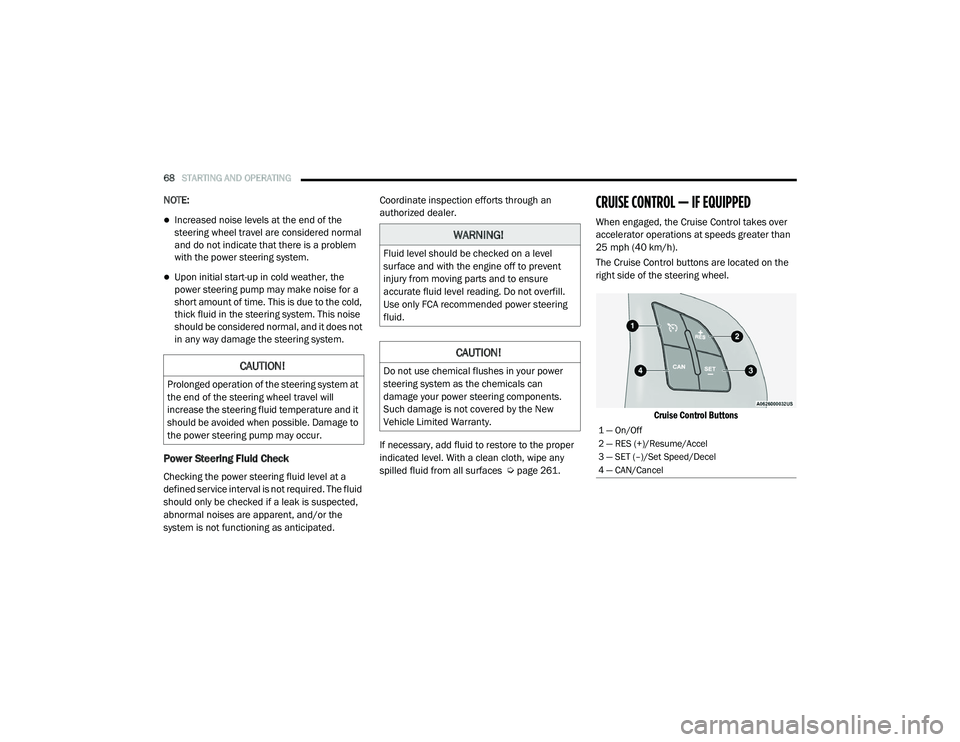
The Cruise Control buttons are located on the
right side of the steering wheel.
Cruise Control Buttons
CAUTION!
Prolonged operation of the steering system at
the end of the steering wheel travel will
increase the steering fluid temperature and it
should be avoided when possible. Damage to
the power steering pump may occur.
WARNING!
Fluid level should be checked on a level
surface and with the engine off to prevent
injury from moving parts and to ensure
accurate fluid level reading. Do not overfill.
Use only FCA recommended power steering
fluid.
CAUTION!
Do not use chemical flushes in your power
steering system as the chemicals can
damage your power steering components.
Such damage is not covered by the New
Vehicle Limited Warranty.
1 — On/Off
2 — RES (+)/Resume/Accel
3 — SET (–)/Set Speed/Decel
4 — CAN/Cancel
21_VM_OM_EN_USC_t.book Page 68
Page 71 of 280

STARTING AND OPERATING69
To Activate
Push the on/off button to activate the Cruise
Control. The cruise indicator light in the
instrument cluster display will illuminate. To
turn the system off, push the on/off button a
second time. The cruise indicator light will turn
off. The system should be turned off when not in
use.
To Set A Desired Speed
Turn the Cruise Control on. When the vehicle
has reached the desired speed greater than
25 mph (40 km/h), push the SET (-) button and
release. Release the accelerator and the
vehicle will operate at the selected speed.
NOTE:
The vehicle should be traveling at a steady
speed and on level ground before pushing the
SET (-) button.
To Vary The Speed Setting
To Increase Or Decrease The Set Speed
When the Cruise Control is set, you can increase
speed by pushing the RES (+) button, or
decrease the speed by pushing the SET (-)
button.
U.S. Speed (mph)
Pushing the RES (+) or SET (-) button once will
result in a 1 mph speed adjustment. Each
subsequent tap of the button results in an
adjustment of 1 mph.
If the button is continually pushed, the set
speed will continue to adjust until the button
is released, then the new set speed will be
established.
Metric Speed (km/h)
Pushing the RES (+) or SET (-) button once will
result in a 1 km/h speed adjustment. Each
subsequent tap of the button results in an
adjustment of 1 km/h.
If the button is continually pushed, the set
speed will continue to adjust until the button
is released, then the new set speed will be
established.
To Accelerate For Passing
Press the accelerator as you would normally.
When the pedal is released, the vehicle will
return to the set speed.
Using Cruise Control On Hills
The transmission may downshift on hills to
maintain the vehicle set speed.
NOTE:
The Cruise Control system maintains speed up
and down hills. A slight speed change on
moderate hills is normal.
On steep hills, a greater speed loss or gain may
occur so it may be preferable to drive without
Cruise Control.
WARNING!
Leaving the Cruise Control system on when
not in use is dangerous. You could
accidentally set the system or cause it to go
faster than you want. You could lose control
and have an accident. Always leave the
system off when you are not using it.
WARNING!
Cruise Control can be dangerous where the
system cannot maintain a constant speed.
Your vehicle could go too fast for the
conditions, and you could lose control and
have an accident. Do not use Cruise Control
in heavy traffic or on roads that are winding,
icy, snow-covered or slippery.
4
21_VM_OM_EN_USC_t.book Page 69
Page 72 of 280

70STARTING AND OPERATING
To Resume Speed
To resume a previously set speed, push the
RES (+) button and release. Resume can be used
at any speed above 20 mph (32 km/h) up to the maximum speed of 100 mph (160 km/h).
To Deactivate
A tap on the brake pedal, pushing the CAN
button, or normal brake pressure will deactivate
the Cruise Control system without erasing the
set speed from memory.
Pushing the on/off button or turning the ignition
switch off erases the set speed from memory.
PARKSENSE REAR PARK ASSIST — IF
EQUIPPED
The ParkSense system provides an audible
indication of the distance between the rear
fascia/bumper and a detected obstacle when
backing up (e.g. during a parking maneuver)
Ú page 72.
The ParkSense system is automatically
activated when the transmission is placed into
REVERSE. As the distance from an obstacle
behind the vehicle decreases, the audible alert
becomes more frequent. Interaction With Trailer Towing
The ParkSense system is automatically
deactivated when a trailer equipped by Mopar is
hitched to the vehicle. The system will be
automatically activated as soon as the trailer is
removed. If it does not happen, turning the key
ignition switch to OFF and then to ON again
would be needed. If a non-Mopar trailer hitch is
mounted, the sensor deactivation cannot be
guaranteed.
ParkSense Rear Park Assist Sensors
The four ParkSense sensors, located in the rear
fascia/bumper, monitor the area behind the
vehicle that is within the sensors’ field of view.
The sensors can detect obstacles, in the
horizontal direction, from approximately
12 inches (30 cm) up to 55 inches (140 cm)
from the center of the rear fascia/bumper and
up to 24 inches (60 cm) from the corners of the
rear fascia/bumper, depending on the location,
type and orientation of the obstacle.
ParkSense Rear Park Assist Sensors Locations
If several obstacles are detected, the
ParkSense system indicates the nearest
obstacle.
The minimum height of a detectable obstacle
corresponds to the maximum height of an
obstacle that would clear the underside of the
vehicle during the parking maneuver.
21_VM_OM_EN_USC_t.book Page 70
Page 84 of 280

82STARTING AND OPERATING
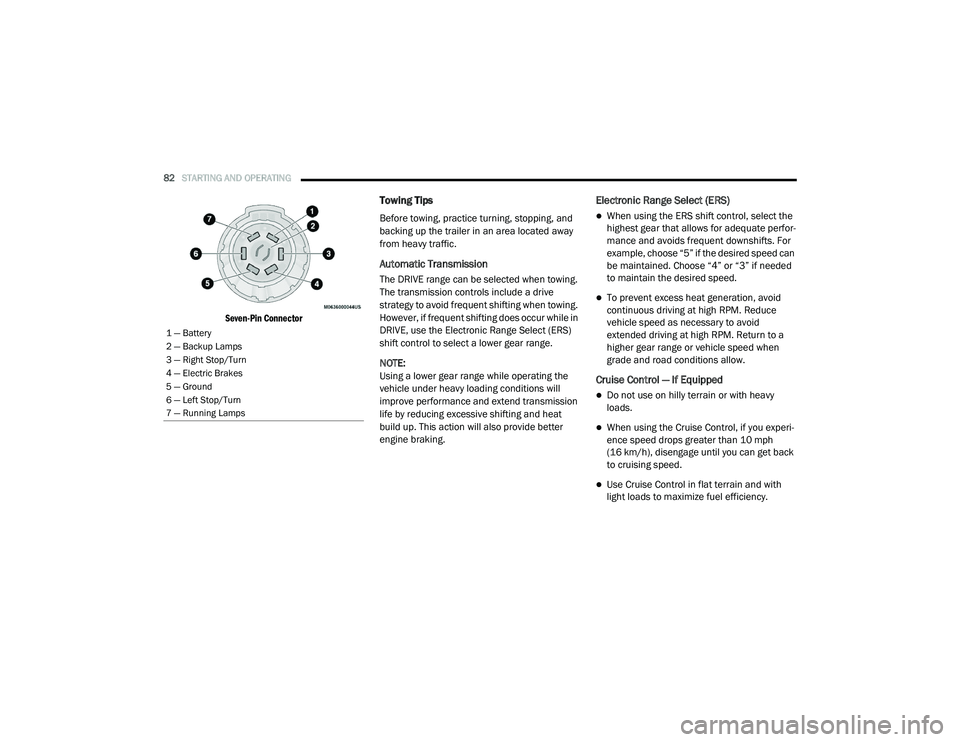
Seven-Pin Connector
Towing Tips
Before towing, practice turning, stopping, and
backing up the trailer in an area located away
from heavy traffic.
Automatic Transmission
The DRIVE range can be selected when towing.
The transmission controls include a drive
strategy to avoid frequent shifting when towing.
However, if frequent shifting does occur while in
DRIVE, use the Electronic Range Select (ERS)
shift control to select a lower gear range.
NOTE:
Using a lower gear range while operating the
vehicle under heavy loading conditions will
improve performance and extend transmission
life by reducing excessive shifting and heat
build up. This action will also provide better
engine braking.
Electronic Range Select (ERS)
When using the ERS shift control, select the
highest gear that allows for adequate perfor -
mance and avoids frequent downshifts. For
example, choose “5” if the desired speed can
be maintained. Choose “4” or “3” if needed
to maintain the desired speed.
To prevent excess heat generation, avoid
continuous driving at high RPM. Reduce
vehicle speed as necessary to avoid
extended driving at high RPM. Return to a
higher gear range or vehicle speed when
grade and road conditions allow.
Cruise Control — If Equipped
Do not use on hilly terrain or with heavy
loads.
When using the Cruise Control, if you experi -
ence speed drops greater than 10 mph
(16 km/h), disengage until you can get back
to cruising speed.
Use Cruise Control in flat terrain and with
light loads to maximize fuel efficiency.
1 — Battery
2 — Backup Lamps
3 — Right Stop/Turn
4 — Electric Brakes
5 — Ground
6 — Left Stop/Turn
7 — Running Lamps
21_VM_OM_EN_USC_t.book Page 82
Page 269 of 280

267
C
Camera, Rear
.................................................. 73Capacities, Fluid............................................ 259Caps, Filler Fuel............................................................. 74Oil (Engine)................................................ 221Power Steering............................................ 68Radiator (Coolant Pressure)...................... 229Car Washes................................................... 252Carbon Monoxide Warning.................. 185, 258Cargo Area Cover............................................. 38Cargo Compartment........................................ 38Cargo Tie-Downs.............................................. 38Cellular Phone............................................... 143Certification Label........................................... 75Chains, Tire.................................................... 249Changing A Flat Tire....................................... 194Chart, Tire Sizing............................................ 235Check Engine Light (Malfunction Indicator
Light)............................................................... 57Checking Your Vehicle For Safety.................. 185Checks, Safety............................................... 185Child Restraint............................................... 170Child RestraintsBooster Seats............................................ 173Child Seat Installation..................... 180, 183How To Stow An unused ALR Seat Belt..... 178Infant And Child Restraints....................... 171
Locating The LATCH Anchorages.............. 177Lower Anchors And Tethers For Children.. 175Older Children And Child Restraints......... 172Seating Positions...................................... 174Clean Air Gasoline......................................... 256CleaningWheels..................................................... 248Climate Control................................................ 31Cold Weather Operation.................................. 58Compact Spare Tire...................................... 247Contract, Service.......................................... 263Cooling Pressure Cap (Radiator Cap)............ 229Cooling System............................................. 227Adding Coolant (Antifreeze)...................... 228Coolant Level............................................ 230Cooling Capacity....................................... 259Disposal Of Used Coolant......................... 229Drain, Flush, And Refill............................. 228Inspection........................................ 228, 230Points To Remember................................ 230Pressure Cap............................................ 229Radiator Cap............................................ 229Selection Of Coolant (Antifreeze)..... 228, 259Corrosion Protection..................................... 252Cruise Light...................................................... 55Customer Assistance.................................... 262Customer Programmable Features.................. 87Cybersecurity................................................... 86
D
Dealer Service............................................... 223Defroster, Windshield................................... 186Deleting A Phone........................................... 114Diagnostic System, Onboard............................56DipsticksOil (Engine)............................................... 222Power Steering............................................68Disable Vehicle Towing................................. 211Disconnecting............................................... 114DisposalAntifreeze (Engine Coolant)...................... 229Disturb.......................................................... 117Door Ajar..........................................................51Door Ajar Light.................................................51Door Locks.......................................................14Doors...............................................................14Driver’s Seat Back Tilt......................................17DrivingThrough Flowing, Rising, Or Shallow Standing Water
.......................................84
E
Electric Brake Control System....................... 146Electric Remote Mirrors...................................26Electrical Outlet, Auxiliary (Power Outlet).........40Electronic Range Select (ERS).........................67Electronic Stability Control (ESC)................... 14611
21_VM_OM_EN_USC_t.book Page 267