2021 Peugeot Landtrek Adjustment
[x] Cancel search: AdjustmentPage 4 of 176

2
Contents
■
Overview
■
Eco-driving
1Instruments
Instrument panels 7
Warning and indicator lamps 8
Total distance recorder 12
Lighting dimmer
12
Trip computer 12
Monochrome screen 13
Touch screen 14
2Access
Electronic key with remote control function
and built-in key, 16
Keyless Entry and Starting 18
Central locking 19
Back-up procedures 20
Doors 21
Tailgate 22
Alarm 22
Electric windows 24
3Ease of use and comfort
Front seats 25
2-seat front bench seat 26
Steering wheel adjustment 27
Mirrors 28
Rear bench seat 29
Heating and Ventilation 31
Heating 32
Manual air conditioning 32
Dual-zone automatic air conditioning 33
Front demisting - defrosting 35
Rear screen demisting/defrosting 35
Front fittings 35
Courtesy lamps 37
Rear fittings 38
Tipper body fittings
39
4Lighting and visibility
Exterior lighting control stalk 42
Cornering lighting 43
Direction indicators 43
Headlamp beam height adjustment 44
Automatic illumination of headlamps 44
Guide-me-home and welcome lighting 45
Wiper control stalk 45
Changing a wiper blade 46
Automatic wipers 47
5Safety
General safety recommendations 48
Hazard warning lamps 48
Horn 49
Electronic stability control (ESC) 49
Hill Assist Descent Control 51
Seat belts 52
Airbags 54
Child seats 56
Deactivating the front passenger airbag 58
ISOFIX child seats 59
Child lock 60
6Driving
Driving recommendations 61
Starting / Switching off the engine with
the key
63
Starting/Switching off the engine with
Keyless Entry and Starting
65
Manual parking brake 66
Locking the rear differential 67
4-wheel drive transmission selector 67
6-speed manual gearbox 69
Automatic gearbox 69
Driving mode 71
Hill start assist 72
Gear shift indicator 73
Tyre under-inflation detection 73
Driving and manoeuvring aids - General
recommendations
74
Speed limiter 75
Overspeed alert at 75 mph (120
km/h) 76
Cruise control - particular recommendations 76
Cruise control 77
Lane Departure Warning System 78
Parking sensors 80
Reversing camera 81
Off Road camera 82
360° camera 82
Page 7 of 176

5
Overview
2.Deactivate the Lane Departure Warning
System function
3. Headlamp beam height adjustment
4. Activate loading zone external lighting
(available only when stationary)
5. Deactivate parking sensors
Central control bar (lower and upper)
1.Rear differential locking
2. Hill Assist Descent Control
3. Deactivate the DSC/ASR system
4. Central locking
5. Central unlocking
6. Hazard warning lamps
7. Passenger airbag deactivation/activation
indication lamp
8. Activate camera functions (360° Camera or
Off Road Camera)
9. Audio system on/off (long press)
Volume adjustment/Mute (short press)
Page 17 of 176
15
Instruments
1Access to system and vehicle usage information.Volume adjustment/Mute (short press).
Audio system on/off (long press).
See "Audio equipment and telematics" section.
Information banners
Certain information is displayed permanently in
the touch screen banners.
Upper banner
– Time.
– Reminder of the information in the
Radio
Media and Telephone menus.
–
Notifications.
–
Display and reminder of air conditioning
system settings.
–
Quick access to the
Settings for touch screen
brightness, call volume (telephone), Bluetooth
®
connection and media volume.
Lower banner
– Quick access to certain touch screen menus
(personalisation, Bluetooth, video, help, etc.).
–
Access to user profiles.
–
Access to voice recognition.
Page 27 of 176
25
Ease of use and comfort
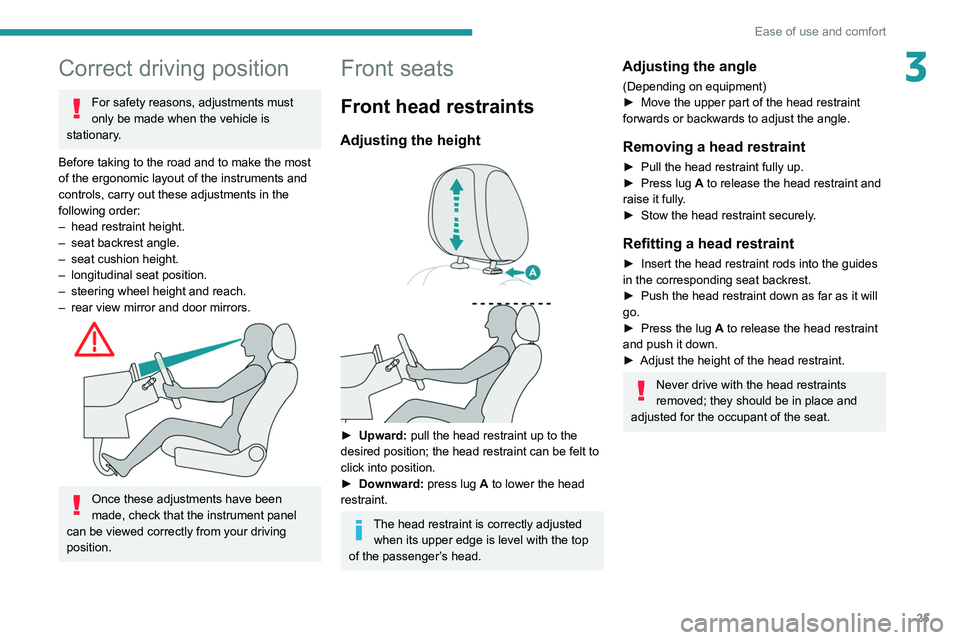
3Correct driving position
For safety reasons, adjustments must
only be made when the vehicle is
stationary.
Before taking to the road and to make the most
of the ergonomic layout of the instruments and
controls, carry out these adjustments in the
following order:
–
head restraint height.
–
seat backrest angle.
–
seat cushion height.
–
longitudinal seat position.
–
steering wheel height and reach.
–
rear view mirror and door mirrors.
Once these adjustments have been
made, check that the instrument panel
can be viewed correctly from your driving
position.
Front seats
Front head restraints
Adjusting the height
► Upward: pull the head restraint up to the
desired position; the head restraint can be felt to
click into position.
►
Downward:
press lug A to lower the head
restraint.
The head restraint is correctly adjusted when its upper edge is level with the top
of the passenger’s head.
Adjusting the angle
(Depending on equipment)
► Move the upper part of the head restraint
forwards or backwards to adjust the angle.
Removing a head restraint
► Pull the head restraint fully up.
► Press lug A to release the head restraint and
raise it fully.
►
Stow the head restraint securely
.
Refitting a head restraint
► Insert the head restraint rods into the guides
in the corresponding seat backrest.
►
Push the head restraint down as far as it will
go.
►
Press the lug
A to release the head restraint
and push it down.
►
Adjust the height of the head restraint.
Never drive with the head restraints
removed; they should be in place and
adjusted for the occupant of the seat.
Page 28 of 176
26
Ease of use and comfort
The backrest of the seat located next to the
driver, once in the table position, can also be
used as an armrest and has 2 cup/can holders
and a support strap.
For more information on the Seat belts,
refer to the corresponding section.
Folding the backrests
The backrests must only be operated with the vehicle stationary.
While driving, having a passenger in the rear,
behind the front benchseat is prohibited if the
benchseat backrests are tilted.
When sharp deceleration occurs, objects
placed on the folded backrest can turn into
projectiles.
Preliminary operations:
► Lower the head restraints.
► Check that no person or object will interfere
with folding down the backrests (clothing,
luggage, etc.).
► Check that the outer seat belt is properly
tensioned along the pillars, the central belt is
stowed and the tongues of the belts are correctly
in the stowed position.
Deactivation of the front passenger
airbag is recommended.
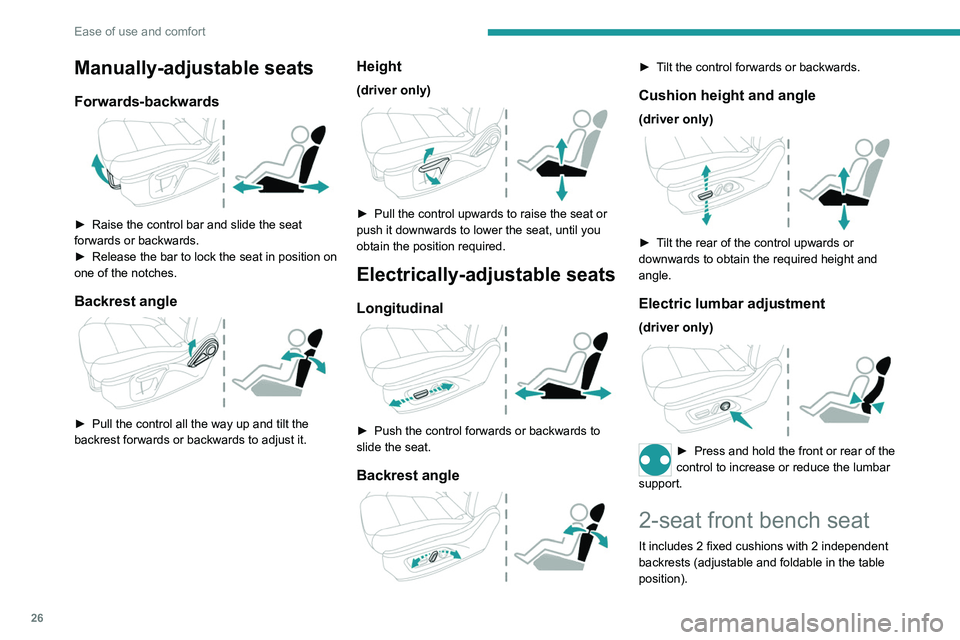
Manually-adjustable seats
Forwards-backwards
► Raise the control bar and slide the seat
forwards or backwards.
►
Release the bar to lock the seat in position on
one of the notches.
Backrest angle
► Pull the control all the way up and tilt the
backrest forwards or backwards to adjust it.
Height
(driver only)
► Pull the control upwards to raise the seat or
push it downwards to lower the seat, until you
obtain the position required.
Electrically-adjustable seats
Longitudinal
► Push the control forwards or backwards to
slide the seat.
Backrest angle
► Tilt the control forwards or backwards.
Cushion height and angle
(driver only)
► Tilt the rear of the control upwards or
downwards to obtain the required height and
angle.
Electric lumbar adjustment
(driver only)
► Press and hold the front or rear of the
control to increase or reduce the lumbar
support.
2-seat front bench seat
It includes 2 fixed cushions with 2 independent
backrests (adjustable and foldable in the table
position).
Page 29 of 176
27
Ease of use and comfort
3The backrest of the seat located next to the
driver, once in the table position, can also be
used as an armrest and has 2 cup/can holders
and a support strap.
For more information on the Seat belts,
refer to the corresponding section.
Folding the backrests
The backrests must only be operated with the vehicle stationary.
While driving, having a passenger in the rear,
behind the front benchseat is prohibited if the
benchseat backrests are tilted.
When sharp deceleration occurs, objects
placed on the folded backrest can turn into
projectiles.
Preliminary operations:
►
Lower the head restraints.
►
Check that no person or object will interfere
with folding down the backrests (clothing,
luggage, etc.).
►
Check that the outer seat belt is properly
tensioned along the pillars, the central belt is
stowed and the tongues of the belts are correctly
in the stowed position.
Deactivation of the front passenger
airbag is recommended.
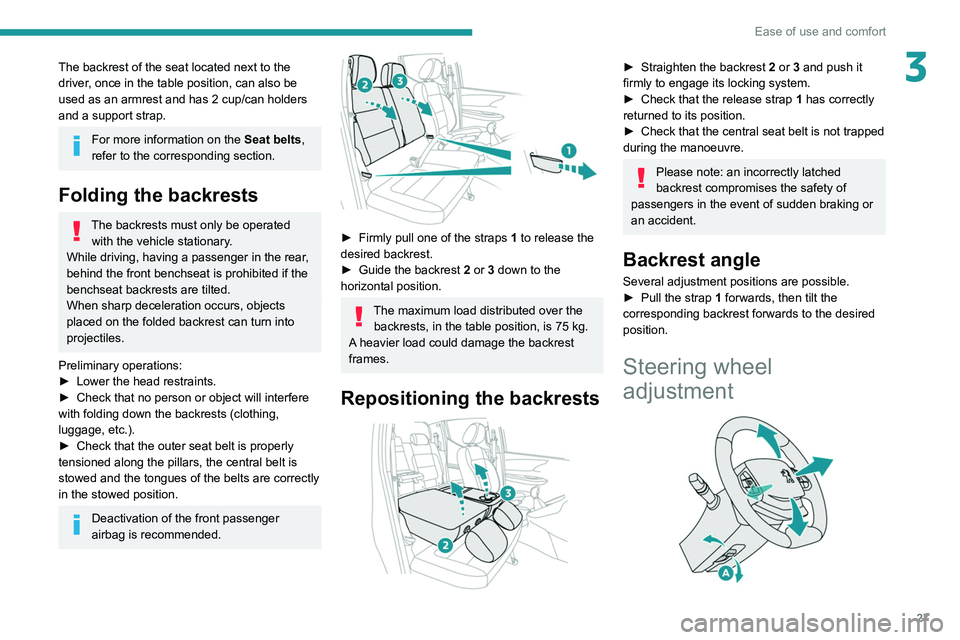
► Firmly pull one of the straps 1 to release the
desired backrest.
►
Guide the backrest
2 or 3 down to the
horizontal position.
The maximum load distributed over the backrests, in the table position, is 75 kg.
A heavier load could damage the backrest
frames.
Repositioning the backrests
► Straighten the backrest 2 or 3 and push it
firmly to engage its locking system.
►
Check that the release strap 1
has correctly
returned to its position.
►
Check that the central seat belt is not trapped
during the manoeuvre.
Please note: an incorrectly latched
backrest compromises the safety of
passengers in the event of sudden braking or
an accident.
Backrest angle
Several adjustment positions are possible.
► Pull the strap 1 forwards, then tilt the
corresponding backrest forwards to the desired
position.
Steering wheel
adjustment
Page 30 of 176

28
Ease of use and comfort
Manual model
Day/night position
► Pull the lever to change to the anti-dazzle
"night” position.
► Push the lever to change to the normal "day"
position.
Adjustment
► Set the mirror to the normal “day” position.
Rear bench seat
Bench seat with folding cushions (giving access
to storage compartments) and split folding
backrests (2/3-1/3).
► When stationary , pull control A to release the
steering wheel.
►
Adjust the height and reach to suit your
driving position.
►
Push the control to lock the steering wheel.
For safety reasons, these adjustments
must only be carried out with the vehicle
stationary.
Mirrors
Door mirrors
As a safety measure, the mirrors should be adjusted to reduce the "blind spots".
The objects that you see in the mirrors are
in fact closer than they appear. Take this
into account in order to correctly judge the
distance of vehicles approaching from behind.
Manual adjustment
► Directly manouevre the mirror glass to adjust
the mirror concerned.
Electric adjustment
► Move control A to the right or to the left to
select the corresponding mirror.
►
Move control
B in any of the four directions
to adjust.
►
Return control A
to its central position.
Manual folding
The mirrors can be folded manually (parking
obstruction, narrow garage, etc.).
►
T
urn the mirror towards the vehicle.
Electric folding
Depending on equipment, the mirrors can be
folded electrically from the inside, with the
vehicle parked and the ignition on.
► Press control C.
Lock the vehicle from the outside.
Electric unfolding
► From outside: unlock the vehicle.
► From inside: with the ignition on, press
control
C.
Demisting/Defrosting
Demisting/defrosting of the door mirrors
operates by pressing on the rear screen
defrost control.
For more information on Rear screen
demisting/defrosting , refer to the
corresponding section.
Interior rear view mirror
Equipped with an anti-dazzle system, which
darkens the mirror glass and reduces the
nuisance to the driver caused by the sun,
headlamps of other vehicles, etc.
Page 31 of 176
29
Ease of use and comfort
3Manual model
Day/night position
► Pull the lever to change to the anti-dazzle
"night” position.
►
Push the lever to change to the normal "day"
position.
Adjustment
►
Set the mirror to the normal “day” position.
Rear bench seat
Bench seat with folding cushions (giving access
to storage compartments) and split folding
backrests (2/3-1/3).
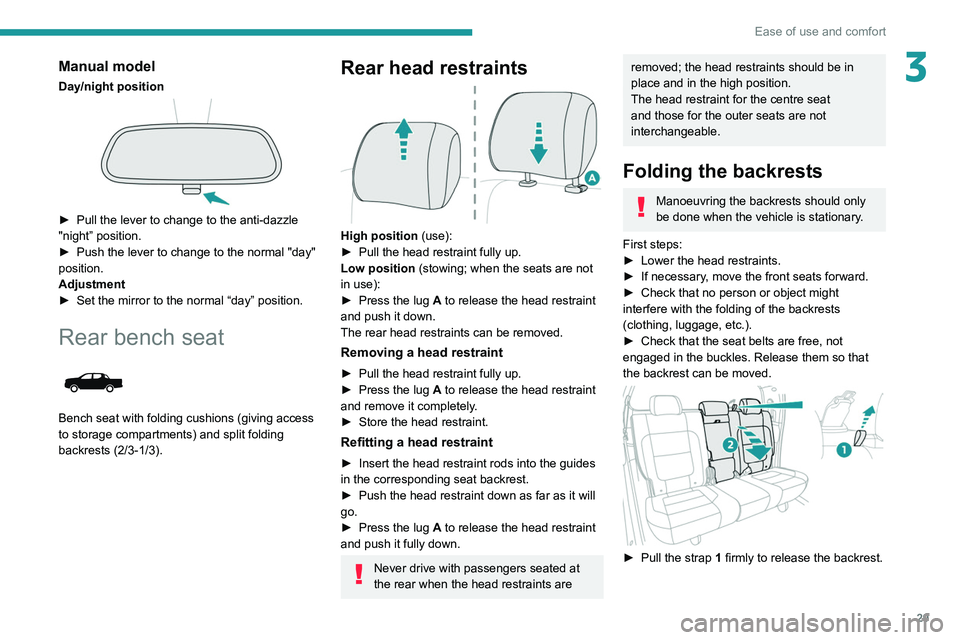
Rear head restraints
High position (use):
► Pull the head restraint fully up.
Low position (stowing; when the seats are not
in use):
►
Press the lug
A to release the head restraint
and push it down.
The rear head restraints can be removed.
Removing a head restraint
► Pull the head restraint fully up.
► Press the lug A to release the head restraint
and remove it completely.
►
Store the head restraint.
Refitting a head restraint
► Insert the head restraint rods into the guides
in the corresponding seat backrest.
►
Push the head restraint down as far as it will
go.
►
Press the lug
A to release the head restraint
and push it fully down.
Never drive with passengers seated at
the rear when the head restraints are
removed; the head restraints should be in
place and in the high position.
The head restraint for the centre seat
and those for the outer seats are not
interchangeable.
Folding the backrests
Manoeuvring the backrests should only
be done when the vehicle is stationary.
First steps:
►
Lower the head restraints.
►
If necessary
, move the front seats forward.
►
Check that no person or object might
interfere with the folding of the backrests
(clothing, luggage, etc.).
►
Check that the seat belts are free, not
engaged in the buckles. Release them so that
the backrest can be moved.
► Pull the strap 1 firmly to release the backrest.