2021 Peugeot Landtrek Door
[x] Cancel search: DoorPage 85 of 176
83
Driving
6
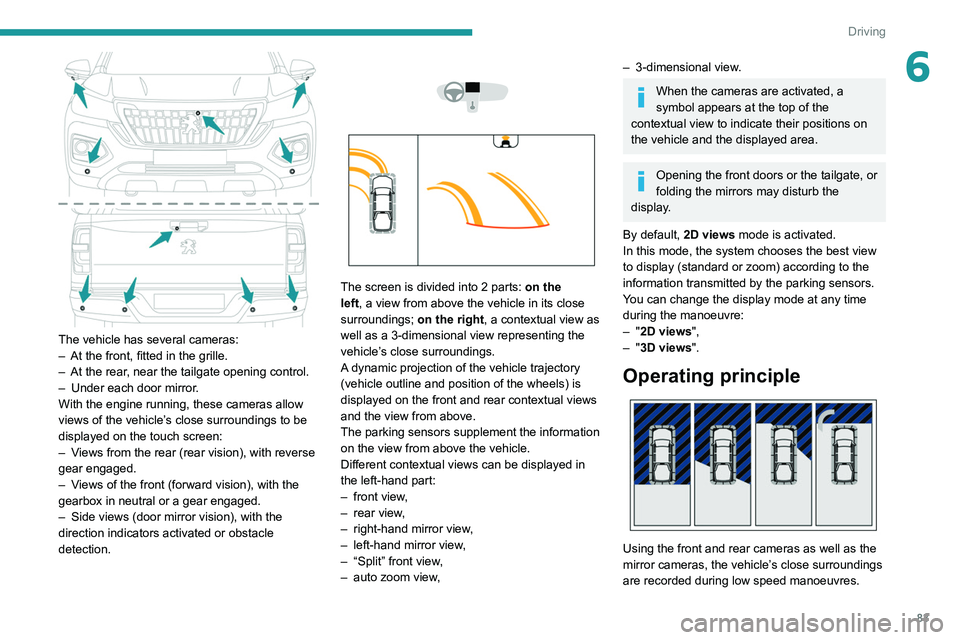
The vehicle has several cameras:
– At the front, fitted in the grille.
–
At the rear
, near the tailgate opening control.
–
Under each door mirror
.
With the engine running, these cameras allow
views of the vehicle’s close surroundings to be
displayed on the touch screen:
–
V
iews from the rear (rear vision), with reverse
gear engaged.
–
V
iews of the front (forward vision), with the
gearbox in neutral or a gear engaged.
–
Side views (door mirror vision), with the
direction indicators activated or obstacle
detection.
The screen is divided into 2 parts: on the
left, a view from above the vehicle in its close
surroundings; on the right, a contextual view as
well as a 3-dimensional view representing the
vehicle’s close surroundings.
A dynamic projection of the vehicle trajectory
(vehicle outline and position of the wheels) is
displayed on the front and rear contextual views
and the view from above.
The parking sensors supplement the information
on the view from above the vehicle.
Different contextual views can be displayed in
the left-hand part:
–
front view
,
–
rear view
,
–
right-hand mirror view
,
–
left-hand mirror view
,
–
“Split” front view
,
–
auto zoom view
,
– 3-dimensional view .
When the cameras are activated, a
symbol appears at the top of the
contextual view to indicate their positions on
the vehicle and the displayed area.
Opening the front doors or the tailgate, or
folding the mirrors may disturb the
display.
By default, 2D views mode is activated.
In this mode, the system chooses the best view
to display (standard or zoom) according to the
information transmitted by the parking sensors.
You can change the display mode at any time
during the manoeuvre:
–
"2D views",
–
"3D views".
Operating principle
Using the front and rear cameras as well as the
mirror cameras, the vehicle’s close surroundings
are recorded during low speed manoeuvres.
Page 86 of 176
84
Driving
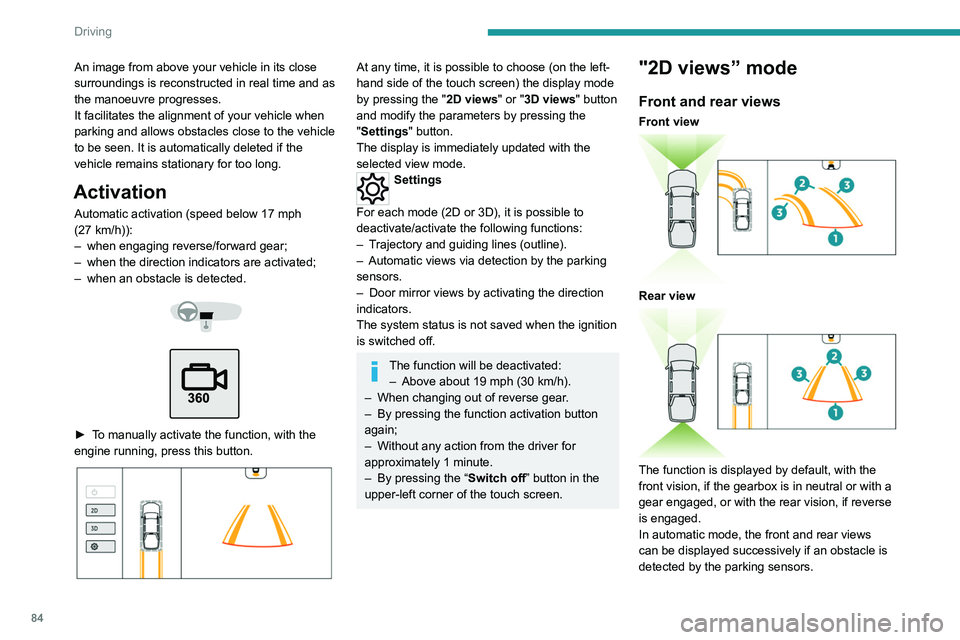
The guiding line 1 (in red) represents the end of
the bumper.
From the bumper, the thin orange guiding lines
2 represent the width of the vehicle, with
the mirrors unfolded and the wide orange
guiding lines 3 represent the trajectory of the
vehicle.
Lines 2 and 3 are oriented according to the
position of the steering wheel.
The system is deactivated:
– Automatically above about 19 mph (30 km/h)
(the image disappears temporarily from 12 mph
(20 km/h)).
– By pressing the function activation button
again.
Door mirror views
The door mirror views make it possible to
visualise the areas located under each mirror as
well as all of the front lateral sides of the vehicle
in order to manoeuvre the vehicle with the
surrounding obstacles.
An image from above your vehicle in its close
surroundings is reconstructed in real time and as
the manoeuvre progresses.
It facilitates the alignment of your vehicle when
parking and allows obstacles close to the vehicle
to be seen. It is automatically deleted if the
vehicle remains stationary for too long.
Activation
Automatic activation (speed below 17 mph
(27 km/h)):
–
when engaging reverse/forward gear;
–
when the direction indicators are activated;
–
when an obstacle is detected.
► To manually activate the function, with the
engine running, press this button.
At any time, it is possible to choose (on the left-
hand side of the touch screen) the display mode
by pressing the " 2D views" or "3D views" button
and modify the parameters by pressing the
"Settings" button.
The display is immediately updated with the
selected view mode.
Settings
For each mode (2D or 3D), it is possible to
deactivate/activate the following functions:
–
T
rajectory and guiding lines (outline).
–
Automatic views via detection by the parking
sensors.
–
Door mirror views by activating the direction
indicators.
The system status is not saved when the ignition
is switched off.
The function will be deactivated: – Above about 19 mph (30 km/h).
–
When changing out of reverse gear
.
–
By pressing the function activation button
again;
–
Without any action from the driver for
approximately 1 minute.
–
By pressing the “
Switch off” button in the
upper-left corner of the touch screen.
"2D views” mode
Front and rear views
Front view
Rear view
The function is displayed by default, with the
front vision, if the gearbox is in neutral or with a
gear engaged, or with the rear vision, if reverse
is engaged.
In automatic mode, the front and rear views
can be displayed successively if an obstacle is
detected by the parking sensors.
Page 87 of 176
85
Driving
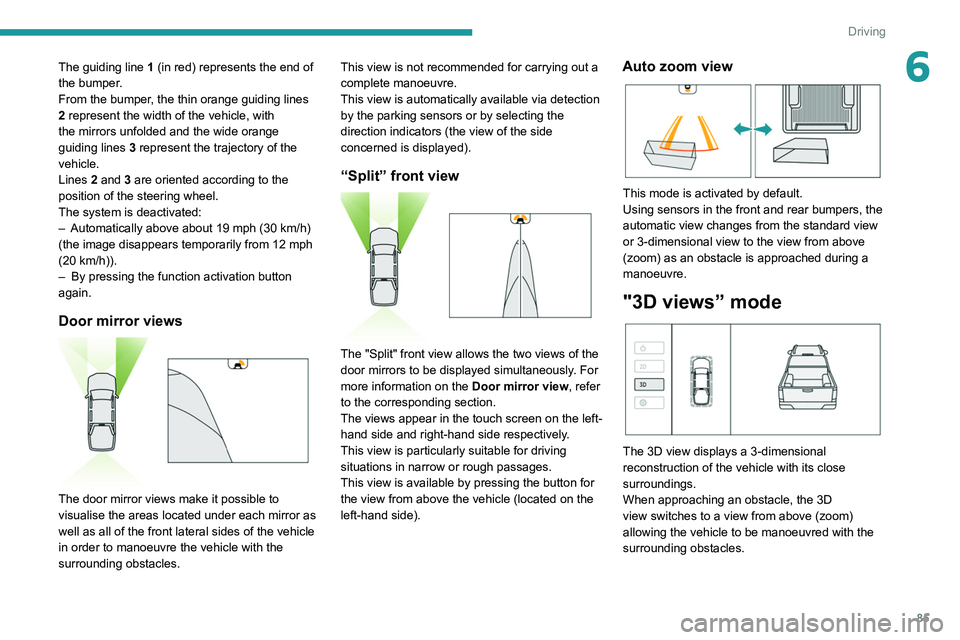
6The guiding line 1 (in red) represents the end of
the bumper.
From the bumper, the thin orange guiding
lines
2 represent the width of the vehicle, with
the mirrors unfolded and the wide orange
guiding
lines 3 represent the trajectory of the
vehicle.
Lines 2 and 3 are oriented according to the
position of the steering wheel.
The system is deactivated:
–
Automatically above about 19 mph (30
km/h)
(the image disappears temporarily from 12 mph
(20
km/h)).
–
By pressing the function activation button
again.
Door mirror views
The door mirror views make it possible to
visualise the areas located under each mirror as
well as all of the front lateral sides of the vehicle
in order to manoeuvre the vehicle with the
surrounding obstacles. This view is not recommended for carrying out a
complete manoeuvre.
This view is automatically available via detection
by the parking sensors or by selecting the
direction indicators (the view of the side
concerned is displayed).
“Split” front view
The "Split" front view allows the two views of the
door mirrors to be displayed simultaneously. For
more information on the
Door mirror view, refer
to the corresponding section.
The views appear in the touch screen on the left-
hand side and right-hand side respectively.
This view is particularly suitable for driving
situations in narrow or rough passages.
This view is available by pressing the button for
the view from above the vehicle (located on the
left-hand side).
Auto zoom view
This mode is activated by default.
Using sensors in the front and rear bumpers, the
automatic view changes from the standard view
or 3-dimensional view to the view from above
(zoom) as an obstacle is approached during a
manoeuvre.
"3D views” mode
The 3D view displays a 3-dimensional
reconstruction of the vehicle with its close
surroundings.
When approaching an obstacle, the 3D
view switches to a view from above (zoom)
allowing the vehicle to be manoeuvred with the
surrounding obstacles.
Page 92 of 176
90
Practical information
Opening
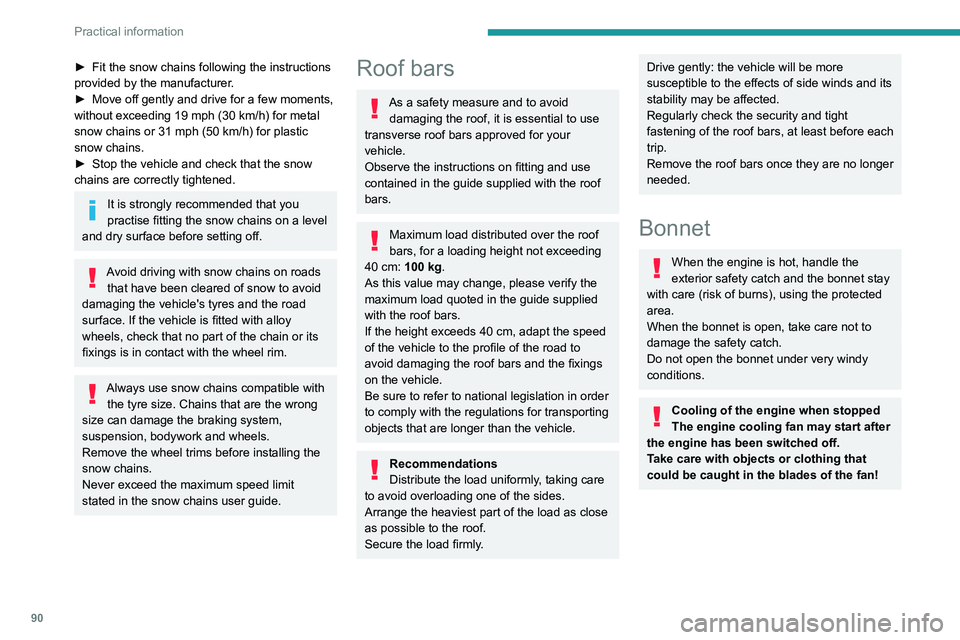
► Open the left-hand front door.
► Pull the interior release lever, located at the
bottom of the dashboard, towards you.
► Tilt the exterior safety catch to the left and
raise the bonnet.
► Unclip the stay from its housing and place it
in the support slot to hold the bonnet open.
* Depending on engine.
► Fit the snow chains following the instructions
provided by the manufacturer .
►
Move off gently and drive for a few moments,
without exceeding 19
mph (30 km/h) for metal
snow chains or 31 mph (50 km/h) for plastic
snow chains.
►
Stop the vehicle and check that the snow
chains are correctly tightened.
It is strongly recommended that you
practise fitting the snow chains on a level
and dry surface before setting off.
Avoid driving with snow chains on roads that have been cleared of snow to avoid
damaging the vehicle's tyres and the road
surface. If the vehicle is fitted with alloy
wheels, check that no part of the chain or its
fixings is in contact with the wheel rim.
Always use snow chains compatible with the tyre size. Chains that are the wrong
size can damage the braking system,
suspension, bodywork and wheels.
Remove the wheel trims before installing the
snow chains.
Never exceed the maximum speed limit
stated in the snow chains user guide.
Roof bars
As a safety measure and to avoid damaging the roof, it is essential to use
transverse roof bars approved for your
vehicle.
Observe the instructions on fitting and use
contained in the guide supplied with the roof
bars.
Maximum load distributed over the roof
bars, for a loading height not exceeding
40 cm: 100
kg.
As this value may change, please verify the
maximum load quoted in the guide supplied
with the roof bars.
If the height exceeds 40 cm, adapt the speed
of the vehicle to the profile of the road to
avoid damaging the roof bars and the fixings
on the vehicle.
Be sure to refer to national legislation in order
to comply with the regulations for transporting
objects that are longer than the vehicle.
Recommendations
Distribute the load uniformly, taking care
to avoid overloading one of the sides.
Arrange the heaviest part of the load as close
as possible to the roof.
Secure the load firmly.
Drive gently: the vehicle will be more
susceptible to the effects of side winds and its
stability may be affected.
Regularly check the security and tight
fastening of the roof bars, at least before each
trip.
Remove the roof bars once they are no longer
needed.
Bonnet
When the engine is hot, handle the
exterior safety catch and the bonnet stay
with care (risk of burns), using the protected
area.
When the bonnet is open, take care not to
damage the safety catch.
Do not open the bonnet under very windy
conditions.
Cooling of the engine when stopped
The engine cooling fan may start after
the engine has been switched off.
Take care with objects or clothing that
could be caught in the blades of the fan!
Page 93 of 176

91
Practical information
7Opening
► Open the left-hand front door.
► Pull the interior release lever , located at the
bottom of the dashboard, towards you.
► Tilt the exterior safety catch to the left and
raise the bonnet.
►
Unclip the stay from its housing and place it
in the support slot to hold the bonnet open.
* Depending on engine.
Closing
► Hold the bonnet and pull out the stay from the
support slot.
►
Clip the stay in its housing.
►
Lower the bonnet and release it near the end
of its travel.
►
Pull on the bonnet to check that it is locked
correctly
.
Because of the presence of electrical
equipment under the bonnet, it is strongly
recommended that exposure to water (rain,
washing, etc.) be limited.
Engine compartment
The engine shown here is an example for
illustrative purposes only.
The locations of the following elements may
vary:
–
Air filter
.
–
Engine oil dipstick.
–
Engine oil filler cap.
–
Priming pump.
–
Degassing screw
.
Petrol engine
Diesel engine
1.Screenwash fluid reservoir
2. Engine coolant reservoir
3. Brake fluid reservoir
4. Battery
5. Power steering fluid reservoir
6. Fusebox
7. Air filter
8. Engine oil filler cap
9. Engine oil dipstick
10. Priming pump*
11 . Degassing screw*
Page 99 of 176
97
Practical information
7In the event of contact with the eyes,
immediately rinse the eyes with large
amounts of water or with an eye wash
solution for at least 15 minutes. Seek medical
attention if you feel a persistent burning
sensation or irritation.
Never go underneath the vehicle raised
using a jack; always use an axle
stand-type support.
When working on the vehicle's electrical
system, take care not to cause a short circuit -
risk of burns and fire.
Flammable products and all sources of heat
(sparks, for example) must be kept away from
the battery, the fuel tank and all components
of the fuel system.
Never run the engine in a closed space
without sufficient ventilation; always use a
ventilation system such as an exhaust gas
extractor, for example.
Never leave liquids (oil, coolant) unattended.
Keep these liquids out of the reach of children
and animals.
The liquids and components replaced must have the same characteristics and
comply with the manufacturer's
recommendations.
General checks
Check the following components to ensure
proper operation and longevity of the vehicle.
For more information on the components
to be
checked, refer to the Checking levels, Checks
and Advice on care
sections.
Daily checks
Check that all vehicle lamps (front and
rear) are working properly.
Check the condition of the door mirrors and
the adjustment controls.
Check that all the doors can be opened,
closed and locked correctly.
Regularly check all levels, the condition of the
tyres and the bodywork.
Monthly checks
Check:
–
The engine coolant level.
–
The absence of leaks on all the pipes and
hoses visible on the vehicle as well as the
tanks.
–
The proper functioning of the elements of
the: •
Heating and ventilation system.
•
Air conditioning system.
•
Parking brake (application and release).
•
Horn.
–
The tightening of the wheel nuts (if
necessary
, retighten them to the specific
tightening values).
–
The good condition of the wipers.
– The absence of significant play in the
steering wheel and steering.
–
The correct travel of the brake pedal as
well as the clutch pedal.
General recommendations
related to maintenance
operations
Electronic engine management
computer
The electronic computer is not completely
waterproof. When performing maintenance
in the rain or washing the engine, it must be
protected from water.
Never remove or disconnect any part of the
electronic injection system to avoid the entry
of moisture, oil or any other foreign body.
Do not install a radio antenna or other
equipment likely to generate interference near
the electronic computer.
Do not expose the electronic computer to a
temperature higher than 105°C.
Before any welding operation on the vehicle,
it is essential to disconnect the electronic
computer - risk of damage to the electronic
system components.
Fuel system
All work on the fuel system must be
carried out only by a PEUGEOT dealer or a
qualified workshop.
Page 104 of 176
102
Practical information
Bodywork
High-gloss paint
Do not use abrasive products, solvents,
petrol or oil to clean the bodywork.
Never use an abrasive sponge to clean
stubborn stains - risk of scratching the
paintwork!
Do not apply polish in strong sunshine, or to
plastic or rubber parts.
Use a soft cloth and soapy water or a pH
neutral product.
Gently wipe the bodywork with a clean
microfibre cloth.
Apply polish with the vehicle clean and dry.
Comply with the instructions for use stated on
the product.
Decals
(Depending on version)
Do not use a high-pressure washer to
clean the vehicle - risk of damaging or
detaching the decals!
Use a high-flow hose (temperature
between 25°C and 40°C).
Place the jet of water perpendicular to the
surface to be cleaned.
Rinse the vehicle with demineralised water.
► Install the seal on the intake manifold and fit
the throttle body B, making sure that the seal
does not fall.
For reassembly, carry out the operations in the
reverse order to those for removal. Tighten the
screws to the correct tightening torque.
Changing to free-wheeling
In certain situations, you must allow the vehicle
to free-wheel (while being towed, on a rolling
road, in an automatic car wash, or being
transported by rail or sea freight, etc.).
The procedure differs depending on the type of
gearbox and transmission.
/
To release them
► With the vehicle stationary and the engine
running, depress the brake pedal and release
the parking brake.
►
With a manual gearbox, move the gear lever
into neutral.
►
With an automatic gearbox, select position N
.
►
For 4-wheel drive vehicles (4x4), put the
transmission selector in 2H
mode.
►
Switch the ignition off.
Advice on care and maintenance
General recommendations
Observe the following recommendations to avoid
damaging the vehicle.
Exterior
Never use a high-pressure jet wash in
the engine compartment - risk of
damaging the electrical components!
Do not wash the vehicle in bright sunshine or
extremely cold conditions.
When washing the vehicle in an
automatic roller-brush car wash, be sure
to lock the doors and, depending on version,
move the electronic key away.
When using a pressure washer, hold the
lance at least 30 cm from the vehicle
(particularly when cleaning areas containing
chipped paint, sensors or seals).
Promptly clean up any stains containing
chemicals liable to damage the vehicle's
paintwork (including tree resin, bird
droppings, insect secretions, pollen and tar).
Depending on the environment, clean the
vehicle frequently to remove salty deposits
(in coastal areas), soot (in industrial areas)
and mud/salts (in wet or cold areas). These
substances can be highly corrosive.
Contact a PEUGEOT dealer or a qualified
workshop for advice on removing stubborn
stains requiring special products (such as tar
or insect removers).
Apply silicone oil to the door and window
seals every year and regularly lubricate the
door hinges and the locks.
To avoid damaging the seals when the vehicle
is parked for a long time, apply silicone-based
lubricant to the door seals and wax on the
bodywork in contact with the seals.
Preferably, have paint touch-ups performed
by a PEUGEOT dealer or a qualified
workshop.
Interior
When washing the vehicle, never use a
water hose or high-pressure jet to clean
the interior.
Liquids carried in cups or other open
containers can spill, presenting a risk of
damage to the instruments and controls and
the controls located on the centre console. Be
vigilant!
When cleaning the windows, never use glass
cleaner on the heated rear screen.
Do not use corrosive cleaning products to
clean the surface of the vehicle windows.
Clean plastic components with a damp cotton
cloth dipped in a neutral pH and non-abrasive
solution. Clean oily or difficult stains with a
solvent-free product.
Page 105 of 176
103
Practical information
7Bodywork
High-gloss paint
Do not use abrasive products, solvents,
petrol or oil to clean the bodywork.
Never use an abrasive sponge to clean
stubborn stains - risk of scratching the
paintwork!
Do not apply polish in strong sunshine, or to
plastic or rubber parts.
Use a soft cloth and soapy water or a pH
neutral product.
Gently wipe the bodywork with a clean
microfibre cloth.
Apply polish with the vehicle clean and dry.
Comply with the instructions for use stated on
the product.
Decals
(Depending on version)
Do not use a high-pressure washer to
clean the vehicle - risk of damaging or
detaching the decals!
Use a high-flow hose (temperature
between 25°C and 40°C).
Place the jet of water perpendicular to the
surface to be cleaned.
Rinse the vehicle with demineralised water.
Corrosion protection
Avoid accumulation of salt, dirt, chemicals and moisture in hard-to-clean
areas.
Have damaged parts of the bodywork
repaired.
Avoid parking the vehicle in wet areas; favour
aerated and ventilated areas.
Remove dust or sand from under the
mats and dry any moisture.
Regularly clean the drain holes in the doors,
the bodywork and the chassis.
When transporting corrosive objects (acids,
fertilisers, salt), use special containers and
clean after unloading.
Wash the vehicle, paying particular attention
to hard-to-reach areas, after driving on roads
treated with road salt.
Leather
Leather is a natural product. Appropriate regular
care is essential for its durability.
It must be protected and nourished using a
specific leather product, to keep it supple and
preserve its original appearance.
Do not clean leather using unsuitable
cleaning agents such as solvents,
detergents, petrol or pure alcohol.
When cleaning items partly made from
leather, take care not to damage the other
materials with the specific leather product.
Before cleaning greasy stains or liquids,
quickly mop up any surplus.
Before cleaning, wipe off any residues liable
to scuff the leather, using a cloth that has
been dampened with demineralised water
and thoroughly wrung out.
Clean leather using a soft cloth moistened
with soapy water or a pH-neutral product.
Dry with a soft, dry cloth.