2021 Peugeot Landtrek Door
[x] Cancel search: DoorPage 107 of 176
105
In the event of a breakdown
8Never keep a fire extinguisher that has
already been used or that does not bear
its seal.
When the fire extinguisher is not used, attach
it to its support. There is a risk of movement
in the event of sudden braking or an accident.
The fire extinguisher must be replaced
approximately every 5 years; the expiry date
is written on its label.
Contact a PEUGEOT dealer or a
qualified workshop to replace the fire
extinguisher with one that has the same
specifications as the original.
Running out of fuel
(Diesel)
With Diesel engines, the fuel system must be
primed if you run out of fuel.
Before starting to prime the system, it is
essential to put at least 5 litres of Diesel into the
fuel tank.
For more information on Refuelling and
on the Engine compartment (in
particular the location of the priming pump),
refer to the corresponding section.
►
Open the bonnet.
►
Loosen the degassing bolt about 2 to 3 turns.
► Activate the priming pump until fuel
(without air) appears through the
degassing bolt.
►
Retighten the degassing bolt.
►
Operate the starter motor until the engine
starts (if the engine does not start at the first
attempt, wait around 15 seconds before trying
again).
►
If the engine does not start after a few
attempts, operate the priming pump again, then
start the engine.
►
Close the bonnet.
Tool kit
Set of tools supplied with the vehicle.
Accessing the tools
Depending on version, the tools are stored under
the rear passenger seat cushion or behind the
front passenger seat or bench seat.
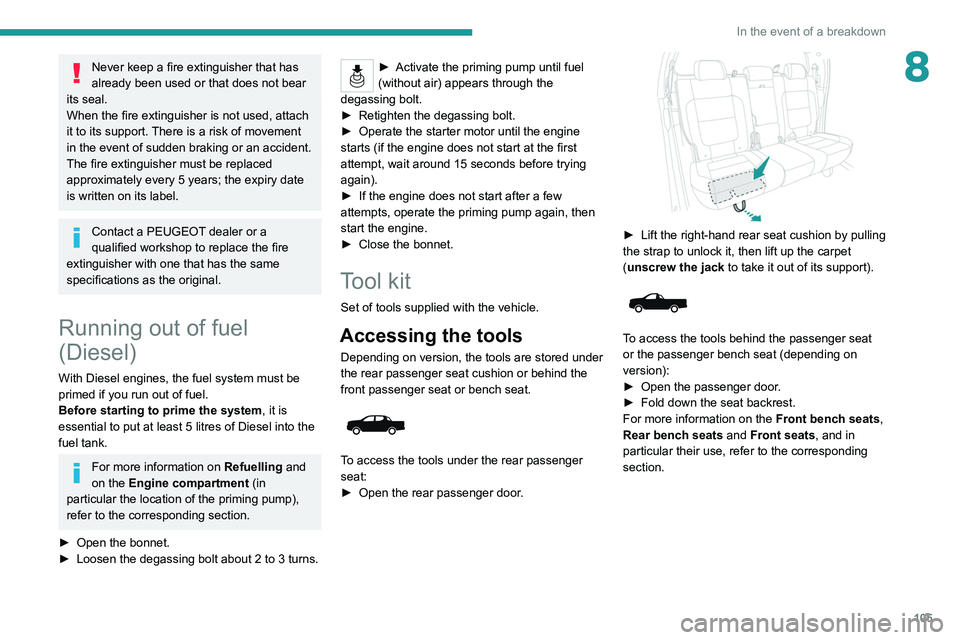
To access the tools under the rear passenger
seat:
►
Open the rear passenger door
.
► Lift the right-hand rear seat cushion by pulling
the strap to unlock it, then lift up the carpet
(
unscrew the jack to take it out of its support).
To access the tools behind the passenger seat
or the passenger bench seat (depending on
version):
►
Open the passenger door
.
►
Fold down the seat backrest.
For more information on the Front bench seats
,
Rear bench seats and Front seats, and in
particular their use, refer to the corresponding
section.
Page 116 of 176

11 4
In the event of a breakdown
PEUGEOT accepts no responsibility for
the cost incurred in repairing the vehicle
or for rectifying malfunctions resulting from
the installation of accessories not supplied or
not recommended by PEUGEOT and not
installed in accordance with its recommendations, in particular when the
combined power consumption of all of the
additional equipment connected exceeds 10
milliamperes.Fuses in the dashboard
The fusebox is located in the lower dashboard
(left-hand side).
To access the fuses, follow the same procedure
as described for accessing the fuse replacement
tools.
Table of fuses
Fuse N° Rating
(Amps) Functions
F6 30 ARear screen defrosting.
F9 20 AFolding door mirrors.
F17 10 AGlove box lighting.
F21 15 AElectric passenger seat.
F22 15 AAlarm (retrofit).
F25 or F45 25 A or 10 AReversing lamps.
F26 10 AElectric driver’s seat.
F31 10 ACigarette lighter/12
V socket.
F34 15 ARain sensor (automatic wipers).
F36 10 AReversing radar (parking sensors).
F39 7.5 ABrake lamps.
F41 7.5 ADoor mirror defrosting.
F42 20 A12
V socket (in the loading bay).
F43/F44 10 AFront/Rear sidelamps.
Engine compartment fuses
The fusebox is placed in the engine
compartment near the battery.
Accessing the fuses
Petrol engine
Table of fuses
Diesel engine box
Fuse N° Rating
(Amps) Functions
F3 25 AHeating and ventilation.
F38 30 AElectric windows.
F46 25 AWipers.
F52/F53 10 ARight-hand/Left-hand sidelamps.
F54/F55 10 ARight-hand/Left-hand front foglamp.
F56/F57 10 ARight-hand/Left-hand dipped beam headlamp.
Page 120 of 176
11 8
In the event of a breakdown
► Allow the engine to run for at least
30 minutes, with the vehicle stationary, so that
the battery reaches an adequate state of charge.
Driving immediately without having
reached a sufficient level of charge may
affect some of the vehicle's functionalities.
With an automatic gearbox, never try to
start the engine by pushing the vehicle.
Charging the battery using a
battery charger
For optimum service life of the battery, it is
essential to maintain an adequate state of
charge.
In some circumstances, it may be necessary to
charge the battery:
–
When using the vehicle mainly for short
journeys.
–
If the vehicle is to be taken off the road for
several weeks.
Contact a PEUGEOT
dealer or a qualified
workshop.
To charge the vehicle's battery yourself, use only a charger compatible with
lead-acid batteries with a nominal voltage of
12
V.
Follow the instructions provided by the
manufacturer of the charger.
Never reverse polarities.
It is not necessary to disconnect the
battery.
►
Switch the ignition off.
►
Switch off all electrical consumers (audio
system, lighting, wipers, etc.).
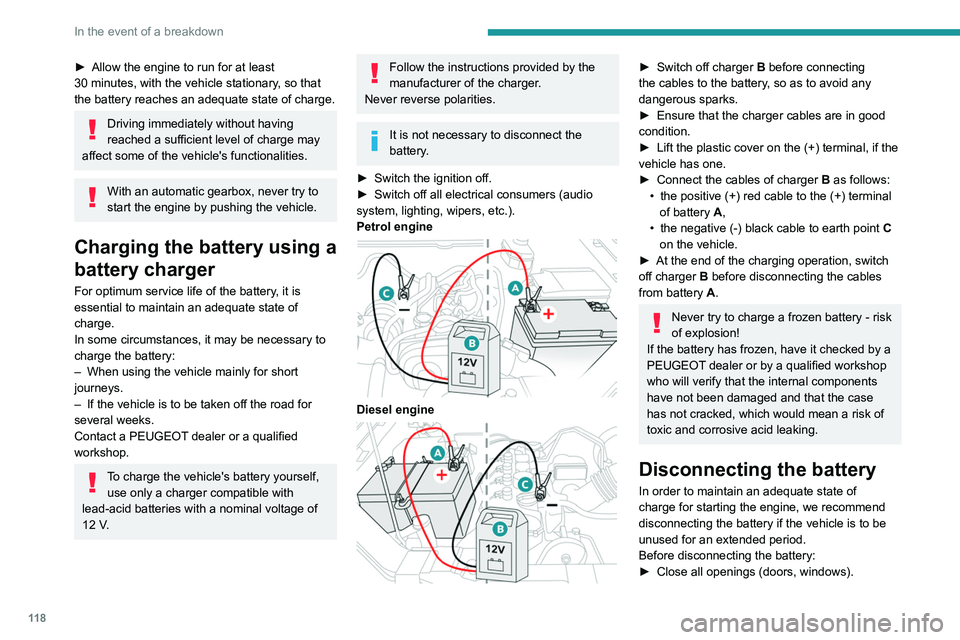
Petrol engine
Diesel engine
► Switch off charger B before connecting
the cables to the battery, so as to avoid any
dangerous sparks.
►
Ensure that the charger cables are in good
condition.
►
Lift the plastic cover on the (+) terminal, if the
vehicle has one.
►
Connect the cables of charger B
as follows:
•
the positive (+) red cable to the (+) terminal
of battery
A,
•
the negative (-) black cable to earth point C
on the vehicle.
►
At the end of the charging operation, switch
off charger B
before disconnecting the cables
from battery A.
Never try to charge a frozen battery - risk
of explosion!
If the battery has frozen, have it checked by a
PEUGEOT dealer or by a qualified workshop
who will verify that the internal components
have not been damaged and that the case
has not cracked, which would mean a risk of
toxic and corrosive acid leaking.
Disconnecting the battery
In order to maintain an adequate state of
charge for starting the engine, we recommend
disconnecting the battery if the vehicle is to be
unused for an extended period.
Before disconnecting the battery:
►
Close all openings (doors, windows).
► Switch off all electricity-consuming devices
(audio system, wipers, lamps, etc.).
► Switch off the ignition and wait for 4 minutes.
After accessing the battery, it is only necessary
to disconnect the (+) terminal.
Screwed terminal
Disconnecting the (+) terminal
► Depending on equipment, lift the plastic cover
on the (+) terminal.
► Loosen the nut A as much as possible to
unlock the clamp B.
► Remove clamp B by lifting it off.
Reconnecting the (+) terminal
► Loosen the nut A as much as possible.
► Refit the clamp B on the (+) terminal.
► Tighten the nut A to lock the clamp B.
► Depending on equipment, lower the plastic
cover on the (+) terminal.
Do not use force when tightening nut A
as the clamp may be damaged.
Page 127 of 176
125
Technical data
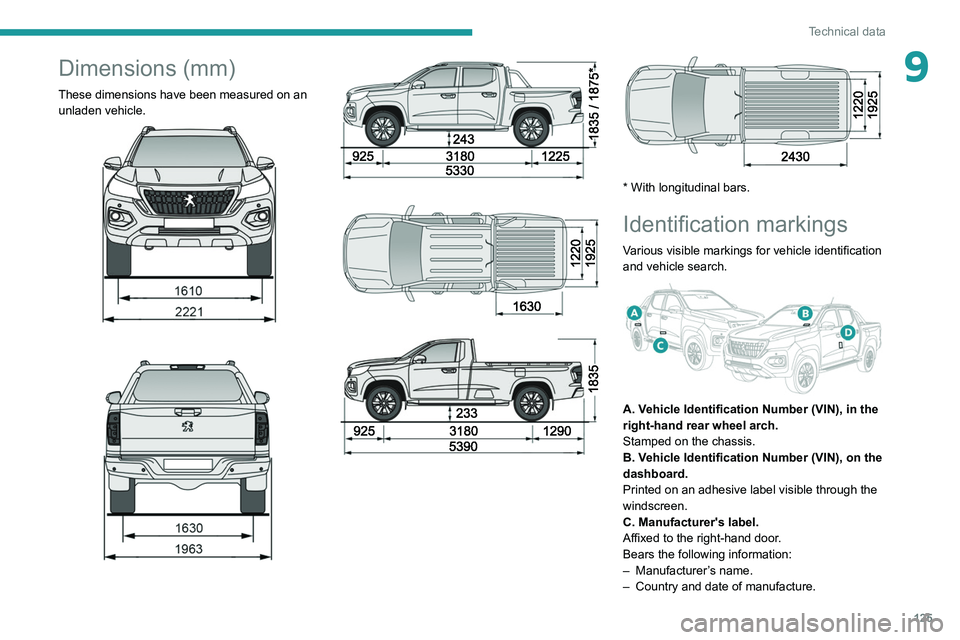
9Dimensions (mm)
These dimensions have been measured on an unladen vehicle.
* With longitudinal bars.
Identification markings
Various visible markings for vehicle identification
and vehicle search.
A. Vehicle Identification Number (VIN), in the
right-hand rear wheel arch.
Stamped on the chassis.
B. Vehicle Identification Number (VIN), on the
dashboard.
Printed on an adhesive label visible through the
windscreen.
C. Manufacturer's label.
Affixed to the right-hand door.
Bears the following information:
–
Manufacturer
’s name.
–
Country and date of manufacture.
Page 128 of 176
126
Technical data
– Vehicle model and engine type.
– European whole vehicle type approval
number
.
–
V
ehicle Identification number (VIN).
–
Gross vehicle weight (GVW).
–
Gross train weight (GTW).
–
Maximum weight on the front axle.
–
Maximum weight on the rear axle.
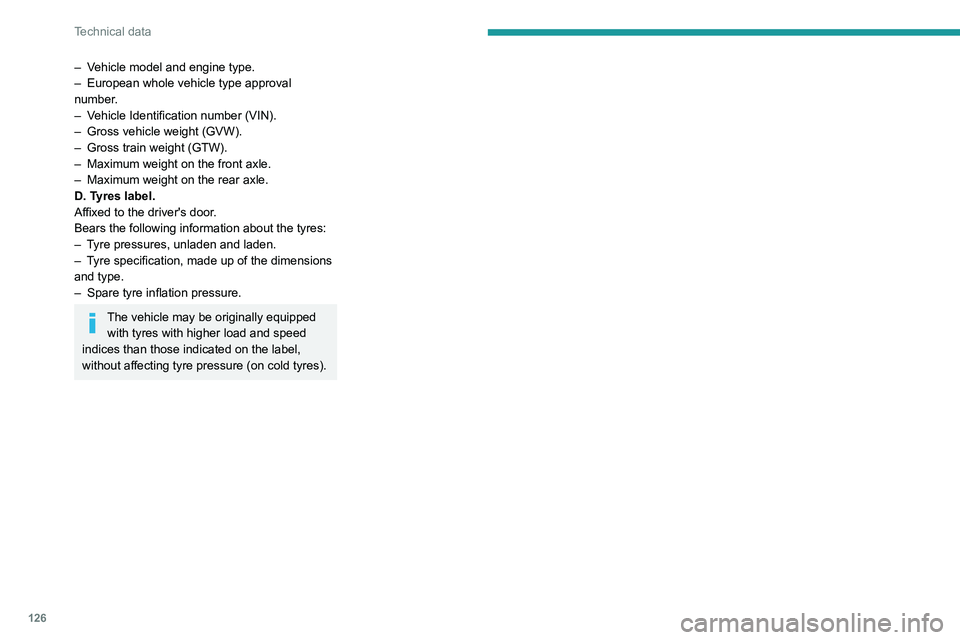
D. T
yres label.
Affixed to the driver's door.
Bears the following information about the tyres:
–
T
yre pressures, unladen and laden.
–
T
yre specification, made up of the dimensions
and type.
–
Spare tyre inflation pressure.
The vehicle may be originally equipped with tyres with higher load and speed
indices than those indicated on the label,
without affecting tyre pressure (on cold tyres).
Page 140 of 176

138
Alphabetical index
4x4 transmission selector 67
360° camera
82
A
ABS 49
Accessories
48
Additive, Diesel
95
Adjusting headlamp beam height
44
Adjusting headlamps
44
Adjusting head restraints
25
Adjusting seat
26
Adjusting the air distribution
34
Adjusting the air flow
34
Adjusting the date
13, 136
Adjusting the height and reach of
the steering wheel
27
Adjusting the seat angle
26
Adjusting the seat belt height
53
Adjusting the temperature
34
Adjusting the time
13, 136
Advice on care and maintenance
102
Advice on driving
6, 61–62
Airbags
54–56, 58
Airbags, curtain
55–56
Airbags, front
55–56, 58
Airbags, lateral
55–56
Air conditioning
31, 33, 34
Air conditioning, automatic
35
Air conditioning, dual-zone automatic
33–35
Air conditioning, manual
32, 35
Air intake 34
Air vents
31
Alarm
22–23
Android Auto connection
136
Anti-lock braking system (ABS)
49
Antitheft / Immobiliser
17
Apple CarPlay connection
135
Area, loading
40
Armrest, front
36–37
Armrest, rear
38
Assistance, emergency braking
49
Audible warning
49
Audio streaming (Bluetooth)
129
B
Battery 98
Battery, 12 V
94, 98, 116–119
Battery, charging
11 8
Battery, remote control
20–21
Bluetooth (hands-free)
129–130, 134
Bluetooth (telephone)
134
Bodywork
103
Bonnet
90–91
Brake discs
95
Brake lamps
11 2
Brakes
95
Braking assistance system
49
Bulbs
111
Bulbs (changing)
110, 112
C
Capacity, fuel tank 88
Cap, fuel filler
88
Care of the bodywork
103
Central locking
17, 19
Changing a bulb
110, 112
Changing a fuse
113–115
Changing a wheel
105–107
Changing a wiper blade
46
Changing the engine oil
99
Changing the remote control battery
20
Checking the levels
92–94
Checks
91, 94–96
Checks, routine
94–95, 97
Child lock
60
Children
54, 59
Children (safety)
60
Child seats
54, 56–58
Child seats, ISOFIX
59
Cigar lighter
36
Cleaning (advice)
101–103
Cleaning the engine throttle housing
101
Closing the boot
18, 22
Closing the doors
18–19, 21
Configuration, vehicle
13–15
Connection, Bluetooth
130, 134
Connection, MirrorLink
136
Connectivity
135
Control, emergency door
20
Control stalk, lighting
42, 44
Control stalk, wipers
45, 47
Page 141 of 176

139
Alphabetical index
Courtesy lamp, rear 38
Courtesy lamps
38
Cruise control
76–78
Cup holder
36
D
Date (setting) 13, 136
Daytime running lamps
43, 110
Deactivating the passenger airbag
55, 58
Defrosting
35
Defrosting, front
35
Demisting
35
Demisting, front
35
Demisting, rear
35
Demisting, rear screen
35
Dials and gauges
7
Dimensions
125
Dipstick
92
Direction indicators
43–44, 110–112
Display screen, instrument panel
7
Door pockets
36
Doors
21
Driving
61–62
Driving aids camera (warnings)
74
Driving aids (recommendations)
74
Driving economically
6
Dynamic stability control (DSC)
49–50
E
EBFD 49
Eco-driving (advice)
6
ECO mode
71
Electric windows
24
Electronic brake force distribution (EBFD)
49
Emergency braking assistance (EBA)
49
Emergency switching off
66
Emergency warning lamps
48, 104
Engine
96
Engine compartment
91
Engine, Diesel
88, 91, 105, 124
Engine, petrol
91, 123
Engines
122–124
Environment
6, 21
ESC (electronic stability control)
49
Extinguisher
104
F
Filling the fuel tank 88
Filter, air
94, 99
Filter, Diesel fuel
100
Filter, oil
94, 100
Filter, particle
95
Filter, passenger compartment
31, 94, 98
Fitting a wheel
107, 109
Fitting roof bars
90
Fittings, front
36
Fittings, interior
36–37
Fittings, rear 38–39
Flap, fuel filler
88
Flashing indicators
43–44, 111
Floor storage compartment
30
Fluid, brake
93
Fluid, engine coolant
93
Fluid, power steering
93
Foglamps, front
42–43, 110
Foglamps, rear
42
Folding bench seat
30
Folding the rear seat backrest
27
Folding the rear seats
29–30
Front map reading lights
38
Fuel
6, 88
Fuel consumption
6
Fuel tank
88
Fusebox, dashboard
11 3
Fusebox, engine compartment
113, 115
Fuses
113–115
G
Gauge, fuel 88
Gearbox, automatic
69, 72, 95, 118
Gearbox, manual
69, 72, 95
Gear lever, manual gearbox
69
Gear shift indicator ~ Gear efficiency
indicator
73
Glove box
36
Grab handles
36
Page 142 of 176
140
Alphabetical index
H
Hazard warning lamps 48, 104
headlamp adjustment
44
Headlamp adjustment
44
Headlamp beam height
44
Headlamps, automatic illumination
44
Headlamps, dipped beam
11 0 – 111
Headlamps, halogen
11 0 – 111
Headlamps, main beam
11 0 – 111
Head restraints, front
25
Head restraints, rear
27, 29–30
Heating
31–33, 35
Hill Assist Descent Control (HADC)
51
Hill start assist
72–73
Hooks
38
Horn
49
I
Ignition 66
Ignition on
66
Ignition switch
63–64
Immobiliser, electronic
63
Indicator, coolant temperature
11
Indicators, direction
43, 111
Inflating tyres
95, 126
Infrared camera
75
Instrument panel
7, 12, 75
ISOFIX mountings
59
J
Jack 106–107
Jump starting
11 7
K
Key 16–17, 20
Key, electronic
18–19
Keyless Entry and Starting
18, 65
Key not recognised
66
Key with remote control
16–17, 63
Kit, hands-free
129–130, 134
L
Labels, identification 125
Lamps, parking
44
Lamps, rear
11 2
Lams with Full LED technology
43
Lane Departure Warning System
(LDWS)
78, 80
Leather (care)
103
LEDs - Light-emitting diodes
43, 110, 112
Level, brake fluid
93
Level, Diesel additive
95
Level, engine coolant
11, 93
Level, engine oil
92
Level, power steering fluid
93
Levels and checks
91–94
Level, screenwash fluid 46, 94
Light-emitting diodes - LEDs
43, 110, 112
Lighting
40
Lighting, cornering
43
Lighting dimmer
12
Lighting, exterior
42
Lighting, guide-me home
45
Lighting, interior
38
Lighting, mood
12
Lighting, welcome
45
Loading
40, 90
Load restraint
40
Locating your vehicle
17
Locking
17–18
Locking from the inside
19
Locking the doors
19
Low fuel level
88
M
Maintenance 96
Maintenance (advice)
102
Maintenance, routine
75, 94, 96
Manoeuvring aids (recommendations)
74
Map reading lamps
38
Markings, identification
125
Mat
37, 75
Mirror, rear view
28
Mirrors, door
28, 35
Mirror, vanity
36
Mode, driving
71