2021 Peugeot Landtrek high beam
[x] Cancel search: high beamPage 13 of 176

11
Instruments
1Green warning/indicator lamps
Hill Assist Descent Control
Fixed.
The system has been activated, but the
conditions for regulation are not met (gradient,
speed too high, gear engaged).
Flashing.
The function is regulating the speed of
the vehicle.
The vehicle is being braked; the brake lamps
come on during the descent.
Cruise controlFixed.
Cruise control is selected.
Manual selection.
Lane Departure Warning SystemFixed.
(white)
The function has been activated, but no lane has
been detected by the camera.
Lane departure detection is not operational.
Fixed.
(green)
The system camera has detected lanes.
The function is operational.
4-wheel drive position (high speed)
4HFlashing.
The 4-wheel driving mode ( 4x4) is
selected but not yet activated.
4HFixed.
The 4-wheel driving mode ( 4x4) is
activated. The vehicle can travel at high speed
4-wheel drive position (low speed)
4LFlashing.
The 4-wheel driving mode (
4x4) is
selected but not yet activated.
4LFixed.
The 4-wheel driving mode ( 4x4) is
activated.
The vehicle can only travel at low speed.
Direction indicatorsFlashing with audible signal.
The direction indicators are on.
Front foglampsFixed.
The front foglamps are on.
SidelampsFixed.
The lamps are on.
Dipped beam headlampsFixed.
The lamps are on.
Blue warning/indicator lamps
Main beam headlamps
Fixed.
The lamps are on.
Engine coolant
temperature indicator
With the engine running:
– In zone A, the temperature is correct.
–
In zone
B, the temperature is too high; the
associated warning lamp and the central STOP
warning lamp come on in red on the instrument
panel, accompanied by the display of a message
and an audible signal.
You must stop the vehicle as soon as it is
safe to do so.
Wait a few minutes before switching off the
engine.
After switching off the ignition, carefully open the bonnet and check the coolant
level.
For more information on Checking
levels, refer to the corresponding
section.
Page 19 of 176

17
Access
2Selective unlocking
Driver's door
► Press the unlocking button.
►
Press it
again to unlock the other doors.
Complete or selective unlocking and alarm
deactivation is confirmed by flashing the
direction indicators.
Depending on version, the door mirrors unfold.
Opening the windows
Depending on version, holding the
unlocking button pressed for more than 3
seconds opens the windows.
The windows stop when the button is released.
With the key
Driver's door
► T urn the key in the driver's door lock towards
the front of the vehicle to unlock it.
If the vehicle has an alarm, it will not be
deactivated. Opening a door will trigger the
alarm, which can be stopped by pressing the
remote control unlocking button.
Tailgate (depending on version)
►
T
urn the dedicated key in the tailgate lock to
the left to unlock.
Locking the vehicle
With the remote control
► Press this button to lock the vehicle.
Locking and alarm activation is confirmed by the
lighting of the direction indicators.
Depending on version, the door mirrors fold.
An improperly closed door prevents the vehicle from locking. If the vehicle is
fitted with an alarm, it will be activated after
about 45
seconds.
If the vehicle is unlocked but the doors
are not subsequently opened, the vehicle
will automatically lock itself again after
approximately 30
seconds. If the vehicle
is fitted with an alarm, it will be reactivated
automatically.
Closing the windows
Holding the locking button pressed for
more than 3 seconds closes the windows.
When closing windows, ensure that no
person or object could prevent their
correct closure.
With the key
Driver's door
► T urn the key in the driver's door lock towards
the rear of the vehicle to lock it.
Check that the doors are properly closed.
Tailgate (depending on version)
►
T
urn the dedicated key in the tailgate lock to
the right to lock it.
Locating the vehicle
Helps you to locate your vehicle from a distance,
with the vehicle locked:
–
The direction indicators flash for approximately
10 seconds.
–
The sidelamps and dipped beam headlamps
come on for 30 seconds.
► Press this button.
Remote audible signal
Used to locate the vehicle when it is not visible.
Also used to dissuade anyone who wants to
enter the vehicle or damage it.
► Press this button twice consecutively
to activate the horn twice.
Advice
Remote control
The remote control is a sensitive, high-
frequency device; avoid handling it in your
pocket, due to the risk of unintentionally
unlocking the vehicle.
Avoid pressing the remote control buttons
while out of range of the vehicle, due to
the risk of rendering the remote control
inoperative. It would then be necessary to
reset it.
The remote control does not work
when the
key is in the ignition switch, even when the
ignition is switched off.
Page 64 of 176

62
Driving
joins your vehicle) approaches the maximum
permitted without exceeding it.
Tyres
► Check the tyre pressures of the towing
vehicle and of the trailer, observing the
recommended pressures.
Lighting
► Check the electrical signalling on the trailer
and the headlamp beam height of your vehicle.
If a genuine PEUGEOT towing device is
used, the rear parking sensors will be
deactivated automatically to avoid the audible
signal.
When driving
Cooling
Towing a trailer uphill causes the coolant
temperature to increase. The maximum towable
load depends on the gradient and the exterior
temperature. The fan’s cooling capacity does not
increase with engine speed.
► Reduce speed and lower the engine speed to
limit heating up.
In all cases, pay attention to the coolant
temperature.
If this warning lamp and the STOP
warning lamp come on, stop the vehicle
and switch off the engine as soon as possible.
Check and clean the vehicle after each off-road
trip.
Important!
Never leave the engine running in a
closed space without sufficient
ventilation. Internal combustion engines emit
toxic exhaust gases such as carbon
monoxide. Danger of poisoning and death!
In very severe wintry conditions
(temperature below -23°C), let the engine
run for 4 minutes before moving off, to ensure
the correct operation and durability of the
mechanical components of your vehicle
(engine and gearbox).
Never drive with the parking brake
applied . Risk of overheating and
damaging the braking system!
Do not park the vehicle or leave the
engine running on a flammable
surface (e.g. dry grass, dead leaves).The
vehicle exhaust system is very hot, even
several minutes after the engine stops. Risk
of fire!
Never leave a vehicle unattended with
the engine running. If you have to leave
your vehicle with the engine running, apply
the parking brake and put the gearbox into
neutral or position N or P (depending on the
type of gearbox).
Never leave children inside the vehicle
unsupervised.
On flooded roads
We strongly advise against driving on flooded
roads, as this could cause serious damage to
the engine or gearbox, as well as to the electrical
systems of your vehicle.
If you are obliged to drive on a flooded road:
► check that the depth of water does not
exceed 60
cm, taking account of waves that
might be generated by other users,
►
drive as slowly as possible without stalling. In
all cases, do not exceed 6 mph (10
km/h),
►
do not stop and do not switch off the engine.
On leaving the flooded road, as soon as safety
conditions allow
, make several light brake
applications to dry the brake discs and pads.
If in doubt about the state of your vehicle,
contact a PEUGEOT dealer or a qualified
workshop.
Towing
Driving with a trailer places greater
demands on the towing vehicle and
particular care must be taken.
Do not exceed the maximum towable
weights.
At altitude: reduce the maximum load by
10% per 1,000 metres of altitude; the lower
air density at high altitudes decreases engine
performance.
New vehicle: do not tow a trailer until the
vehicle has driven at least 620 miles
(1,000 kilometres).
If the outside temperature is high, let the
engine idle for 1 to 2 minutes after the
vehicle comes to a stop, to help it to cool.
Before setting off
Nose weight
► Distribute the load in the trailer so that the
heaviest items are as close as possible to the
axle and the nose weight (at the point where it
Page 112 of 176
11 0
In the event of a breakdown
After changing a wheel
Visit a PEUGEOT dealer or a qualified
workshop as soon as possible to have
the tightness of the nuts and the pressure of
the spare wheel checked.
Have the punctured tyre examined. After
inspection, the technician will advise you on
whether the tyre can be repaired or if it must
be replaced.
Changing a bulb
In some weather conditions (e.g. low
temperature or humidity), misting on the
internal surface of the glass of the headlamps
and rear lamps is normal, and will disappear
after the lamps have been on for a few
minutes.
The headlamps have polycarbonate lenses with a protective coating:
►
do not clean them with a dry or
abrasive cloth, nor with detergent or
solvent products,
►
use a sponge and soapy water or a pH
neutral product,
►
when using a high-pressure washer on
persistent marks, do not keep the lance
directed towards the lamps or their edges for
too long, so as not to damage their protective
coating and seals.
Changing a bulb must only be done with
the ignition off and after the lamp has
been switched off for several minutes - risk of
serious burns!
Do not touch the bulb directly with your
fingers, use a lint-free cloth.
It is essential only to use anti-ultraviolet
(UV) type bulbs, so as not to damage the
headlamp.
Always replace a failed bulb with a new bulb
of the same type and specification.
After changing a bulb
To refit, carry out the operations in
reverse order to removal.
Close the protective cover very carefully to
guarantee the sealing of the lamps.
Light-emitting diode (LED)
headlamps and lamps
Depending on version, the affected types of
headlamps / lamps are:
–
Offset daytime running lamps.
–
Direction indicator side repeaters.
–
Rear sidelamps.
–
Third brake lamp and loading bay lighting.
For the replacement of this type of bulb,
you must contact a PEUGEOT dealer or
a qualified workshop.
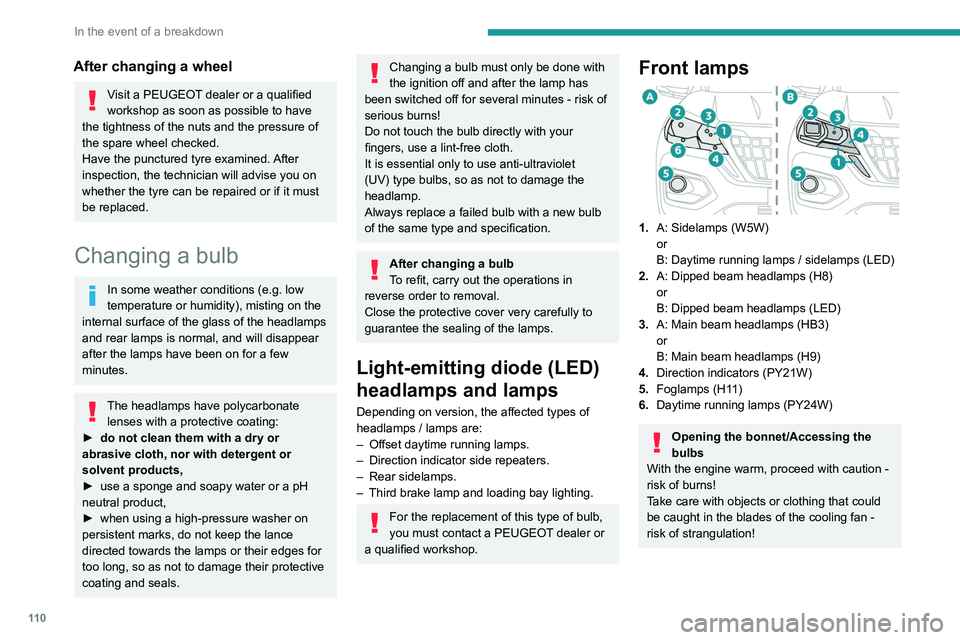
Front lamps
1. A: Sidelamps (W5W)
or
B: Daytime running lamps / sidelamps (LED)
2. A: Dipped beam headlamps (H8)
or
B: Dipped beam headlamps (LED)
3. A: Main beam headlamps (HB3)
or
B: Main beam headlamps (H9)
4. Direction indicators (PY21W)
5. Foglamps (H11)
6. Daytime running lamps (PY24W)
Opening the bonnet/Accessing the
bulbs
With the engine warm, proceed with caution -
risk of burns!
Take care with objects or clothing that could
be caught in the blades of the cooling fan -
risk of strangulation!
Halogen bulbs (Hx)
To ensure good quality lighting, check
that the bulb is correctly positioned in its
housing.
Sidelamps
► Remove the protective cover by giving it a
quarter turn.
► Pull the bulb holder backwards to remove it.
► Pull out the bulb and replace it.
When refitting the bulb holder in its housing,
press until you hear a click which means it is
locked in place.