2021 Peugeot Landtrek auto door lock
[x] Cancel search: auto door lockPage 66 of 176

64
Driving
To switch the ignition back on, turn the key to
position 1, then back to position 3.
Starting/Switching off the
engine with Keyless Entry
and Starting
The electronic key must be present in the
passenger compartment.
If it is not detected, a message is displayed.
Move the electronic key so that the engine
can be started or switched off.
If there is still a problem, refer to the "Key
not detected - Back-up starting or Back-up
switch-off" section.
Starting
► With a manual gearbox, place the gear lever
in neutral and fully depress the clutch pedal.
Once the state of charge of the battery drops to
the reserve level, the system switches to energy
economy mode : the power supply is cut off
automatically to preserve the remaining battery
charge.
Starting the engine
With the parking brake applied:
► With a manual gearbox, place the gear lever
in neutral then fully depress the clutch pedal.
►
With an
automatic gearbox, place the gear
selector in mode N or P then depress the brake
pedal.
►
Insert the key into the ignition switch; the
system recognises the code.
►
Unlock
the steering column by simultaneously
turning the steering wheel and the key.
In certain cases, you may have to apply
significant force to move the steering
wheel (wheels on full lock, for example).
►
With a
petrol engine , operate the starter
motor by turning the key to position 4 without
pressing the accelerator pedal, until the engine
starts. As soon as the engine starts, release the
key.
With petrol engines , after a cold start,
preheating the catalytic converter can
cause
noticeable engine vibrations for
anything up to 2 minutes while stationary with
the engine running (accelerated idle speed).
► With a Diesel engine, turn the key to position
3, to activate the engine preheating system.
Wait until this warning lamp goes off on
the instrument panel, then turn the key to
position 4 without pressing the accelerator pedal,
to operate the starter motor. As soon as the
engine starts, release the key.
In wintry conditions, the warning lamp
may stay on for a longer period. When
the engine is hot, the warning lamp does not
come on.
In mild conditions, do not leave the engine
to warm up while stationary, but move off
straight away and drive at moderate speed.
If the engine does not start straight away,
switch off the ignition. Wait a few
seconds before operating the starter motor
again. If the engine does not start after a few
attempts, do not keep trying - risk of
damaging the starter motor and the engine.
Contact a PEUGEOT dealer or a qualified
workshop.
If the wheels are not straight, a message
appears prompting the driver to
straighten the wheels by turning the steering
wheel.
Switching off the engine
► Immobilise the vehicle.
► With the engine at idle, turn the key to
position 2
.
►
Press the key against the ignition switch and
turn it to position
1, then remove the key from the
ignition switch.
►
T
o lock the steering column, turn the steering
wheel until it locks.
To facilitate unlocking of the steering column, it is recommended that the
wheels be returned to the straight ahead
position before switching off the engine.
Never switch off the ignition before the
complete immobilisation of the vehicle.
With the engine off, the braking and steering
assistance systems are also cut off - risk of
loss of control of the vehicle!
Check that the parking brake is correctly
applied, particularly on sloping ground.
When leaving the vehicle, keep the key in
your possession and lock the vehicle.
Key left in
When the driver's door is opened, a
message is displayed, accompanied by an
audible signal, if the key has been left in the
ignition switch in position 1.
If the key has been left in the ignition switch
in position 3, the ignition will be switched off
automatically after one hour.
Page 68 of 176

66
Driving
When parking on a slope, turn the
wheels against the kerb, apply the
parking brake, engage a gear and switch off
the ignition.
Locking the rear
differential
When the rear differential is locked, torque is
transmitted to both rear wheels equally, thereby
improving the vehicle's traction.
Locking the rear differential is especially useful
when the rear wheels are skidding (in a ditch or
on a slippery road, for example).
Operating conditions
The differential lock is activated manually (speed
below approximately 5 mph (8 km/h)).
The vehicle's wheels must not be skidding (wait
until they have stopped).
Switching on/off
► To activate the system, at a speed below
approximately 5 mph (8 km/h), press this button.
Switching on the ignition
without starting the engine
With the electronic key in the passenger
compartment, the first two presses on the
“START/STOP” button, without pressing any
of the pedals , allow the accessories to be
switched on, then the ignition, without starting
the engine (turning on accessories such as the
audio system and the lighting, then turning on
the instrument panel).
►
Press this button
again to switch off the
ignition and allow the vehicle to be locked.
Key not detected
Back-up starting
A back-up reader is fitted in the front armrest, to
enable the engine to be started if the system fails
to detect the key in the recognition zone, or if the
battery in the electronic key is flat.
► Place and hold the remote control against the
reader .
►
W
ith a manual gearbox, place the gear lever
in neutral, then fully depress the clutch pedal.
►
W
ith an automatic gearbox, select mode P,
then depress the brake pedal.
►
Press the "
START/STOP" button.
The engine starts.
Back-up switch-off
If the electronic key is not detected or is no
longer in the recognition zone, a message
appears in the instrument panel when closing a
door or trying to switch off the engine.
►
T
o confirm the instruction to switch off the
engine, press the " START/STOP" button for
approximately 5
seconds.
In the event of a fault with the electronic key,
contact a PEUGEOT dealer or a qualified
workshop.
Emergency switch-off
In the event of an emergency only, the engine
can be switched off without conditions (even
when driving).
►
Press the "
START/STOP" button for about
5
seconds.
In this case, the steering column locks as soon
as the vehicle stops.
Manual parking brake
Release
► Pull the parking brake lever up slightly , press
the release button, then lower the lever fully.
When driving the vehicle, if this warning
lamp and the STOP warning lamp come
on, accompanied by the display of a message,
this means that the parking brake is still applied
or has not been fully released.
Application
► Pull the parking brake lever up to immobilise
the vehicle.
Page 73 of 176
71
Driving
6Automatic operation
► Select position D for automatic changing of
the six gears.
The gearbox then operates in auto-adaptive
mode, without any intervention on the part of the
driver. It continuously selects the most suitable
gear according to the driving style, the road
profile and the load in the vehicle.
For maximum acceleration without touching the
selector, press the accelerator fully down (kick-
down). The gearbox changes down automatically
or holds the gear selected until the maximum
engine speed is reached.
When braking, the gearbox changes down
automatically to provide effective engine braking.
If you release the accelerator sharply, the
gearbox will not shift to a higher gear for safety
reasons.
Never select position N while the vehicle
is moving.
Never select positions P or R unless the
vehicle is completely stationary.
Manual operation
To limit fuel consumption during an extended standstill with the engine
running (for example, in a traffic jam), set the
gear selector to N and apply the parking
brake.
► Selecting position +/- enables sequential
shifting between the six gears.
►
T
o shift up/down through the gears, push the
control forwards/backwards.
The gearbox only changes gear if the vehicle
speed and engine speed conditions allow;
otherwise, the rules for automatic operation are
temporarily applied.
D disappears, and the gears engaged appear in
succession on the instrument panel.
If the engine speed is too low or too high, the
selected gear flashes for a few seconds, then the
gear actually engaged is shown.
It is possible to change from position D to
position +/-
at any time.
When the vehicle is stationary or moving very
slowly, the gearbox selects gear 1 automatically.
This symbol is displayed if a gear is not
engaged correctly (gear selector between
two positions).
Switching off the vehicle
Before switching off the engine, it is possible to
engage position P or N to place the gearbox in
neutral.
In both cases, apply the parking brake to
immobilise the vehicle.
If the gear selector is not in position P,
when the driver's door is opened or
approximately 45 seconds after the ignition is
switched off, an audible signal sounds and a
message appears.
►
Return the gear selector to P
; the audible
signal stops and the message disappears.
Malfunction
In the event of a malfunction, this warning
lamp comes on and a message is
displayed, when the ignition is switched on.
In this case, the gearbox goes into back-up
mode and is locked in 3
rd gear. You may feel a
significant jolt (without risk for the gearbox) while
changing from
P
to R and from N to R.
Do not exceed 62 mph (100
km/h), local speed
restrictions permitting.
Have the system checked by a PEUGEOT
dealer or a qualified workshop.
There is a risk of damaging the gearbox: – If the accelerator and brake pedals are
pressed simultaneously
.
–
In the event of a battery failure, forcing the
selector from position P
to another position.
Driving mode
Driving modes are selected using one of the
following controls, depending on version:
Page 74 of 176
72
Driving
Facing downhill, with the vehicle stationary
and reverse gear engaged, the vehicle is held
for a short time when you release the brake
pedal.
Malfunction
These warning lamps come on in the event of a malfunction,
accompanied by the display of a message.
Contact a PEUGEOT dealer or a qualified
workshop to have the system checked.
Gear shift indicator
(Depending on engine.)
System which reduces fuel consumption by
recommending the most appropriate gear.
Operation
Depending on the driving situation and
the vehicle's equipment, the system may
recommend skipping one or more gears.
Gear shift recommendations should not be
considered compulsory. The road layout, traffic
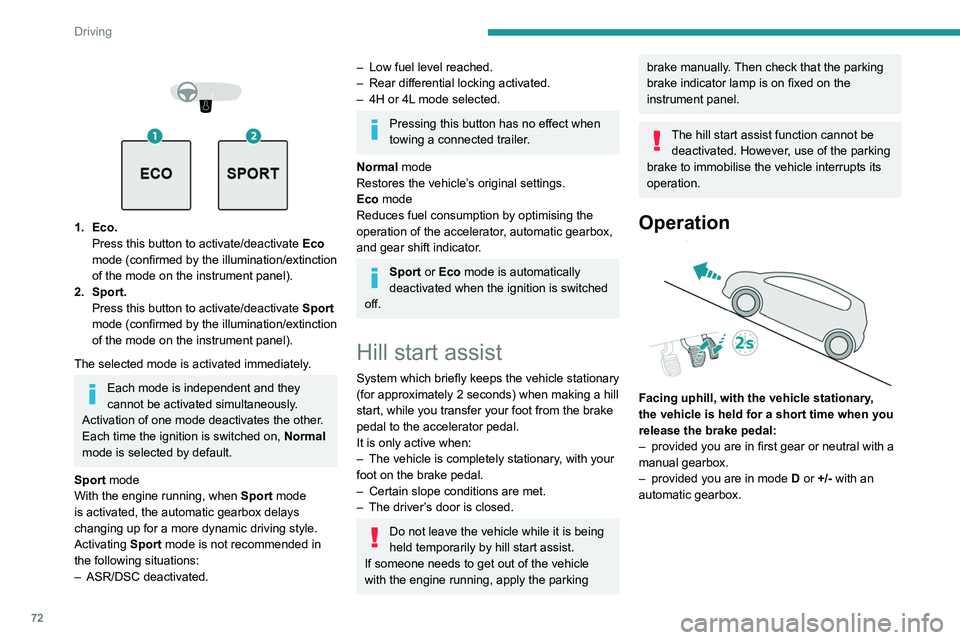
1. Eco. Press this button to activate/deactivate Eco
mode (confirmed by the illumination/extinction
of the mode on the instrument panel).
2. Sport. Press this button to activate/deactivate
Sport
mode (confirmed by the illumination/extinction
of the mode on
the instrument panel).
The selected mode is activated immediately.
Each mode is independent and they
cannot be activated simultaneously.
Activation of one mode deactivates the other.
Each time the ignition is switched on, Normal
mode is selected by default.
Sport mode
With the engine running, when
Sport
mode
is activated, the automatic gearbox delays
changing up for a more dynamic driving style.
Activating
Sport mode is not recommended in
the following situations:
–
ASR/DSC deactivated.
– Low fuel level reached.
– Rear differential locking activated.
–
4H or 4L
mode selected.
Pressing this button has no effect when
towing a connected trailer.
Normal mode
Restores the vehicle’s original settings.
Eco mode
Reduces fuel consumption by optimising the
operation of the accelerator, automatic gearbox,
and gear shift indicator.
Sport or Eco mode is automatically
deactivated when the ignition is switched
off.
Hill start assist
System which briefly keeps the vehicle stationary
(for approximately 2 seconds) when making a hill
start, while you transfer your foot from the brake
pedal to the accelerator pedal.
It is only active when:
–
The vehicle is completely stationary
, with your
foot on the brake pedal.
–
Certain slope conditions are met.
–
The driver
’s door is closed.
Do not leave the vehicle while it is being
held temporarily by hill start assist.
If someone needs to get out of the vehicle
with the engine running, apply the parking
brake manually. Then check that the parking
brake indicator lamp is on fixed on the
instrument panel.
The hill start assist function cannot be deactivated. However, use of the parking
brake to immobilise the vehicle interrupts its
operation.
Operation
Facing uphill, with the vehicle stationary,
the vehicle is held for a short time when you
release the brake pedal:
–
provided you are in first gear or neutral with a
manual gearbox.
–
provided you are in mode D
or +/- with an
automatic gearbox.
Page 104 of 176
102
Practical information
Bodywork
High-gloss paint
Do not use abrasive products, solvents,
petrol or oil to clean the bodywork.
Never use an abrasive sponge to clean
stubborn stains - risk of scratching the
paintwork!
Do not apply polish in strong sunshine, or to
plastic or rubber parts.
Use a soft cloth and soapy water or a pH
neutral product.
Gently wipe the bodywork with a clean
microfibre cloth.
Apply polish with the vehicle clean and dry.
Comply with the instructions for use stated on
the product.
Decals
(Depending on version)
Do not use a high-pressure washer to
clean the vehicle - risk of damaging or
detaching the decals!
Use a high-flow hose (temperature
between 25°C and 40°C).
Place the jet of water perpendicular to the
surface to be cleaned.
Rinse the vehicle with demineralised water.
► Install the seal on the intake manifold and fit
the throttle body B, making sure that the seal
does not fall.
For reassembly, carry out the operations in the
reverse order to those for removal. Tighten the
screws to the correct tightening torque.
Changing to free-wheeling
In certain situations, you must allow the vehicle
to free-wheel (while being towed, on a rolling
road, in an automatic car wash, or being
transported by rail or sea freight, etc.).
The procedure differs depending on the type of
gearbox and transmission.
/
To release them
► With the vehicle stationary and the engine
running, depress the brake pedal and release
the parking brake.
►
With a manual gearbox, move the gear lever
into neutral.
►
With an automatic gearbox, select position N
.
►
For 4-wheel drive vehicles (4x4), put the
transmission selector in 2H
mode.
►
Switch the ignition off.
Advice on care and maintenance
General recommendations
Observe the following recommendations to avoid
damaging the vehicle.
Exterior
Never use a high-pressure jet wash in
the engine compartment - risk of
damaging the electrical components!
Do not wash the vehicle in bright sunshine or
extremely cold conditions.
When washing the vehicle in an
automatic roller-brush car wash, be sure
to lock the doors and, depending on version,
move the electronic key away.
When using a pressure washer, hold the
lance at least 30 cm from the vehicle
(particularly when cleaning areas containing
chipped paint, sensors or seals).
Promptly clean up any stains containing
chemicals liable to damage the vehicle's
paintwork (including tree resin, bird
droppings, insect secretions, pollen and tar).
Depending on the environment, clean the
vehicle frequently to remove salty deposits
(in coastal areas), soot (in industrial areas)
and mud/salts (in wet or cold areas). These
substances can be highly corrosive.
Contact a PEUGEOT dealer or a qualified
workshop for advice on removing stubborn
stains requiring special products (such as tar
or insect removers).
Apply silicone oil to the door and window
seals every year and regularly lubricate the
door hinges and the locks.
To avoid damaging the seals when the vehicle
is parked for a long time, apply silicone-based
lubricant to the door seals and wax on the
bodywork in contact with the seals.
Preferably, have paint touch-ups performed
by a PEUGEOT dealer or a qualified
workshop.
Interior
When washing the vehicle, never use a
water hose or high-pressure jet to clean
the interior.
Liquids carried in cups or other open
containers can spill, presenting a risk of
damage to the instruments and controls and
the controls located on the centre console. Be
vigilant!
When cleaning the windows, never use glass
cleaner on the heated rear screen.
Do not use corrosive cleaning products to
clean the surface of the vehicle windows.
Clean plastic components with a damp cotton
cloth dipped in a neutral pH and non-abrasive
solution. Clean oily or difficult stains with a
solvent-free product.
Page 120 of 176
11 8
In the event of a breakdown
► Allow the engine to run for at least
30 minutes, with the vehicle stationary, so that
the battery reaches an adequate state of charge.
Driving immediately without having
reached a sufficient level of charge may
affect some of the vehicle's functionalities.
With an automatic gearbox, never try to
start the engine by pushing the vehicle.
Charging the battery using a
battery charger
For optimum service life of the battery, it is
essential to maintain an adequate state of
charge.
In some circumstances, it may be necessary to
charge the battery:
–
When using the vehicle mainly for short
journeys.
–
If the vehicle is to be taken off the road for
several weeks.
Contact a PEUGEOT
dealer or a qualified
workshop.
To charge the vehicle's battery yourself, use only a charger compatible with
lead-acid batteries with a nominal voltage of
12
V.
Follow the instructions provided by the
manufacturer of the charger.
Never reverse polarities.
It is not necessary to disconnect the
battery.
►
Switch the ignition off.
►
Switch off all electrical consumers (audio
system, lighting, wipers, etc.).
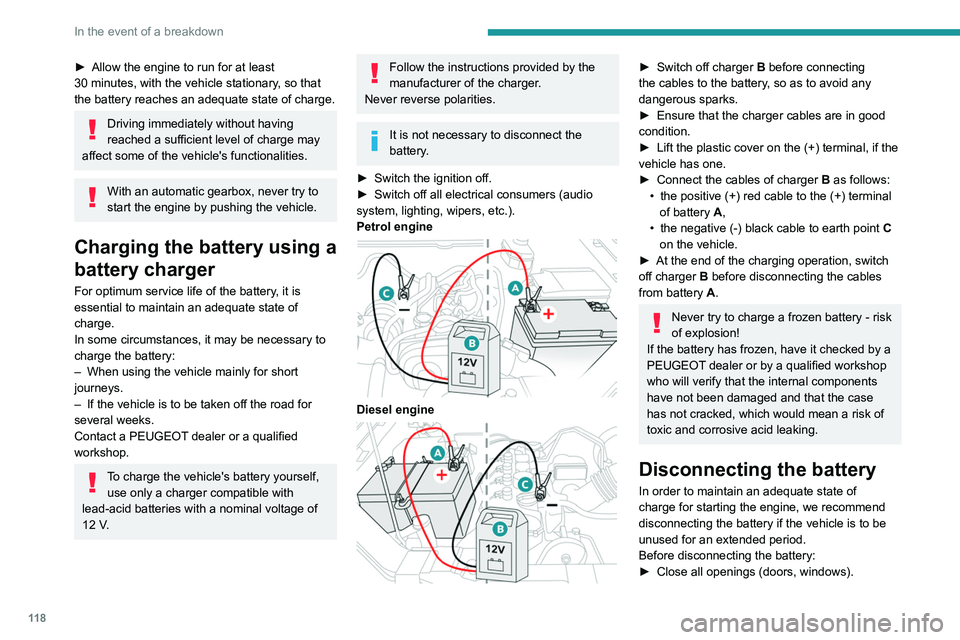
Petrol engine
Diesel engine
► Switch off charger B before connecting
the cables to the battery, so as to avoid any
dangerous sparks.
►
Ensure that the charger cables are in good
condition.
►
Lift the plastic cover on the (+) terminal, if the
vehicle has one.
►
Connect the cables of charger B
as follows:
•
the positive (+) red cable to the (+) terminal
of battery
A,
•
the negative (-) black cable to earth point C
on the vehicle.
►
At the end of the charging operation, switch
off charger B
before disconnecting the cables
from battery A.
Never try to charge a frozen battery - risk
of explosion!
If the battery has frozen, have it checked by a
PEUGEOT dealer or by a qualified workshop
who will verify that the internal components
have not been damaged and that the case
has not cracked, which would mean a risk of
toxic and corrosive acid leaking.
Disconnecting the battery
In order to maintain an adequate state of
charge for starting the engine, we recommend
disconnecting the battery if the vehicle is to be
unused for an extended period.
Before disconnecting the battery:
►
Close all openings (doors, windows).
► Switch off all electricity-consuming devices
(audio system, wipers, lamps, etc.).
► Switch off the ignition and wait for 4 minutes.
After accessing the battery, it is only necessary
to disconnect the (+) terminal.
Screwed terminal
Disconnecting the (+) terminal
► Depending on equipment, lift the plastic cover
on the (+) terminal.
► Loosen the nut A as much as possible to
unlock the clamp B.
► Remove clamp B by lifting it off.
Reconnecting the (+) terminal
► Loosen the nut A as much as possible.
► Refit the clamp B on the (+) terminal.
► Tighten the nut A to lock the clamp B.
► Depending on equipment, lower the plastic
cover on the (+) terminal.
Do not use force when tightening nut A
as the clamp may be damaged.
Page 140 of 176

138
Alphabetical index
4x4 transmission selector 67
360° camera
82
A
ABS 49
Accessories
48
Additive, Diesel
95
Adjusting headlamp beam height
44
Adjusting headlamps
44
Adjusting head restraints
25
Adjusting seat
26
Adjusting the air distribution
34
Adjusting the air flow
34
Adjusting the date
13, 136
Adjusting the height and reach of
the steering wheel
27
Adjusting the seat angle
26
Adjusting the seat belt height
53
Adjusting the temperature
34
Adjusting the time
13, 136
Advice on care and maintenance
102
Advice on driving
6, 61–62
Airbags
54–56, 58
Airbags, curtain
55–56
Airbags, front
55–56, 58
Airbags, lateral
55–56
Air conditioning
31, 33, 34
Air conditioning, automatic
35
Air conditioning, dual-zone automatic
33–35
Air conditioning, manual
32, 35
Air intake 34
Air vents
31
Alarm
22–23
Android Auto connection
136
Anti-lock braking system (ABS)
49
Antitheft / Immobiliser
17
Apple CarPlay connection
135
Area, loading
40
Armrest, front
36–37
Armrest, rear
38
Assistance, emergency braking
49
Audible warning
49
Audio streaming (Bluetooth)
129
B
Battery 98
Battery, 12 V
94, 98, 116–119
Battery, charging
11 8
Battery, remote control
20–21
Bluetooth (hands-free)
129–130, 134
Bluetooth (telephone)
134
Bodywork
103
Bonnet
90–91
Brake discs
95
Brake lamps
11 2
Brakes
95
Braking assistance system
49
Bulbs
111
Bulbs (changing)
110, 112
C
Capacity, fuel tank 88
Cap, fuel filler
88
Care of the bodywork
103
Central locking
17, 19
Changing a bulb
110, 112
Changing a fuse
113–115
Changing a wheel
105–107
Changing a wiper blade
46
Changing the engine oil
99
Changing the remote control battery
20
Checking the levels
92–94
Checks
91, 94–96
Checks, routine
94–95, 97
Child lock
60
Children
54, 59
Children (safety)
60
Child seats
54, 56–58
Child seats, ISOFIX
59
Cigar lighter
36
Cleaning (advice)
101–103
Cleaning the engine throttle housing
101
Closing the boot
18, 22
Closing the doors
18–19, 21
Configuration, vehicle
13–15
Connection, Bluetooth
130, 134
Connection, MirrorLink
136
Connectivity
135
Control, emergency door
20
Control stalk, lighting
42, 44
Control stalk, wipers
45, 47
Page 142 of 176
140
Alphabetical index
H
Hazard warning lamps 48, 104
headlamp adjustment
44
Headlamp adjustment
44
Headlamp beam height
44
Headlamps, automatic illumination
44
Headlamps, dipped beam
11 0 – 111
Headlamps, halogen
11 0 – 111
Headlamps, main beam
11 0 – 111
Head restraints, front
25
Head restraints, rear
27, 29–30
Heating
31–33, 35
Hill Assist Descent Control (HADC)
51
Hill start assist
72–73
Hooks
38
Horn
49
I
Ignition 66
Ignition on
66
Ignition switch
63–64
Immobiliser, electronic
63
Indicator, coolant temperature
11
Indicators, direction
43, 111
Inflating tyres
95, 126
Infrared camera
75
Instrument panel
7, 12, 75
ISOFIX mountings
59
J
Jack 106–107
Jump starting
11 7
K
Key 16–17, 20
Key, electronic
18–19
Keyless Entry and Starting
18, 65
Key not recognised
66
Key with remote control
16–17, 63
Kit, hands-free
129–130, 134
L
Labels, identification 125
Lamps, parking
44
Lamps, rear
11 2
Lams with Full LED technology
43
Lane Departure Warning System
(LDWS)
78, 80
Leather (care)
103
LEDs - Light-emitting diodes
43, 110, 112
Level, brake fluid
93
Level, Diesel additive
95
Level, engine coolant
11, 93
Level, engine oil
92
Level, power steering fluid
93
Levels and checks
91–94
Level, screenwash fluid 46, 94
Light-emitting diodes - LEDs
43, 110, 112
Lighting
40
Lighting, cornering
43
Lighting dimmer
12
Lighting, exterior
42
Lighting, guide-me home
45
Lighting, interior
38
Lighting, mood
12
Lighting, welcome
45
Loading
40, 90
Load restraint
40
Locating your vehicle
17
Locking
17–18
Locking from the inside
19
Locking the doors
19
Low fuel level
88
M
Maintenance 96
Maintenance (advice)
102
Maintenance, routine
75, 94, 96
Manoeuvring aids (recommendations)
74
Map reading lamps
38
Markings, identification
125
Mat
37, 75
Mirror, rear view
28
Mirrors, door
28, 35
Mirror, vanity
36
Mode, driving
71