2021 Peugeot Landtrek acc location
[x] Cancel search: acc locationPage 3 of 176

Welcome
Thank you for choosing a Peugeot Landtrek.
This document presents the key information and recommendations required
for you to be able to explore your vehicle in complete safety. We strongly
recommend familiarising yourself with this document and the Maintenance
and Warranty Guide.
003C
00470052004600580050004800510057
country in which it was sold.
The descriptions and illustrations are for guidance only.
0024005800570052005000520045004C004F004800560003
equipment and accessories without having to update this document.
If ownership of your vehicle is transferred, please ensure this Han is
passed on to the new owner.
Key
Safety warning
Additional information
Environmental protection featureLocation of equipment/button indicated using a
black area
Key
This key allows you to identify the special features of the vehicle: Double cab
Single cab
Page 6 of 176

4
Overview
Instruments and controls
These illustrations and descriptions are intended
as a guide. The presence and location of some
elements vary depending on the version or trim
level.
1.Electric windows
Central locking/unlocking
2. Side switch panel
3. Horn
Driver front airbag
4. Instrument panel
5. Front courtesy/map reading lamps
6. Glasses holder
7. Interior rear view mirror
8. Monochrome screen or touch screen
9. Heating/air conditioning controls
10. Central switch panel (lower and upper)
11 . Audio USB socket/Charger USB socket
12. Key ignition switch or button START/STOP 13.
2H, 4H and 4L transmission mode selector
14. Gearbox
15. Sport/Eco button
16. Parking brake
Cigarette lighter/12 V (120 W) accessory
socket
17. Front passenger airbag
18. Glove box
19. Deactivate front passenger airbag (on the
side of the dashboard)
Steering-mounted controls
Depending on the vehicle’s equipment, the
function and location of the controls may vary.
1.External lighting/Direction indicator controls
2. Wiper/Screenwash controls
3.Audio system settings
4. Speed limiter/Cruise control A.
Speed limiter/Cruise control pause
B. Activate Cruise control
C. Decrease/Increase Speed limiter/Cruise
control speed setting
Memorising speeds function (SET) or
reactivation of the programmed speed
function (RES)
D. V
oice recognition/Media
E. Activate Speed limiter
F. Select menus on the instrument panel and
validate
G.
Decrease/Increase volume
H. Select the instrument panel display mode
and navigate in the menus
I. Access the
Telephone menu /Answer a call
Select next media
J. Access the Telephone menu / End a call
Select previous media
Side control bar
1. Door mirror controls
Page 16 of 176

14
Instruments
Touch screen
This system gives access to the following elements:
–
Permanent
display of the time.
–
Display and reminder of air conditioning
system settings.
–
V
ehicle functions and equipment setting
menus.
–
Audio system and telephone controls and
display of related information.
–
Display of visual manoeuvring aid functions
–
Navigation system controls and
display
of related information (depending on
version).
For safety reasons, always stop the
vehicle before performing operations
that require sustained attention.
Some functions are not accessible while
driving.
Recommendations
This screen is of the capacitive type.
Do not use pointed objects on the touch screen.
Do not touch the touch screen with wet hands.
Use a soft, clean cloth to clean the touch screen.
Principles
Use the buttons indicated on the touch screen to
access the various menus.
* Depending on equipment.
After a few moments with no action on the second page, the first page is
displayed automatically.
To deactivate/activate a function, press the slider
that appears opposite the function. The slider
changes to orange to indicate that the function
is activated.
Return to the menu page.
Menus
It is possible to modify the appearance of
the touch screen by selecting a different
background and display mode ( Classic,
Sport or Technology ). Depending on the
selected mode, the menus can be displayed
in various locations and in different ways.
For more information on changing the
appearance of the touch screen, refer to the
Audio equipment and telematics section.
Example with the " Classic” display mode.
Media
Refer to the “Audio equipment and
telematics” section.
Radio
Refer to the “Audio equipment and
telematics” section.
Navigation*
Refer to the “Audio equipment and
telematics” section.
Telephone
Refer to the “Audio equipment and
telematics” section.
Settings
Main system settings.
Vehicle settings
Activation, deactivation and settings for
certain functions.
File
Direct access to system content or USB
content.
Help
Page 94 of 176
92
Practical information
Oil grade
Before topping up or changing the
engine oil, check that the oil is suitable
for your engine and complies with the
recommendations in the service schedule
supplied with the vehicle (or available
from your PEUGEOT dealer or qualified
workshop).
Use of non-recommended oil may invalidate
your warranty in the event of engine failure.
Topping up the engine oil level
For the location of the engine oil filler cap, please
refer to the corresponding engine compartment
illustration.
Never remove the oil filler cap with the
engine running. Risk of burns and
splashes inside the engine compartment.
► Add oil in small quantities, avoiding any spills
on engine components (risk of fire).
► Wait a few minutes before checking the level
again using the dipstick.
► Top up the level if necessary.
► After checking the level, carefully screw the
oil filler cap back on and replace the dipstick in
its tube.
Brake fluid
�� ������ ��
The level of this fluid should be close to
the "MAX" mark. If not, check the brake
pad wear.
12. Fuel filter*
The Diesel fuel system operates under
very high pressure.
All work on this circuit must be carried out
only by a PEUGEOT dealer or a qualified
workshop.
Checking levels
Check all of the following levels regularly in
accordance with the manufacturer's service
schedule. Top them up if required, unless
otherwise indicated.
If a level drops significantly, have the
corresponding system checked by a PEUGEOT
dealer or a qualified workshop.
The fluids must comply with the manufacturer's requirements and with
the vehicle's engine.
Take care when working under the bonnet, as certain areas of the engine
may be extremely hot (risk of burns) and the
cooling fan could start at any time (even with
the ignition off).
Used products
Avoid prolonged contact of used oil or fluids with the skin.
Most of these fluids are harmful to health and
very corrosive.
Do not discard used oil or fluids into
sewers or onto the ground.
Empty used oil into the containers reserved
for this purpose at a PEUGEOT dealer or a
qualified workshop.
Engine oil
The level is checked, with the engine having been switched off for at least 30
minutes and on level ground, using the dipstick.
It is normal to top up the oil level between two
services (or oil changes). It is recommended
that you check the level, and top up if necessary,
every 3,000 miles (5,000 km).
In order to maintain the reliability of the
engine and emissions control system,
never use additives in the engine oil.
Checking using the dipstick
For the location of the dipstick, please refer
to the illustration of the corresponding engine
compartment.
►
Grasp the dipstick by its coloured grip and
pull it out completely
.
► Wipe the end of the dipstick using a clean,
lint-free cloth.
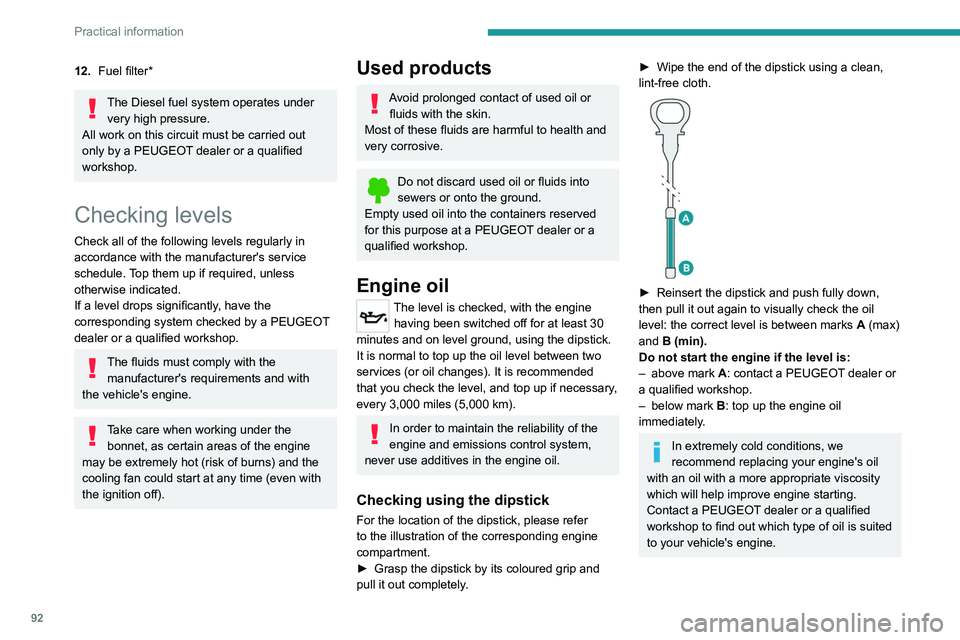
► Reinsert the dipstick and push fully down,
then pull it out again to visually check the oil
level: the correct level is between marks A
(max)
and B (min).
Do not start the engine if the level is:
–
above mark
A: contact a PEUGEOT dealer or
a qualified workshop.
–
below mark B
: top up the engine oil
immediately.
In extremely cold conditions, we
recommend replacing your engine's oil
with an oil with a more appropriate viscosity
which will help improve engine starting.
Contact a PEUGEOT dealer or a qualified
workshop to find out which type of oil is suited
to your vehicle's engine.
Page 96 of 176
94
Practical information
Particle filter (Diesel)
(Depending on version)The start of clogging of the particle filter is indicated by the temporary lighting of this
warning lamp, accompanied by an alert
message.
As soon as the traffic conditions permit,
regenerate the filter by driving at a speed of at
least 37 mph (60 km/h) until the warning lamp
goes off.
If the warning lamp stays on, this
indicates a low Diesel additive level.
For more information on Checking levels,
refer to the corresponding section.
Following prolonged operation of the
vehicle at very low speed or at idle, you
may, in exceptional circumstances, notice
water vapour coming from the exhaust while
accelerating. These emissions have no
impact on the vehicle’s behaviour and the
environment.
New vehicle
During the first few particle filter
regeneration operations, you may notice a
"burning" smell. This is perfectly normal.
Manual gearbox
The gearbox does not require any maintenance (no oil change).
Screenwash fluid
Top up to the required level when necessary.
Tank capacity: 3 litres.
Fluid specification
The fluid must be topped up with a pre-mixed
product.
In winter (temperatures below zero), a fluid
containing an anti-freeze agent which is
appropriate for the temperature conditions
must be used in order to protect the system's
components (pump, tank, ducts, jets).
Filling with pure water is prohibited in all
circumstances (risk of freezing,
limescale, etc.).
Checks
Unless otherwise indicated, check these
components in accordance with the
manufacturer's service schedule and according
to your engine.
Otherwise, have them checked by a PEUGEOT
dealer or a qualified workshop.
Only use products recommended by
PEUGEOT or products of equivalent
quality and specification.
In order to optimise the operation of
components as important as those in the
braking system, PEUGEOT selects and offers
very specific products.
12 V battery
The battery does not require any maintenance.
Check regularly that the terminals are correctly
tightened (versions without quick-release
terminals) and that the connections are clean.
For more information on the precautions
to take before any work on the 12 V
battery, refer to the corresponding section.
Passenger compartment
filter
Depending on the environment and the
use of the vehicle (e.g. dusty atmosphere,
city driving), change it twice as often, if
necessary .
A clogged passenger compartment filter
can adversely affect air conditioning
system performance and generate
undesirable odours.
Air filter
Depending on the environment and the
use of the vehicle (e.g. dusty atmosphere,
city driving), change it twice as often, if
necessary .
Oil filter
Change the oil filter each time the engine
oil is changed.
Diesel fuel filter
Change the Diesel fuel filter according to
the schedule of operations in the
manufacturer's service schedule.
A clogged Diesel fuel filter can reduce engine performance and damage the
injection system.
Bleeding water from the Diesel fuel
filter
If this warning lamp comes on, bleed the
filter. Otherwise, bleed regularly at each
engine oil change.
–
T
o drain the water, unscrew the bleed screw
located under the filter.
–
Operate it until all the water in the transparent
tube has drained, then tighten the bleed screw
again.
For more information on the Engine
compartment, in particular the location
of the Diesel fuel filter, refer to the
corresponding section.
Page 98 of 176
96
Practical information
When the wear indicators no longer appear set
back from the tread, the depth of the grooves is
less than 1.6 mm; replace the tyres as soon as
possible.
Regularly remove foreign bodies trapped in the
tyre tread.
Using different size wheels and tyres from those
specified can affect the lifetime of tyres, wheel
rotation, ground clearance, the speedometer
reading and have an adverse effect on road
holding.
Fitting different tyres on the front and rear axles
can cause the ESC to mistime.
Fitting winter tyres to only one axle could cause
you to lose control of the vehicle. Fitting winter
tyres to both axles is recommended.
Always mark the direction of rotation on the tyres
that will be stored when fitting winter or summer
tyres. Store them in a cool, dry place and away
from direct exposure to the sun's rays.
Winter or 4-seasons tyres can be
identified by this symbol on their
sidewalls.
Tyres older than 6 years should always be replaced, even if no damage or wear
has been found.
When a rim is warped, cracked or corroded,
it is essential to replace it as it may cause the
tyre to come off. Do not use a wheel with a
rim that has been damaged (even if has been
straightened out).
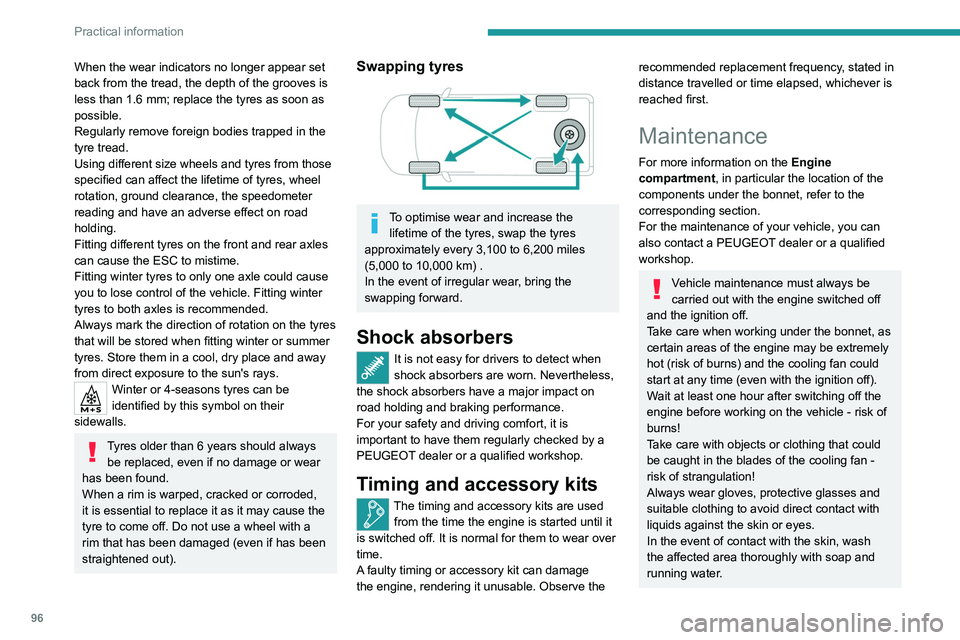
Swapping tyres
To optimise wear and increase the lifetime of the tyres, swap the tyres
approximately every 3,100 to 6,200 miles
(5,000 to 10,000 km) .
In the event of irregular wear, bring the
swapping forward.
Shock absorbers
It is not easy for drivers to detect when
shock absorbers are worn. Nevertheless,
the shock absorbers have a major impact on
road holding and braking performance.
For your safety and driving comfort, it is
important to have them regularly checked by a
PEUGEOT dealer or a qualified workshop.
Timing and accessory kits
The timing and accessory kits are used
from the time the engine is started until it
is switched off. It is normal for them to wear over
time.
A
faulty timing or accessory kit can damage
the engine, rendering it unusable. Observe the
recommended replacement frequency, stated in
distance travelled or time elapsed, whichever is
reached first.
Maintenance
For more information on the Engine
compartment, in particular the location of the
components under the bonnet, refer to the
corresponding section.
For the maintenance of your vehicle, you can
also contact a PEUGEOT dealer or a qualified
workshop.
Vehicle maintenance must always be
carried out with the engine switched off
and the ignition off.
Take care when working under the bonnet, as
certain areas of the engine may be extremely
hot (risk of burns) and the cooling fan could
start at any time (even with the ignition off).
Wait at least one hour after switching off the
engine before working on the vehicle - risk of
burns!
Take care with objects or clothing that could
be caught in the blades of the cooling fan -
risk of strangulation!
Always wear gloves, protective glasses and
suitable clothing to avoid direct contact with
liquids against the skin or eyes.
In the event of contact with the skin, wash
the affected area thoroughly with soap and
running water.
Page 106 of 176
104
In the event of a breakdown
Warning triangle
As a safety precaution, before leaving your
vehicle to set up and install the triangle, switch
on the hazard warning lamps and put on your
high visibility vest.
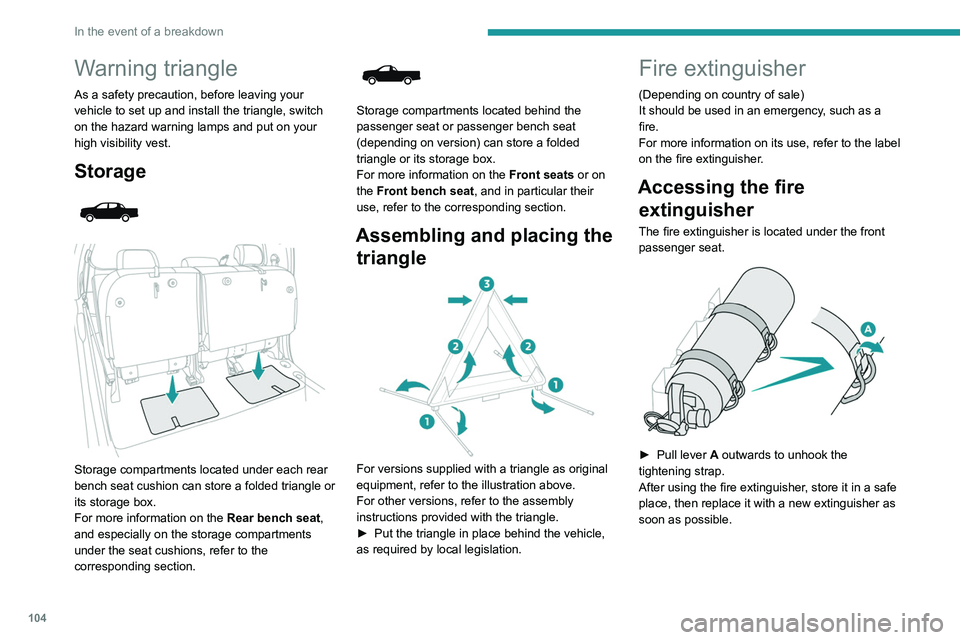
Storage
Storage compartments located under each rear
bench seat cushion can store a folded triangle or
its storage box.
For more information on the Rear bench seat,
and especially on the storage compartments
under the seat cushions, refer to the
corresponding section.
Storage compartments located behind the
passenger seat or passenger bench seat
(depending on version) can store a folded
triangle or its storage box.
For more information on the Front seats or on
the Front bench seat, and in particular their
use, refer to the corresponding section.
Assembling and placing the triangle
For versions supplied with a triangle as original
equipment, refer to the illustration above.
For other versions, refer to the assembly
instructions provided with the triangle.
►
Put the triangle in place behind the vehicle,
as required by local legislation.
Fire extinguisher
(Depending on country of sale)
It should be used in an emergency, such as a
fire.
For more information on its use, refer to the label
on the fire extinguisher.
Accessing the fire extinguisher
The fire extinguisher is located under the front
passenger seat.
► Pull lever A outwards to unhook the
tightening strap.
After using the fire extinguisher, store it in a safe
place, then replace it with a new extinguisher as
soon as possible.
Never keep a fire extinguisher that has
already been used or that does not bear
its seal.
When the fire extinguisher is not used, attach
it to its support. There is a risk of movement
in the event of sudden braking or an accident.
The fire extinguisher must be replaced
approximately every 5 years; the expiry date
is written on its label.
Contact a PEUGEOT dealer or a
qualified workshop to replace the fire
extinguisher with one that has the same
specifications as the original.
Running out of fuel
(Diesel)
With Diesel engines, the fuel system must be
primed if you run out of fuel.
Before starting to prime the system, it is
essential to put at least 5 litres of Diesel into the
fuel tank.
For more information on Refuelling and
on the Engine compartment (in
particular the location of the priming pump),
refer to the corresponding section.
► Open the bonnet.
► Loosen the degassing bolt about 2 to 3 turns.
Page 107 of 176
105
In the event of a breakdown
8Never keep a fire extinguisher that has
already been used or that does not bear
its seal.
When the fire extinguisher is not used, attach
it to its support. There is a risk of movement
in the event of sudden braking or an accident.
The fire extinguisher must be replaced
approximately every 5 years; the expiry date
is written on its label.
Contact a PEUGEOT dealer or a
qualified workshop to replace the fire
extinguisher with one that has the same
specifications as the original.
Running out of fuel
(Diesel)
With Diesel engines, the fuel system must be
primed if you run out of fuel.
Before starting to prime the system, it is
essential to put at least 5 litres of Diesel into the
fuel tank.
For more information on Refuelling and
on the Engine compartment (in
particular the location of the priming pump),
refer to the corresponding section.
►
Open the bonnet.
►
Loosen the degassing bolt about 2 to 3 turns.
► Activate the priming pump until fuel
(without air) appears through the
degassing bolt.
►
Retighten the degassing bolt.
►
Operate the starter motor until the engine
starts (if the engine does not start at the first
attempt, wait around 15 seconds before trying
again).
►
If the engine does not start after a few
attempts, operate the priming pump again, then
start the engine.
►
Close the bonnet.
Tool kit
Set of tools supplied with the vehicle.
Accessing the tools
Depending on version, the tools are stored under
the rear passenger seat cushion or behind the
front passenger seat or bench seat.
To access the tools under the rear passenger
seat:
►
Open the rear passenger door
.
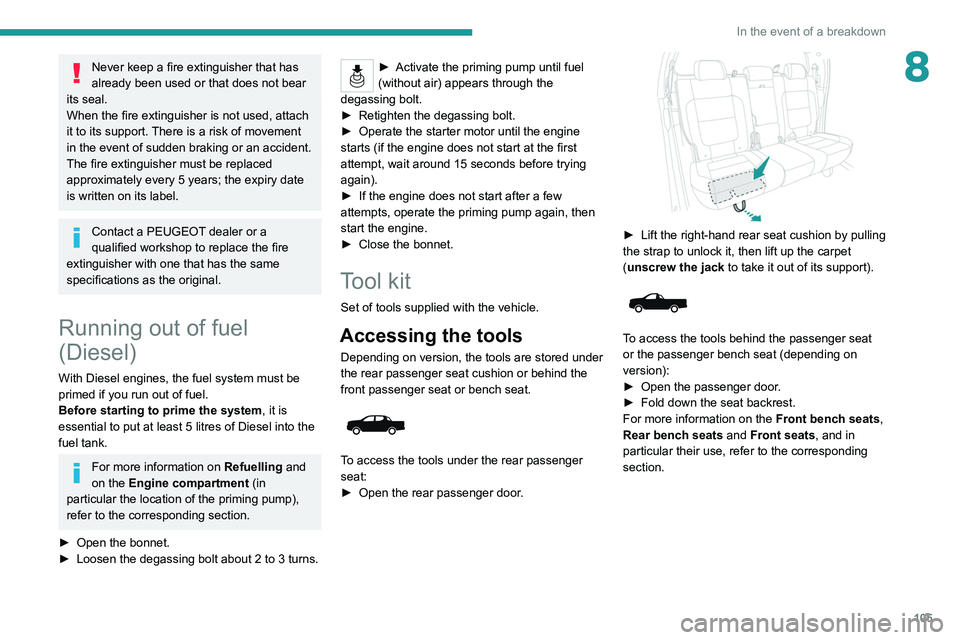
► Lift the right-hand rear seat cushion by pulling
the strap to unlock it, then lift up the carpet
(
unscrew the jack to take it out of its support).
To access the tools behind the passenger seat
or the passenger bench seat (depending on
version):
►
Open the passenger door
.
►
Fold down the seat backrest.
For more information on the Front bench seats
,
Rear bench seats and Front seats, and in
particular their use, refer to the corresponding
section.