2021 PEUGEOT BOXER tow
[x] Cancel search: towPage 56 of 212
54
Lighting and visibility
Headlamp beam height
adjustment
To avoid inconvenience to other road users,
the height of the halogen headlamps should be
adjusted according to the load in the vehicle.
This function can be accessed in dipped beam
and main beam headlamp positions.
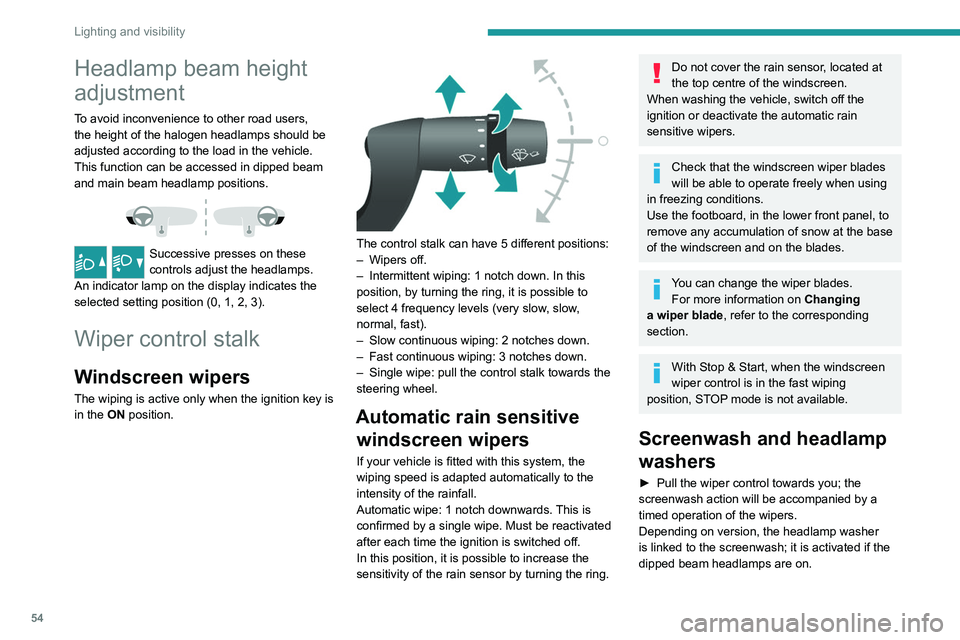
Successive presses on these
controls adjust the headlamps.
An indicator lamp on the display indicates the
selected setting position (0, 1, 2, 3).
Wiper control stalk
Windscreen wipers
The wiping is active only when the ignition key is
in the ON position.
The control stalk can have 5 different positions:
– Wipers off.
–
Intermittent wiping: 1 notch down. In this
position, by turning the ring, it is possible to
select 4 frequency levels (very slow
, slow,
normal, fast).
–
Slow continuous wiping: 2 notches down.
–
Fast continuous wiping: 3 notches down.
–
Single wipe: pull the control stalk towards the
steering wheel.
Automatic rain sensitive windscreen wipers
If your vehicle is fitted with this system, the
wiping speed is adapted automatically to the
intensity of the rainfall.
Automatic wipe: 1 notch downwards. This is
confirmed by a single wipe. Must be reactivated
after each time the ignition is switched off.
In this position, it is possible to increase the
sensitivity of the rain sensor by turning the ring.
Do not cover the rain sensor, located at
the top centre of the windscreen.
When washing the vehicle, switch off the
ignition or deactivate the automatic rain
sensitive wipers.
Check that the windscreen wiper blades
will be able to operate freely when using
in freezing conditions.
Use the footboard, in the lower front panel, to
remove any accumulation of snow
at the base
of the windscreen and on the blades.
You can change the wiper blades. For more information on Changing
a wiper blade , refer to the corresponding
section.
With Stop & Start, when the windscreen
wiper control is in the fast wiping
position, STOP mode is not available.
Screenwash and headlamp
washers
► Pull the wiper control towards you; the
screenwash action will be accompanied by a
timed operation of the wipers.
Depending on version, the headlamp washer
is linked to the screenwash; it is activated if the
dipped beam headlamps are on.
Page 59 of 212
57
Safety
5Pedestrian horn (Electric)
This system alerts pedestrians that the vehicle is approaching.
The pedestrian horn operates once the vehicle
is moving and at speeds of up to 25 mph
(40
km/h), in forward or reverse gear.
This function cannot be deactivated.
Electronic stability control
(ESC)
Electronic stability control (ESC: Electronic
Stability Control) integrating the following
systems:
–
anti-lock braking system (ABS) and electronic
brake force distribution (EBFD),
–
emergency braking assistance (EBA),
–
wheel anti-slip regulation (ASR) or traction
control,
–
dynamic stability control (DSC).
Definitions
Anti-lock braking system (ABS) and Electronic brake force distribution
(EBFD)
This system improves the stability and handling
of your vehicle when braking and contributes
towards improved control on bends, in particular
on poor or slippery road surfaces. ABS prevents wheel locking in the event of
emergency braking.
EBFD manages the braking pressure wheel by
wheel.
Emergency braking assistance (EBA)
In an emergency, this system enables you
to reach the optimum braking pressure more
quickly and therefore reduce the stopping
distance.
It is triggered in relation to the speed at which
the brake pedal is depressed. The effect of this
is a reduction in the resistance of the pedal and
an increase in braking efficiency.
Anti-slip regulation (ASR)
The ASR system (also known as Traction
Control) optimises traction in order to limit
wheel slip, by acting on the brakes of the driving
wheels and on the engine. It also improves the
directional stability of the vehicle on acceleration.
Dynamic stability control (DSC)
If there is a difference between the path followed
by the vehicle and that required by the driver, the
DSC monitors each wheel and automatically acts
on the brake of one or more wheels and on the
engine to return the vehicle to the required path,
within the limits of the laws of physics.
Anti-lock braking system
(ABS) and electronic brake
force distribution (EBFD)
When this warning lamp comes on,
accompanied by a message on the
instrument panel display screen, it indicates that
there is a fault with the ABS, which could cause
loss of control of the vehicle when braking.
When these warning lamps come
on, accompanied by a message on
the instrument panel display screen, they
indicate that there is a fault with the electronic
brake force distribution (EBFD), which could
cause loss of control of the vehicle when
braking.
You must stop as soon as it is safe to do so.
Contact a PEUGEOT dealer or a qualified
workshop.
For maximum efficiency of the braking
system, a period of adjustment of
approximately 310 miles (500 km) is
necessary. During this period, it is advisable
to avoid abrupt, repeated and prolonged
braking.
The anti-lock device does not allow for shorter braking. On a very slippery road
Page 64 of 212
62
Safety
The upper part must be positioned in the
hollow of the shoulder.
At the front, adjusting the position of the
seat belt may require the seat height to be
adjusted.
In order to be effective, a seat belt must:
–
be tightened as close to the body as
possible.
–
be pulled in front of you with a smooth
movement, checking that it is not twisted.
–
must only be used to secure one person.
–
not show signs of tearing or fraying.
–
not be changed or modified, in order to
avoid affecting its performance.
Recommendations for children
Use a suitable child seat if the passenger
is less than 12 years old or shorter than 1.5
metres.
Never use the same seat belt to secure more
than one child.
Never carry a child on your lap.
For more information on Child seats, refer to
the corresponding section.
Maintenance
In accordance with current safety
regulations, for all work on your vehicle's
seat belts, contact a qualified workshop with
the skills and equipment needed, which a
PEUGEOT
dealer is able to provide.
Have the seat belts checked regularly by a
PEUGEOT dealer or a qualified workshop,
particularly if the straps show signs of
damage.
Clean the seat belt straps with soapy water or
a textile cleaning product, sold by PEUGEOT
dealers.
Airbags
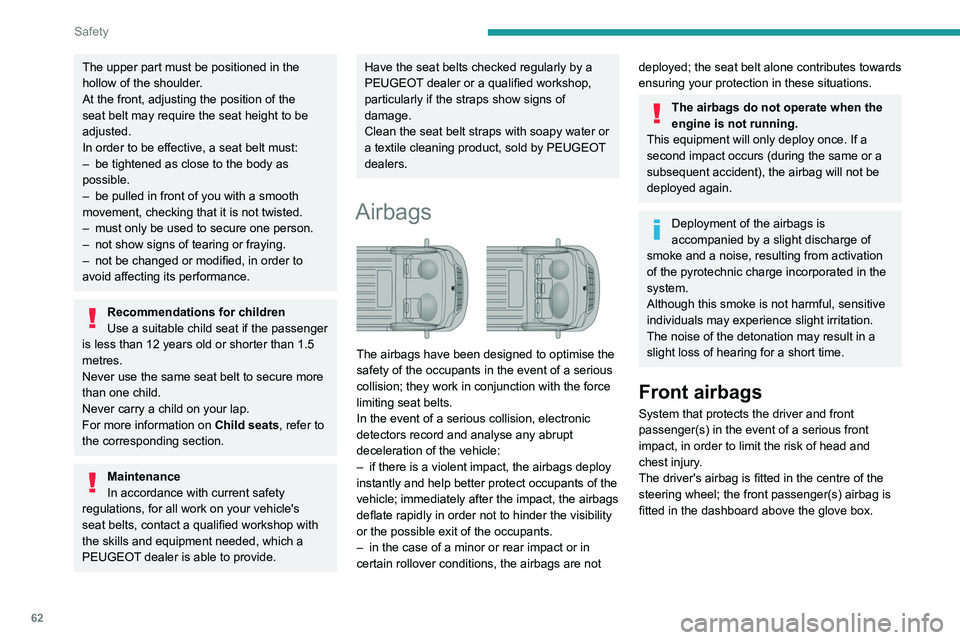
The airbags have been designed to optimise the
safety of the occupants in the event of a serious
collision; they work in conjunction with the force
limiting seat belts.
In the event of a serious collision, electronic
detectors record and analyse any abrupt
deceleration of the vehicle:
–
if there is a violent impact, the airbags deploy
instantly and help better protect occupants of the
vehicle; immediately after the impact, the airbags
deflate rapidly in order not to hinder the visibility
or the possible exit of the occupants.
–
in the case of a minor or rear impact or in
certain rollover conditions, the airbags are not
deployed; the seat belt alone contributes towards
ensuring your protection in these situations.
The airbags do not operate when the
engine is not running.
This equipment will only deploy once. If a
second impact occurs (during the same or a
subsequent accident), the airbag will not be
deployed again.
Deployment of the airbags is
accompanied by a slight discharge of
smoke and a noise, resulting from activation
of the pyrotechnic charge incorporated in the
system.
Although this smoke is not harmful, sensitive
individuals may experience slight irritation.
The noise of the detonation may result in a
slight loss of hearing for a short time.
Front airbags
System that protects the driver and front
passenger(s) in the event of a serious front
impact, in order to limit the risk of head and
chest injury.
The driver's airbag is fitted in the centre of the
steering wheel; the front passenger(s) airbag is
fitted in the dashboard above the glove box.
Page 69 of 212
67
Safety
5
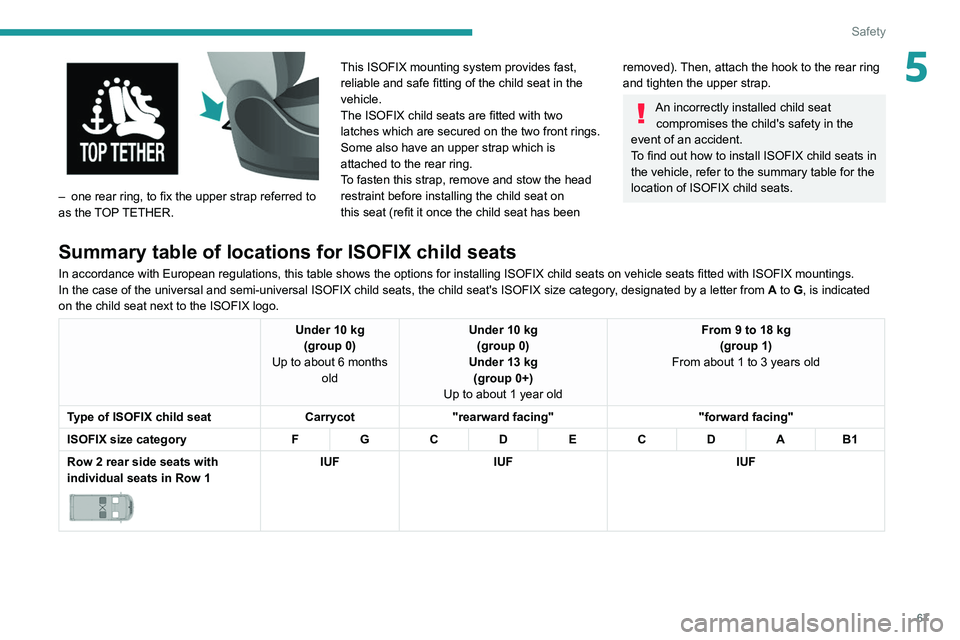
– one rear ring, to fix the upper strap referred to
as the TOP TETHER. This ISOFIX mounting system provides fast,
reliable and safe fitting of the child seat in the
vehicle.
The ISOFIX child seats are fitted with two
latches which are secured on the two front rings.
Some also have an upper strap which is
attached to the rear ring.
To fasten this strap, remove and stow the head
restraint before installing the child seat on
this seat (refit it once the child seat has been
removed). Then, attach the hook to the rear ring
and tighten the upper strap.
An incorrectly installed child seat
compromises the child's safety in the
event of an accident.
To find out how to install ISOFIX child seats in
the vehicle, refer to the summary table for the
location of ISOFIX child seats.
Summary table of locations for ISOFIX child seats
In accordance with European regulations, this table shows the options for installing ISOFIX child seats on vehicle seats fitted with ISOFIX mountings.
In the case of the universal and semi-universal ISOFIX child seats, the child seat's ISOFIX size category , designated by a letter from A to G, is indicated
on the child seat next to the ISOFIX logo.
Under 10 kg (group 0)
Up to about 6 months old Under 10 kg
(group 0)
Under 13 kg (group 0+)
Up to about 1 year old From 9 to 18 kg
(group 1)
From about 1 to 3 years old
Type of ISOFIX child seat Carrycot"rearward facing" "forward facing"
ISOFIX size category FG C DEC DA B1
Row 2 rear side seats with
individual seats in Row 1
IUF IUF IUF
Page 72 of 212

70
Driving
A load that is not properly secured inside the
vehicle may affect vehicle handling and create a
risk of accident.
If your vehicle is fitted with a drop-side back, the
height and width of the load must remain within
the overall dimensions of the vehicle.
Drive the vehicle in a prudent and efficient
way
Take corners gently.
Anticipate the need to brake as the stopping
distance is increased, particularly on wet or icy
roads.
Be aware of the effect of side winds on the
vehicle.
Effective eco-driving allows you to save energy;
accelerate gradually, anticipate the need to slow
down and adapt your speed to suit the situation.
Indicate changes of direction well in advance so
that you are seen by other road users.
Take care
The tyres must be inflated to at least the
pressures indicated on the label, even over-
inflated by 0.2 to 0.3 bar for long journeys.
On flooded roads
We strongly advise against driving on flooded
roads, as this could cause serious damage to the
engine or gearbox, as well as to your vehicle's
electrical systems.
If the vehicle absolutely must drive through a
flooded section of road:
►
Check that the depth of the water does not
exceed 15
cm, taking account of waves that
might be generated by other users.
►
Deactivate the Stop & Start function.
►
Drive as slowly as possible without stalling. In
all cases, do not exceed 6 mph (10
km/h).
►
Do not stop and do not switch off the engine.
On leaving the flooded road, as soon as safety
conditions allow
, make several light brake
applications to dry the brake discs and pads.
If in doubt about the state of your vehicle,
contact a PEUGEOT dealer or a qualified
workshop.
Noise (Electric)
On the outside
Due to the vehicle’s quiet operation when
driving, the driver must pay particular attention.
When manoeuvring, the driver must always
check the vehicle's immediate surroundings.
At speeds of up to 25 mph (40 km/h), the
pedestrian horn warns other road users of the
vehicle’s presence.
Cooling the traction battery
The cooling fan comes on during
charging to cool the on-board charger.
On the inside
During use, you may hear certain perfectly
normal noises specific to electric vehicles, such
as:
–
T
raction battery relay when starting.
–
V
acuum pump when braking.
–
V
ehicle tyres or aerodynamics when driving.
–
Jolting and knocking noise during hill starts.
Towing
Driving with a trailer places greater
demands on the towing vehicle and
particular care must be taken.
Do not exceed the maximum towable
weights.
At altitude: reduce the maximum load by
10% per 1,000 metres of altitude; the lower
air density at high altitudes decreases engine
performance.
New vehicle: do not tow a trailer until the
vehicle has driven at least 620 miles
(1,000 kilometres).
Page 73 of 212

71
Driving
6If the outside temperature is high, let the
engine idle for 1 to 2 minutes after the
vehicle comes to a stop, to help it to cool.
Before setting off
Nose weight
► Distribute the load in the trailer so that the
heaviest items are located as close as possible
to the axle, and the nose weight (at the point
where it joins your vehicle) approaches the
maximum permitted, without exceeding it.
Tyres
► Check the tyre pressures of the towing
vehicle and of the trailer , observing the
recommended pressures.
Lighting
► Check the electrical signalling on the trailer
and the headlamp beam height of your vehicle.
If a genuine PEUGEOT towing device is
used, the rear parking sensors will be
deactivated automatically to avoid activating
the audible signal.
When driving
Cooling
Towing a trailer uphill causes the coolant
temperature to increase. The maximum towable
load depends on the gradient and the exterior temperature. The fan’s cooling capacity does not
increase with engine speed.
►
Reduce speed and lower the engine speed to
limit the amount of heating produced.
►
Pay constant attention to the coolant
temperature.
If this warning lamp and the STOP
warning lamp come on, stop the vehicle
and switch off the engine as soon as possible.
Brakes
Using the engine brake is recommended to limit
the overheating of the brakes. Braking distances
are increased when towing a trailer.
Side wind
Bear in mind that the vehicle will be more
susceptible to wind when towing.
Anti-theft protection
Electronic immobiliser
The keys contain an electronic immobiliser
device.
This device locks the engine supply system. It
activates automatically when the key is removed
from the ignition.
When the ignition switch is turned on, a dialogue
is set up between the key and the electronic
immobiliser.
This warning lamp goes off after the key has been recognised, the ignition is
switched on and the engine can be started.
If the key is not recognised, the engine
cannot be started. Use another key and
have the faulty key checked by a PEUGEOT
dealer.
Carefully note the key number. In case of
loss, the intervention of a PEUGEOT
dealer will be faster and more efficient if you
provide this number and the confidential card.
Do not make any modifications to the
electronic immobiliser system.
Operating the remote control, even in your
pocket, may cause the doors to be unlocked
accidentally.
The simultaneous use of other high-frequency
devices (mobile phones, home alarms, etc.),
may temporarily disturb the operation of the
remote control.
Except for reinitialisation, the remote control
cannot operate while the key is in the ignition
switch, even when the ignition is off.
Driving with the doors locked could make
it more difficult for the emergency
services to enter the vehicle in an emergency.
As a safety precaution (with children on
board), remove the key from the ignition when
leaving the vehicle, even for a short time.
Page 76 of 212

74
Driving
Parking brake
Application
► Apply the parking brake to immobilise the
vehicle.
►
Check that the parking brake is correctly
applied before leaving the vehicle.
Apply the parking brake only when the
vehicle is stationary.
When parking on a slope, turn your
wheels towards the kerb and pull the
parking brake lever up.
There is no advantage in engaging a gear
after parking the vehicle, particularly if the
vehicle is loaded.
In the event of a failure of the
hydraulic braking system
While driving , to avoid any accidental
movement of the vehicle, use the parking
brake while depressing the brake pedal.
In this exceptional circumstance, it is
advisable to pull the parking brake up gently
so as not to block the rear wheels - risk of
skidding!
Release
► Pull the lever up gently and press the button
to release the parking brake.
When the vehicle is being driven, this
warning lamp coming on indicates that
the parking brake is still applied or has not been
fully released.
Manual gearbox
To change gear easily, always fully depress the
clutch pedal.
To prevent the mat from becoming caught under
the pedal:
–
ensure that the mat is positioned correctly
,
–
never fit one mat on top of another
.
Avoid leaving your hand on the gear knob as
the force exerted, even if slight, may wear the
internal components of the gearbox over time.
Engaging reverse gear
► Lift the ring under the knob to engage reverse
gear .
Never engage it until the vehicle has
come to a complete stop.
The movement must be done slowly to reduce
the noise when engaging reverse gear.
If fitted to the vehicle, the parking
sensors are activated when reverse gear
is engaged; an audible signal sounds.
For more information on the Parking
sensors, refer to the corresponding section.
Page 87 of 212
85
Driving
6Cruise control - Specific
recommendations
The cruise control function does not guarantee compliance with the maximum
authorised speed and the safety distance
between vehicles, the driver remains
responsible for their driving.
In the interest of public safety, only use cruise
control if the traffic conditions enable vehicles
to drive at a steady speed and maintain an
adequate safety distance.
Remain vigilant while cruise control is
activated. If you press and hold one of the
speed setting modification buttons, your
vehicle may change speed very abruptly.
When descending a steep hill , the cruise
control system cannot prevent the vehicle
from exceeding the set speed. Brake if
necessary to control the vehicle speed.
On steep climbs or when towing, the set
speed may not be reached or maintained.
Exceeding the programmed speed
setting
You can temporarily exceed the speed
setting by pressing the accelerator pedal (the
programmed speed flashes).
To return to the speed setting, release the
accelerator pedal (when the set speed is
reached again, the displayed speed stops
flashing).
Operating limits
Never use the system in the following
situations:
–
In an urban area with the risk of
pedestrians crossing the road.
–
In heavy traffic.
–
On winding or steep roads.
–
On slippery or flooded roads.
–
In poor weather conditions.
–
In the event of restricted visibility for the
driver
.
–
Driving on a speed circuit.
–
Driving on a rolling road.
–
When using a ‘space-saver
’ type spare
wheel.
–
When using snow chains, non-slip covers
or studded tyres.
Cruise control
For more information, refer to the
General recommendations on the use
of driving and manoeuvring aids and the
Cruise control - particular
recommendations.
System which automatically maintains the
speed of the vehicle at the cruise setting
programmed by the driver, without using the
accelerator pedal. To be programmed or activated, the speed of the
vehicle must be above 19 mph (30 km/h), with at
least 2
nd gear engaged.
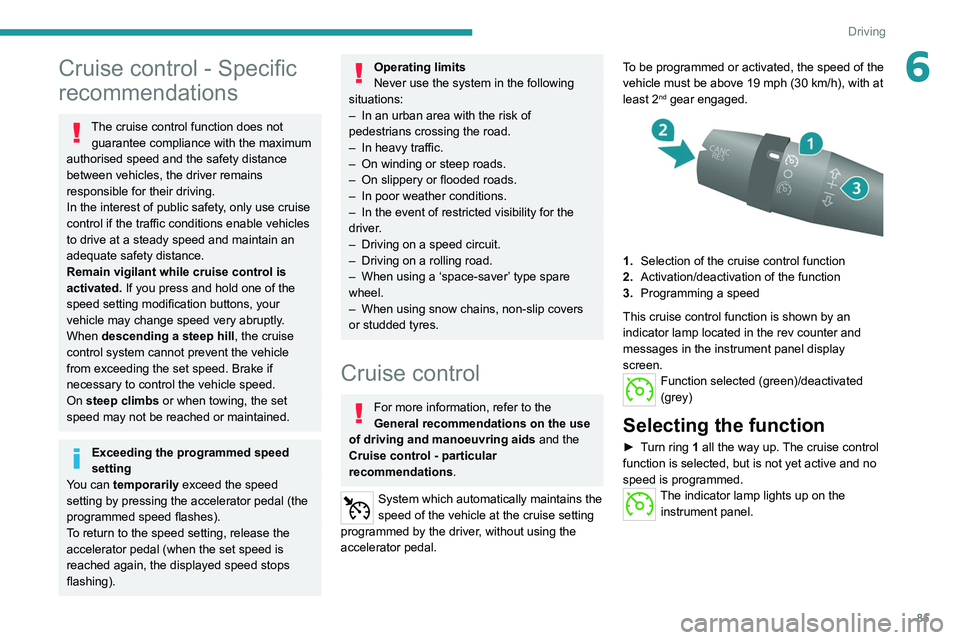
1.
Selection of the cruise control function
2. Activation/deactivation of the function
3. Programming a speed
This cruise control function is shown by an
indicator lamp located in the rev counter and
messages in the instrument panel display
screen.
Function selected (green)/deactivated
(grey)
Selecting the function
► Turn ring 1 all the way up. The cruise control
function is selected, but is not yet active and no
speed is programmed.
The indicator lamp lights up on the instrument panel.