2021 PEUGEOT BOXER tyre pressure
[x] Cancel search: tyre pressurePage 120 of 212
11 8
In the event of a breakdown
Temporary puncture repair kit
This temporary puncture repair kit is stored in a
bag, placed in one of the front doors.
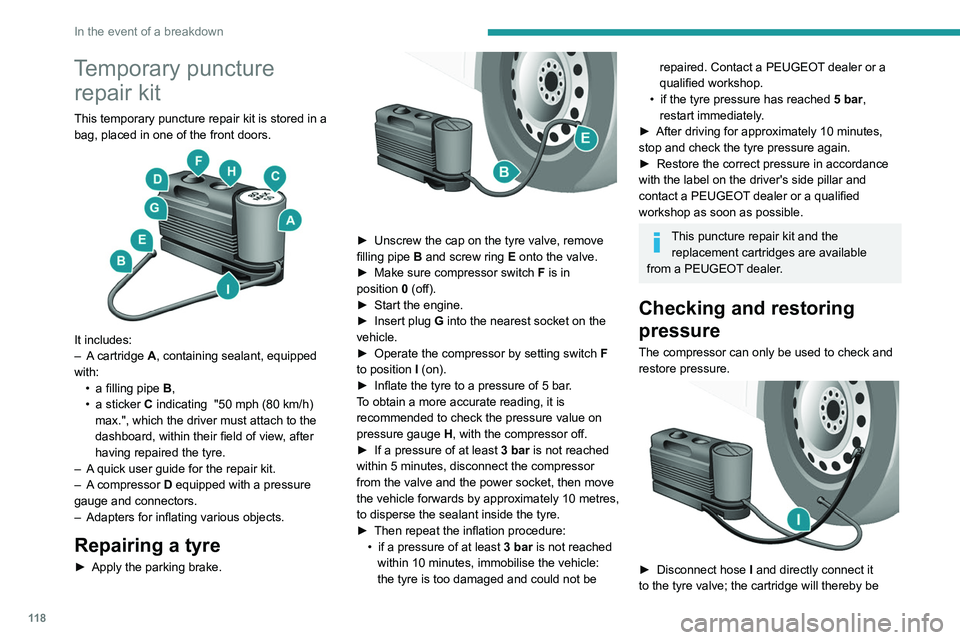
It includes:
–
A cartridge A, containing sealant, equipped
with: •
a filling pipe B
,
•
a sticker
C indicating "50 mph (80 km/h)
max.", which the driver must attach to the
dashboard, within their field of view, after
having repaired the tyre.
–
A
quick user guide for the repair kit.
–
A
compressor D equipped with a pressure
gauge and connectors.
–
Adapters for inflating various objects.
Repairing a tyre
► Apply the parking brake.
► Unscrew the cap on the tyre valve, remove
filling pipe B and screw ring E onto the valve.
►
Make sure compressor switch F
is in
position
0
(off).
►
Start the engine.
►
Insert plug
G into the nearest socket on the
vehicle.
►
Operate the compressor by setting switch F
to position I (on).
►
Inflate the tyre to a pressure of 5 bar
.
To obtain a more accurate reading, it is
recommended to check the pressure value on
pressure gauge H, with the compressor off.
►
If a pressure
of at least 3 bar is not reached
within 5 minutes, disconnect the compressor
from the valve and the power socket, then move
the vehicle forwards by approximately 10 metres,
to disperse the sealant inside the tyre.
►
Then repeat the inflation procedure:
•
if a pressure of at least
3 bar is not reached
within 10 minutes, immobilise the vehicle:
the tyre is too damaged and could not be
repaired. Contact a PEUGEOT dealer or a
qualified workshop.
•
if the tyre pressure has reached 5 bar
,
restart immediately.
►
After driving for approximately 10 minutes,
stop and check the tyre pressure again.
►
Restore the correct pressure in accordance
with the label on the driver's side pillar and
contact a PEUGEOT
dealer or a qualified
workshop as soon as possible.
This puncture repair kit and the replacement cartridges are available
from a PEUGEOT dealer.
Checking and restoring
pressure
The compressor can only be used to check and
restore pressure.
► Disconnect hose I and directly connect it
to the tyre valve; the cartridge will thereby be
Page 126 of 212
124
In the event of a breakdown
► Tighten initially using wheelbrace D and bar
B.
►
Lower the vehicle using wheelbrace D
and
bar B, then remove the jack.
►
T
ighten the bolts again using wheelbrace D
and bar B.
Have the tightening of the bolts and the
pressure of the spare wheel checked by
the Manufacturer's dealer network or a
qualified workshop without delay.
Have the punctured wheel repaired and
refitted on the vehicle as soon as possible.
Vehicle fitted with a tyre under-
inflation detection system
The spare wheel is not fitted with a pressure
sensor. Tyre under-inflation detection will not
work on this tyre. An alert may be issued by
the system.
Check the tyre pressures and reinitialise the
system.
For more information on Tyre under-inflation
detection, refer to the corresponding section.
5 - Storing the wheel to be
repaired
You must reposition the wheel to be repaired or
the spare wheel under the vehicle to lock the
winch system.
Check that it is securely fastened in its
compartment under the floor.
Improper wheel positioning can compromise
safety.
►
Reposition the wheel at the rear of the
vehicle.
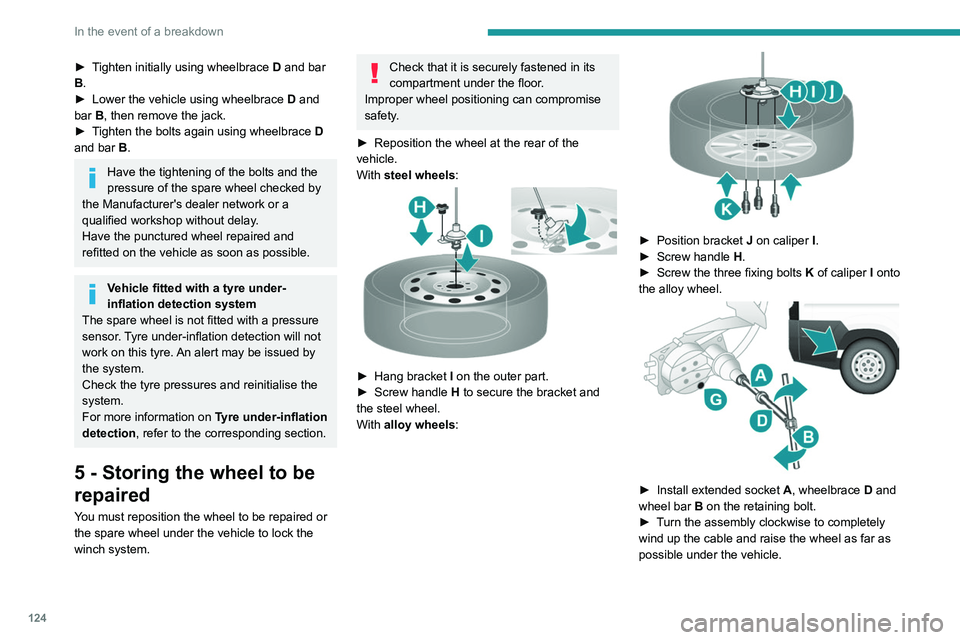
With
steel wheels:
► Hang bracket I on the outer part.
► Screw handle H
to secure the bracket and
the steel wheel.
With alloy wheels:
► Position bracket J on caliper I .
► Screw handle H
.
►
Screw the three fixing bolts
K
of caliper I onto
the alloy wheel.
► Install extended socket A , wheelbrace D and
wheel bar B on the retaining bolt.
►
T
urn the assembly clockwise to completely
wind up the cable and raise the wheel as far as
possible under the vehicle.
Page 127 of 212
125
In the event of a breakdown
8► Check that the wheel is flat against the floor
of the vehicle and that the notch G
of the winch
is visible.
►
Store the tools and the wheel trim (depending
on version).
For more information on
the Identification markings of the
vehicle, and in particular the tyre pressure
label, refer to the corresponding section.
Changing a bulb
The headlamps have polycarbonate lenses with a protective coating:
►
do not clean them using a dry or
abrasive cloth, nor with a detergent or
solvent product,
►
use a sponge and soapy water or a pH
neutral product,
►
when using a high pressure washer on
persistent marks, do not keep the lance
directed towards the lamps or their edges for
too long, so as not to damage their protective
coating and seals.
Changing a bulb must only be done with
the ignition off and after the lamp has
been switched off for several minutes - Risk
of serious burns!
►
Do not touch the bulb directly with your
fingers, use a lint-free cloth.
It is essential only to use anti-ultraviolet
(UV) type bulbs, so as not to damage the
headlamp.
Always replace a failed bulb with a new bulb
with the same type and specification.
In some weather conditions (e.g. low
temperature or humidity), the presence
of misting on the internal surface of the glass
of the headlamps and rear lamps is normal; it
disappears after the lamps have been on for a
few minutes.
Types of bulb
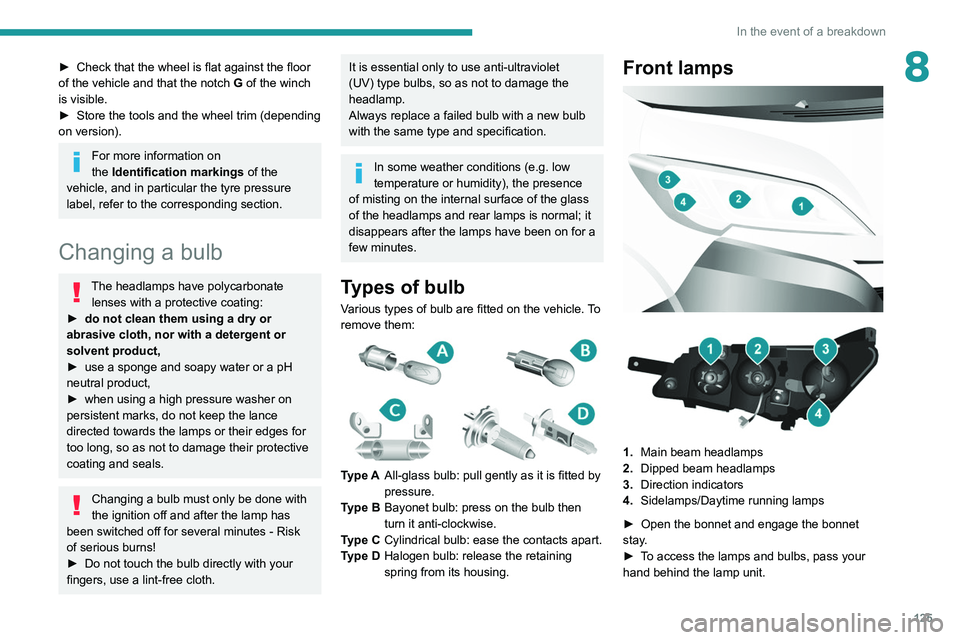
Various types of bulb are fitted on the vehicle. To
remove them:
Type A All-glass bulb: pull gently as it is fitted by
pressure.
Type B Bayonet bulb: press on the bulb then
turn it anti-clockwise.
Type C Cylindrical bulb: ease the contacts apart.
Type D Halogen bulb: release the retaining
spring from its housing.
Front lamps
1. Main beam headlamps
2. Dipped beam headlamps
3. Direction indicators
4. Sidelamps/Daytime running lamps
►
Open the bonnet and engage the bonnet
stay
.
►
T
o access the lamps and bulbs, pass your
hand behind the lamp unit.
Page 147 of 212
145
Technical data
9Identification markings
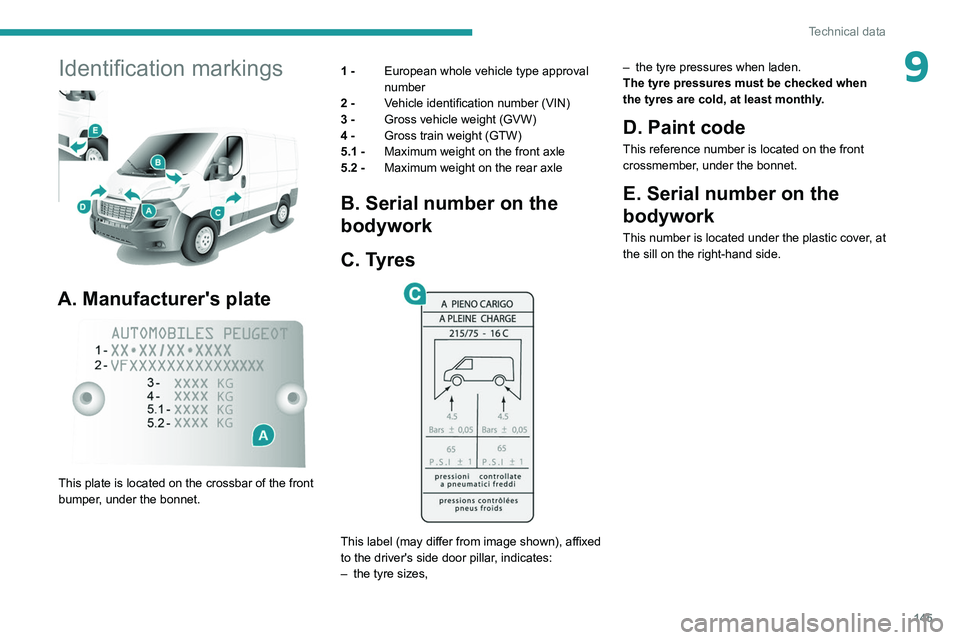
A. Manufacturer's plate
This plate is located on the crossbar of the front
bumper, under the bonnet.1 -
European whole vehicle type approval
number
2 - Vehicle identification number (VIN)
3 - Gross vehicle weight (GVW)
4 - Gross train weight (GTW)
5.1 - Maximum weight on the front axle
5.2 - Maximum weight on the rear axle
B. Serial number on the
bodywork
C. Tyres
This label (may differ from image shown), affixed
to the driver's side door pillar, indicates:
–
the tyre sizes, –
the tyre pressures when laden.
The tyre pressures must be checked when
the tyres are cold, at least monthly
.
D. Paint code
This reference number is located on the front
crossmember, under the bonnet.
E. Serial number on the
bodywork
This number is located under the plastic cover, at
the sill on the right-hand side.
Page 159 of 212
157
Special features
10Tipper truck
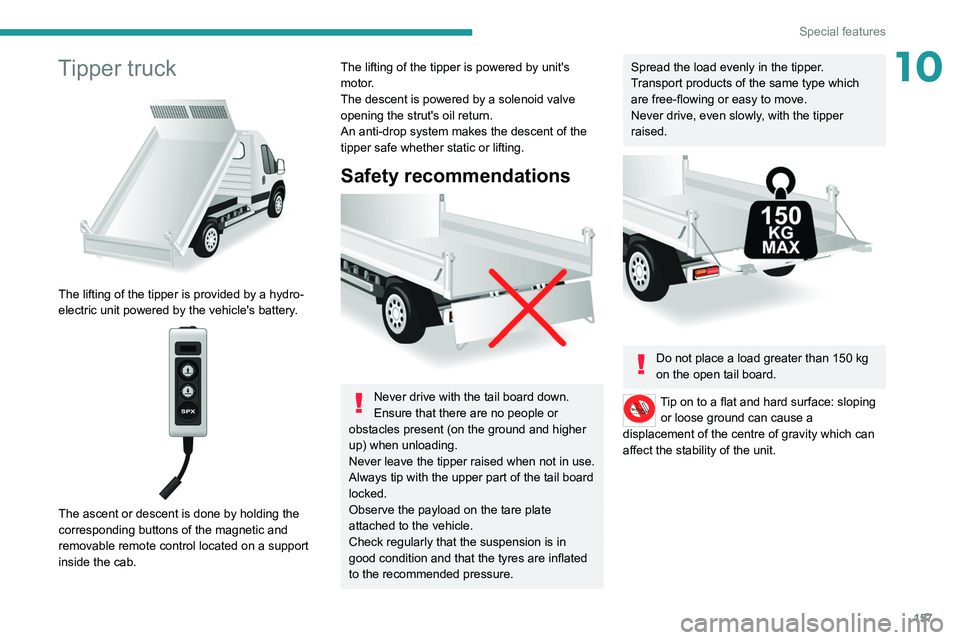
The lifting of the tipper is provided by a hydro-
electric unit powered by the vehicle's battery.
The ascent or descent is done by holding the
corresponding buttons of the magnetic and
removable remote control located on a support
inside the cab.
The lifting of the tipper is powered by unit's
motor.
The descent is powered by a solenoid valve
opening the strut's oil return.
An anti-drop system makes the descent of the
tipper safe whether static or lifting.
Safety recommendations
Never drive with the tail board down.
Ensure that there are no people or
obstacles present (on the ground and higher
up) when unloading.
Never leave the tipper raised when not in use.
Always tip with the upper part of the tail board
locked.
Observe the payload on the tare plate
attached to the vehicle.
Check regularly that the suspension is in
good condition and that the tyres are inflated
to the recommended pressure.
Spread the load evenly in the tipper.
Transport products of the same type which
are free-flowing or easy to move.
Never drive, even slowly, with the tipper
raised.
Do not place a load greater than 150 kg
on the open tail board.
Tip on to a flat and hard surface: sloping or loose ground can cause a
displacement of the centre of gravity which can
affect the stability of the unit.
Page 189 of 212

187
Event data recorders
14Recording event data
Electronic control units are installed in your
vehicle. These control units process data
received from the vehicle's sensors, for example,
or data they generate themselves or exchange
with each other. Some of these control units are
required for the correct operation of your vehicle,
some others assist you while driving (driving or
manoeuvring aids), while others provide comfort
or infotainment functions.
The following contains general information about
how data is processed within the vehicle.
You will find additional information about the
specific data which is downloaded, stored
and transmitted to third parties and what it is
used for in your vehicle under the keyword
"Data protection". This information is directly
associated with the references for the functions
in question contained in the corresponding
vehicle handbook, or in the general terms and
conditions of sale.
This information is also available online.
Vehicle operating data
The control units process the data used for the
operation of the vehicle.
This data includes, for example:
–
Information about the state of the vehicle
(e.g.
speed, travel time, lateral acceleration,
wheel rotation rate, fastened seat belts display).
–
Environmental conditions (e.g.
temperature,
rain sensor, distance sensor). As a general rule, this data is temporary, is
not stored for longer than one operating cycle
and is only used within the vehicle itself. The
control units often record this data (including the
vehicle's key). This function allows either the
temporary or permanent storage of information
about the state of the vehicle, stresses on
components, servicing requirements, as well as
events and technical errors.
Depending on the vehicle's equipment level, the
data stored is as follows:
–
Operating state of system components
(e.g.
filling level, tyre pressures, battery charge
status).
–
Faults and malfunctions in important system
components (e.g.
lamps, brakes).
–
System reactions in specific driving situations
(e.g.
deployment of an airbag, triggering of
stability control and braking systems).
–
Information about events which have
damaged the vehicle.
–
For electric and rechargeable hybrid vehicles,
the traction battery charge level and the
estimated driving range.
In particular circumstances (e.g.
if the vehicle
has detected a malfunction), it may be necessary
to record data which would otherwise simply not
be stored.
When taking your vehicle in for servicing
(e.g.
repairs, maintenance), the stored operating
data may be read along with the vehicle's
identification number and used if necessary.
The personnel working for the servicing network (e.g.
garages, manufacturers) or third parties
(e.g. roadside assistance agents) may read
the vehicle's data. This also applies to work
carried out under warranty and quality assurance
measures.
This data is generally read via the OBD
(On-Board Diagnostics) port fitted by law to
the vehicle. It is used to report on the technical
state of the vehicle or its components and
facilitates the diagnosis of malfunctions, in
compliance with warranty obligations and for
quality improvement. This data, in particular the
information relating to stress on components,
technical events, operator errors and other
malfunctions, is sent to the Manufacturer, if
necessary, along with the vehicle's identification
number. The Manufacturer's liability may also be
engaged. The Manufacturer may also use the
operating data taken from the vehicle for product
recalls. This data may also be used to check the
customer's warranty and any claims made under
warranty.
Any malfunctions stored in the vehicle may be
reset by an after-sales service company during
servicing or repair work, or at your request.
Comfort and infotainment
functions
Comfort settings and personalised settings
may be saved in the vehicle and modified or
reinitialised at any time.
Page 194 of 212
192
Alphabetical index
K
Key with remote control 43
Kit, hands-free
137, 177–178
L
Lane Departure Warning System
(LDWS)
87–88
Level, AdBlue®
83
Level, brake fluid
82
Level, engine coolant
14, 82
Level, engine oil
81
Level, heating system fluid
83
Level, power steering fluid
82
Levels
110–111
Levels and checks
109–111
Lighting dimmer
8
Low fuel level
68
Lumbar
18
M
Mains socket (domestic network) 71
Maintenance (advice)
70, 88
Maintenance, routine
53, 83
Manoeuvring aids (recommendations)
52
Mat
53
Menu
15, 171–172, 146, 149, 151
Menus (audio)
171–172
Mirror, rear view 8
Mirrors, door
22, 61
Motor, electric
81, 109
O
Oil change 81
Oil consumption
81
OIl, engine
109–111
On-board tools
119–124
Opening the bonnet
79
Overhead storage
43–46
P
Pads, brake 85
Paint
89
Parking brake
46, 85
Pedestrian horn (Electric)
29, 42
Player, USB
163–164, 172–173
Port, USB
163–164, 172–173
Power indicator (Electric)
6
Pressures, tyres
85
Pre-tensioning seat belts
33
Protecting children
62–65
Public fast charging station
71
R
Radar (warnings) 53
Radio
135, 143, 145
Radio, digital (Digital Audio
Broadcasting - DAB)
144
Range, AdBlue®
14–15, 83
Recharging the traction battery
(Electric)
69, 101–103
Recovery
104
Regeneration of the particle filter
84
Remote control
13
Replacing bulbs
97
Replacing fuses
101
Replacing the air filter
84
Replacing the oil filter
84
Replacing the passenger compartment filter
84
Resetting the service indicator
13
Reversing camera
53
S
Safety, children 62–65
Screen, colour
143
Screen menu map
171–172, 146, 149, 151
Screenwash fluid
110–111
SCR (Selective Catalytic Reduction)
86
Seat belts
60–61
Seat belts, rear
33
Seats, heated
19
Seats, rear
36