2021 PEUGEOT BOXER traction control
[x] Cancel search: traction controlPage 4 of 212

2
Contents
■
Overview
■
Eco-driving
1InstrumentsInstrument panel 8
Warning and indicator lamps 9
Indicators 13
Vehicle configuration (MODE) 15
Touch screen audio and multimedia system 21
Setting the date and time 21
Trip computer 22
Trip computer 22
2AccessKey 23
Remote control 23
Front doors 26
Sliding side door 26
Rear doors 27
Alarm 27
Electric windows 28
3Ease of use and comfortFront seats 30
Front bench seat 31
Rear seats 32
Rear bench seat 32
Steering wheel adjustment 33
Mirrors 34
Heating and Ventilation 35
Heating/Manual air conditioning 35
Automatic air conditioning 36
Heating (Electric) 37
Additional heating systems 39
Rear heating/air conditioning 39
Additional programmable heating 40
Front demist - defrost 42
Rear screen de-icing 42
Cab layout 43
Rear fittings 47
Exterior fittings 49
4Lighting and visibilityLighting control stalk 51
Direction indicators 51
LED daytime running lamps 51
Automatic headlamp dipping 52
Headlamp beam height adjustment 54
Wiper control stalk 54
Changing a wiper blade 55
5SafetyGeneral safety recommendations 56
Hazard warning lamps 56
Horn 56
Pedestrian horn (Electric) 57
Electronic stability control (ESC) 57
Seat belts 60
Airbags 62
Child seats 63
Deactivating the front passenger airbag 65
ISOFIX seats 66
Child lock 68
6DrivingDriving recommendations 69
Starting-switching off the engine 72
Battery standby system 73
Parking brake 74
Gearbox 74
Drive selector (Electric) 75
Gear shift indicator 75
Stop & Start 76
Hill start assist 77
Tyre under-inflation detection 78
Pneumatic suspension 79
Driving and manoeuvring aids - General
recommendations
80
Road signs recognition 82
Speed limiter 83
Cruise control - Specific recommendations 85
Cruise control 85
Lane departure warning system 86
Blind spot monitoring with trailer detection 89
Active Safety Brake with Collision Risk Alert and
Intelligent emergency braking assistance
90
Rear parking sensors 93
Reversing camera 94
7Practical informationFuel 96
Compatibility of fuels 97
Charging system (Electric) 97
Charging the traction battery (Electric) 101
Snow chains 103
Towing a trailer 104
Towbar with quickly detachable towball 104
Roof-mounted carrying system 107
Bonnet 107
Page 6 of 212

4
Overview
Presentation
These illustrations and descriptions are intended
as a guide. The presence and location of certain
elements may vary, depending on the version or
trim level.
Instruments and controls
1. Instrument panel with display screen
2. Lighting control and direction indicator stalk
3. Wiper/Screenwash
control stalk
Trip computer (Diesel)
4. Vehicle configuration/Headlamps beam
height/Front/rear foglamps 5.
Steering mounted controls for the audio
system
6. Driver's front airbag/Horn
7. Ignition switch
8. Additional programmable heating (Diesel)
Heating (Electric)
9. Fusebox
10. Cruise control/speed limiter controls (Diesel)
11 . Pneumatic suspension/Reading spotlamps/
Additional rear ventilation (Diesel)
Centre console
1. Audio system/Navigation
2. Heating/Air conditioning
3. Storage compartment/Removable ashtray
4. 12 volt accessory socket (180
W max)
5. USB socket/Cigarette lighter
6. Dynamic stability control (DSC/ASR)
Intelligent traction control (Diesel)
7. Hill Assist Descent Control
8. Lane departure warning system
9. Hazard warning lamps
10. Central locking
11 . De-icing/Demisting
12. Gear lever (Diesel)
Drive selector (Electric)
Page 13 of 212

11
Instruments
1Fixed, accompanied by a message and
an audible signal.
The system has a fault.
Carry out (3).
Fixed.
The system has a fault.
If these warning lamps come on after the engine
is switched off and then restarted, carry out (3).
Brake padsFixed.
The front brake pads are worn.
Carry out (3) to replace the pads.
DSC / ASRFlashing.
The system is operating.
The system optimises traction and improves the
directional stability of the vehicle.
Fixed, accompanied by an audible signal
and a message in the screen.
The DSC / ASR or hill start assist system has a
fault.
Carry out (2).
Fixed.
The Intelligent Traction Control has a
fault.
Carry out (2).
Front passenger airbag (OFF)Fixed.
The front passenger airbag is deactivated.
A "rearward facing" child seat can be installed,
unless there is a fault with the airbags (Airbags
warning lamp on).
Particle filter (Diesel)Fixed.
The particle filter is regenerating itself.
Leave the engine running until the warning lamp
goes off so that regeneration can be completed.
Engine self-diagnostic systemFixed.
A fault with the engine or the EOBD
emissions control system has been detected.
EOBD (European On Board Diagnosis) is a
diagnostics system which complies with, among
others, the standards on emissions limits of:
–
CO (carbon monoxide),
–
HC (unburnt hydrocarbons),
–
NOx (nitrogen oxides), detected by oxygen
sensors placed downstream of the catalytic
converters and
–
particles.
Carry out (3) quickly.
Tyre under-inflation detectionFixed.
A tyre is deflated or punctured.
Carry out (1).
Change the wheel or repair the tyre.
Fixed.
A sensor is faulty.
Carry out (3).
Lane departure warning systemFlashing, accompanied by an
audible signal.
The involuntary crossing of a line on the left or
right has been detected. Turn the steering wheel in the opposite direction
to return to the correct trajectory.
Fixed, accompanied by an audible signal.
The lane departure warning system is
faulty.
Clean the windscreen.
If the problem persists, carry out (3).
Electronic immobiliserFixed.
The ignition key inserted is not
recognised.
The engine cannot start.
Change key and carry out (3) to have the faulty
key checked.
On for about 10 seconds when the
ignition is switched on.
The alarm has been triggered.
Carry out (3) to have the locks checked.
Water in Diesel fuel filter(Diesel)Fixed.
The Diesel filter contains water.
Carry out (2) without delay - risk of damage to
the injection system!
AdBlueFixed, then flashing accompanied by a
message in the display.
The driving range is decreasing.
You must quickly top up the AdBlue.
Low fuel levelFixed, with the needle in zone E.
The fuel reserve is being used.
Refuel without delay.
Page 40 of 212
38
Ease of use and comfort
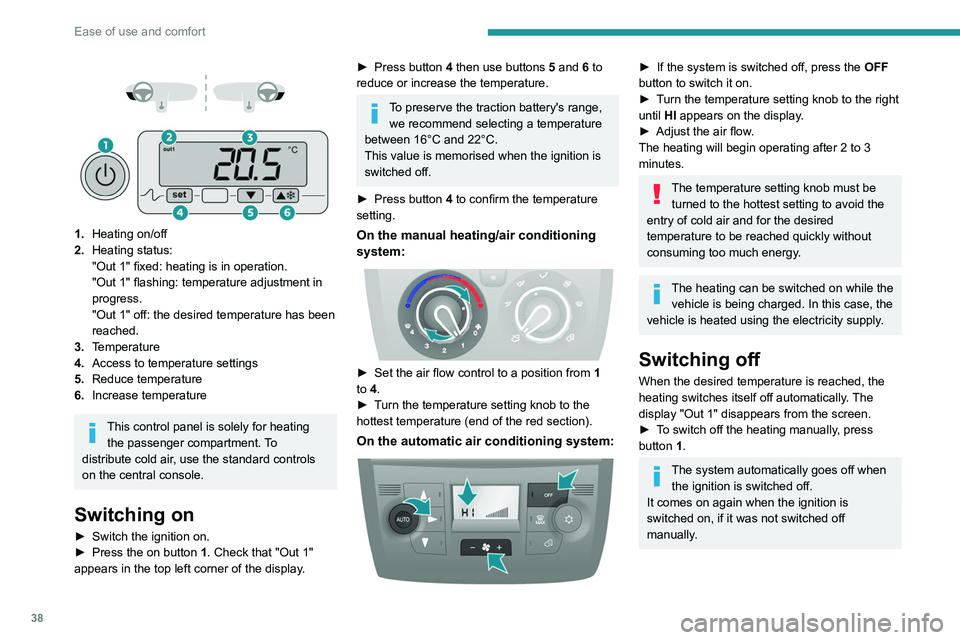
1. Heating on/off
2. Heating status:
"Out 1" fixed: heating is in operation.
"Out 1" flashing: temperature adjustment in
progress.
"Out 1" off: the desired temperature has been
reached.
3. Temperature
4. Access to temperature settings
5. Reduce temperature
6. Increase temperature
This control panel is solely for heating
the passenger compartment. To
distribute cold air, use the standard controls
on the central console.
Switching on
► Switch the ignition on.
► Press the on button 1. Check that "Out 1"
appears in the top left corner of the display.
► Press button 4 then use buttons 5 and 6 to
reduce or increase the temperature.
To preserve the traction battery's range, we recommend selecting a temperature
between 16°C and 22°C.
This value is memorised when the ignition is
switched off.
►
Press button
4 to confirm the temperature
setting.
On the manual heating/air conditioning
system:
► Set the air flow control to a position from 1
to 4.
►
T
urn the temperature setting knob to the
hottest temperature (end of the red section).
On the automatic air conditioning system:
► If the system is switched off, press the OFF
button to switch it on.
►
T
urn the temperature setting knob to the right
until HI appears on the display.
►
Adjust the air flow
.
The heating will begin operating after 2 to 3
minutes.
The temperature setting knob must be turned to the hottest setting to avoid the
entry of cold air and for the desired
temperature to be reached quickly without
consuming too much energy.
The heating can be switched on while the vehicle is being charged. In this case, the
vehicle is heated using the electricity supply.
Switching off
When the desired temperature is reached, the
heating switches itself off automatically. The
display "Out 1" disappears from the screen.
►
T
o switch off the heating manually, press
button 1.
The system automatically goes off when the ignition is switched off.
It comes on again when the ignition is
switched on, if it was not switched off
manually.
Page 44 of 212
42
Ease of use and comfort
The memorisation is confirmed by the
disappearance of the duration on the screen or
by pressing button 3 again.
Switching the heating off
In the event of a delayed start, the heating
switches off automatically at the end of the
programmed duration.
►
In the event of an immediate start, press
button
2 again to switch it off manually.
The heating cycle indicator lamp and the screen
switch off.
Have the additional heating checked at
least once a year at the beginning of
winter.
For maintenance and repairs, contact a
PEUGEOT dealer or a qualified workshop
only.
Only use approved replacement parts.
To avoid the risks of poisoning or asphyxia, the programmable heating
must not be used, even for short periods, in a
closed environment such as a garage or
workshop which is not equipped with an
exhaust gas extraction system.
The additional heating turns off when the
battery voltage is low, to allow the vehicle to
start.
The additional heating is supplied by the
vehicle fuel tank. Make sure the fuel gauge
level indicator is not in the reserve.
Always switch off the additional heating when
refuelling to avoid any risk of fire or explosion!
The temperature in the vicinity of the heater
must not exceed 120°C. A higher temperature
(e.g. in the case of oven painting) could
damage electronic circuits components.
The additional heating is equipped with a
thermal limiter which cuts off combustion in
case of engine overheating due to lack of
coolant. Check the level and top-up with fluid,
if necessary.
For more information on Checking levels,
refer to the corresponding section.
Then press the programme selection button
before turning on the heating again.
Front demist - defrost
These markings on the control panel indicate the control positions for rapid
demisting or defrosting of the windscreen and
side windows.
With manual air
conditioning
► Set the air flow and air distribution
controls to the appropriately marked
positions.
T
o make the windscreen de-icing and demisting
more efficient and faster:
►
increase the air flow setting,
► momentarily swi tch the exterior air
intake control to air recirculation.
With automatic air
conditioning
► Press this button. The indicator lamp
lights up.
The system manages the air conditioning, the air
flow and intake, the de-icing of the rear screen
and distributes air optimally to the windscreen
and front side windows.
If the vehicle is equipped with an additional
heating system, deactivate it to ensure fast and
efficient demisting / de-icing.
De-icing the rear screen
and/or door mirrors
► Press this button to activate/deactivate
demisting/de-icing of the rear screen and
door mirrors.
The indicator lamp illuminates
when the fonction is activated.
This function turns off automatically to prevent
excessive power consumption.
Rear screen demisting/de-icing can only
operate when the engine is running.
Page 59 of 212
57
Safety
5Pedestrian horn (Electric)
This system alerts pedestrians that the vehicle is approaching.
The pedestrian horn operates once the vehicle
is moving and at speeds of up to 25 mph
(40
km/h), in forward or reverse gear.
This function cannot be deactivated.
Electronic stability control
(ESC)
Electronic stability control (ESC: Electronic
Stability Control) integrating the following
systems:
–
anti-lock braking system (ABS) and electronic
brake force distribution (EBFD),
–
emergency braking assistance (EBA),
–
wheel anti-slip regulation (ASR) or traction
control,
–
dynamic stability control (DSC).
Definitions
Anti-lock braking system (ABS) and Electronic brake force distribution
(EBFD)
This system improves the stability and handling
of your vehicle when braking and contributes
towards improved control on bends, in particular
on poor or slippery road surfaces. ABS prevents wheel locking in the event of
emergency braking.
EBFD manages the braking pressure wheel by
wheel.
Emergency braking assistance (EBA)
In an emergency, this system enables you
to reach the optimum braking pressure more
quickly and therefore reduce the stopping
distance.
It is triggered in relation to the speed at which
the brake pedal is depressed. The effect of this
is a reduction in the resistance of the pedal and
an increase in braking efficiency.
Anti-slip regulation (ASR)
The ASR system (also known as Traction
Control) optimises traction in order to limit
wheel slip, by acting on the brakes of the driving
wheels and on the engine. It also improves the
directional stability of the vehicle on acceleration.
Dynamic stability control (DSC)
If there is a difference between the path followed
by the vehicle and that required by the driver, the
DSC monitors each wheel and automatically acts
on the brake of one or more wheels and on the
engine to return the vehicle to the required path,
within the limits of the laws of physics.
Anti-lock braking system
(ABS) and electronic brake
force distribution (EBFD)
When this warning lamp comes on,
accompanied by a message on the
instrument panel display screen, it indicates that
there is a fault with the ABS, which could cause
loss of control of the vehicle when braking.
When these warning lamps come
on, accompanied by a message on
the instrument panel display screen, they
indicate that there is a fault with the electronic
brake force distribution (EBFD), which could
cause loss of control of the vehicle when
braking.
You must stop as soon as it is safe to do so.
Contact a PEUGEOT dealer or a qualified
workshop.
For maximum efficiency of the braking
system, a period of adjustment of
approximately 310 miles (500 km) is
necessary. During this period, it is advisable
to avoid abrupt, repeated and prolonged
braking.
The anti-lock device does not allow for shorter braking. On a very slippery road
Page 61 of 212
59
Safety
5Intelligent Traction Control
Traction assistance system on roads with low
grip (snow, ice, mud, etc.).
This system makes it possible to detect the
situations of precarious grip which can make the
starting and the progress of the vehicle difficult.
In these situations, the Intelligent Traction
Control system overrides the ASR system by
transferring the driving force to the wheel with
the greatest contact with the ground to optimise
traction and trajectory tracking.
Activation/Deactivation
When starting the vehicle, this system is
deactivated.
► Press this button to activate/deactivate the
system.
When the button indicator lamp comes on, the
system is activated.
This system is active up to approximately 19
mph (30 km/h).
Above 19 mph (30 km/h), the system is
automatically deactivated but the button indicator
lamp remains on. The system is automatically reactivated as soon
as the speed returns below approximately 19
mph (30 km/h).
Malfunction
In the event of an Intelligent Traction
Control malfunction, this warning lamp
comes on.
Have it checked by a PEUGEOT dealer or a
qualified workshop.
Load inertia control
The actual total weight of a commercial vehicle
can vary considerably depending on its load.
The centre of gravity of the vehicle can therefore
move in the longitudinal direction and even in
height.
Each of these variations has repercussions
on braking, traction, cornering behaviour and
overturning.
The load inertia control estimates the actual total
weight of the vehicle by analysing its behaviour,
during acceleration and braking phases.
This system then adapts the intervention of the
DSC and ASR systems according to the weight
distribution of the vehicle. In critical situations,
your vehicle therefore remains more safely on its
trajectory.
Hill Assist Descent
Control
Descent assistance system on roads with low
grip (mud, gravel, etc.) or with a steep gradient.
This system reduces the risk of the vehicle
slipping or running out of control as it moves
downhill.
It maintains the vehicle at a constant speed
during a descent by acting independently and
differentially on the brakes.
Activation / Deactivation
When starting the vehicle, the system is
deactivated.
► With the speed below 19 mph (30 km/h),
press this button to activate the system; the
button indicator lamp lights up.
When the vehicle begins its descent, you can
release the accelerator and brake pedals; the
button indicator lamp flashes.
The brake lamps automatically light up when the
function is activated.
Page 77 of 212
75
Driving
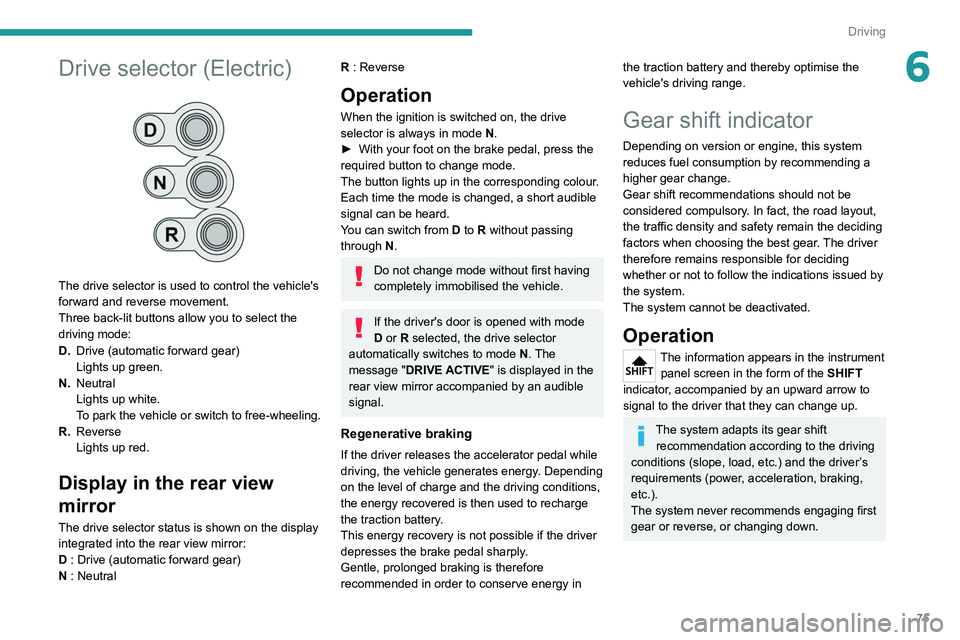
6Drive selector (Electric)
The drive selector is used to control the vehicle's
forward and reverse movement.
Three back-lit buttons allow you to select the
driving mode:
D.Drive (automatic forward gear)
Lights up green.
N. Neutral
Lights up white.
To park the vehicle or switch to free-wheeling.
R. Reverse
Lights up red.
Display in the rear view
mirror
The drive selector status is shown on the display
integrated into the rear view mirror:
D : Drive (automatic forward gear)
N : Neutral
R : Reverse
Operation
When the ignition is switched on, the drive
selector is always in mode N.
►
With your foot on the brake pedal, press the
required button to change mode.
The button lights up in the corresponding colour
.
Each time the mode is changed, a short audible
signal can be heard.
You can switch from D to R without passing
through N.
Do not change mode without first having
completely immobilised the vehicle.
If the driver's door is opened with mode
D or R selected, the drive selector
automatically switches to mode N. The
message "DRIVE ACTIVE" is displayed in the
rear view mirror accompanied by an audible
signal.
Regenerative braking
If the driver releases the accelerator pedal while
driving, the vehicle generates energy. Depending
on the level of charge and the driving conditions,
the energy recovered is then used to recharge
the traction battery.
This energy recovery is not possible if the driver
depresses the brake pedal sharply.
Gentle, prolonged braking is therefore
recommended in order to conserve energy in
the traction battery and thereby optimise the
vehicle's driving range.
Gear shift indicator
Depending on version or engine, this system
reduces fuel consumption by recommending a
higher gear change.
Gear shift recommendations should not be
considered compulsory. In fact, the road layout,
the traffic density and safety remain the deciding
factors when choosing the best gear. The driver
therefore remains responsible for deciding
whether or not to follow the indications issued by
the system.
The system cannot be deactivated.
Operation
The information appears in the instrument panel screen in the form of the SHIFT
indicator, accompanied by an upward arrow to
signal to the driver that they can change up.
The system adapts its gear shift recommendation according to the driving
conditions (slope, load, etc.) and the driver’s
requirements (power, acceleration, braking,
etc.).
The system never recommends engaging first
gear or reverse, or changing down.