2021 PEUGEOT BOXER charging
[x] Cancel search: chargingPage 4 of 212

2
Contents
■
Overview
■
Eco-driving
1InstrumentsInstrument panel 8
Warning and indicator lamps 9
Indicators 13
Vehicle configuration (MODE) 15
Touch screen audio and multimedia system 21
Setting the date and time 21
Trip computer 22
Trip computer 22
2AccessKey 23
Remote control 23
Front doors 26
Sliding side door 26
Rear doors 27
Alarm 27
Electric windows 28
3Ease of use and comfortFront seats 30
Front bench seat 31
Rear seats 32
Rear bench seat 32
Steering wheel adjustment 33
Mirrors 34
Heating and Ventilation 35
Heating/Manual air conditioning 35
Automatic air conditioning 36
Heating (Electric) 37
Additional heating systems 39
Rear heating/air conditioning 39
Additional programmable heating 40
Front demist - defrost 42
Rear screen de-icing 42
Cab layout 43
Rear fittings 47
Exterior fittings 49
4Lighting and visibilityLighting control stalk 51
Direction indicators 51
LED daytime running lamps 51
Automatic headlamp dipping 52
Headlamp beam height adjustment 54
Wiper control stalk 54
Changing a wiper blade 55
5SafetyGeneral safety recommendations 56
Hazard warning lamps 56
Horn 56
Pedestrian horn (Electric) 57
Electronic stability control (ESC) 57
Seat belts 60
Airbags 62
Child seats 63
Deactivating the front passenger airbag 65
ISOFIX seats 66
Child lock 68
6DrivingDriving recommendations 69
Starting-switching off the engine 72
Battery standby system 73
Parking brake 74
Gearbox 74
Drive selector (Electric) 75
Gear shift indicator 75
Stop & Start 76
Hill start assist 77
Tyre under-inflation detection 78
Pneumatic suspension 79
Driving and manoeuvring aids - General
recommendations
80
Road signs recognition 82
Speed limiter 83
Cruise control - Specific recommendations 85
Cruise control 85
Lane departure warning system 86
Blind spot monitoring with trailer detection 89
Active Safety Brake with Collision Risk Alert and
Intelligent emergency braking assistance
90
Rear parking sensors 93
Reversing camera 94
7Practical informationFuel 96
Compatibility of fuels 97
Charging system (Electric) 97
Charging the traction battery (Electric) 101
Snow chains 103
Towing a trailer 104
Towbar with quickly detachable towball 104
Roof-mounted carrying system 107
Bonnet 107
Page 7 of 212
5
Overview
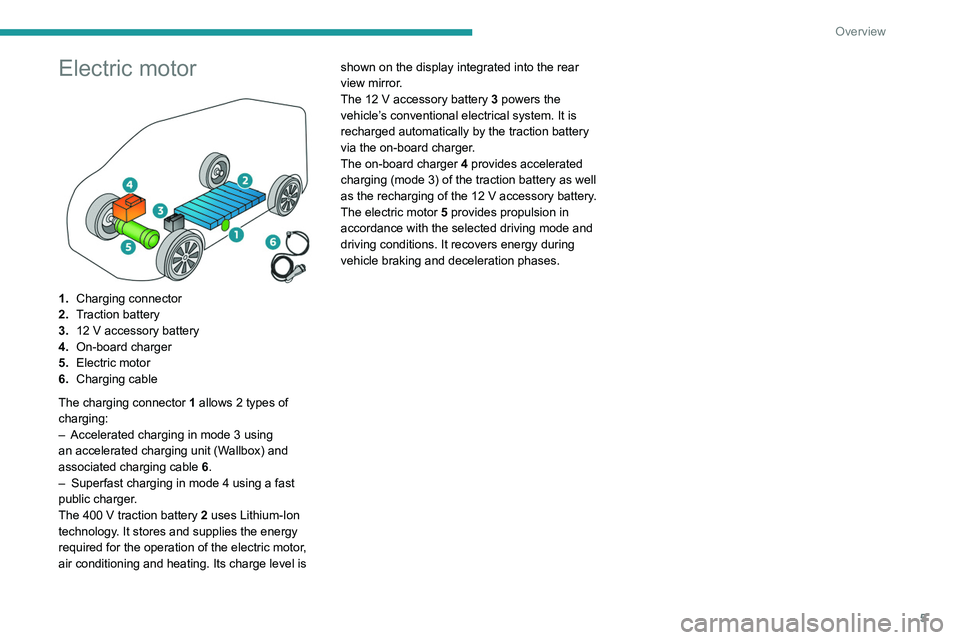
Electric motor
1.Charging connector
2. Traction battery
3. 12
V accessory battery
4. On-board charger
5. Electric motor
6. Charging cable
The charging connector 1 allows 2
types of
charging:
–
Accelerated charging in mode 3 using
an accelerated charging unit (W
allbox) and
associated charging cable 6.
–
Superfast charging in mode 4 using a fast
public charger
.
The 400
V traction battery 2 uses Lithium-Ion
technology. It stores and supplies the energy
required for the operation of the electric motor,
air conditioning and heating. Its charge level is shown on the display integrated into the rear
view mirror.
The 12
V accessory battery 3 powers the
vehicle’s conventional electrical system. It is
recharged automatically by the traction battery
via the on-board charger.
The on-board charger 4 provides accelerated
charging (mode 3) of the traction battery as well
as the recharging of the 12 V accessory battery.
The electric motor 5 provides propulsion in
accordance with the selected driving mode and
driving conditions. It recovers energy during
vehicle braking and deceleration phases.
Page 11 of 212
9
Instruments
1
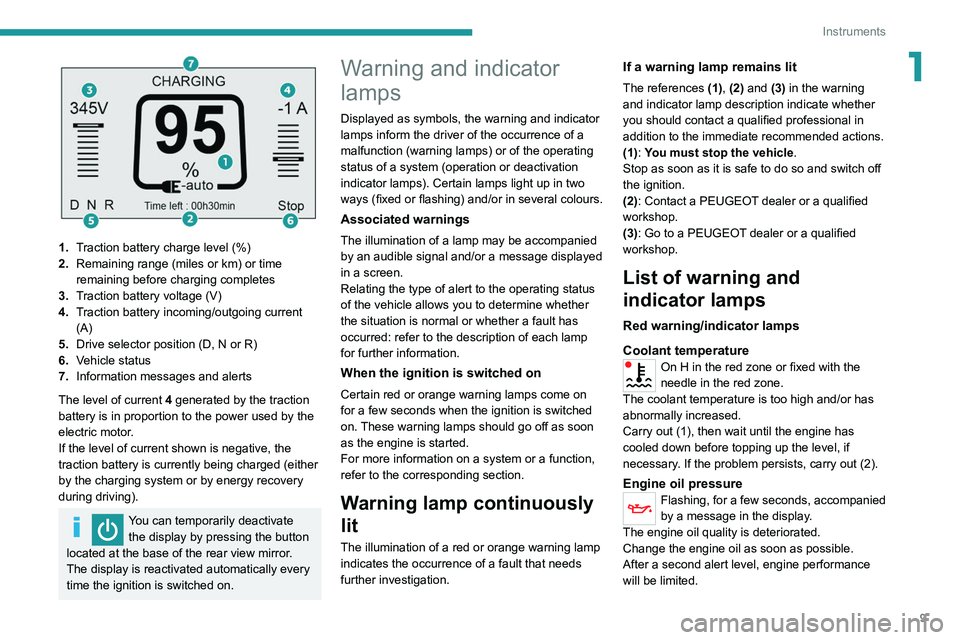
1.Traction battery charge level (%)
2. Remaining range (miles or km) or time
remaining before charging completes
3. Traction battery voltage (V)
4. Traction battery incoming/outgoing current
(A)
5. Drive selector position (D, N or R)
6. Vehicle status
7. Information messages and alerts
The level of current 4 generated by the traction
battery is in proportion to the power used by the
electric motor.
If the level of current shown is negative, the
traction battery is currently being charged (either
by the charging system or by energy recovery
during driving).
You can temporarily deactivate the display by pressing the button
located at the base of the rear view mirror.
The display is reactivated automatically every
time the ignition is switched on.
Warning and indicator
lamps
Displayed as symbols, the warning and indicator
lamps inform the driver of the occurrence of a
malfunction (warning lamps) or of the operating
status of a system (operation or deactivation
indicator lamps). Certain lamps light up in two
ways (fixed or flashing) and/or in several colours.
Associated warnings
The illumination of a lamp may be accompanied
by an audible signal and/or a message displayed
in a screen.
Relating the type of alert to the operating status
of the vehicle allows you to determine whether
the situation is normal or whether a fault has
occurred: refer to the description of each lamp
for further information.
When the ignition is switched on
Certain red or orange warning lamps come on
for a few seconds when the ignition is switched
on. These warning lamps should go off as soon
as the engine is started.
For more information on a system or a function,
refer to the corresponding section.
Warning lamp continuously
lit
The illumination of a red or orange warning lamp
indicates the occurrence of a fault that needs
further investigation.
If a warning lamp remains lit
The references (1), (2) and (3) in the warning
and indicator lamp description indicate whether
you should contact a qualified professional in
addition to the immediate recommended actions.
(1): You must stop the vehicle .
Stop as soon as it is safe to do so and switch off
the ignition.
(2): Contact a PEUGEOT dealer or a qualified
workshop.
(3): Go to a PEUGEOT dealer or a qualified
workshop.
List of warning and
indicator lamps
Red warning/indicator lamps
Coolant temperature
On H in the red zone or fixed with the
needle in the red zone.
The coolant temperature is too high and/or has
abnormally increased.
Carry out (1), then wait until the engine has
cooled down before topping up the level, if
necessary. If the problem persists, carry out (2).
Engine oil pressureFlashing, for a few seconds, accompanied
by a message in the display.
The engine oil quality is deteriorated.
Change the engine oil as soon as possible.
After a second alert level, engine performance
will be limited.
Page 12 of 212
10
Instruments
Temporarily or permanently on, with the engine running.
A lack of oil or a major malfunction is detected.
Carry out (1) then manually check the level.
If necessary, top up.
If the level is correct, carry out (2).
Battery chargeFixed.
A malfunction in the charging circuit or the
battery is detected.
Check the battery terminals.
Fixed or flashing, despite the checks.
An ignition or injection malfunction is
detected.
Carry out (2).
Opening detectionFixed.
One of the vehicle access openings is not
properly closed.
Check that the cab doors, the rear and side
doors and the bonnet are closed.
Power steering
Fixed, accompanied by an audible signal
and a message on the screen.
The power steering has a fault.
Drive carefully at moderate speed, then carry
out (3).
AirbagsFixed or flashing.
One of the airbags or seat belt
pyrotechnic pretensioners is faulty.
Carry out (3).
Seat belt not fastenedFixed, then flashing.
The driver has not fastened his seat belt.
Pull the strap then insert the tongue in the
buckle.
Accompanied by an audible signal, then fixed.
The vehicle is moving with the driver's seat belt
unfastened.
Check that the seat belt is fastened correctly by
pulling the strap.
Pneumatic suspensionFixed.
The system has a fault.
Carry out (3).
Parking brakeFixed.
The parking brake is applied or not
properly released.
Release the parking brake to switch off the
warning lamp, keeping your foot on the brake
pedal.
BrakingFixed.
The brake fluid level is too low.
Carry out (1) then top up with fluid that complies
with the Manufacturer's recommendations.
If the problem persists, carry out (2).
Fixed.
The electronic brake force
distribution
(EBFD) system is faulty.
Carry out (1) and then (2).
Orange warning/indicator lamps
Service
Temporarily on. One or more minor faults, for which there
is/are no specific warning lamp(s), have been
detected.
Carry out (2).
Fixed, accompanied by the display of a
message.
One or more major faults, for which there is/are
no specific warning lamp(s), have been detected.
Identify the cause of the fault using the message
displayed in the instrument panel, then carry out
(3).
Anti-lock braking system (ABS)Fixed.
The anti-lock braking system has a fault.
The vehicle retains conventional braking.
Drive carefully at moderate speed, then carry
out (3).
Collision Risk Alert/Active Safety BrakeFixed, accompanied by the display of a
message.
The system has been deactivated via the vehicle
configuration menu.
Flashing.
The system activates and brakes the
vehicle momentarily to reduce the speed of
collision with the vehicle in front.
For more information, refer to the Driving
section.
Page 50 of 212
48
Ease of use and comfort
Courtesy lamps
If fitted to the vehicle, one or two courtesy lamps
are located above the rear and side doors.
They can be activated by:
–
tilting the courtesy lamp (to the left or to the
right),
–
opening or closing the rear or side doors.
This lighting will turn off automatically after a few
minutes if the doors remain open.
Reading lamps
They are located above each
row of seats.
Interior roof rack
This is a storage device located in the loading
area above the cab. Its capacity is variable
according to the height of the van (H2 or H3
type).
For safety reasons, do not install heavy
objects in the interior rack.
Load stop
On the floor, behind the front seats, a horizontal
partition protects the driver and front passengers
against the risk of load movement.
Ladder-type vertical
partition
Depending on the country of sale, behind the
driver’s seat, a ladder-type vertical partition
protects the driver against the risk of load
movement.
Glass partition
Depending on the country of sale, a glass
partition isolates the cab from the loading area.
You can nevertheless use the control to open/
close its sliding glass.
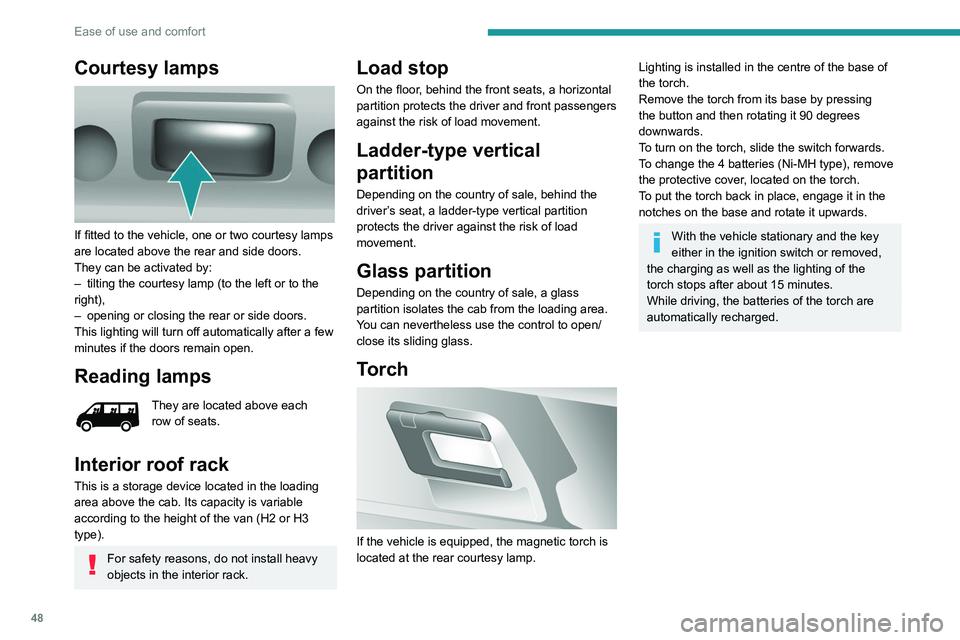
Torch
If the vehicle is equipped, the magnetic torch is
located at the rear courtesy lamp.
Lighting is installed in the centre of the base of
the torch.
Remove the torch from its base by pressing
the button and then rotating it 90 degrees
downwards.
To turn on the torch, slide the switch forwards.
To change the 4 batteries (Ni-MH type), remove
the protective cover, located on the torch.
To put the torch
back in place, engage it in the
notches on the base and rotate it upwards.
With the vehicle stationary and the key
either in the ignition switch or removed,
the charging as well as the lighting of the
torch stops after about 15 minutes.
While driving, the batteries of the torch are
automatically recharged.
Page 65 of 212
63
Safety
5Lateral airbags and curtain
airbags
If fitted to your vehicle, the lateral airbags are
built into the backrests of the front seats, on the
side by the door.
The curtain airbags are built into the pillars and
the upper passenger compartment area, in the
roof above the front seats.
They inflate between the occupant and the
window.
They deploy on one side only (the side where
the collision occurs).
Malfunction
If this warning lamp comes on, contact a
PEUGEOT dealer to have the system
checked.
Advice
For the airbags to be fully effective,
observe the safety recommendations
below.
Adopt a normal upright sitting position.
Fasten the seat belt ensuring it is correctly
positioned and adjusted.
Do not leave anything between the occupants
and the airbags (a child, pet, object, etc.), nor
fix or attach anything close to or in the way of
the airbag release trajectory; this could cause
injuries during their deployment.
Never modify the original definition of your
vehicle, particularly in the area directly around
the airbags.
After an accident or if the vehicle has been
stolen, have the airbag systems checked.
All work on the airbag systems must only
be performed by a PEUGEOT dealer or a
qualified workshop.
Even if all of the precautions mentioned
are observed, a risk of injury or of minor
burns to the head, chest or arms cannot be
ruled out when an airbag is deployed. The
airbag inflates almost instantly (within a few
milliseconds) then deflates within the same
time discharging the hot gas via openings
provided for this purpose.
Front airbags
Do not drive holding the steering wheel
by its spokes or resting your hands on the
centre part of the wheel.
Passengers must not place their feet on the
dashboard.
Do not smoke as deployment of the airbags
can cause burns or the risk of injury from a
cigarette or pipe.
Never remove or pierce the steering wheel or
hit it violently.
Do not fix or attach anything to the steering
wheel or dashboard, as this could cause
injuries when the airbags are deployed.
Lateral airbags
Use only approved covers on the seats,
compatible with the deployment of the lateral
airbags. For information on the range of seat
covers suitable for your vehicle, contact a
PEUGEOT dealer.
Do not fix or attach anything to the seat
backrests (clothes, etc.), as this could cause
injuries to the thorax or arm when the lateral
airbag is deployed.
Do not sit with the upper part of the body any
nearer to the door than necessary.
Curtain airbags
Do not fix or attach anything to the roof,
as this could cause head injuries when the
curtain airbag is deployed.
Do not remove the grab handles installed on
the roof, as they play a part in securing the
curtain airbags.
Child seats
The regulations on carrying children are specific to each country. Refer to the
legislation in force in your country.
For maximum safety, please observe the
following recommendations:
–
In accordance with European regulations,
all children under the age of 12 or less than
1.5 metres tall must travel in approved child
Page 72 of 212

70
Driving
A load that is not properly secured inside the
vehicle may affect vehicle handling and create a
risk of accident.
If your vehicle is fitted with a drop-side back, the
height and width of the load must remain within
the overall dimensions of the vehicle.
Drive the vehicle in a prudent and efficient
way
Take corners gently.
Anticipate the need to brake as the stopping
distance is increased, particularly on wet or icy
roads.
Be aware of the effect of side winds on the
vehicle.
Effective eco-driving allows you to save energy;
accelerate gradually, anticipate the need to slow
down and adapt your speed to suit the situation.
Indicate changes of direction well in advance so
that you are seen by other road users.
Take care
The tyres must be inflated to at least the
pressures indicated on the label, even over-
inflated by 0.2 to 0.3 bar for long journeys.
On flooded roads
We strongly advise against driving on flooded
roads, as this could cause serious damage to the
engine or gearbox, as well as to your vehicle's
electrical systems.
If the vehicle absolutely must drive through a
flooded section of road:
►
Check that the depth of the water does not
exceed 15
cm, taking account of waves that
might be generated by other users.
►
Deactivate the Stop & Start function.
►
Drive as slowly as possible without stalling. In
all cases, do not exceed 6 mph (10
km/h).
►
Do not stop and do not switch off the engine.
On leaving the flooded road, as soon as safety
conditions allow
, make several light brake
applications to dry the brake discs and pads.
If in doubt about the state of your vehicle,
contact a PEUGEOT dealer or a qualified
workshop.
Noise (Electric)
On the outside
Due to the vehicle’s quiet operation when
driving, the driver must pay particular attention.
When manoeuvring, the driver must always
check the vehicle's immediate surroundings.
At speeds of up to 25 mph (40 km/h), the
pedestrian horn warns other road users of the
vehicle’s presence.
Cooling the traction battery
The cooling fan comes on during
charging to cool the on-board charger.
On the inside
During use, you may hear certain perfectly
normal noises specific to electric vehicles, such
as:
–
T
raction battery relay when starting.
–
V
acuum pump when braking.
–
V
ehicle tyres or aerodynamics when driving.
–
Jolting and knocking noise during hill starts.
Towing
Driving with a trailer places greater
demands on the towing vehicle and
particular care must be taken.
Do not exceed the maximum towable
weights.
At altitude: reduce the maximum load by
10% per 1,000 metres of altitude; the lower
air density at high altitudes decreases engine
performance.
New vehicle: do not tow a trailer until the
vehicle has driven at least 620 miles
(1,000 kilometres).
Page 75 of 212
73
Driving
6Starting/Switching off the
motor (Electric)
Starting
► With the parking brake applied, turn the key
to the AV V position and then release it so it
returns to the MAR position.
The message "Go green" appears in the display
integrated into the rear view mirror.
►
Depress the brake pedal fully
, then press
button D (Drive) or R (Reverse) on the drive
selector.
The pedestrian horn comes on.
►
Release the parking brake.
If the electric motor does not start first time, turn
the key to the
STOP position and repeat the
procedure.
Do not depress the accelerator pedal
when switching on the ignition.
Switching off
► Press button N (Neutral) on the drive selector
and then apply the parking brake.
►
Move the key back to the
STOP position.
The parking brake must be applied each time the ignition is switched off.
If the parking brake is not applied, the
message "ENGAGE HANDBRAKE " appears
in the rear view mirror accompanied by an
audible signal lasting 10 seconds.
If the driver's door is opened with mode
D or R selected, the drive selector
automatically switches to mode N. The
message "DRIVE ACTIVE" is displayed in the
rear view mirror accompanied by an audible
signal.
Always remove the key from the ignition switch when the vehicle is parked in
order to avoid discharging the 12
V accessory
battery.
Battery standby system
If your vehicle is to be out of use for an extended
period of time, such as during winter storage for
example, it is strongly recommended to put the
battery in standby mode in order to protect it and
optimise its life.
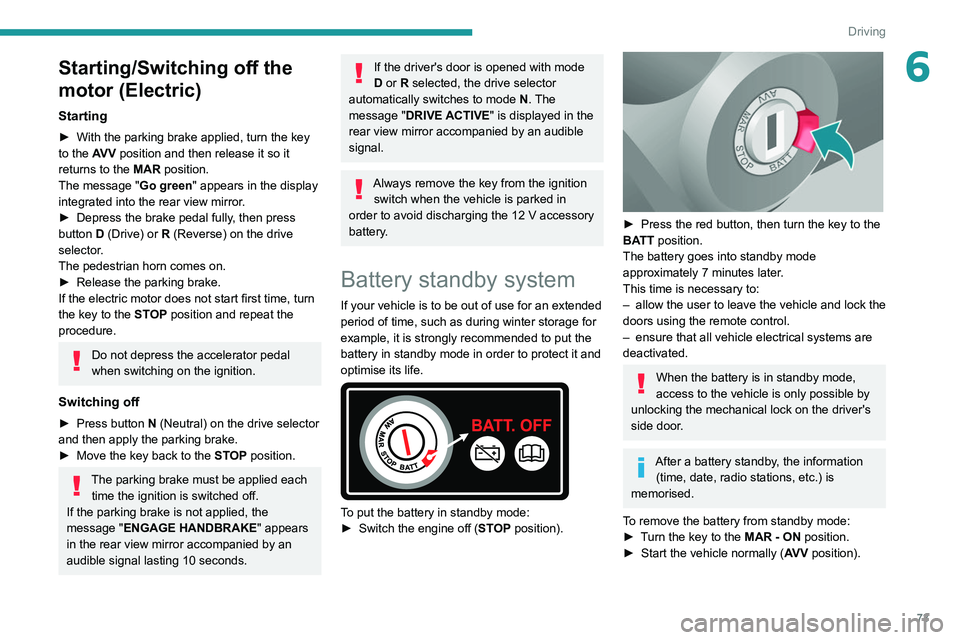
To put the battery in standby mode:
► Switch the engine off ( ST
OP position).
► Press the red button, then turn the key to the
BA TT position.
The battery goes into standby mode
approximately 7 minutes later.
This time is necessary to:
–
allow the user to leave the vehicle and lock the
doors using the remote control.
–
ensure that all vehicle electrical systems are
deactivated.
When the battery is in standby mode,
access to the vehicle is only possible by
unlocking the mechanical lock on the driver's
side door.
After a battery standby, the information (time, date, radio stations, etc.) is
memorised.
To remove the battery from standby mode:
►
T
urn the key to the MAR - ON position.
►
Start the vehicle normally ( AV
V position).