2021 PEUGEOT BOXER open bonnet
[x] Cancel search: open bonnetPage 12 of 212
10
Instruments
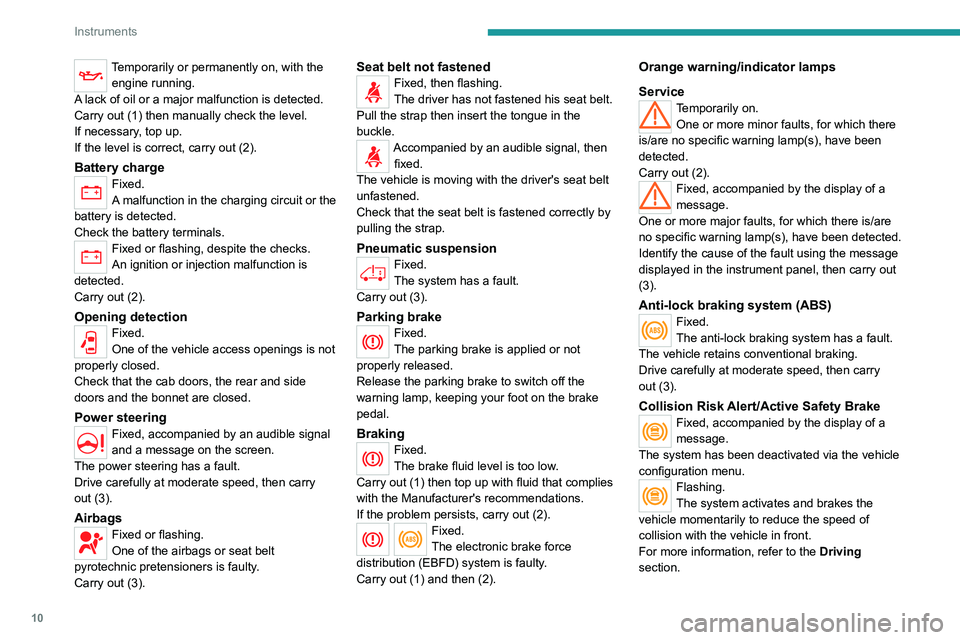
Temporarily or permanently on, with the engine running.
A lack of oil or a major malfunction is detected.
Carry out (1) then manually check the level.
If necessary, top up.
If the level is correct, carry out (2).
Battery chargeFixed.
A malfunction in the charging circuit or the
battery is detected.
Check the battery terminals.
Fixed or flashing, despite the checks.
An ignition or injection malfunction is
detected.
Carry out (2).
Opening detectionFixed.
One of the vehicle access openings is not
properly closed.
Check that the cab doors, the rear and side
doors and the bonnet are closed.
Power steering
Fixed, accompanied by an audible signal
and a message on the screen.
The power steering has a fault.
Drive carefully at moderate speed, then carry
out (3).
AirbagsFixed or flashing.
One of the airbags or seat belt
pyrotechnic pretensioners is faulty.
Carry out (3).
Seat belt not fastenedFixed, then flashing.
The driver has not fastened his seat belt.
Pull the strap then insert the tongue in the
buckle.
Accompanied by an audible signal, then fixed.
The vehicle is moving with the driver's seat belt
unfastened.
Check that the seat belt is fastened correctly by
pulling the strap.
Pneumatic suspensionFixed.
The system has a fault.
Carry out (3).
Parking brakeFixed.
The parking brake is applied or not
properly released.
Release the parking brake to switch off the
warning lamp, keeping your foot on the brake
pedal.
BrakingFixed.
The brake fluid level is too low.
Carry out (1) then top up with fluid that complies
with the Manufacturer's recommendations.
If the problem persists, carry out (2).
Fixed.
The electronic brake force
distribution
(EBFD) system is faulty.
Carry out (1) and then (2).
Orange warning/indicator lamps
Service
Temporarily on. One or more minor faults, for which there
is/are no specific warning lamp(s), have been
detected.
Carry out (2).
Fixed, accompanied by the display of a
message.
One or more major faults, for which there is/are
no specific warning lamp(s), have been detected.
Identify the cause of the fault using the message
displayed in the instrument panel, then carry out
(3).
Anti-lock braking system (ABS)Fixed.
The anti-lock braking system has a fault.
The vehicle retains conventional braking.
Drive carefully at moderate speed, then carry
out (3).
Collision Risk Alert/Active Safety BrakeFixed, accompanied by the display of a
message.
The system has been deactivated via the vehicle
configuration menu.
Flashing.
The system activates and brakes the
vehicle momentarily to reduce the speed of
collision with the vehicle in front.
For more information, refer to the Driving
section.
Page 29 of 212
27
Access
2Rear doors
With the vehicle stationary, when
opening the rear doors, the camera is
activated and transmits views to the screen
installed in the cab.
Opening
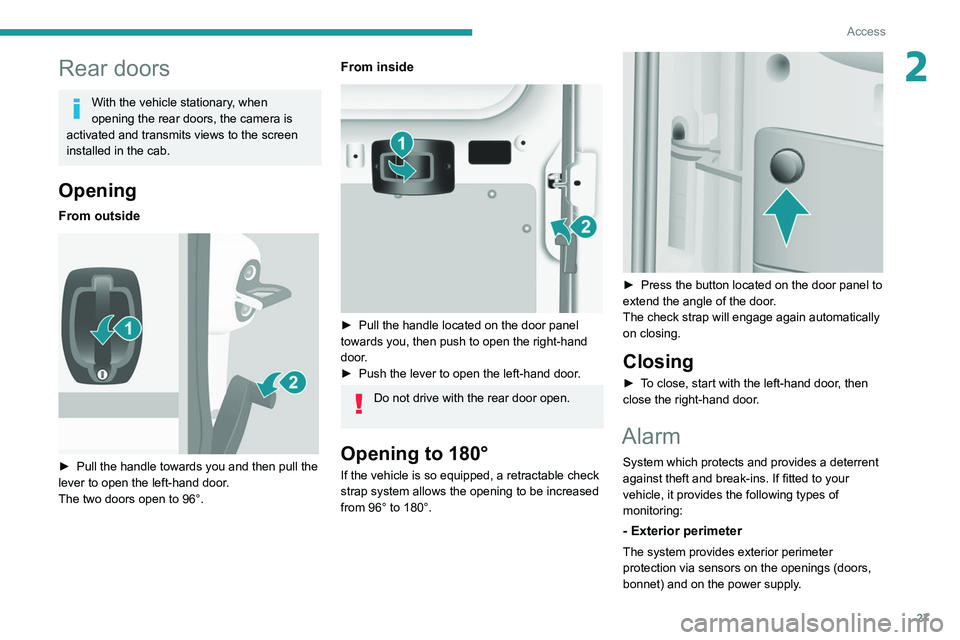
From outside
► Pull the handle towards you and then pull the
lever to open the left-hand door .
The two doors open to 96°.
From inside
► Pull the handle located on the door panel
towards you, then push to open the right-hand
door.
►
Push the lever to open the left-hand door
.
Do not drive with the rear door open.
Opening to 180°
If the vehicle is so equipped, a retractable check
strap system allows the opening to be increased
from 96° to 180°.
► Press the button located on the door panel to
extend the angle of the door .
The check strap will engage again automatically
on closing.
Closing
► To close, start with the left-hand door, then
close the right-hand door.
Alarm
System which protects and provides a deterrent
against theft and break-ins. If fitted to your
vehicle, it provides the following types of
monitoring:
- Exterior perimeter
The system provides exterior perimeter
protection via sensors on the openings (doors,
bonnet) and on the power supply.
Page 78 of 212

76
Driving
Stop & Start
The Stop & Start function puts the engine temporarily into standby - STOP mode - during
phases when the vehicle is stopped (red lights,
queues, etc.). The engine restarts automatically
- START mode - as soon as the driver wishes to
move off again.
Primarily designed for urban use, the function
is intended to reduce fuel consumption and
exhaust emissions as well as the noise level
when stationary.
The function does not affect the functionalities of
the vehicle, in particular the braking.
Deactivation/Reactivation
The function is activated by default when the
ignition is switched on.
To deactivate/reactivate the function:
► Press the button.
A message in the instrument panel confirms the
change of status.
When the function is deactivated, the indicator
lamp is lit; if the engine was in standby, it restarts
immediately.
To allow continuous operation of the air conditioning, deactivate the Stop & Start.
Opening the bonnet
Before doing anything under the bonnet,
deactivate the Stop & Start system to avoid
any risk of injury caused by the engine
restarting automatically.
Driving on flooded roads
Before entering into a flooded area, it is
strongly recommended that you deactivate
the Stop & Start system.
For more information on Driving
recommendations, particularly on flooded
roads, refer to the corresponding section.
Going into engine STOP
mode
With the vehicle stationary, place the gear lever
in neutral and release the clutch pedal.
This indicator lamp comes on in the instrument panel and the engine goes into
standby.
Automatic engine shutdown is only possible when the speed of the vehicle
has exceeded 6 mph (10 km/h), to avoid
repeated engine shutdowns when driving
slowly.
Never leave the vehicle without first
switching the ignition off with the key.
Never refuel with the engine in STOP
mode; you must switch off the ignition
using the key.
Special cases: STOP mode
not available
STOP mode is not activated when:
– the system is initialising,
–
the driver's door is open,
–
the driver's seat belt is not fastened,
–
the air conditioning is on,
–
the rear screen demisting is on,
–
the windscreen wipers are on fast wipe,
–
the reverse gear is engaged for the parking
manoeuvre,
–
some special conditions (battery charge,
engine temperature, particle filter regeneration,
braking assistance, exterior temperature, etc.)
Page 104 of 212
102
Practical information
Superfast charging: do not use the system
yourself and avoid approaching public fast
charging points. Leave the area and ask a
third party to recharge the vehicle.
Before charging
Accelerated charging
Depending on the context:
►
Have a professional check that the
electrical system to be used complies with
applicable standards and is compatible with
the vehicle.
►
Have an accelerated charging unit which
is compatible with the vehicle installed by a
professional.
Favour the use of the cable supplied with the
vehicle or as an accessory
.
For more information, contact a PEUGEOT
dealer or a qualified workshop.
Superfast charging
Check that the fast public charging
station and its charging cable are compatible
with the vehicle.
During charging
Never work under the bonnet:
– Some areas remain very hot, even an
hour after charging ends - risk of burns!
–
The fan may start at any time - risk of cuts
or strangulation!
The performance of the traction battery varies depending on the outside
temperature and the temperature inside the
traction battery itself.
During charging, the outside temperature
must ideally be between 0°C and 45°C.
Charging is not possible when the
temperature inside the traction battery is
below -5°C or above 55°C. Charging time
may be longer if the temperature is below
0°C.
In cold weather, immediately connect the
vehicle after switching off the ignition.
Significant variations in the level of
incoming electric current may stop the
charging process.
►
Disconnect the charging cable and wait for
the level of electric current to return to normal.
After charging
Check that the charging flap is closed.
Connection
► Switch the ignition off.
► Open the charging flap, remove the
protective covers and check that there are no
foreign bodies on the charging connector
.
Accelerated charging, mode 3
► Connect the charging cable to the charging
unit (if applicable).
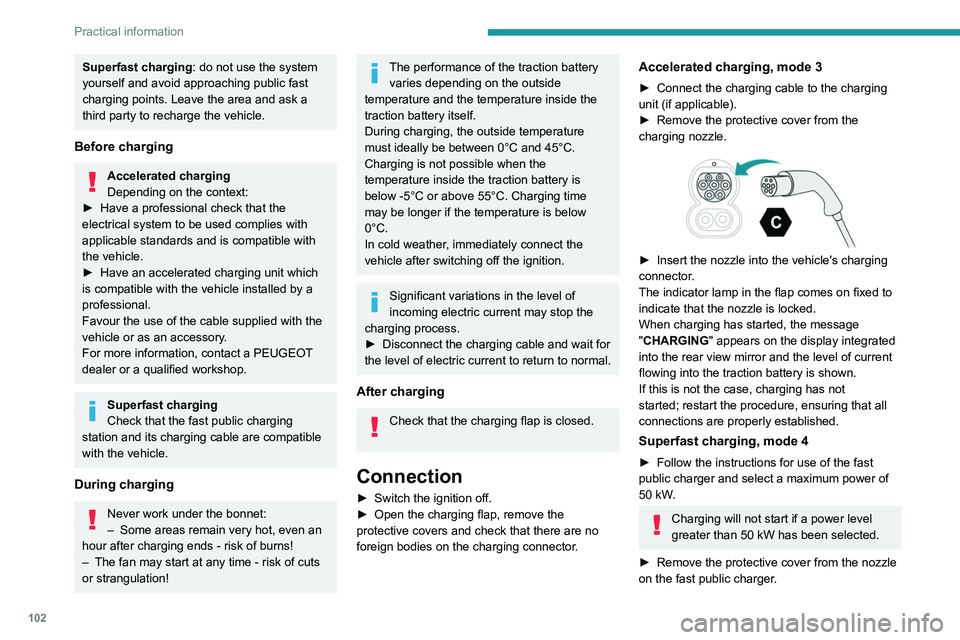
►
Remove the protective cover from the
charging nozzle.
► Insert the nozzle into the vehicle's charging
connector .
The indicator lamp in the flap comes on fixed to
indicate that the nozzle is locked.
When charging has started, the message
"CHARGING" appears on the display integrated
into the rear view mirror and the level of current
flowing into the traction battery is shown.
If this is not the case, charging has not
started; restart the procedure, ensuring that all
connections are properly established.
Superfast charging, mode 4
► Follow the instructions for use of the fast
public charger and select a maximum power of
50 kW
.
Charging will not start if a power level
greater than 50 kW has been selected.
►
Remove the protective cover from the nozzle
on the fast public charger
.
Page 109 of 212
107
Practical information
7Roof-mounted carrying
systems
For safety reasons and to avoid damaging the
roof, it is imperative to use a carrying system
(roof bars or roof rack) approved for the vehicle.
Roof bars can only be fitted on H1 or H2 height
versions of vans, combis and minibuses. On
minibuses, check the presence of a roof air
conditioning unit.
The carrying device must be fixed to the
anchorage points on the roof of the vehicle: 6,
8 or 10, depending on the wheelbase of the
vehicle.
Observe the fitting instructions and the
conditions of use in the guide supplied with the
carrying device.
Maximum roof load, evenly distributed:
150 kg, for all versions, within the limits
of the gross vehicle weight (GVW).
Roofs cannot be equipped with a
carrying system on H3 height versions.
Strictly observe the legal provisions in
force concerning the maximum volume
measurements.
For more information on the Technical
data of the vehicle, and in particular on
the dimensions, refer to the corresponding
section.
Bonnet
Opening
Before doing anything under the bonnet,
deactivate the Stop & Start system to
avoid the risk of injury related to an automatic
change to START mode.
Electric motor
Take care with objects or clothing that
could be caught in the blades of the cooling
fan or in certain moving components - risk of
strangulation and serious injury!
Before carrying out any work under the
bonnet, you must switch off the ignition
and
disconnect the nozzle from the charging
connector
if it is connected.
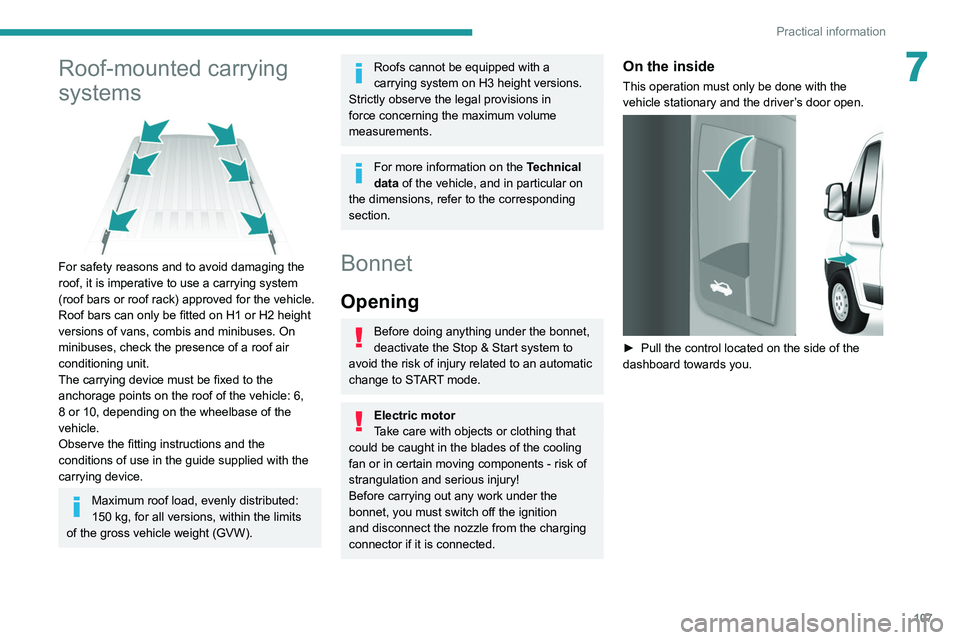
On the inside
This operation must only be done with the
vehicle stationary and the driver’s door open.
► Pull the control located on the side of the
dashboard towards you.
Page 110 of 212

108
Practical information
On the outside
► Push the lever located above the grille
upwards and lift the bonnet.
Do not open the bonnet under very windy
conditions.
When the engine is hot, handle the lever and
the stay with care (risk of burns).
► Unclip the stay and rotate it to insert it into
the first slot and then into the second slot.
Because of the presence of electrical
equipment under the bonnet, it is
recommended that exposure to water (rain,
washing, etc.) be limited.
Closing the bonnet
► Before closing the bonnet, replace the stay in
its housing.
►
Lower the bonnet and release it near the end
of its travel. Check the bonnet is locked.
Diesel engines
1. Screenwash and headlamp washer reservoir
2. Power steering fluid reservoir
3. Engine coolant reservoir
4. Brake and clutch fluid reservoir
5. Diesel fuel filter
6. Fusebox
7. Air filter
8. Dipstick
9. Engine oil filler cap
Battery connections:
+ Positive metallic terminal
- Negative metallic terminal (earth)
Diesel fuel system
This system is under very high pressure.
Page 127 of 212
125
In the event of a breakdown
8► Check that the wheel is flat against the floor
of the vehicle and that the notch G
of the winch
is visible.
►
Store the tools and the wheel trim (depending
on version).
For more information on
the Identification markings of the
vehicle, and in particular the tyre pressure
label, refer to the corresponding section.
Changing a bulb
The headlamps have polycarbonate lenses with a protective coating:
►
do not clean them using a dry or
abrasive cloth, nor with a detergent or
solvent product,
►
use a sponge and soapy water or a pH
neutral product,
►
when using a high pressure washer on
persistent marks, do not keep the lance
directed towards the lamps or their edges for
too long, so as not to damage their protective
coating and seals.
Changing a bulb must only be done with
the ignition off and after the lamp has
been switched off for several minutes - Risk
of serious burns!
►
Do not touch the bulb directly with your
fingers, use a lint-free cloth.
It is essential only to use anti-ultraviolet
(UV) type bulbs, so as not to damage the
headlamp.
Always replace a failed bulb with a new bulb
with the same type and specification.
In some weather conditions (e.g. low
temperature or humidity), the presence
of misting on the internal surface of the glass
of the headlamps and rear lamps is normal; it
disappears after the lamps have been on for a
few minutes.
Types of bulb
Various types of bulb are fitted on the vehicle. To
remove them:
Type A All-glass bulb: pull gently as it is fitted by
pressure.
Type B Bayonet bulb: press on the bulb then
turn it anti-clockwise.
Type C Cylindrical bulb: ease the contacts apart.
Type D Halogen bulb: release the retaining
spring from its housing.
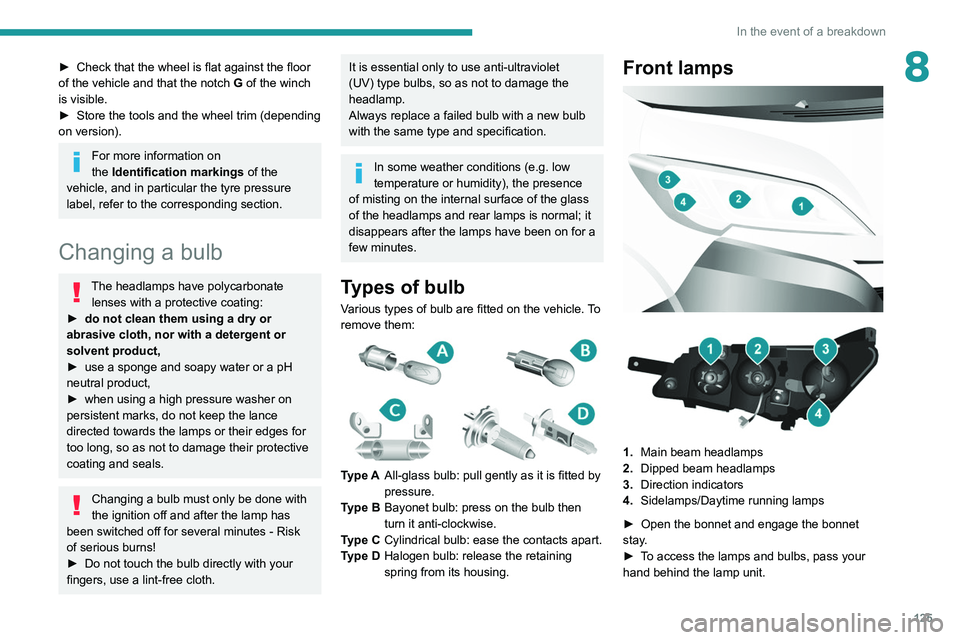
Front lamps
1. Main beam headlamps
2. Dipped beam headlamps
3. Direction indicators
4. Sidelamps/Daytime running lamps
►
Open the bonnet and engage the bonnet
stay
.
►
T
o access the lamps and bulbs, pass your
hand behind the lamp unit.
Page 133 of 212

131
In the event of a breakdown
8Disconnecting the battery
► Tilt lever 1 downwards to release the
terminals.
►
Remove terminals
2
from the negative (-)
terminal.
Wait approximately 6 minutes after
switching off the ignition before
disconnecting the battery.
Do not disconnect the terminals while the
engine is running.
Do not charge a battery without disconnecting
the terminals first.
Close the windows and the doors before
disconnecting the battery.
After reconnecting the battery, turn on the
ignition and wait 1 minute before starting the
engine, to enable the electronic systems to
initialise. If minor problems nevertheless persist
following this operation, contact a PEUGEOT
dealer or a qualified workshop.
It is recommended to disconnect the (-)
terminal of the battery if the vehicle is to
be left unused for more than one month.
The description of the battery charging
procedure is only indicative.
After prolonged battery disconnection, it may be
necessary to reinitialise the following functions:
–
the display parameters (date, time, language,
distance and temperature units),
–
the stations of the audio system,
–
the central locking.
Some settings are cancelled and must be
entered once again; contact a PEUGEOT
dealer.
If the vehicle is equipped with a tachograph or
an alarm,
it is recommended that the (-) terminal
of the battery (located under the floor on the
left-hand side, in the cab) be disconnected if the
vehicle is not going to be used for more than 5
days.
Starting using another
battery
Never start the engine by connecting a
battery charger.
Never use a 24 V or higher battery booster.
Check beforehand that the backup battery
has a nominal voltage of 12 V and a capacity
at least equal to that of the discharged
battery.
The two vehicles must not be in contact with
each other.
Switch off all electricity-consuming equipment
on both vehicles (audio system, wipers,
lighting, etc.).
Make sure that the jump leads are well away
from the engine’s moving parts (fan, belt,
etc.).
Do not disconnect the (+) terminal while the
engine is running.
Starting the engine using another battery is to be
performed inside the engine compartment.
►
Open the bonnet.
A. Positive metallic terminal on the vehicle
B. Backup battery
C. Vehicle earth point
The positive metallic terminal A is accessible
through a flap located on the side of the fuse
box.