2021 PEUGEOT BOXER seats
[x] Cancel search: seatsPage 4 of 212

2
Contents
■
Overview
■
Eco-driving
1InstrumentsInstrument panel 8
Warning and indicator lamps 9
Indicators 13
Vehicle configuration (MODE) 15
Touch screen audio and multimedia system 21
Setting the date and time 21
Trip computer 22
Trip computer 22
2AccessKey 23
Remote control 23
Front doors 26
Sliding side door 26
Rear doors 27
Alarm 27
Electric windows 28
3Ease of use and comfortFront seats 30
Front bench seat 31
Rear seats 32
Rear bench seat 32
Steering wheel adjustment 33
Mirrors 34
Heating and Ventilation 35
Heating/Manual air conditioning 35
Automatic air conditioning 36
Heating (Electric) 37
Additional heating systems 39
Rear heating/air conditioning 39
Additional programmable heating 40
Front demist - defrost 42
Rear screen de-icing 42
Cab layout 43
Rear fittings 47
Exterior fittings 49
4Lighting and visibilityLighting control stalk 51
Direction indicators 51
LED daytime running lamps 51
Automatic headlamp dipping 52
Headlamp beam height adjustment 54
Wiper control stalk 54
Changing a wiper blade 55
5SafetyGeneral safety recommendations 56
Hazard warning lamps 56
Horn 56
Pedestrian horn (Electric) 57
Electronic stability control (ESC) 57
Seat belts 60
Airbags 62
Child seats 63
Deactivating the front passenger airbag 65
ISOFIX seats 66
Child lock 68
6DrivingDriving recommendations 69
Starting-switching off the engine 72
Battery standby system 73
Parking brake 74
Gearbox 74
Drive selector (Electric) 75
Gear shift indicator 75
Stop & Start 76
Hill start assist 77
Tyre under-inflation detection 78
Pneumatic suspension 79
Driving and manoeuvring aids - General
recommendations
80
Road signs recognition 82
Speed limiter 83
Cruise control - Specific recommendations 85
Cruise control 85
Lane departure warning system 86
Blind spot monitoring with trailer detection 89
Active Safety Brake with Collision Risk Alert and
Intelligent emergency braking assistance
90
Rear parking sensors 93
Reversing camera 94
7Practical informationFuel 96
Compatibility of fuels 97
Charging system (Electric) 97
Charging the traction battery (Electric) 101
Snow chains 103
Towing a trailer 104
Towbar with quickly detachable towball 104
Roof-mounted carrying system 107
Bonnet 107
Page 32 of 212
30
Ease of use and comfort
Driver's seat
For safety reasons, seat adjustments
must only be made when the vehicle is
stationary.
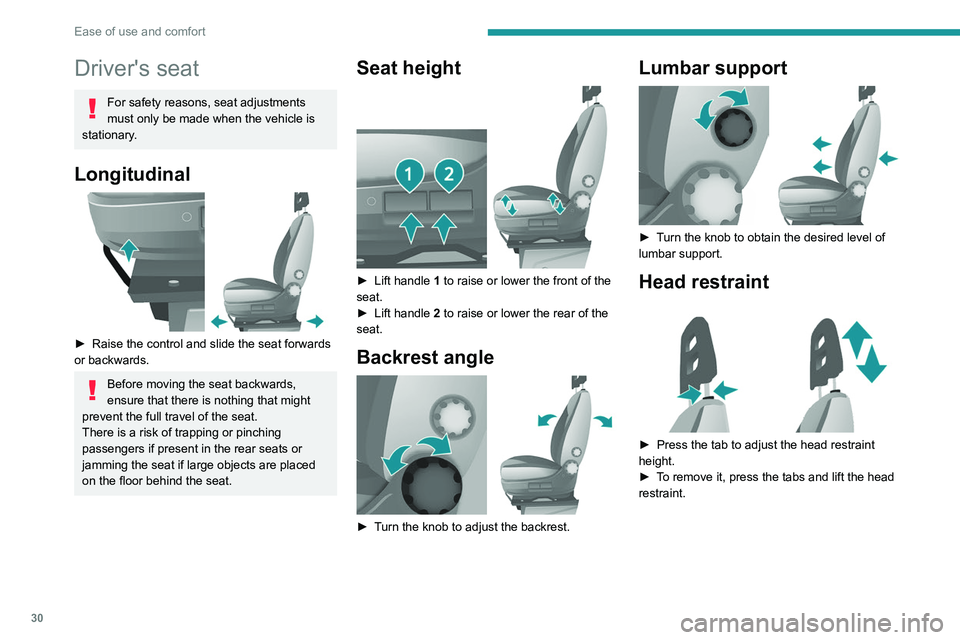
Longitudinal
► Raise the control and slide the seat forwards
or backwards.
Before moving the seat backwards,
ensure that there is nothing that might
prevent the full travel of the seat.
There is a risk of trapping or pinching
passengers if present in the rear seats or
jamming the seat if large objects are placed
on the floor behind the seat.
Seat height
► Lift handle 1 to raise or lower the front of the
seat.
►
Lift handle 2
to raise or lower the rear of the
seat.
Backrest angle
► Turn the knob to adjust the backrest.
Lumbar support
► Turn the knob to obtain the desired level of
lumbar support.
Head restraint
► Press the tab to adjust the head restraint
height.
►
T
o remove it, press the tabs and lift the head
restraint.
Page 33 of 212
31
Ease of use and comfort
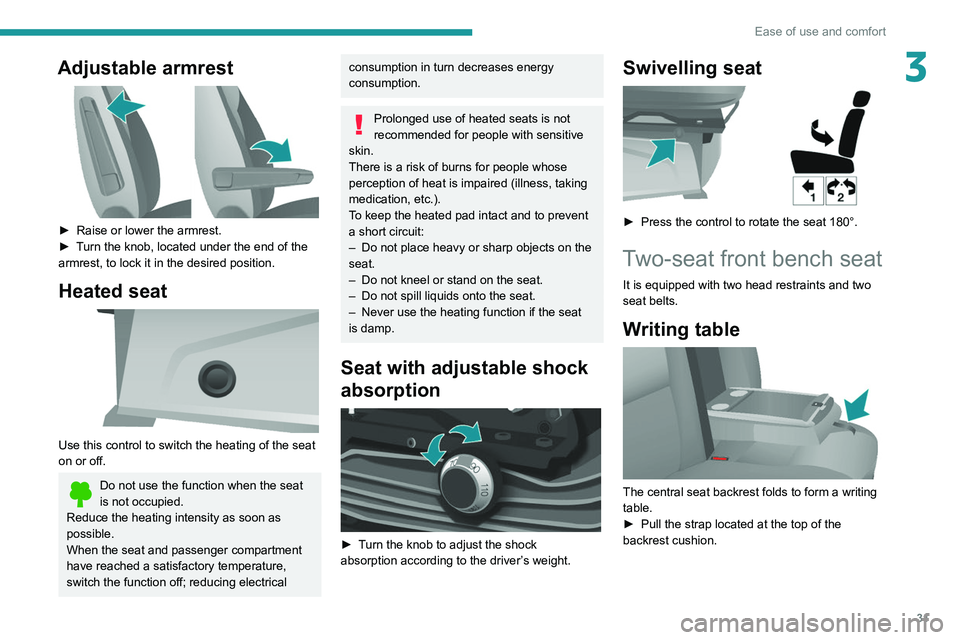
3Adjustable armrest
► Raise or lower the armrest.
► T urn the knob, located under the end of the
armrest, to lock it in the desired position.
Heated seat
Use this control to switch the heating of the seat
on or off.
Do not use the function when the seat
is not occupied.
Reduce the heating intensity as soon as
possible.
When the seat and passenger compartment
have reached a satisfactory temperature,
switch the function off; reducing electrical
consumption in turn decreases energy
consumption.
Prolonged use of heated seats is not
recommended for people with sensitive
skin.
There is a risk of burns for people whose
perception of heat is impaired (illness, taking
medication, etc.).
To keep the heated pad intact and to prevent
a short circuit:
–
Do not place heavy or sharp objects on the
seat.
–
Do not kneel or stand on the seat.
–
Do not spill liquids onto the seat.
–
Never use the heating function if the seat
is damp.
Seat with adjustable shock
absorption
► Turn the knob to adjust the shock
absorption according to the driver’s weight.
Swivelling seat
► Press the control to rotate the seat 180°.
Two-seat front bench seat
It is equipped with two head restraints and two
seat belts.
Writing table
The central seat backrest folds to form a writing
table.
►
Pull the strap located at the top of the
backrest cushion.
Page 34 of 212
32
Ease of use and comfort
Rear seats
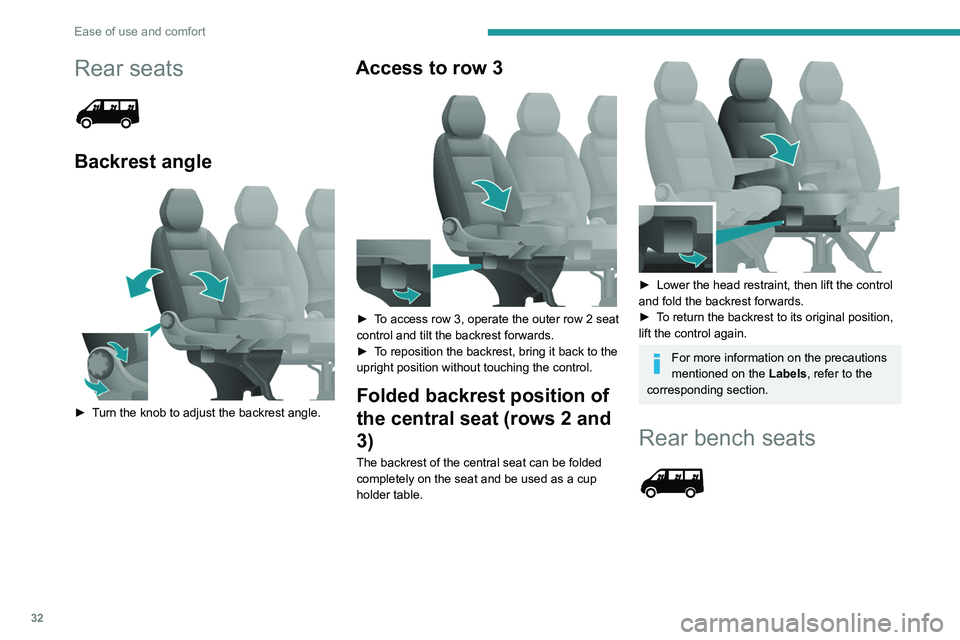
Backrest angle
► Turn the knob to adjust the backrest angle.
Access to row 3
► To access row 3, operate the outer row 2 seat
control and tilt the backrest forwards.
►
T
o reposition the backrest, bring it back to the
upright position without touching the control.
Folded backrest position of
the central seat (rows 2 and
3)
The backrest of the central seat can be folded
completely on the seat and be used as a cup
holder table.
► Lower the head restraint, then lift the control
and fold the backrest forwards.
►
T
o return the backrest to its original position,
lift the control again.
For more information on the precautions
mentioned on the Labels, refer to the
corresponding section.
Rear bench seats
Page 35 of 212
33
Ease of use and comfort
3
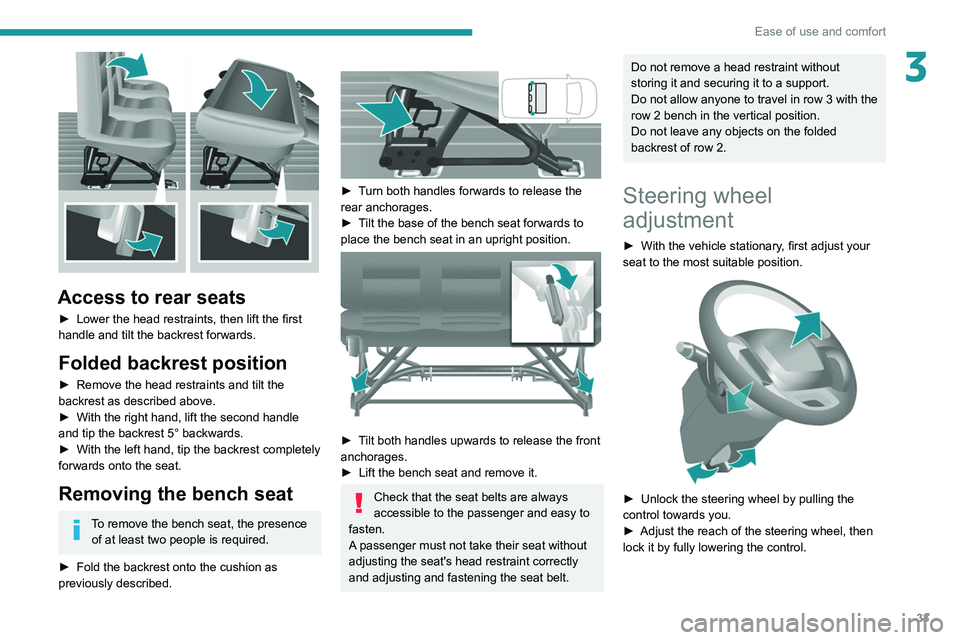
Access to rear seats
► Lower the head restraints, then lift the first
handle and tilt the backrest forwards.
Folded backrest position
► Remove the head restraints and tilt the
backrest as described above.
►
With the right hand, lift the second handle
and tip the backrest 5° backwards.
►
With the left hand, tip the backrest completely
forwards onto the seat.
Removing the bench seat
To remove the bench seat, the presence of at least two people is required.
►
Fold the backrest onto the cushion as
previously described.
► Turn both handles forwards to release the
rear anchorages.
►
T
ilt the base of the bench seat forwards to
place the bench seat in an upright position.
► Tilt both handles upwards to release the front
anchorages.
►
Lift the bench seat and remove it.
Check that the seat belts are always
accessible to the passenger and easy to
fasten.
A passenger must not take their seat without
adjusting the seat's head restraint correctly
and adjusting and fastening the seat belt.
Do not remove a head restraint without
storing it and securing it to a support.
Do not allow anyone to travel in row 3 with the
row 2 bench in the vertical position.
Do not leave any objects on the folded
backrest of row 2.
Steering wheel
adjustment
► With the vehicle stationary , first adjust your
seat to the most suitable position.
► Unlock the steering wheel by pulling the
control towards you.
►
Adjust the reach of the steering wheel, then
lock it by fully lowering the control.
Page 41 of 212
39
Ease of use and comfort
3Additional rear ventilation
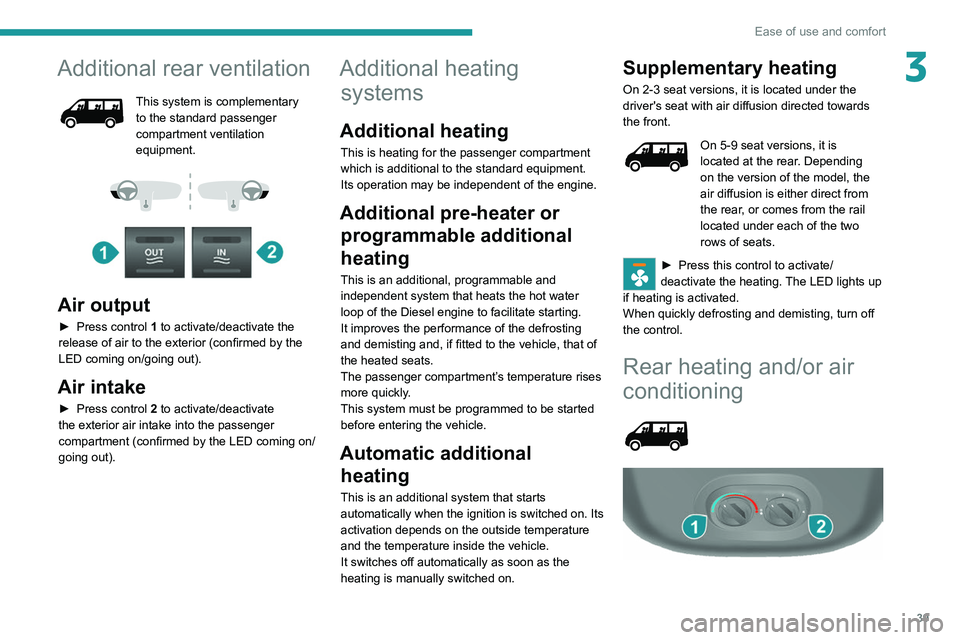
This system is complementary
to the standard passenger
compartment ventilation
equipment.
Air output
► Press control 1 to activate/deactivate the
release of air to the exterior (confirmed by the
LED coming on/going out).
Air intake
► Press control 2 to activate/deactivate
the exterior air intake into the passenger
compartment (confirmed by the LED coming on/
going out).
Additional heating systems
Additional heating
This is heating for the passenger compartment
which is additional to the standard equipment.
Its operation may be independent of the engine.
Additional pre-heater or
programmable additional
heating
This is an additional, programmable and
independent system that heats the hot water
loop of the Diesel engine to facilitate starting.
It improves the performance of the defrosting
and demisting and, if fitted to the vehicle, that of
the heated seats.
The passenger compartment’s temperature rises
more quickly.
This system must be programmed to be started
before entering the vehicle.
Automatic additional heating
This is an additional system that starts
automatically when the ignition is switched on. Its
activation depends on the outside temperature
and the temperature inside the vehicle.
It switches off automatically as soon as the
heating is manually switched on.
Supplementary heating
On 2-3 seat versions, it is located under the
driver's seat with air diffusion directed towards
the front.
On 5-9 seat versions, it is
located at the rear. Depending
on the version of the model, the
air diffusion is either direct from
the rear, or comes from the rail
located under each of the two
rows of seats.
► Press this control to activate/
deactivate the heating. The LED lights up
if heating is activated.
When quickly defrosting and demisting, turn off
the control.
Rear heating and/or air
conditioning
Page 50 of 212
48
Ease of use and comfort
Courtesy lamps
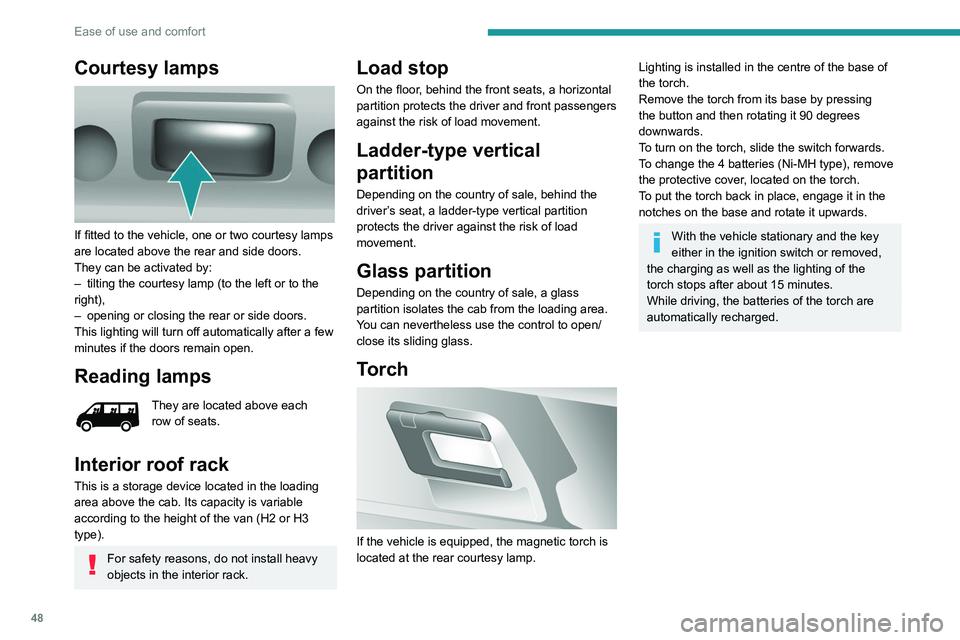
If fitted to the vehicle, one or two courtesy lamps
are located above the rear and side doors.
They can be activated by:
–
tilting the courtesy lamp (to the left or to the
right),
–
opening or closing the rear or side doors.
This lighting will turn off automatically after a few
minutes if the doors remain open.
Reading lamps
They are located above each
row of seats.
Interior roof rack
This is a storage device located in the loading
area above the cab. Its capacity is variable
according to the height of the van (H2 or H3
type).
For safety reasons, do not install heavy
objects in the interior rack.
Load stop
On the floor, behind the front seats, a horizontal
partition protects the driver and front passengers
against the risk of load movement.
Ladder-type vertical
partition
Depending on the country of sale, behind the
driver’s seat, a ladder-type vertical partition
protects the driver against the risk of load
movement.
Glass partition
Depending on the country of sale, a glass
partition isolates the cab from the loading area.
You can nevertheless use the control to open/
close its sliding glass.
Torch
If the vehicle is equipped, the magnetic torch is
located at the rear courtesy lamp.
Lighting is installed in the centre of the base of
the torch.
Remove the torch from its base by pressing
the button and then rotating it 90 degrees
downwards.
To turn on the torch, slide the switch forwards.
To change the 4 batteries (Ni-MH type), remove
the protective cover, located on the torch.
To put the torch
back in place, engage it in the
notches on the base and rotate it upwards.
With the vehicle stationary and the key
either in the ignition switch or removed,
the charging as well as the lighting of the
torch stops after about 15 minutes.
While driving, the batteries of the torch are
automatically recharged.
Page 63 of 212
61
Safety
5Height adjustment
► On the driver's side or the side passenger
seat side, squeeze the control with the belt
return and slide the whole thing, then release to
lock.
The belt associated with the central seat is not
height adjustable.
If the driver's seat belt is unfastened,
START mode of Stop & Start will not be
invoked. The engine can then only be
restarted using the key.
Rear seat belts
The rear seats / bench seats are fitted with
three-point inertia reel seat belts.
The central seat has a guide and an inertia reel,
which are attached to the backrest.
Each side seat is provided with a support to
hang the belt buckle when not in use.
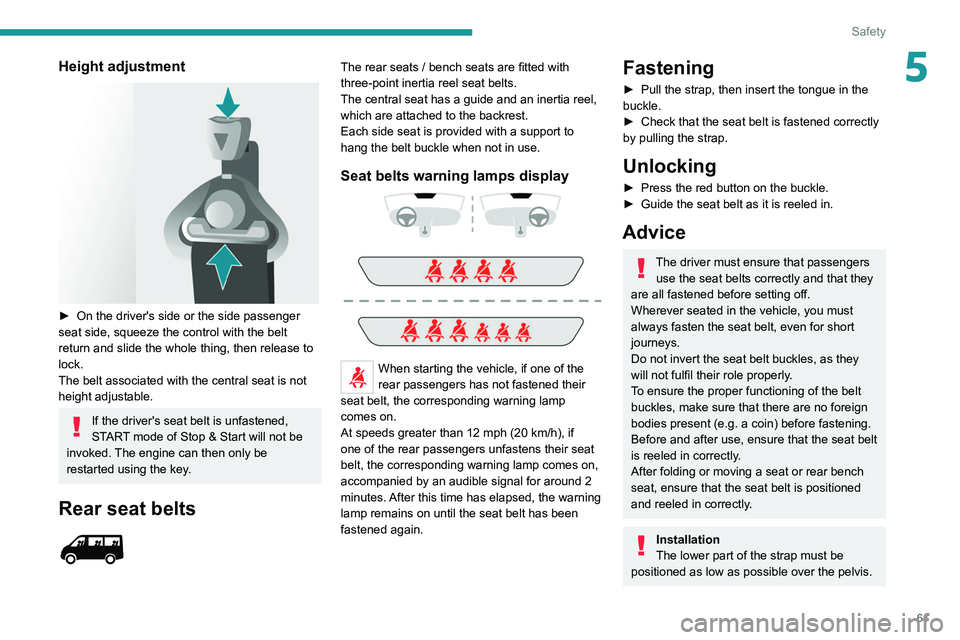
Seat belts warning lamps display
When starting the vehicle, if one of the
rear passengers has not fastened their
seat belt, the corresponding warning lamp
comes on.
At speeds greater than 12 mph (20
km/h), if
one of the rear passengers unfastens their seat
belt, the corresponding warning lamp comes on,
accompanied by an audible signal for around 2
minutes. After this time has elapsed, the warning
lamp remains on until the seat belt has been
fastened again.
Fastening
► Pull the strap, then insert the tongue in the
buckle.
►
Check that the seat belt is fastened correctly
by pulling the strap.
Unlocking
► Press the red button on the buckle.
► Guide the seat belt as it is reeled in.
Advice
The driver must ensure that passengers use the seat belts correctly and that they
are all fastened before setting off.
Wherever seated in the vehicle, you must
always fasten the seat belt, even for short
journeys.
Do not invert the seat belt buckles, as they
will not fulfil their role properly.
To ensure the proper functioning of the belt
buckles, make sure that there are no foreign
bodies present (e.g.
a coin) before fastening.
Before and after use, ensure that the seat belt
is reeled in correctly.
After folding or moving a seat or rear bench
seat, ensure that the seat belt is positioned
and reeled in correctly.
Installation
The lower part of the strap must be
positioned as low as possible over the pelvis.