2021 Peugeot 308 ECO mode
[x] Cancel search: ECO modePage 124 of 244

122
Driving
Rear view
To activate the camera located on the tailgate,
engage reverse gear and do not exceed a speed
of 6 mph (10 km/h).
The system is deactivated:
– If a trailer is attached or a bicycle carrier
is fitted on a towing device (vehicle fitted
with a towing device installed in line with the
manufacturer's recommendations).
– Automatically, at speeds above approximately
6 mph (10 km/h),
– Automatically, if the tailgate is opened.
– Upon changing out of reverse gear (the image
remains displayed for 7 seconds).
– By pressing the white arrow in the upper-left
corner of the touch screen.
Malfunction
In the event of a malfunction when
changing into reverse, this warning lamp
comes on on the instrument panel, accompanied
by an onscreen message and an audible signal
(short beep).
Contact a PEUGEOT dealer or a qualified
workshop to have the system checked.
Visiopark 1
Refer to the General recommendations on the
use of driving and manoeuvring aids .
As soon as reverse gear is engaged with the
engine running, this system displays views of
your vehicle’s close surroundings on the touch
screen using a camera located at the rear of the
vehicle.
The screen is divided into two parts with a
contextual view and a view from above the
vehicle in its close surroundings.
The parking sensors supplement the information
on the view from above the vehicle.
Various contextual views may be displayed:
–
Standard view
.
–
180° view
.
–
Zoom view
.
AUTO mode is activated by default.
In this mode, the system chooses the best view
to display
(standard or zoom).
You can change the type of view at any time
during a manoeuvre.
The system status is not saved when the ignition
is switched off.
Principle of operation
Using the rear camera, the vehicle's close
surroundings are recorded during manoeuvres
at low speed.
An image from above your vehicle in its close
surroundings is reconstructed (represented
between the brackets) in real time and as the
manoeuvre progresses.
It facilitates the alignment of your vehicle when
parking and allows obstacles close to the vehicle
to be seen. It is automatically deleted if the
vehicle remains stationary for too long.
Page 125 of 244

123
Driving
6Rear view
To activate the camera located on the tailgate,
engage reverse gear and do not exceed a speed
of 6 mph (10 km/h).
The system is deactivated:
–
If a trailer is attached or a bicycle carrier
is fitted on a towing device (vehicle fitted
with a towing device installed in line with the
manufacturer's recommendations).
–
Automatically
, at speeds above approximately
6 mph (10
km/h),
–
Automatically
, if the tailgate is opened.
–
Upon changing out of reverse gear (the image
remains displayed for 7
seconds).
–
By pressing the white arrow in the upper-left
corner of the touch screen.
AUTO mode
This mode is activated by default.
Using sensors in the rear bumper, the automatic
view changes from the rear view (standard) to
the view from above (zoom) as an obstacle is
approached at the level of the red line (less than
30
cm) during a manoeuvre.
Standard view
The area behind the vehicle is displayed on the
screen. The blue lines
1 represent the width of your
vehicle, with the mirrors unfolded; their direction
changes according to the position of the steering
wheel.
The red line 2 represents a distance of 30 cm
from the rear bumper; the two blue lines 3 and 4
represent 1 m and 2 m, respectively.
This view is available with AUTO mode or in the
view selection menu.
Zoom view
The camera records the vehicle's surroundings
during the manoeuvre in order to create a
view from above the rear of the vehicle in its
near surroundings, allowing the vehicle to be
manoeuvred around nearby obstacles.
This view is available with AUTO mode or in the
view selection menu.
Page 126 of 244

124
Driving
Obstacles may appear further away than
they actually are.
It is important to monitor the sides of the
vehicle during the manoeuvre, using the
mirrors.
Parking sensors also provide additional
information about the area around the vehicle.
180° view
The 180° view facilitates reversing out of a
parking space, making it possible to see the
approach of vehicles, pedestrians and cyclists.
This view is not recommended for carrying out a
complete manoeuvre.
It features 3 areas: left A, centre B and right C.
This view is only available via the view selection
menu.
Park Assist
Refer to the General recommendations on the
use of driving and manoeuvring aids .
This system provides active parking
assistance:
it detects a parking space then operates the
steering system to park in this space.
With a manual gearbox, the driver manages the
accelerator, brakes, gears and clutch.
With an automatic gearbox (EAT6/EAT8), the
driver manages the accelerator, brakes and
gears.
During phases of entry into and exit from a
parking space, the system provides visual and
audible information to the driver in order to make
the manoeuvres safe. Several forward and
reverse manoeuvres may be required.
At any time, the driver can take back control by
holding the steering wheel.
In some circumstances, the sensors may
not detect small obstacles located in their
blind spots.
The Park Assist system cannot work with the engine off.
The Park Assist system provides assistance for
the following manoeuvres:
A. Entry into a "parallel" parking space.
B. Exit from a "parallel" parking space.
C. Entry into a "bay" parking space.
During manoeuvring phases, the steering
wheel performs rapid turns: do not hold
the steering wheel, do not put your hands
between the spokes of the steering wheel.
Watch out for any object that could interfere
with the manoeuvre (loose clothing, scarves,
ties, etc.)- risk of injury!
When Park Assist is activated, it prevents
Stop & Start from going into STOP mode.
In STOP mode, activation of Park Assist
restarts the engine.
The Park Assist system takes control of the steering for a maximum of 4
manoeuvring cycles. The function is
deactivated after these 4 cycles. If you think
that your vehicle is not positioned correctly,
Page 141 of 244

139
Practical information
7► Lift the protective cover on the connection
socket and connect the trailer's electric plug.
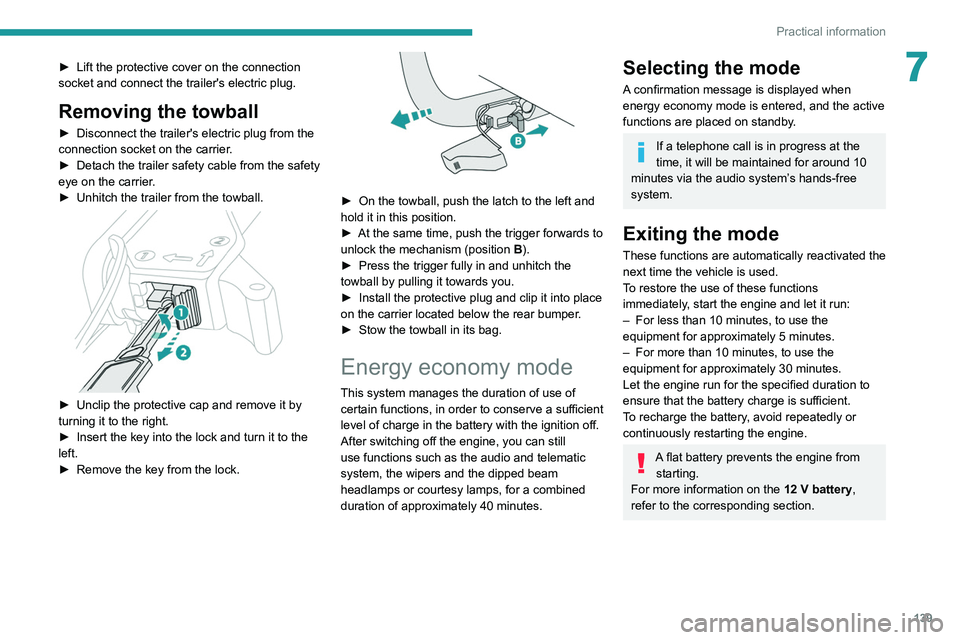
Removing the towball
► Disconnect the trailer's electric plug from the
connection socket on the carrier .
►
Detach the trailer safety cable from the safety
eye on the carrier
.
►
Unhitch the trailer from the towball.
► Unclip the protective cap and remove it by
turning it to the right.
►
Insert the key into the lock and turn it to the
left.
►
Remove the key from the lock.
► On the towball, push the latch to the left and
hold it in this position.
►
At the same time, push the trigger forwards to
unlock the mechanism (position B
).
►
Press the trigger fully in and unhitch the
towball by pulling it towards you.
►
Install the protective plug and clip it into place
on the carrier
located below the rear bumper.
►
Stow the towball in its bag.
Energy economy mode
This system manages the duration of use of
certain functions, in order to conserve a sufficient
level of charge in the battery with the ignition off.
After switching off the engine, you can still
use functions such as the audio and telematic
system, the wipers and the dipped beam
headlamps or courtesy lamps, for a combined
duration of approximately 40 minutes.
Selecting the mode
A confirmation message is displayed when
energy economy mode is entered, and the active
functions are placed on standby.
If a telephone call is in progress at the
time, it will be maintained for around 10
minutes via the audio system’s hands-free
system.
Exiting the mode
These functions are automatically reactivated the
next time the vehicle is used.
To restore the use of these functions
immediately, start the engine and let it run:
–
For less than 10 minutes, to use the
equipment for approximately 5 minutes.
–
For more than 10 minutes, to use the
equipment for approximately 30 minutes.
Let the engine run for the specified duration to
ensure that the battery charge is sufficient.
T
o recharge the battery, avoid repeatedly or
continuously restarting the engine.
A flat battery prevents the engine from starting.
For more information on the 12
V battery,
refer to the corresponding section.
Page 142 of 244

140
Practical information
Load reduction mode
This system manages the use of certain
functions according to the level of charge
remaining in the battery.
When the vehicle is being driven, the load
reduction function temporarily deactivates certain
functions, such as the air conditioning and the
heated rear screen.
The deactivated functions are reactivated
automatically as soon as conditions permit.
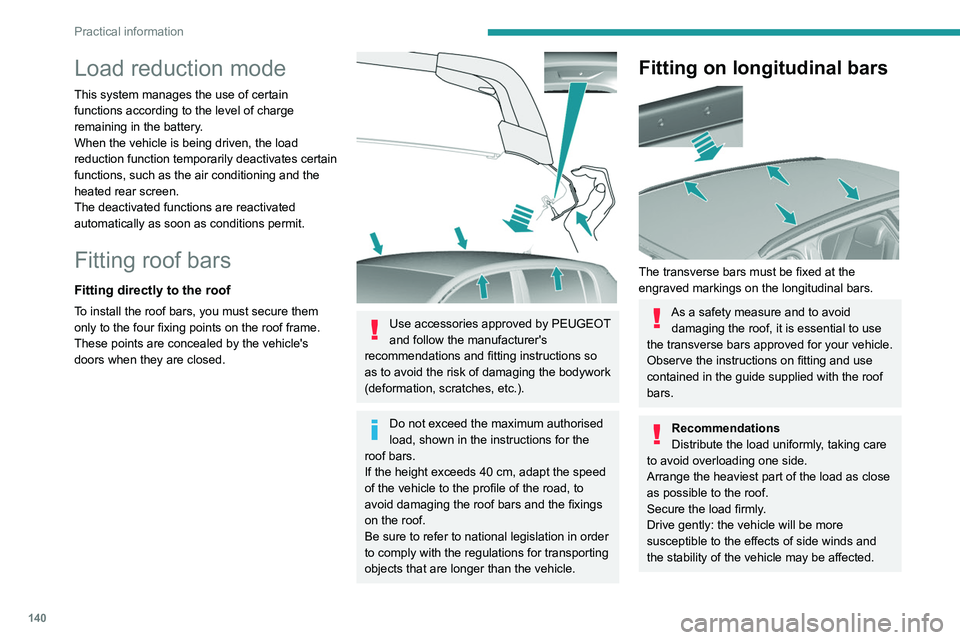
Fitting roof bars
Fitting directly to the roof
To install the roof bars, you must secure them
only to the four fixing points on the roof frame.
These points are concealed by the vehicle's
doors when they are closed.
Use accessories approved by PEUGEOT
and follow the manufacturer's
recommendations and fitting instructions so
as to avoid the risk of damaging the bodywork
(deformation, scratches, etc.).
Do not exceed the maximum authorised
load, shown in the instructions for the
roof bars.
If the height exceeds 40
cm, adapt the speed
of the vehicle to the profile of the road, to
avoid damaging the roof bars and the fixings
on the roof.
Be sure to refer to national legislation in order
to comply with the regulations for transporting
objects that are longer than the vehicle.
Fitting on longitudinal bars
The transverse bars must be fixed at the
engraved markings on the longitudinal bars.
As a safety measure and to avoid damaging the roof, it is essential to use
the transverse bars approved for your vehicle.
Observe the instructions on fitting and use
contained in the guide supplied with the roof
bars.
Recommendations
Distribute the load uniformly, taking care
to avoid overloading one side.
Arrange the heaviest part of the load as close
as possible to the roof.
Secure the load firmly.
Drive gently: the vehicle will be more
susceptible to the effects of side winds and
the stability of the vehicle may be affected.
On a long journey, check the security of the
load at every stop.
Remove the roof bars once they are no longer
needed.
Bonnet
Opening
► Open the left-hand front door.
► Pull the release lever, located at the bottom
of the door frame, towards you.
Page 150 of 244

148
Practical information
► Insert the AdBlue® pump nozzle and refill the
tank until the nozzle stops automatically.
Important:
To avoid overfilling the AdBlue® tank, it is
recommended:
►
T
o top up between 10 and 13 litres using
AdBlue
® containers.
Or
►
When filling at a service station, to stop
after the third automatic cut-off of the nozzle.
Free-wheeling
In certain situations, you must allow the vehicle
to free-wheel (while being towed, on a rolling
road, in an automatic car wash, or being
transported by rail or sea freight, etc.).
The procedure varies according to the type of
gearbox and parking brake.
With a manual gearbox and
electric parking brake
/
Release procedure
► With the engine running and while depressing
the brake pedal, move the gear selector to the
neutral position.
►
While depressing the brake pedal, switch off
the ignition. ►
Release the brake pedal, then switch on the
ignition again.
►
While depressing the brake pedal, press the
control lever to release the parking brake.
►
Release the brake pedal, then switch off the
ignition.
Reverting to normal operation
► While depressing the brake pedal, start the
engine.
With an automatic gearbox
and electric parking brake
/
Release procedure
► With the vehicle stationary and the engine
running, select mode N and switch off the
ignition.
Within 5
seconds:
►
Switch on the ignition again.
►
While depressing the brake pedal, move the
push selector forwards or backwards to confirm
mode
N.
►
While depressing the brake pedal, press the
control lever to release the parking brake.
►
Release the brake pedal, switch off the
ignition.
If the 5-second time limit is exceeded, the
gearbox engages mode P
; it is then necessary to
restart the procedure.
Reverting to normal operation
► While depressing the brake pedal, restart the
engine.
Keyless Entry and Starting
You must not depress the brake pedal
while switching the ignition on or off. If you do,
the engine will start, requiring you to restart
the procedure.
Advice on care and maintenance
General recommendations
Observe the following recommendations to avoid
damaging the vehicle.
Exterior
Never use a high-pressure jet wash in
the engine compartment - risk of
damaging the electrical components!
Do not wash the vehicle in bright sunshine or
extremely cold conditions.
When washing the vehicle in an
automatic roller-brush car wash, be sure
to lock the doors and, depending on version,
move the electronic key away and deactivate
Page 178 of 244

176
Technical data
Engine technical data and
towed loads
Engines
The engine characteristics are given in the
vehicle's registration document, as well as in
sales brochures.
The maximum power corresponds to the value type-approved on a test bed, under
conditions defined in European legislation
(Directive 1999/99/EC).
For more information, contact a PEUGEOT
dealer or a qualified workshop.
Weights and towed loads
The weights and towed loads relating to
the vehicle are indicated on the registration
document, as well as in sales brochures.
These values are also indicated on the
manufacturer's plate or label.
For more information, contact a PEUGEOT
dealer or a qualified workshop.
The GTW (Gross Train Weight) and towed load
values indicated are valid up to a maximum
altitude of 1,000 metres. The towed load value
must be reduced by 10% for each additional
1,000 metres of altitude.
The maximum authorised nose weight
corresponds to the weight permitted on the
towball.
When exterior temperatures are high, the
vehicle performance may be limited in
order to protect the engine. When the exterior
temperature is higher than 37°C, reduce the
towed weight.
Towing even with a lightly loaded vehicle can adversely affect its road holding.
Braking distances are increased when towing
a trailer.
When using a vehicle to tow, never exceed
a speed of 62 mph (100
km/h) (observe the
local legislation in force).
If the exterior temperature is high, it is
recommended that the engine is allowed
to idle for 1 to 2 minutes after the vehicle
comes to a stop, to facilitate its cooling.
Engines and towed loads - PETROL
Engine PureTech 110 BVM5PureTech 110 BVM6PureTech 130 BVM6
Gearbox Manual 5-speedManual 6-speedManual 6-speed
Code EB2DTM BE5EB2ADT STT MB6E EB2DTSM MCM
Body style Hatchback SW Hatchback SW Hatchback SW
Model codes LPHNVA LRHNVA LPHNPJ LRHNPJ LPHNWG LRHNWG
Cubic capacity (cc) 1,1991,1991,199
Max. power: EC standard (kW) 818196
Fuel UnleadedUnleadedUnleaded
Braked trailer (within the GTW limit) (kg)
on a 10% or 12% gradient 1,200
1,1001,3151,2001,3001,200
Unbraked trailer (kg) 575630575630580630
Maximum authorised nose weight (kg) 757175717571
Engine PureTech 130 S&S BVM6 PureTech 130 EAT6 PureTech 130 S&S EAT8
Gearbox Manual 6-speedAutomatic 6-speed Automatic 8-speed
Code EB2ADTS MB6EEB2DTSM AT6III EB2ADTS ATN8
Body style Hatchback SW Hatchback SW Hatchback SW
Model codes LPHNSJ LRHNSJ LPHNWV LRHNWV LPHNSK LRHNSK
Cubic capacity (cm
3) 1,1991,1991,199
Max. power: EC standard (kW) 969696
Fuel UnleadedUnleadedUnleaded
Braked trailer (within the GTW limit) (kg)
on a 10% or 12% gradient 1,300
1,2001,2001,1001,2001,200
Page 180 of 244

178
Technical data
EnginePureTech 130 S&S BVM6 PureTech 130 EAT6 PureTech 130 S&S EAT8
Gearbox Manual 6-speedAutomatic 6-speed Automatic 8-speed
Code EB2ADTS MB6EEB2DTSM AT6III EB2ADTS ATN8
Body style Hatchback SW Hatchback SW Hatchback SW
Model codes LPHNSJ LRHNSJ LPHNWV LRHNWV LPHNSK LRHNSK
Unbraked trailer (kg) 570620610635570630
Maximum authorised nose weight (kg) 757175717571
Engines THP 165 EAT6
Gearboxes Automatic 6-speed
Code EP6FDTM AT6III
Body styles HatchbackSW
Model codes L35GYVL45GYV
Cubic capacity (cm
3) 1,598
Max. power: EC standard (kW) 121
Fuel Unleaded
Braked trailer (within the GTW limit) (kg)
on a 10% or 12% gradient 600
600
Unbraked trailer (kg) 600600
Maximum authorised nose weight (kg) 7571
Engines and towed loads - PETROL GTi
Engine PureTech 263 S&S BVM6
Gearbox Manual 6-speed
Code EP6FADTR MCM STT
Body style Hatchback
Model codes L3EGXP
Cubic capacity (cc) 1,598
Max. power: EC standard (kW) 193
Fuel Unleaded
(RON 98 recommended)
Braked trailer (within the GTW limit) (kg)
on a 10% or 12% gradient 0
Unbraked trailer (kg) 0
Maximum authorised nose weight (kg) 0
Engines and towed loads - DIESEL
EngineBlueHDi 100 S&S BVM6BlueHDi 130 S&S BVM6
Gearbox Manual 6-speedManual 6-speed
Code DV5RD STT MB6DV5RC ML6C STT
Body style HatchbackHatchback SW
Model codes LBYHYPLBYHZJLCYHZJ
Cubic capacity (CC) 1,4991,499
Max. power: EC standard (kW) 7596