2021 NISSAN ROGUE light
[x] Cancel search: lightPage 455 of 556

8 Do-it-yourself
Maintenance precautions ...................................................... 8-2
Engine compartment check locations ........................ 8-3PR25DD engine model ...................................................... 8-3
Engine cooling system ............................................................. 8-4 Checking engine coolant level .................................... 8-5
Changing engine coolant ................................................ 8-5
Engine oil ........................................................................\
..................... 8-5 Checking engine oil level ................................................. 8-5
Changing engine oil and filter ..................................... 8-6
Continuously Variable Transmission
(CVT) fluid ........................................................................\
.................... 8-8
Brake fluid ........................................................................\
.................. 8-9
Window washer fluid ................................................................. 8-9
Battery ........................................................................\
........................ 8-11 Jump starting ........................................................................\
. 8-12
Variable voltage control system ................................... 8-13
Drive belt ........................................................................\
.................. 8-13
Spark plugs ........................................................................\
............. 8-14 Replacing spark plugs ..................................................... 8-14
Air cleaner ........................................................................\
............... 8-15 Windshield wiper blades ..................................................... 8-16
Cleaning ........................................................................\
........... 8-16
Replacing ........................................................................\
........ 8-16
Rear window wiper blade .................................................. 8-17
Brakes ........................................................................\
........................ 8-17 Self-adjusting brakes ..................................................... 8-17
Brake pad wear warning ............................................ 8-17
Fuses ........................................................................\
........................... 8-18 Engine compartment .................................................... 8-18
Passenger compartment ........................................... 8-19
Intelligent Key battery replacement .......................... 8-20
Lights ........................................................................\
.......................... 8-22 Headlights ........................................................................\
...... 8-23
Exterior and interior lights ........................................ 8-23
Wheels and tires ........................................................................\
8-25 Tire pressure ........................................................................\
8-25
Tire labeling ........................................................................\
.. 8-29
Types of tires ....................................................................... 8-31
Tire chains ........................................................................\
...... 8-32
Changing wheels and tires ...................................... 8-33
Page 462 of 556

8-8Do-it-yourself
so could lead to engine damage.
6. Coat the gasket on the new filter with clean engine oil.
7. Screw in the oil filter clockwise until a slight resistance is felt, then tighten
additionally more than 2/3 turn.
Oil filter tightening torque:11 to 15 ft-lb
(14.7 to 20.6 N·m)
8. Clean and re-install the drain plug with a new washer. Securely tighten
the drain plug with a wrench.
Drain plug tightening torque:
22 to 29 ft-lb
(29.4 to 39.2 N·m)
Do not use excessive force.
9. Refill the engine with the recom- mended oil through the oil filler open-
ing, and install the oil filler cap
securely.
See “Capacities and recommended
fluids/lubricants” (P.10-3) for drain
and refill capacity. The drain and refill
capacity depends on the oil tempera-
ture and drain time. Use these speci-
fications for reference only. Always
use the dipstick to determine the
proper amount of oil in the engine. 10. Start the engine and check for leak-
age around the drain plug and the oil
filter. Correct as required.
11. Turn the engine off and wait more than 10 minutes. Check the oil level
with the dipstick. Add engine oil if
necessary.
After the operation
1. Reinstall undercover in reverse orderof removal.
2. Lower the vehicle carefully to the ground.
3. Reset the Oil Control System (if so equipped) and oil and filter mainte-
nance reminder. (See “Maintenance”
(P.2-29).) When checking or replacement is re-
quired, we recommend a NISSAN dealer
for servicing.
CAUTION
.
NISSAN recommends using Gen-
uine NISSAN CVT Fluid NS-3 (or
equivalent) ONLY in NISSAN CVTs.
Do not mix with other fluids.
. Do not use Automatic transmis-
sion fluid (ATF) or Manual Trans-
mission fluid in a NISSAN CVT, as
it may damage the CVT. Damage
caused by the use of fluids other
than as recommended is not
covered by the NISSAN’s New
Vehicle Limited Warranty.
. Using fluids that are not equiva-
lent to Genuine NISSAN CVT Fluid
NS-3 may also damage the CVT.
Damage caused by the use of
fluids other than as recom-
mended is not covered under
the NISSAN’s New Vehicle Limited
Warranty.
CONTINUOUSLY VARIABLE
TRANSMISSION (CVT) FLUID
Page 463 of 556
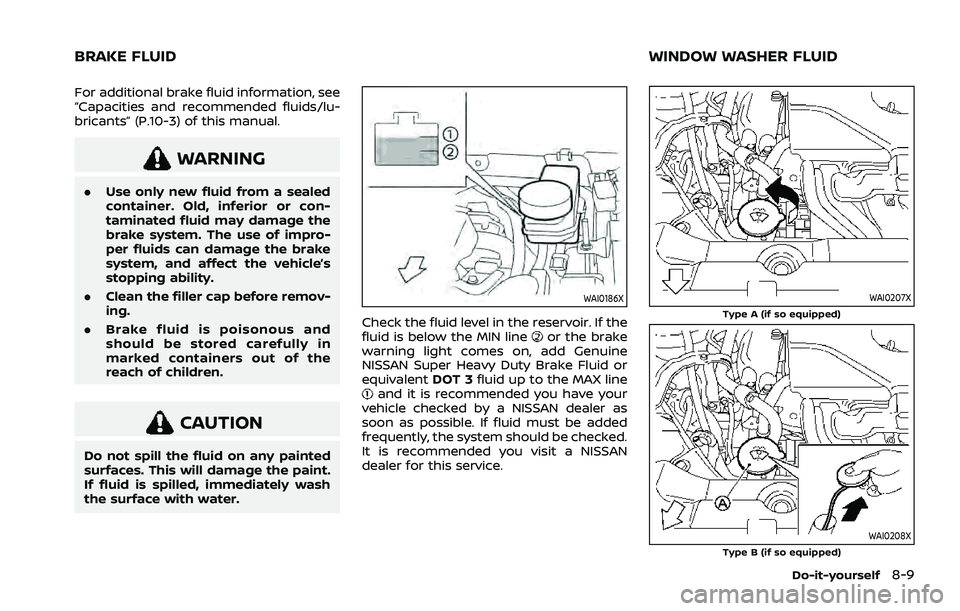
For additional brake fluid information, see
“Capacities and recommended fluids/lu-
bricants” (P.10-3) of this manual.
WARNING
.Use only new fluid from a sealed
container. Old, inferior or con-
taminated fluid may damage the
brake system. The use of impro-
per fluids can damage the brake
system, and affect the vehicle’s
stopping ability.
. Clean the filler cap before remov-
ing.
. Brake fluid is poisonous and
should be stored carefully in
marked containers out of the
reach of children.
CAUTION
Do not spill the fluid on any painted
surfaces. This will damage the paint.
If fluid is spilled, immediately wash
the surface with water.
WAI0186X
Check the fluid level in the reservoir. If the
fluid is below the MIN lineor the brake
warning light comes on, add Genuine
NISSAN Super Heavy Duty Brake Fluid or
equivalent DOT 3fluid up to the MAX line
and it is recommended you have your
vehicle checked by a NISSAN dealer as
soon as possible. If fluid must be added
frequently, the system should be checked.
It is recommended you visit a NISSAN
dealer for this service.
WAI0207XType A (if so equipped)
WAI0208XType B (if so equipped)
Do-it-yourself8-9
BRAKE FLUID WINDOW WASHER FLUID
Page 471 of 556

It is recommended you contact a NISSAN
dealer if checking or replacement is
required.If the brakes do not operate properly, it is
recommended you have the brakes
checked by a NISSAN dealer.
SELF-ADJUSTING BRAKES
Your vehicle is equipped with self-adjust-
ing brakes.
The disc-type brakes self-adjust every
time the brake pedal is applied.
WARNING
Have your brake system checked if
the brake pedal height does not
return to normal. It is recommended
you visit a NISSAN dealer for this
service.
BRAKE PAD WEAR WARNING
The disc brake pads have audible wear
warnings. When a brake pad requires
replacement, it will make a high pitched
scraping sound when the vehicle is in
motion. This scraping sound will first
occur only when the brake pedal is
depressed. After more wear of the brake
pad, the sound will always be heard even
if the brake pedal is not depressed. Have
the brakes checked as soon as possible if
the wear warning sound is heard.
Under some driving or climate conditions,occasional brake squeak, squeal or other
noise may be heard. Occasional brake
noise during light to moderate stops is
normal and does not affect the function
or performance of the brake system.
Proper brake inspection intervals
should be followed.
For additional infor-
mation, see the maintenance schedule
shown in the “9. Maintenance and sche-
dules” section.
Do-it-yourself8-17
REAR WINDOW WIPER BLADE BRAKES
Page 472 of 556

8-18Do-it-yourself
WAI0124X
ENGINE COMPARTMENT
WARNING
Never use a fuse of a higher or lower
amperage rating than that specified
on the fuse box cover. This could
damage the electrical system or
electronic control units or cause a
fire.
If any electrical equipment does not
operate, check for an open fuse.
1. Be sure the ignition switch is turned off and the headlights are off. 2. Open the engine hood.
3. Remove the fuse/fusible link box cov-
er by using a suitable tool and pushing
the tab.
4. Locate the fuse that needs to be replaced.
5. Remove the fuse using the fuse puller located in the passenger compart-
ment fuse box.
SDI1753
6. If the fuse is open, replace it with a
new fuse.
7. If a new fuse also opens, have the electrical system checked and re-
paired. It is recommended you visit a
NISSAN dealer for this service.
Fusible links
If any electrical equipment does not
operate and the fuses are in good condi-
tion, check the fusible links. If any of these
fusible links are melted, replace only with
genuine NISSAN parts.
For checking and replacing the fusible
links, it is recommended you visit a
NISSAN dealer.
FUSES
Page 473 of 556

WAI0205X
PASSENGER COMPARTMENT
WARNING
Never use a fuse of a higher or lower
amperage rating than that specified
on the fuse box cover. This could
damage the electrical system or
electronic control units or cause a
fire.
If any electrical equipment does not
operate, check for an open fuse.
1. Be sure the ignition switch is turned off and the headlights are off. 2. Remove the fuse box cover.
3. Remove the fuse with the fuse puller
.
SDI1753
4. If the fuse is open, replace it with a
new fuse.
5. If a new fuse also opens, have the electrical system checked and re-
paired. It is recommended you visit a
NISSAN dealer for this service.
Do-it-yourself8-19
Page 474 of 556

8-20Do-it-yourself
WAI0204X
Extended storage switch (if so
equipped)
The extended storage switch is used
when shipping the vehicle. It is located
in the fuse panel on the driver’s side of the
instrument panel. If any electrical equip-
ment does not operate, ensure the ex-
tended storage switch is pushed fully in
place.
To inspect the extended storage switch,
ensure the ignition switch and headlights
are off.
CAUTION
.Be careful not to allow children to
swallow the battery and removed
parts.
. An improperly disposed battery
can harm the environment. Al-
ways confirm local regulations
for battery disposal.
. When changing batteries, do not
let dust or oil get on the compo-
nents.
. There is danger of explosion if the
lithium battery is incorrectly re-
placed. Replace only with the
same or equivalent type.
SDI2451
Replace the battery in the Intelligent Key
as follows:
1. Remove the mechanical key from the
Intelligent Key.
2. Insert a small screwdriver into the slit of the corner and twist it to separate
the upper part from the lower part.
INTELLIGENT KEY BATTERY REPLACEMENT
Page 476 of 556

8-22Do-it-yourself
WAI0201X
1. Front map light
2. Vanity mirror light
3. Room light (if so equipped)
4. Side turn signal light
5. Rear personal light (if so equipped)
6. Headlight (high-beam)
7. Front fog light (if so equipped)8. Headlight (low-beam)
9. Front parking light/Daytime running
light/Front turn signal light (LED type)
10. Front turn signal light (Bulb type)
11. Front side marker light
12. High-mounted stop light
13. Cargo light 14. License plate light
15. Back-up light/Tail light
16. Rear turn signal light/Stop light/Tail light
17. Rear side marker light
LIGHTS