2021 NISSAN FRONTIER lock
[x] Cancel search: lockPage 193 of 492
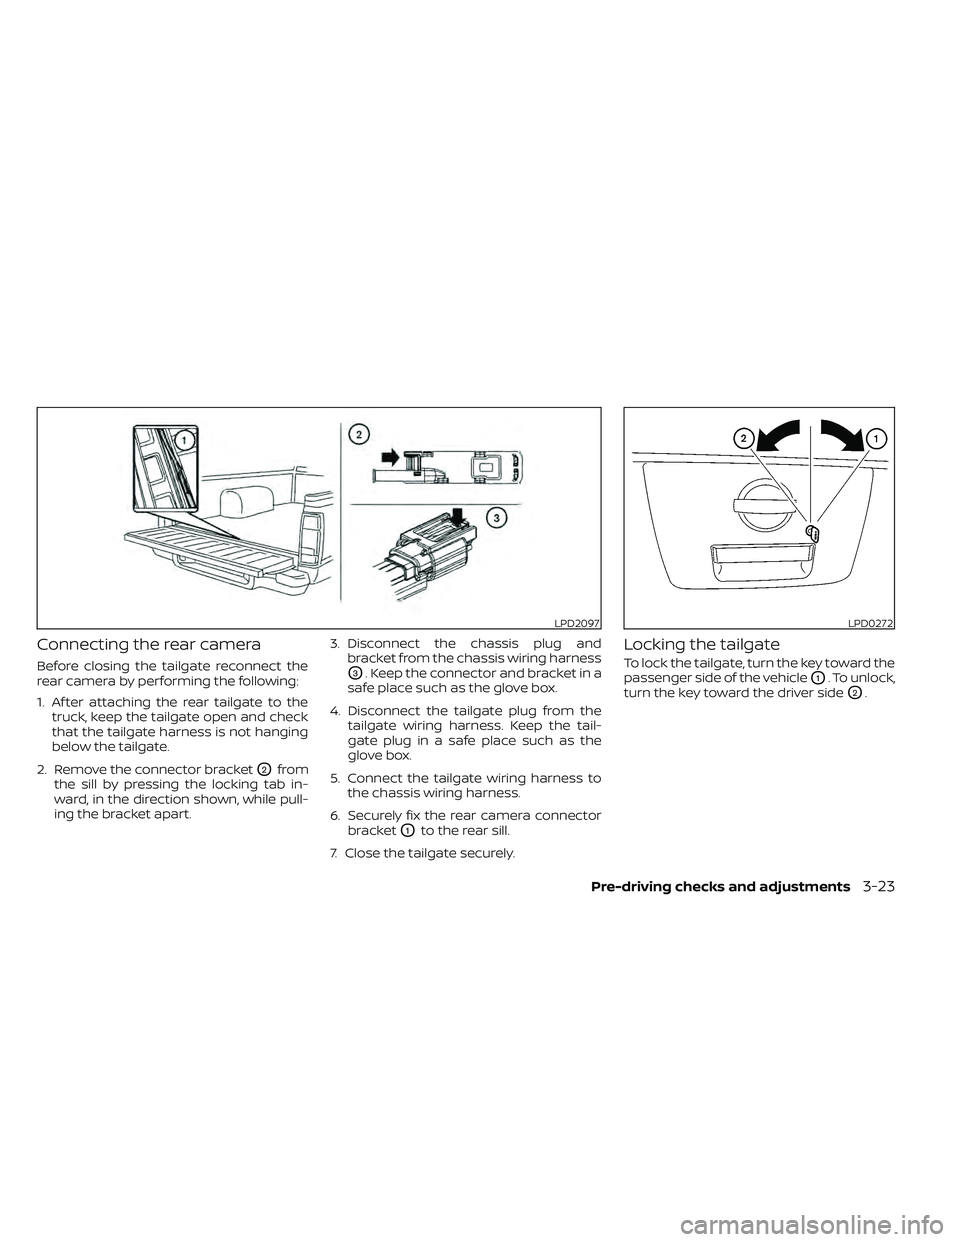
Connecting the rear camera
Before closing the tailgate reconnect the
rear camera by performing the following:
1. Af ter attaching the rear tailgate to thetruck, keep the tailgate open and check
that the tailgate harness is not hanging
below the tailgate.
2. Remove the connector bracket
O2from
the sill by pressing the locking tab in-
ward, in the direction shown, while pull-
ing the bracket apart. 3. Disconnect the chassis plug and
bracket from the chassis wiring harness
O3. Keep the connector and bracket in a
safe place such as the glove box.
4. Disconnect the tailgate plug from the tailgate wiring harness. Keep the tail-
gate plug in a safe place such as the
glove box.
5. Connect the tailgate wiring harness to the chassis wiring harness.
6. Securely fix the rear camera connector bracket
O1to the rear sill.
7. Close the tailgate securely.
Locking the tailgate
To lock the tailgate, turn the key toward the
passenger side of the vehicle
O1. To unlock,
turn the key toward the driver side
O2.
LPD2097LPD0272
Page 204 of 492

Menu itemResult
Settings Touch to change the following steps.
Connections Touch this key to select either Bluetooth® phone, Bluetooth® audio or USB audio options. For additional infor-
mation, refer to “USB connections screen” and “Bluetooth® connections screen” in this section.
Phone For additional information, refer to “Bluetooth® Hands-Free Phone System without Navigation System” in this
section.
Sound For additional information, refer to “Audio system” in this section.
Volume & Beeps For additional information, refer to “Volume & beeps” in this section.
Clock Touch this key to adjust clock settings.
On-screen Clock Touch to toggle ON or OFF the clock display on the upper right corner of the display screen.
Clock Format Touch to set the clock to 12 hours or 24 hours formats.
Daylight Savings Time Touch to adjusts the daylight saving time to ON or OFF.
Set Clock Manually Touch to adjust the clock manually; then touch to change between AM and PM, the hour and the minutes.
System Voice For additional information, refer to “Settings” in this section.
Camera Touch this key to change the camera settings.
Others Touch this key to select and/or adjust various functions of this system. A screen with additional options will
appear.
Display Touch this key to adjust the appearance of the display. For additional information, refer to “Adjusting the
screen” in this section.
Language Touch this key to change the language on the display.
OSS Licenses Touch this key to display sof tware licensing information.
Return All Settings To DefaultTouch this key to return all settings to default and to clear the memory.
4-8Monitor, climate, audio, phone and voice recognition systems
Page 210 of 492

Menu itemResult
Audio For additional information, refer to “Audio system” in this section.
Navigation For additional information, refer to the separate NissanConnect® Owner’s Manual.
Phone & Bluetooth For additional information, refer to “Bluetooth® Hands-Free Phone System with Navigation System” in this section.
System Touch this key to select and/or adjust various functions of this system. A screen with additional options will ap-
pear.
Display Touch this key to adjust the appearance of the display.
Brightness Adjusts the brightness of the display.
Display Mode Adjusts to fit the level of lighting in the vehicle. Touch key to cycle through options. “Day ” and “Night” modes are
suited for the respective times of day while “Auto” controls the display automatically.
Scroll Direction Adjusts the direction of the menu scroll. Choose to either move up or down.
Clock/Date Touch this key to adjust the time and date.
Time Format The clock can be set to 12 hours or 24 hours.
Date Format Select from two possible formats for displaying the day, month, and year.
Clock Mode Adjust the mode for the clock. “Auto” uses the system’s GPS to automatically maintain the time. “Manual” allows
you to set the clock using the “Set Clock Manually ” key. Select a time zone using the “Time Zone” key.
Set Clock Manually Adjust the clock manually, Touch the “+” or “-” keys to adjust the hours, minutes, day, month and year up or down. “Clock Mode” must be set to manual for this option to be available.
Daylight Savings Time Adjusts the daylight savings time on or off.
Time Zone Choose the applicable time zone from the list.
Language Touch this key to change the language on the display.
Camera Settings Touch this key to change the camera settings.
Display Mode Touch this key to select the touch-screen display mode (day, night, or automatic).
Brightness Adjust touch-screen brightness.
Contrast Adjust touch-screen contrast.
Color Adjust touch-screen color.
4-14Monitor, climate, audio, phone and voice recognition systems
Page 233 of 492
Static and flutter: During signal interfer-
ence from buildings, large hills or due to
antenna position (usually in conjunction
with increased distance from the station
transmitter), static or flutter can be heard.
This can be reduced by adjusting the treble
control to reduce treble response.
Multipath reception: Because of the reflec-
tive characteristics of FM signals, direct and
reflected signals reach the receiver at the
same time. The signals may cancel each
other, resulting in momentary flutter or loss
of sound.
AM RADIO RECEPTION
AM signals, because of their low frequency,
can bend around objects and skip along
the ground. In addition, the signals can be
bounced off the ionosphere and bent back
to earth. Because of these characteristics,
AM signals are also subject to interference
as they travel from transmitter to receiver.
Fading: Occurs while the vehicle is passing
through freeway underpasses or in areas
with many tall buildings. It can also occur for
several seconds during ionospheric turbu-
lence even in areas where no obstacles exist.
Static: Caused by thunderstorms, electrical
power lines, electric signs and even traffic
lights.
SATELLITE RADIO RECEPTION (if so
equipped)
When the satellite radio is used for the first
time or the battery has been replaced, the
satellite radio may not work properly. This
is not a malfunction. Wait more than 10
minutes with satellite radio ON and the ve-
hicle outside of any metal or large building
for satellite radio to receive all of the neces-
sary data.
No satellite radio reception is available and
“NO SAT” is displayed when the SAT band
option is selected unless optional satellite
receiver and antenna are installed and a
SiriusXM® Satellite Radio service subscrip-
tion is active. Satellite radio is not available
in Alaska, Hawaii and Guam.
Satellite radio performance may be af-
fected if cargo carried on the roof blocks
the satellite radio signal.
If possible, do not put cargo over the satel-
lite antenna.
A build up of ice on the satellite radio an-
tenna can affect satellite radio perfor-
mance. Remove the ice to restore satellite
radio reception.
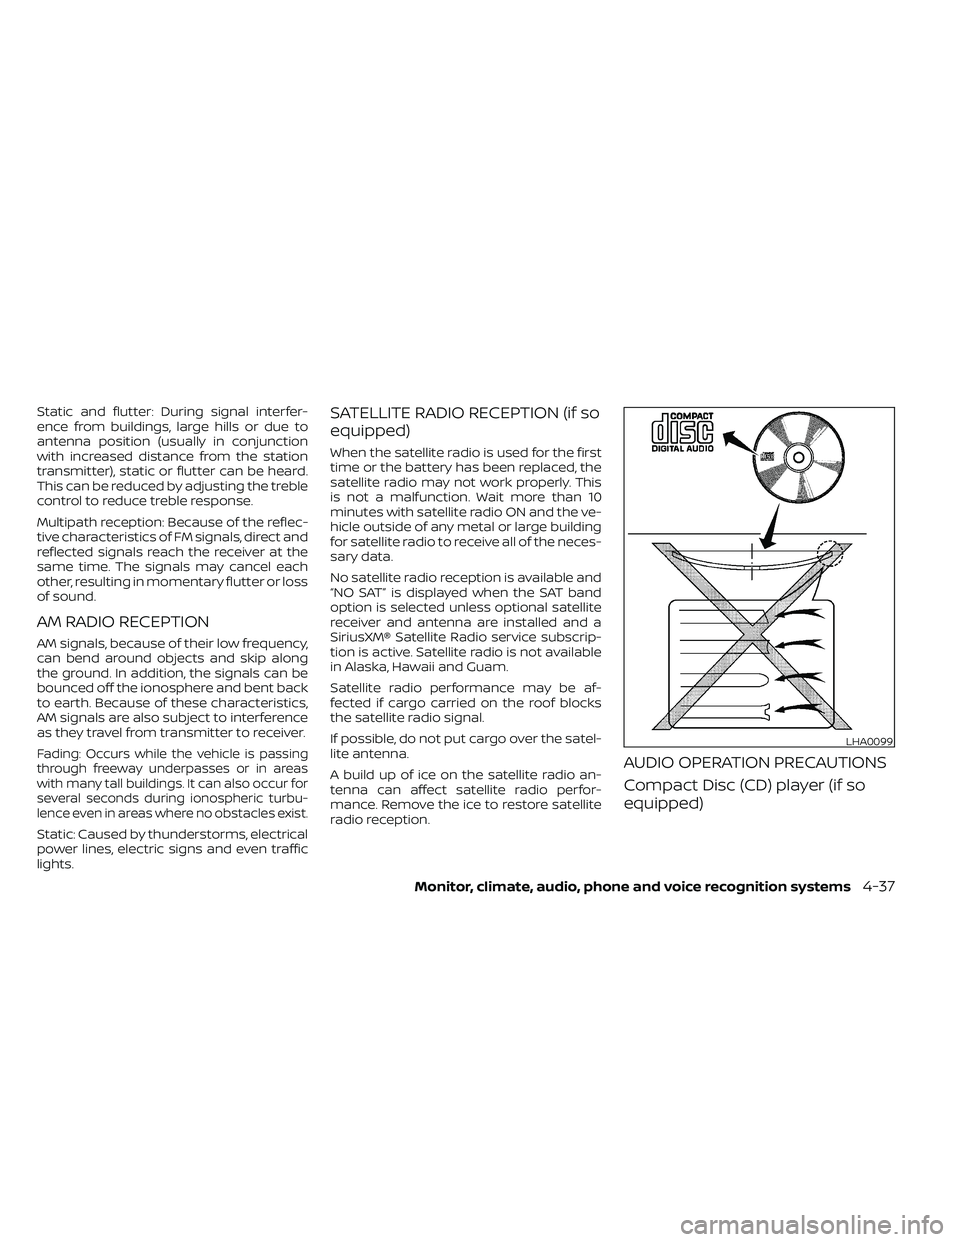
AUDIO OPERATION PRECAUTIONS
Compact Disc (CD) player (if so
equipped)
LHA0099
Page 268 of 492
ANTENNA
The antenna cannot be shortened, but can
be removed. When you need to remove the
antenna, turn the antenna rod counter-
clockwise.
To install the antenna rod, turn the antenna
rod clockwise and hand tighten.
Page 269 of 492
APPLICATION DOWNLOAD
Once connected, the NissanConnect® App
will search your phone to determine which
compatible applications are currently in-
stalled. The user will then choose which
apps they want to bring into their vehicle
from the list of apps within the “Manage My
Apps” section of the NissanConnect® App
on their smartphone. The vehicle will then
download the in-vehicle interface for each
of these compatible applications. Once
downloaded, the user can access their se-
lected smartphone applications through
the vehicle touch-screen. For additional in-
formation, refer to www.nissanusa.com/
connect or www.nissan.ca/en/connect or
www.nissan.ca/fr/connect regarding ap-
plication availability.Apple Siri® Eyes Free personal assistant
can be accessed from the vehicle. Siri Eyes
Free can be accessed in Siri Eyes Free
mode to reduce user distraction. In this
mode, Siri Eyes Free is available for interac-
tion by voice control. Af ter connecting a
compatible Apple device by using
Bluetooth®, Siri Eyes Free can be activated
from the
button on the steering
wheel.
Siri® is a trademark of Apple Inc., registered
in the U.S. and other countries.
• Some Siri Eyes Free functions, such as displaying pictures or opening apps, may
not be available while driving.
• For getting best results, always update your device to the latest sof tware version.
• Keep the interior of the vehicle as quiet as possible. Close the windows to eliminate
the surrounding noises (traffic noises, vi-
bration sounds, etc.), which may prevent
the system from recognizing the voice
commands correctly.
• For functions that can be used in Siri Eyes Free, please refer to the Apple website.
REQUIREMENTS
Siri® is only available on the iPhone® 4S or
later. Devices released before iPhone® 4S
are not supported by the Siri® Eyes Free
system. Visit www.apple.com/ios/siri for
details about device compatibility.
Siri must be enabled on the phone. Please
check phone settings.
If the device has a lock screen, Siri must be
accessible from the lock screen. Please
check phone settings.
For best results, always update your device
to the latest sof tware version.
SIRI® EYES FREE (models without
Navigation System) (if so equipped)
Monitor, climate, audio, phone and voice recognition systems4-73
Page 272 of 492
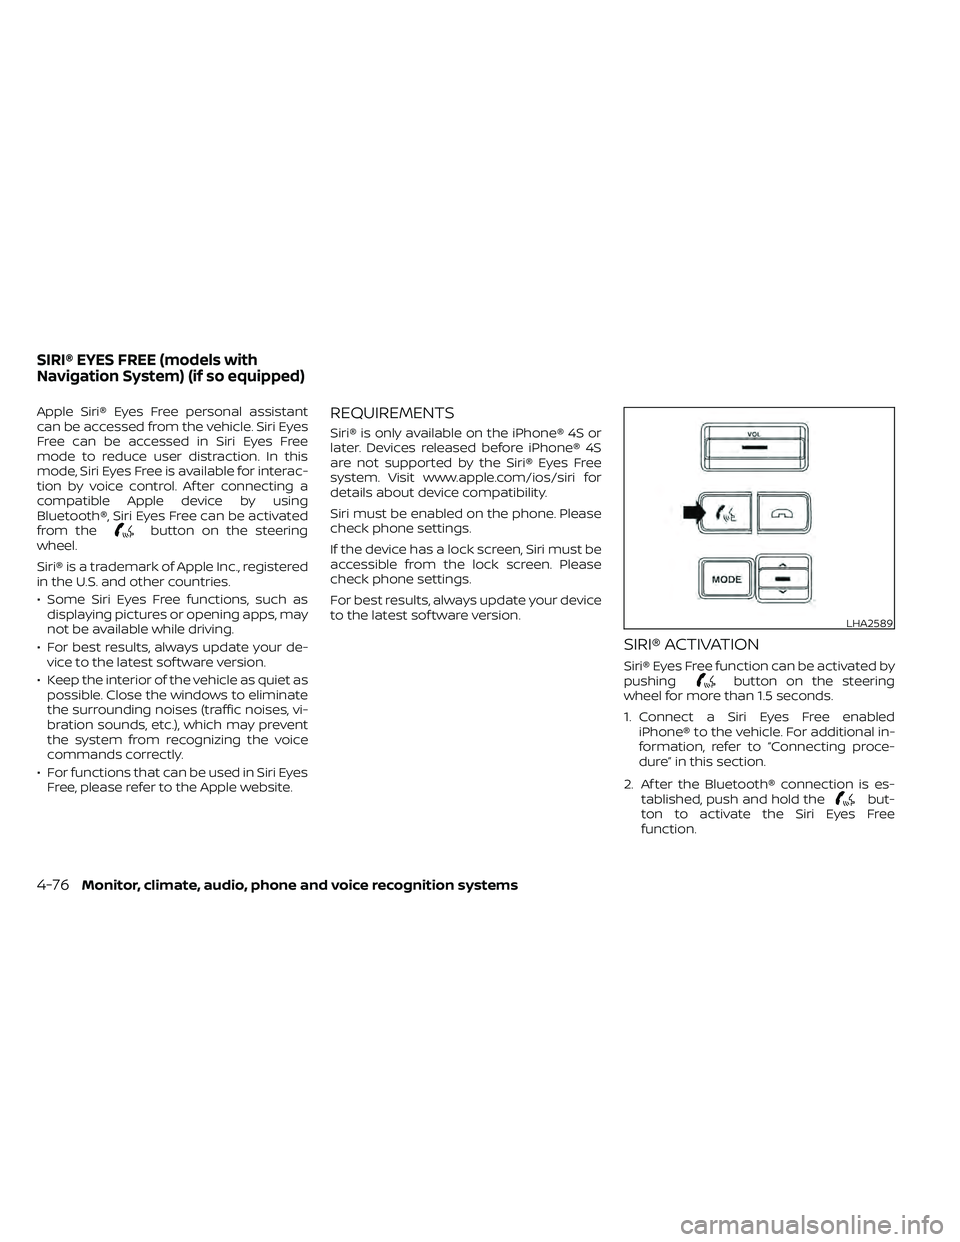
Apple Siri® Eyes Free personal assistant
can be accessed from the vehicle. Siri Eyes
Free can be accessed in Siri Eyes Free
mode to reduce user distraction. In this
mode, Siri Eyes Free is available for interac-
tion by voice control. Af ter connecting a
compatible Apple device by using
Bluetooth®, Siri Eyes Free can be activated
from the
button on the steering
wheel.
Siri® is a trademark of Apple Inc., registered
in the U.S. and other countries.
• Some Siri Eyes Free functions, such as displaying pictures or opening apps, may
not be available while driving.
• For best results, always update your de- vice to the latest sof tware version.
• Keep the interior of the vehicle as quiet as possible. Close the windows to eliminate
the surrounding noises (traffic noises, vi-
bration sounds, etc.), which may prevent
the system from recognizing the voice
commands correctly.
• For functions that can be used in Siri Eyes Free, please refer to the Apple website.
REQUIREMENTS
Siri® is only available on the iPhone® 4S or
later. Devices released before iPhone® 4S
are not supported by the Siri® Eyes Free
system. Visit www.apple.com/ios/siri for
details about device compatibility.
Siri must be enabled on the phone. Please
check phone settings.
If the device has a lock screen, Siri must be
accessible from the lock screen. Please
check phone settings.
For best results, always update your device
to the latest sof tware version.
SIRI® ACTIVATION
Siri® Eyes Free function can be activated by
pushingbutton on the steering
wheel for more than 1.5 seconds.
1. Connect a Siri Eyes Free enabled iPhone® to the vehicle. For additional in-
formation, refer to “Connecting proce-
dure” in this section.
2. Af ter the Bluetooth® connection is es- tablished, push and hold the
but-
ton to activate the Siri Eyes Free
function.
LHA2589
SIRI® EYES FREE (models with
Navigation System) (if so equipped)
Page 277 of 492
• You will not be able to use a hands-freephone under the following conditions:– Your vehicle is outside of the cellular service area.
– Your vehicle is in an area where it is difficult to receive a cellular signal; such
as in a tunnel, in an underground park-
ing garage, near a tall building or in a
mountainous area.
– Your cellular phone is locked to prevent it from being dialed.
• When the radio wave condition is not ideal or ambient sound is too loud, it may
be difficult to hear the other person's
voice during a call.
• Do not place the cellular phone in an area surrounded by metal or far away from
the in-vehicle phone module to prevent
tone quality degradation and wireless
connection disruption.
• While a cellular phone is connected through the Bluetooth® wireless connec-
tion, the battery power of the cellular
phone may discharge quicker than usual.
The Bluetooth® Hands-Free Phone Sys-
tem cannot charge cellular phones.
• For additional information, you can visit www.nissanusa.com/bluetooth or
www.nissan.ca/bluetooth for trouble-
shooting help. •Some cellular phones or other devices
may cause interference or a buzzing noise
to come from the audio system speakers.
Storing the device in a different location
may reduce or eliminate the noise.
• For additional information, refer to the cellular phone owner's manual regarding
the telephone charges, cellular phone
antenna and body, etc.
REGULATORY INFORMATION
FCC Regulatory information
– CAUTION: To maintain compliance with FCC’s RF exposure guidelines, use only
the supplied antenna. Unauthorized an-
tenna, modification, or attachments
could damage the transmitter and may
violate FCC regulations.
– Operation is subject to the following two conditions:1. 1) This device may not cause interfer- ence and
2.2) this device must accept any interfer- ence, including interference that may
cause undesired operation of the
device.
IC Regulatory information
– Operation is subject to the following two conditions: (1) this device may not cause
interference, and (2) this device must ac- cept any interference, including interfer-
ence that may cause undesired opera-
tion of the device.
– This Class B digital apparatus meets all requirements of the Canadian
Interference-Causing Equipment Regu-
lations.
BLUETOOTH® is a
trademark owned by
Bluetooth SIG, Inc. and
licensed to
Panasonic.
USING THE SYSTEM
The system allows hands-free operation of
the Bluetooth® Hands-Free Phone System.
If the vehicle is in motion, some commands
may not be available so full attention may
be given to vehicle operation.
Initialization
When the ignition switch is placed in the ON
position, NISSAN Voice Recognition is initial-
ized, which takes a few seconds. If the
button is pressed before the initialization
completes, the system will announce
“There is no phone connected” and will not
react to voice commands.
Monitor, climate, audio, phone and voice recognition systems4-81