Page 357 of 492
winch and turn the jacking rod counter-
clockwise to lower the spare tire.
2. Once the spare tire is completely low- ered, reach under the vehicle, remove
the retainer chain, and carefully slide the
tire from under the rear of the vehicle.
3. To reinstall the wheel, remove the centercap and insert the tire chain through the
wheel. Be sure the rubber spacer is cen-
tered on the wheel before lif ting. Use the
assembled jacking rod to slowly rotate
the winch clockwise to raise the wheel
to the vehicle.
NOTE:
Inspect the spacer every six years and
replace as necessary. It is recommended
that you visit a NISSAN dealer for this
service.
CAUTION
• Be sure to center the spare tire sus-
pending plate on the wheel and then
lif t the spare tire.
• Failure to use the spacer may allow
the chain to get stuck on the wheel
nut holes.
Page 359 of 492
Always refer to the illustration for the cor-
rect placement and jack-up points for your
specific vehicle model and jack type.
Carefully read the caution label attached
to the jack body and the following in-
structions.1. Loosen each wheel nut 1 or 2 turns by
turning counterclockwise with the wheel
nut wrench. Do not remove the wheel
nuts until the tire is off the ground. 2. Place the jack directly under the jack-up
point as illustrated so the top of the jack
contacts the vehicle at the jack-up point.
Align the jack head under the arrow
stamped on the side of the frame or rear
as shown.
The jack should be used on firm and
level ground.
Page 384 of 492
Removal of under-engine
protectors (if so equipped)
1. Remove boltsOAand plate.
Engine oil and filter
1. Place a large drain pan under the drainplug and oil filter.
2. Remove the oil filler cap.
3. Remove the drain plug with a wrench by turning it counterclockwise and com-
pletely drain the oil.
LDI3363
O3Oil filter
8-8Do-it-yourself
Page 385 of 492
CAUTION
Be careful not to burn yourself, as the
engine oil is hot.
WARNING
• Prolonged and repeated contact
with used engine oil may cause skin
cancer.
• Try to avoid direct skin contact with
used oil. If skin contact is made, wash
thoroughly with soap or hand
cleaner as soon as possible.
• Keep used engine oil out of reach of
children.
4. Loosen the oil filter with an oil filter wrench by turning it counterclockwise.
Remove the oil filter by turning it by
hand.
5. Wipe the engine oil filter mounting sur- face with a clean rag.
Page 391 of 492

CAUTION
• Do not ground accessories directly to
the battery terminal. Doing so will
bypass the variable voltage control
system and the vehicle battery may
not charge completely.
• Use electrical accessories with the
engine running to avoid discharging
the vehicle battery.
NOTE:
If the battery is dead the transmission
will not manually shif t into other
positions.
Your vehicle is equipped with a variable
voltage control system. This system mea-
sures the amount of electrical discharge
from the battery and controls voltage gen-
erated by the generator.
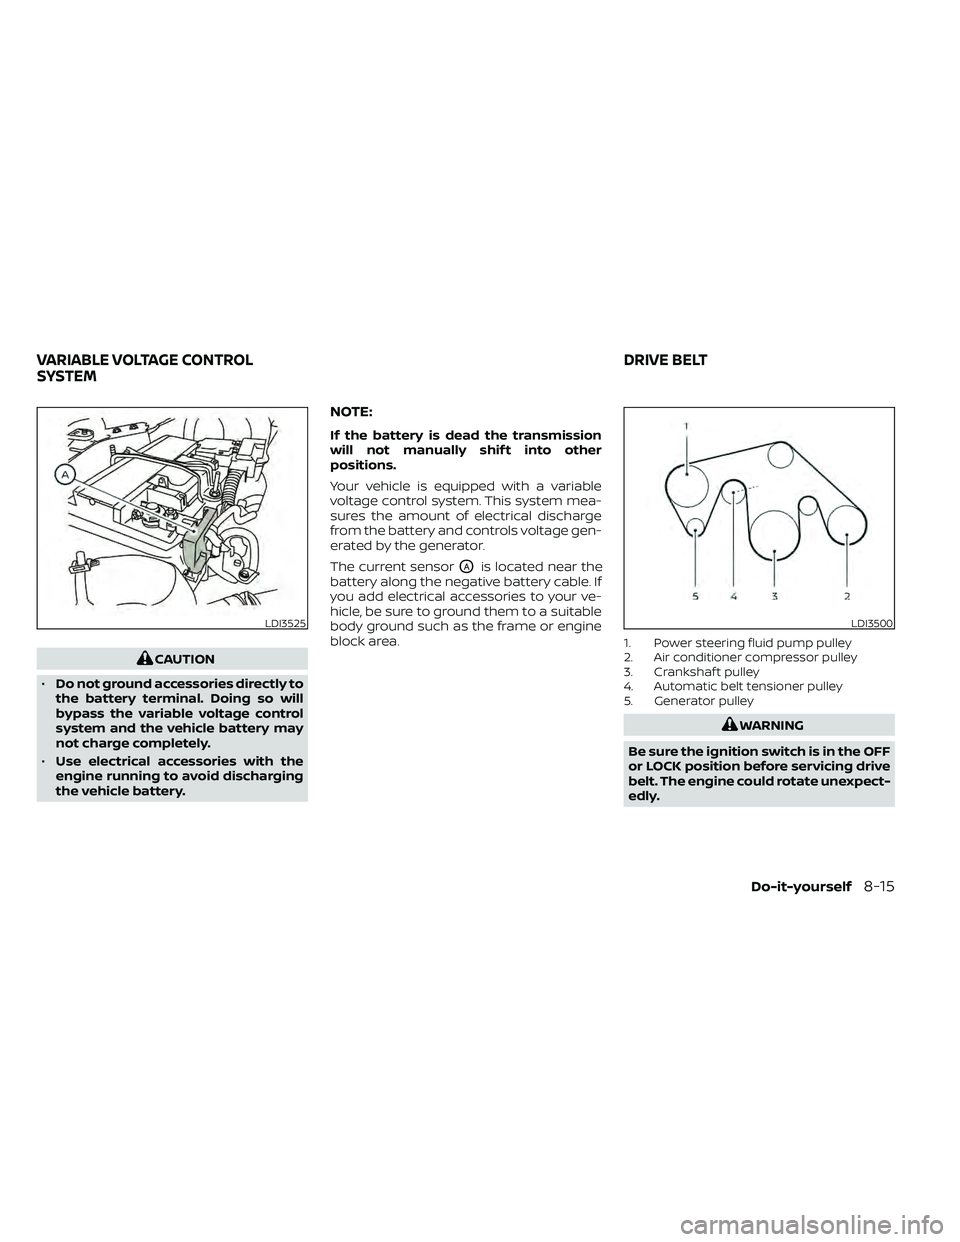
The current sensor
OAis located near the
battery along the negative battery cable. If
you add electrical accessories to your ve-
hicle, be sure to ground them to a suitable
body ground such as the frame or engine
block area.
1. Power steering fluid pump pulley
2. Air conditioner compressor pulley
3. Crankshaf t pulley
4. Automatic belt tensioner pulley
5. Generator pulley
LDI3500
VARIABLE VOLTAGE CONTROL
SYSTEM DRIVE BELT
Do-it-yourself8-15
Page 399 of 492

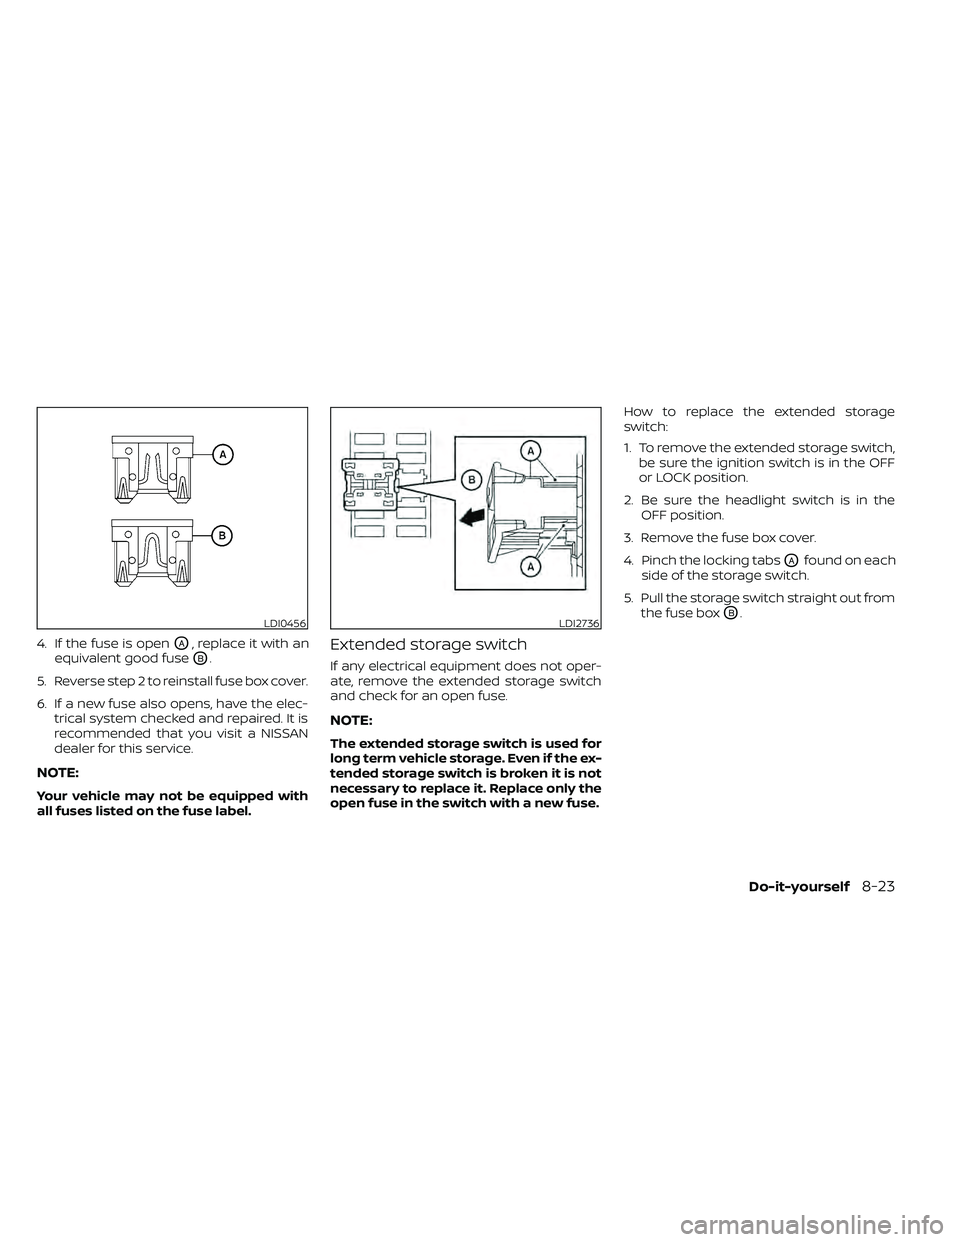
4. If the fuse is openOA, replace it with an
equivalent good fuse
OB.
5. Reverse step 2 to reinstall fuse box cover.
6. If a new fuse also opens, have the elec- trical system checked and repaired. It is
recommended that you visit a NISSAN
dealer for this service.
NOTE:
Your vehicle may not be equipped with
all fuses listed on the fuse label.
Extended storage switch
If any electrical equipment does not oper-
ate, remove the extended storage switch
and check for an open fuse.
NOTE:
The extended storage switch is used for
long term vehicle storage. Even if the ex-
tended storage switch is broken it is not
necessary to replace it. Replace only the
open fuse in the switch with a new fuse. How to replace the extended storage
switch:
1. To remove the extended storage switch,
be sure the ignition switch is in the OFF
or LOCK position.
2. Be sure the headlight switch is in the OFF position.
3. Remove the fuse box cover.
4. Pinch the locking tabs
OAfound on each
side of the storage switch.
5. Pull the storage switch straight out from the fuse box
OB.LDI0456LDI2736
Page 403 of 492
4. Turn the bulb retaining ringOAcounter-
clockwise until it is free from the head-
light reflector and then remove it.
5. Carefully remove the headlight bulb. Do not shake or rotate the bulb
OBwhen
removing it.
Replacing the headlight bulb
1. Insert the bulb.
DO NOT TOUCH THE BULB WITH BARE
HANDS.
2. Install and tighten the bulb retainer. • Be sure the lip of the bulb socket con-tacts the headlight body.
3. Push the electrical connector into the bulb plastic base until it snaps and
stops.
4. Connect the negative (-) battery cable.
5. Close the hood.
FOG LIGHTS (if so equipped)
For additional information on fog light bulb
replacement, refer to the instructions out-
lined in this section.
Replacing the fog light bulb
If fog light bulb replacement is required, it is
recommended that you visit a NISSAN
dealer for this service.
Page 406 of 492
To replace the license plate light:
1. Apply force as shown in image to re-move tension that locks bulb assembly
to the bumper.
2. Pivot bulb assembly away from bumper to release fully.
3. Rotate the bulb retainer as shown in the image.
4. Pull the bulb out to remove and replace. *Lef t side assembly is shown. Right side
assembly is mirror. If you have a flat tire, refer to “Flat tire” in
the “In case of emergency ” section of
this manual.
TIRE PRESSURE
Tire Pressure Monitoring System
(TPMS)
LDI3134
License plate light
WHEELS AND TIRES