2021 NISSAN FRONTIER service indicator
[x] Cancel search: service indicatorPage 247 of 492
![NISSAN FRONTIER 2021 Owners Manual SXM settings
To view the SXM settings:
1. Press the [
] button.
2. Touch the “Settings” key.
3. Touch the “SXM” key.
The signal strength, activation status and
other information are displayed NISSAN FRONTIER 2021 Owners Manual SXM settings
To view the SXM settings:
1. Press the [
] button.
2. Touch the “Settings” key.
3. Touch the “SXM” key.
The signal strength, activation status and
other information are displayed](/manual-img/5/56721/w960_56721-246.png)
SXM settings
To view the SXM settings:
1. Press the [
] button.
2. Touch the “Settings” key.
3. Touch the “SXM” key.
The signal strength, activation status and
other information are displayed on the
screen.
FM/AM/SAT radio operation
FM·AM button
Press the FM·AM button to change the
band as follows:
AM →P1→ FM1→FM→P2
If another audio source is playing when the
FM·AM button is pressed, the audio source
playing will automatically be turned off and
the last radio station played will begin play-
ing.
The FM stereo indicator (STEREO) is shown
on the screen during FM stereo reception.
When the stereo broadcast signal is weak,
the radio automatically changes from ste-
reo to monaural reception.
SXM band select
Pressing the SXM button will change the
band as follows:
SXM1* →SXM2* →SXM3* →SXM1* (satellite,
if so equipped)
When the SXM button is pressed while the
ignition switch is in the ACC or ON position, the
radio will come on at the last station played.
The last station played will also come on
when the ON-OFF button is pressed to turn
the radio on.
*When the SXM button is pressed, the sat-
ellite radio mode will be skipped unless an
optional satellite receiver and antenna are
installed and a SiriusXM® Satellite Radio
service subscription is active. Satellite radio
is not available in Alaska, Hawaii and Guam.
If a compact disc is playing when the SXM
button is pressed, the compact disc will
automatically be turned off and the last
radio station played will come on.
While the radio is in SXM mode, the opera-
tion can be controlled through the touch-
screen. Touch the “Categories” key to dis-
play a list of categories. Touch a category
displayed on the list to display options
within that category.
Tuning with the touch-screen
When in AM or FM mode, the radio can be
tuned using the touch-screen. To bring up
the visual tuner, touch the “Tune” key on the
lower right corner of the screen. A screen
appears with a bar running from low fre-
quencies on the lef t to high frequencies on
the right. Touch the screen at the location
of the frequency you wish to tune and the
station will change to that frequency. To
return to the regular radio display screen,
touch the “OK” key.
Tuning with the TUNE knob
The radio can also be manually tuned us-
ing the TUNE knob. When in FM or AM mode,
turn the TUNE knob to the lef t for lower
frequencies or to the right for higher fre-
quencies. When in SXM mode, turn the
TUNE knob to change the channel.
orseek buttons to tune from low to high
or high to low frequencies and to stop at
the next broadcasting station.
When in SXM mode, press the
orseek buttons to change the category.
Monitor, climate, audio, phone and voice recognition systems4-51
Page 311 of 492
THREE-WAY CATALYST
The three-way catalyst is an emission con-
trol device installed in the exhaust system.
Exhaust gases in the three-way catalyst
are burned at high temperatures to help
reduce pollutants.
CAUTION
• Do not use leaded gasoline. Deposits
from leaded gasoline will seriously
reduce the three-way catalyst's abil-
ity to help reduce exhaust pollutants. •
Keep your engine tuned up. Malfunc-
tions in the ignition, fuel injection, or
electrical systems can cause overrich
fuel flow into the three-way catalyst,
causing it to overheat. Do not keep
driving if the engine misfires, or if no-
ticeable loss of performance or other
unusual operating conditions are de-
tected. Have the vehicle inspected
promptly. It is recommended that
you visit a NISSAN dealer for this
service.
• Avoid driving with an extremely low
fuel level. Running out of fuel could
cause the engine to misfire, damag-
ing the three-way catalyst.
• Do not race the engine while warm-
ing it up.
• Do not push or tow your vehicle to
start the engine.
TIRE PRESSURE MONITORING
SYSTEM (TPMS)
Each tire, including the spare (if provided),
should be checked monthly when cold and
inflated to the inflation pressure recom-
mended by the vehicle manufacturer on
the vehicle placard or tire inflation pressure
label. (If your vehicle has tires of a different
size than the size indicated on the vehicle placard or tire inflation pressure label, you
should determine the proper tire inflation
pressure for those tires.)
As an added safety feature, your vehicle
has been equipped with a Tire Pressure
Monitoring System (TPMS) that illuminates
a low tire pressure telltale when one or
more of your tires is significantly under-
inflated. Accordingly, when the low tire
pressure telltale illuminates, you should
stop and check your tires as soon as pos-
sible, and inflate them to the proper pres-
sure. Driving on a significantly under-
inflated tire causes the tire to overheat and
can lead to tire failure. Under-inflation also
reduces fuel efficiency and tire tread life,
and may affect the vehicle’s handling and
stopping ability.
Please note that the TPMS is not a substi-
tute for proper tire maintenance, and it is
the driver’s responsibility to maintain cor-
rect tire pressure, even if under-inflation
has not reached the level to trigger illumi-
nation of the TPMS low tire pressure telltale.
Your vehicle has also been equipped with a
TPMS malfunction indicator to indicate
when the system is not operating properly.
The TPMS malfunction indicator is com-
bined with the low tire pressure telltale.
When the system detects a malfunction,
Starting and driving5-3
Page 328 of 492
• If the SET indicator light blinks, turn theON•OFF switch off and have the system
checked. It is recommended that you visit
a NISSAN dealer for this service.
• The SET indicator light may blink when the ON•OFF switch is turned on while
pushing the ACCEL•RES, COAST•SET, or
CANCEL switch (located on the steering
wheel). To properly set the cruise control
system, use the following procedures.
Page 333 of 492
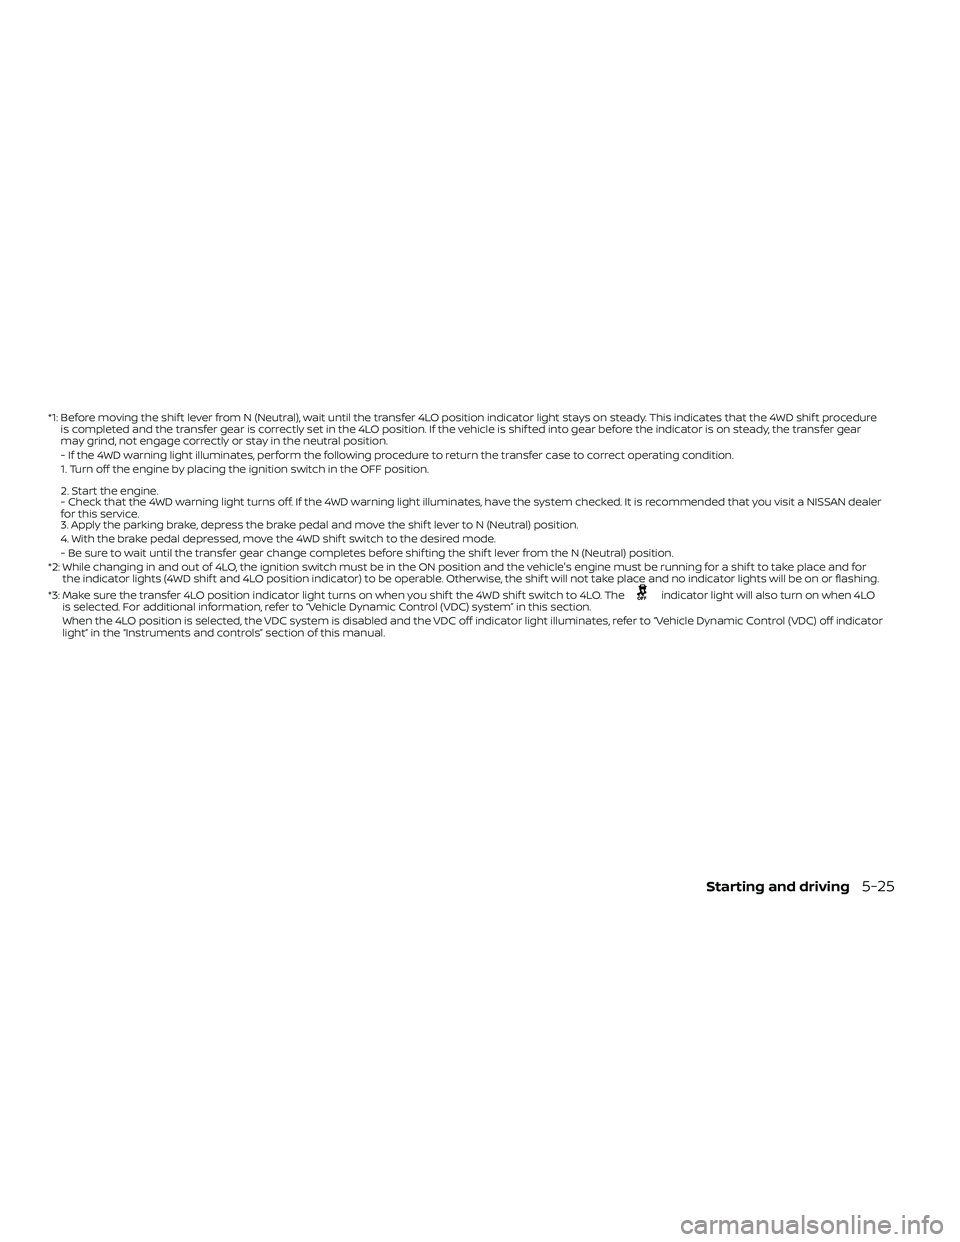
*1: Before moving the shif t lever from N (Neutral), wait until the transfer 4LO position indicator light stays on steady. This indicates that the 4WD shif t procedure
is completed and the transfer gear is correctly set in the 4LO position. If the vehicle is shif ted into gear before the indicator is on steady, the transf er gear
may grind, not engage correctly or stay in the neutral position.
- If the 4WD warning light illuminates, perform the following procedure to return the transfer case to correct operating condition.
1. Turn off the engine by placing the ignition switch in the OFF position.
2. Start the engine.
- Check that the 4WD warning light turns off. If the 4WD warning light illuminates, have the system checked. It is recommended that you visit a NISSAN dea ler
for this service.
3. Apply the parking brake, depress the brake pedal and move the shif t lever to N (Neutral) position.
4. With the brake pedal depressed, move the 4WD shif t switch to the desired mode.
- Be sure to wait until the transfer gear change completes before shif ting the shif t lever from the N (Neutral) position.
*2: While changing in and out of 4LO, the ignition switch must be in the ON position and the vehicle's engine must be running for a shif t to take place and for the indicator lights (4WD shif t and 4LO position indicator) to be operable. Otherwise, the shif t will not take place and no indicator lights will be on o r flashing.
*3: Make sure the transfer 4LO position indicator light turns on when you shif t the 4WD shif t switch to 4LO. The
indicator light will also turn on when 4LO
is selected. For additional information, refer to “Vehicle Dynamic Control (VDC) system” in this section.
When the 4LO position is selected, the VDC system is disabled and the VDC off indicator light illuminates, refer to “Vehicle Dynamic Control (VDC) off indicator
light” in the “Instruments and controls” section of this manual.
Starting and driving5-25
Page 415 of 492
WARNING
• Tires should be periodically in-
spected for wear, cracking,
bulging or objects caught in
the tread. If excessive wear,
cracks, bulging or deep cuts
are found, the tire(s) should be
replaced.
• The original tires have built-in
tread wear indicators. When
the wear indicators are visible,
the tire(s) should be replaced.
• Tires degrade with age and
use. Have tires, including the
spare, over 6 years old checked
by a qualified technician be-
cause some tire damage may
not be obvious. Replace the
tires as necessary to prevent
tire failure and possible per-
sonal injury. •
Improper service of the spare
tire may result in serious per-
sonal injury. If it is necessary to
repair the spare tire, it is rec-
ommended that you visit a
NISSAN dealer for this service.
• For additional information re-
garding tires, refer to “Impor-
tant Tire Safety Information”
(US) or “Tire Safety Informa-
tion” (Canada) in the Warranty
Information Booklet.
Replacing wheels and tires
When replacing a tire, use the same size,
tread design, speed rating and load carry-
ing capacity as originally equipped. For ad-
ditional information, refer to “Wheels and
tires” in the “Technical and consumer infor-
mation” section of this manual.
Page 469 of 492
4. Apply the parking brake.
5. Shif t the transmission into P (Park).
6. Make sure the
indicator light (if so
equipped) indicates the transfer case is
in 4H, 4L, or 2H and that the ATP light is
off. If the
indicator light is flashing,
or the ATP light is ON, make sure the
transmission is in P (Park) (A/T) and turn
the 4WD switch to 2WD or 4H. For addi-
tional information, refer to “Automatic
transmission park warning light” in the
“Instruments and controls” section and
“Using 4-wheel drive (4WD)” in the “Start-
ing and driving” section of this manual.
7. Turn off the engine.
To drive away:
1. Start the vehicle.
2. Apply and hold the brake pedal.
3. Shif t the transmission into gear.
4. Release the parking brake.
5. Drive slowly until the vehicle and trailer are clear from the blocks.
6. Apply and hold the brake pedal. 7. Have someone retrieve and store the
blocks.
• While going downhill, the weight of the trailer pushing on the tow vehicle may
decrease overall stability. Therefore, to
maintain adequate control, reduce your
speed and shif t to a lower gear. Avoid
long or repeated use of the brakes when
descending a hill, as this reduces their
effectiveness and could cause overheat-
ing. Shif ting to a lower gear instead pro-
vides “engine braking” and reduces the
need to brake as frequently.
• If the engine coolant temperature rises to a high temperature, refer to “If your ve-
hicle overheats” in the “In case of emer-
gency” section of this manual.
• Trailer towing requires more fuel than normal circumstances.
• Avoid towing a trailer for your vehicle's first 500 miles (805 km).
•
For the first 500 miles (805 km) that you do
tow, do not drive over 50 mph (80 km/h).
• Have your vehicle serviced more of ten than at intervals specified. For additional
information, refer to “Maintenance
Schedules” in the “Maintenance and
schedules” section of this manual. • When making a turn, your trailer wheels
will be closer to the inside of the turn than
your vehicle wheels. To compensate for
this, make a larger than normal turning
radius during the turn.
• Crosswinds and rough roads will ad- versely affect vehicle/trailer handling,
possibly causing vehicle sway. When be-
ing passed by larger vehicles, be pre-
pared for possible changes in crosswinds
that could affect vehicle handling.
Do the following if the trailer begins to
sway:
1. Take your foot off the accelerator pedal to allow the vehicle to coast and steer as
straight ahead as the road conditions
allow. This combination will help stabilize
the vehicle
– Do not correct trailer sway by steering or applying the brakes.
2. When the trailer sway stops, gently apply the brakes and pull to the side of the
road in a safe area.
Technical and consumer information10-35
Page 481 of 492
M
MaintenanceGeneral maintenance...........9-2Inside the vehicle..............9-3Maintenance precautions.........8-2Outside the vehicle.............9-2Seat belt maintenance..........1-24Under the hood and vehicle.......9-4Maintenance requirements..........9-2Maintenance schedules............9-7Maintenance under severe operation
conditions....................9-10Malfunction indicator light..........2-22Manual front seat adjustment........1-3Manual windows...............2-49Map lights.................. .2-55Map pocket..................2-40Meters and gauges..............2-4Instrument brightness control.....2-33Mirror
Automatic anti-glare inside mirror. . .3-18Outside mirrors...............3-19Rearview...................3-17Vanity mirror.................3-17Mirrors......................3-17Mobile apps...................4-72Moonroof................ .2-52, 7-5
N
NISSAN Intelligent Key®..........3-2,3-8NISSAN Intelligent Key® battery discharge
indicator.....................5-12NISSAN Vehicle Immobilizer
System..................2-27,5-13NISSAN voice recognition system. . . .4-106NissanConnect®................4-72
O
Octane rating (See fuel octane rating). .10-6Odometer................... .2-5Oil
Capacities and recommended
fuel/lubricants
...............10-2Changing engine oil............8-6Changing engine oil filter.........8-6Checking engine oil level.........8-6Engine oil.................. .8-6Engine oil and oil filter
recommendation.............10-7Engine oil viscosity.............10-7One shot call..................4-99Outside mirrors................3-19Overhead sunglasses holder........2-45Overheat
If your vehicle overheats.........6-13Owner's manual order form........10-41Owner's manual/service manual order
information................. .10-41
P
Parking
Parking brake operation.........5-19Parking/parking on hills..........5-31Phone, Bluetooth® hands-free system. .4-96PowerFront seat adjustment...........1-5Power door locks...........3-5, 3-6Power outlet................2-39Power steering fluid............8-10Power steering system..........5-32Power windows..............2-50Rear power windows...........2-51Power outlet................. .2-39Power steering................5-32Power steering fluid..............8-10Precautions
Maintenance precautions.........8-2On-pavement and off-road driving
precautions................. .5-6Precautions on booster
seats...........1-39, 1-42, 1-54, 1-65Precautions on child
restraints.........1-39, 1-42, 1-54, 1-65Precautions on seat belt usage.....1-15Precautions on supplemental restraint
system....................1-70Precautions when starting and
driving.....................5-2Programmable features...........4-13Push starting..................6-13
11-5
Page 482 of 492
R
RadioCar phone or CB radio..........4-79FM/AM/SAT radio with compact disc (CD)
player................ .4-44, 4-49Steering wheel audio control switch. .4-71Readiness for inspection maintenance (I/M)
test...................... .10-40Rear power windows.............2-51Rear seat.....................1-6Rear sliding window.............2-52Rear Sonar System (RSS)..........5-39Rear sonar system OFF switch.......2-38Rear window and outside mirror
defroster switch................2-29Rear window defroster switch.......2-29Rearview mirror................3-17RearView Monitor...............4-16Recommended Fluids............10-2Recorders
Event Data................ .10-40Refrigerant recommendation.......10-8Registering a vehicle in another
country.................... .10-11Reporting safety defects (US only). . . .10-39Roof rack....................2-48
S
Safety
Child safety rear door lock.........3-7Child seat belts. .1-28, 1-39, 1-42, 1-54, 1-65
Reporting safety defects (US only). .10-39SeatJump seat...................1-7Seat adjustmentFront manual seat adjustment......1-3Front power seat adjustment.......1-5Seat beltChild safety.................1-25Infants and small children........1-26Injured person................1-18Larger children...............1-26Precautions on seat belt usage.....1-15Pregnant women..............1-18Seat belt extenders............1-24Seat belt maintenance..........1-24Seat belts................1-15,7-6Shoulder belt height adjustment. . . .1-24Three-point type with retractor.....1-19Seat belt extenders..............1-24Seat belt warning light.........1-18,2-20Seatback pockets...............2-41SeatsAdjustment..................1-2Front seats..................1-2Manual front seat adjustment......1-3Rear seat.................. .1-6Security indicator light............2-23Security system
(NISSAN Vehicle Immobilizer System),
engine start
...............2-27,5-13Security systems
Vehicle security system.........2-25Self-adjusting brakes.............8-20Service manual order form.........10-41
Servicing air conditioner...........4-36Setting button.................4-13Shif tingAutomatic transmission.........5-15Shoulder belt height adjustment......1-24Side air bag system (See supplemental
side air bag, curtain and rollover air bag
systems)
................... .1-82Siri® Eyes-Free..............4-73,4-76Smartphone connectivity..........4-72Sonar
Rear system................5-39Spark plug replacement...........8-16Spark plugs...................8-16Specifications................ .10-9Speedometer................. .2-5Speedometer and odometer........2-4SRS warning label...............1-85Stability control................5-35Standard maintenance.........9-7,9-8Starting
Before starting the engine........5-13Jump starting.............6-11,8-14Precautions when starting and
driving.....................5-2Push starting................6-13Starting the engine
(gasoline engine only)............5-13SteeringPower steering fluid............8-10Power steering system..........5-32Tilting steering wheel...........3-16Steering wheel.................3-16Steering wheel audio control switch. . . .4-71
11-6