2021 NISSAN FRONTIER light
[x] Cancel search: lightPage 252 of 492
CAUTION
• To avoid damage and loss of function
when using a USB device, note the
following precautions.
• Do not force the USB device into the
USB port. Inserting the USB device
tilted or up-side-down into the port
may damage the port. Make sure
that the USB device is connected cor-
rectly into the USB port.
• Do not grab the USB port cover (if so
equipped) when pulling the USB de-
vice out of the port. This could dam-
age the port and the cover.
• Do not leave the USB cable in a place
where it can be pulled unintention-
ally. Pulling the cable may damage
the port.
For additional information, refer to your de-
vice manufacturer's owner information re-
garding the proper use and care of the
device. The USB port is located on the center con-
sole beneath the heater and air condi-
tioner controls. Insert the USB device into
the connection port.
When a compatible storage device is
plugged into the connection port, compat-
ible audio files on the storage device can be
played through the vehicle's audio system.
The port is illuminated for better visibility
when the headlight switch is in the ON po-
sition.
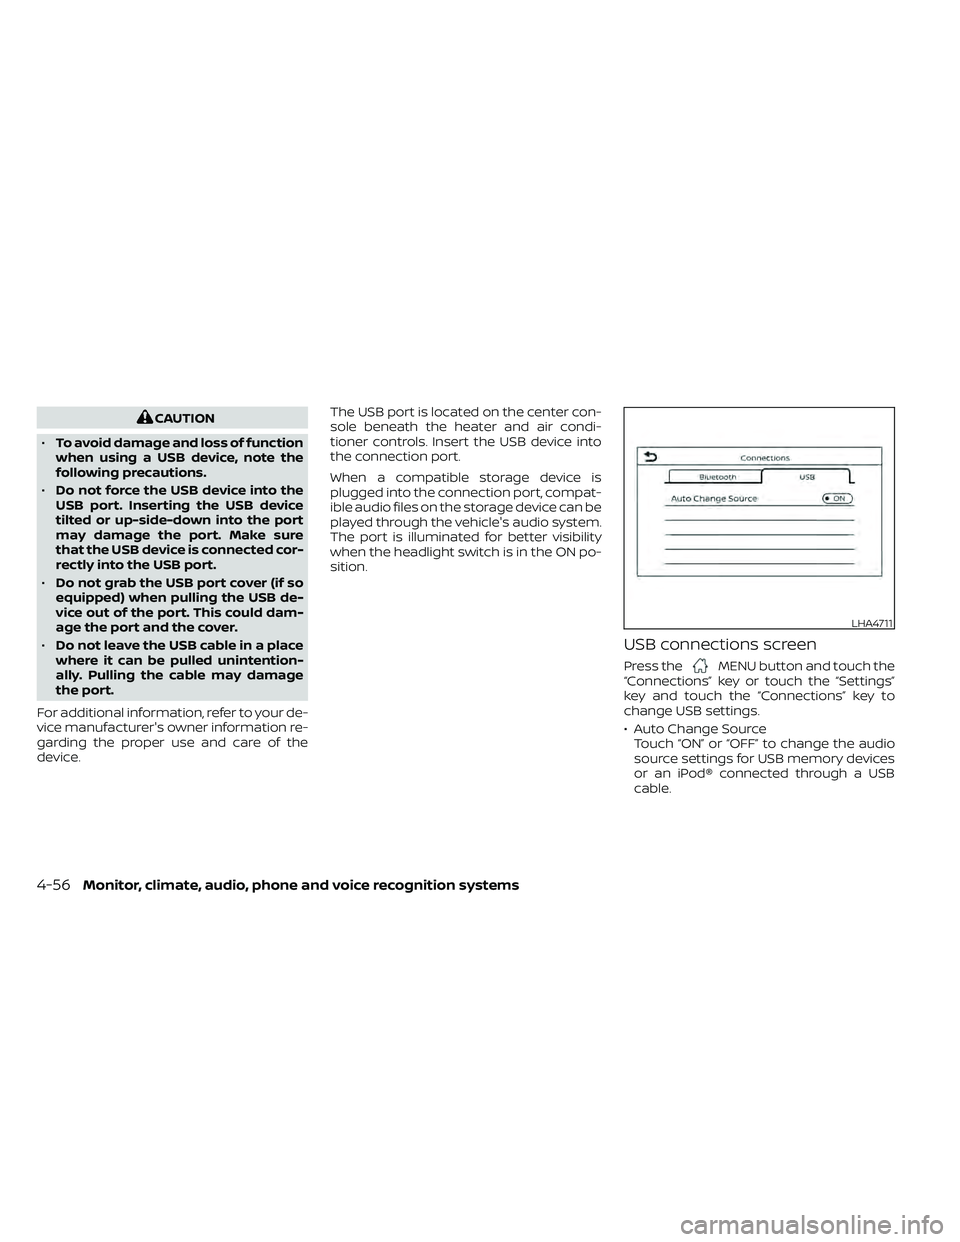
USB connections screen
Press theMENU button and touch the
“Connections” key or touch the “Settings”
key and touch the “Connections” key to
change USB settings.
• Auto Change Source Touch “ON” or “OFF” to change the audio
source settings for USB memory devices
or an iPod® connected through a USB
cable.
LHA4711
4-56Monitor, climate, audio, phone and voice recognition systems
Page 257 of 492
CAUTION
• Do not force the USB device into the
USB port. Inserting the USB device
tilted or up-side-down into the port
may damage the port. Make sure
that the USB device is connected cor-
rectly into the USB port.
• Do not grab the USB port cover (if so
equipped) when pulling the USB de-
vice out of the port. This could dam-
age the port and the cover.
• Do not leave the USB cable in a place
where it can be pulled unintention-
ally. Pulling the cable may damage
the port.
For additional information, refer to your de-
vice manufacturer’s owner information re-
garding the proper use and care of the
device.
To connect an iPod® to the vehicle so that
the iPod® can be controlled with the audio
system controls and display screen, use
the USB connection port located on the
center console below the heater and air
conditioner controls. Connect the iPod®-
specific end of the cable to the iPod® and
the USB end of the cable to the USB con-
nection port on the vehicle. If your iPod®
supports charging via a USB connection, its battery will be charged while connected to
the vehicle with the ignition switch in the
ON position. The port is illuminated for bet-
ter visibility when the headlight switch is in
the ON position.
While connected to the vehicle, the iPod®
can only be operated by the vehicle audio
controls.
To disconnect the iPod® from the vehicle,
remove the USB end of the cable from the
USB connection port on the vehicle, then
remove the cable from the iPod®.
* iPod® is a trademark of Apple Inc., regis-
tered in the U.S. and other countries.
Compatibility
The following models are compatible:
• iPod® Classic 5th generation (firmware
version 1.3.0 or later)
• iPod® Classic 6th generation (firmware version 2.0.1 or later)
• iPod® Classic 7th generation (firmware version 2.0.4 or later)
• iPod® Touch 2nd generation (firmware version 4.2.1 or later)*
• iPod® Touch 3rd generation (firmware version 5.1 or later) • iPod® Touch 4th generation (firmware
version 5.1 or later)
• iPod® nano - 1st generation (firmware version 1.3.1 or later)
• iPod® nano - 2nd generation (firmware version 1.1.3 or later)
• iPod® nano - 3rd generation (firmware version 1.1.3 or later)
• iPod® nano - 4th generation (firmware version 1.0.4 or later)
• iPod® nano - 5th generation (firmware version 1.0.2 or later)
• iPod® nano - 6th generation (firmware version 1.1 or later)
• iPhone® 3G (firmware version 4.2.1 or later)
• iPhone® 3GS (firmware version 5.1 or later)
• iPhone® 4 (firmware version 5.1 or later)
• iPhone® 4S (firmware version 5.1 or later)
* Some features of this iPod® may not be
fully functional.
Make sure that your iPod® firmware is up-
dated to the version indicated above.
Monitor, climate, audio, phone and voice recognition systems4-61
Page 283 of 492
“Add Phone”
Speak this command to access the Con-
nections menu. For additional information,
refer to “Bluetooth® connections screen” in
this section.
“Settings”
Speak this command to access the Sys-
tem Voice settings menu. The system will
exit Voice Recognition mode. Touch one of
the following options on the screen to
change the settings.
• Beep Only for Opening PromptBy touching the “ON” key, the indicator
light will illuminate, the system voice will
turn off and only a tone will sound when
the Bluetooth® Hands-Free Phone Sys-
tem is activated. To turn the system voice
back on, touch the “ON” key again, the
indicator light will turn off.
• Best Match List When the system doesn't recognize a
phonebook name or dial number, it will
provide a list of similar sounding results.
To turn this off, touch the “ON” key, the
indicator light will turn off. To turn on,
touch the “ON” key again, the indicator
light will turn on.
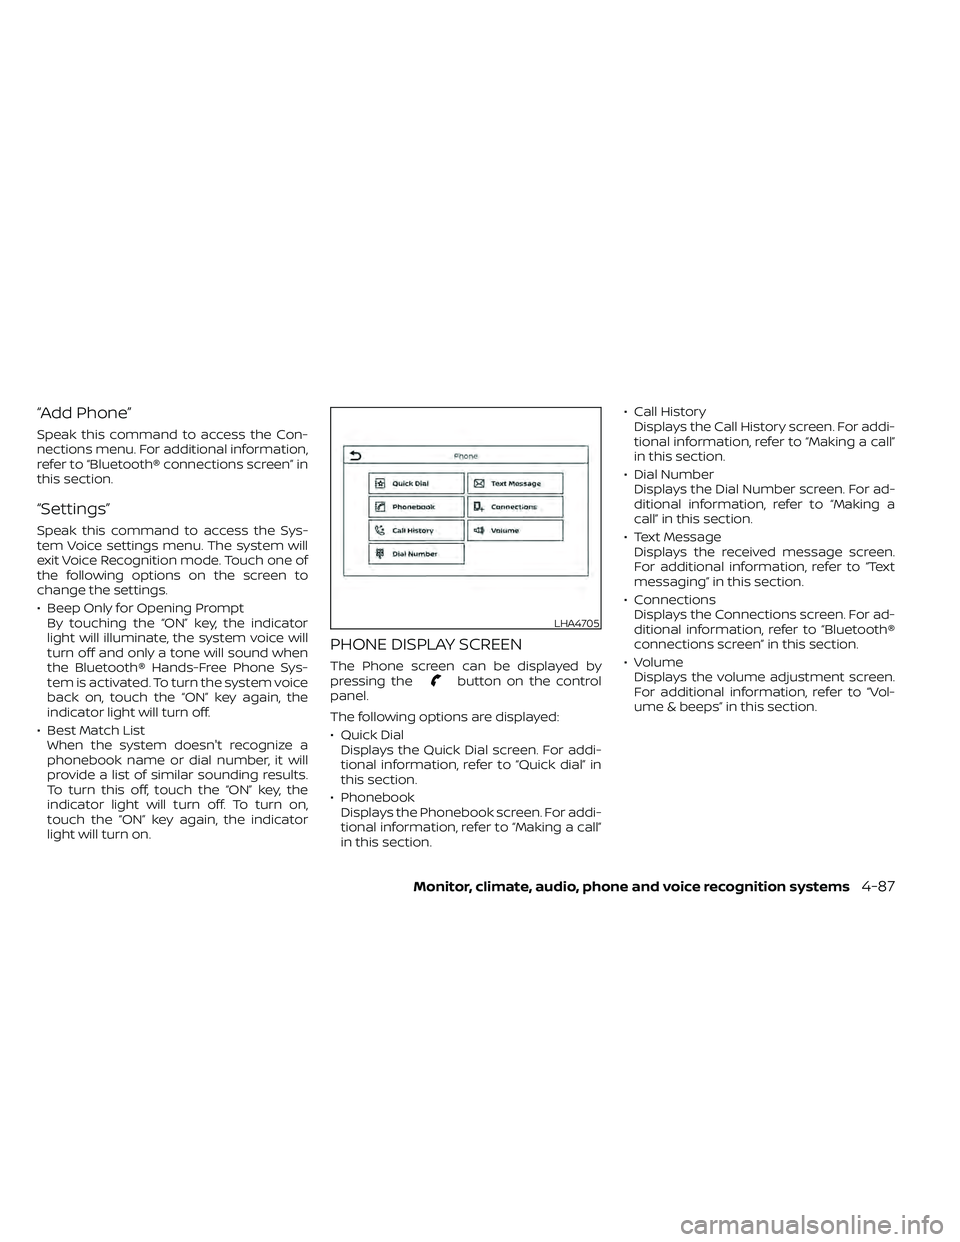
PHONE DISPLAY SCREEN
The Phone screen can be displayed by
pressing thebutton on the control
panel.
The following options are displayed:
• Quick Dial Displays the Quick Dial screen. For addi-
tional information, refer to “Quick dial” in
this section.
• Phonebook Displays the Phonebook screen. For addi-
tional information, refer to “Making a call”
in this section. • Call History
Displays the Call History screen. For addi-
tional information, refer to “Making a call”
in this section.
• Dial Number Displays the Dial Number screen. For ad-
ditional information, refer to “Making a
call” in this section.
• Text Message Displays the received message screen.
For additional information, refer to “Text
messaging” in this section.
• Connections Displays the Connections screen. For ad-
ditional information, refer to “Bluetooth®
connections screen” in this section.
• Volume Displays the volume adjustment screen.
For additional information, refer to “Vol-
ume & beeps” in this section.
LHA4705
Page 307 of 492
“Made for iPod”, “Made for iPhone” and
“Made for iPad” mean that an electronic
accessory has been designed to connect
specifically to iPod, iPhone or iPad, respec-
tively, and has been certified by the devel-
oper to meet Apple performance stan-
dards. Apple is not responsible for the
operation of this device or its compliance
with safety and regulatory standards.
Please note that the use of this accessory
with iPod, iPhone or iPad may affect wire-
less performance.
iPad, iPhone, iPod classic, iPod nano, iPod
shuffle and iPod touch are trademarks of
Apple Inc., registered in the U.S. and other
countries. Lightning is a trademark of
Apple Inc.
iPod®/IPHONE®
Monitor, climate, audio, phone and voice recognition systems4-111
Page 312 of 492
the telltale will flash for approximately 1
minute and then remain continuously illu-
minated. This sequence will continue upon
subsequent vehicle start-ups as long as
the malfunction exists. When the malfunc-
tion indicator is illuminated, the system
may not be able to detect or signal low tire
pressure as intended. TPMS malfunctions
may occur for a variety of reasons, includ-
ing the installation of replacement or alter-
nate tires or wheels on the vehicle that
prevent the TPMS from functioning prop-
erly. Always check the TPMS malfunction
telltale af ter replacing one or more tires or
wheels on your vehicle to ensure that the
replacement or alternate tires and wheels
allow the TPMS to continue to function
properly.
Additional information:
• When replacing a wheel without theTPMS such as the spare tire, the TPMS
does not monitor the tire pressure of the
spare tire.
• The TPMS will activate only when the ve- hicle is driven at speeds above 16 mph (25
km/h). Also, this system may not detect a
sudden drop in tire pressure (for example,
a flat tire while driving). • The low tire pressure warning light does
not automatically turn off when the tire
pressure of your tires are adjusted. Af ter
the tires are inflated to the recom-
mended pressure, the vehicle must be
driven at speeds above 16 mph (25 km/h)
to activate the TPMS and turn off the low
tire pressure warning light. Use a tire
pressure gauge to check the tire pres-
sure.
• The CHECK TIRE PRES (pressure) warning message is displayed in the odometer
when the low tire pressure warning light
is illuminated and low tire pressure is de-
tected. The CHECK TIRE PRES warning
message turns off when the low tire pres-
sure warning light turns off. The low tire
pressure warning light remains illumi-
nated until the tires are inflated to the
recommended COLD tire pressure. The
CHECK TIRE PRES warning message is
displayed each time the ignition switch is
placed in the ON position as long as the
low tire pressure warning light remains
illuminated. For additional information,
refer to “Check tire pressure warning
message” in the “Instruments and con-
trols” section of this manual. • The CHECK TIRE PRES warning is not dis-
played if the low tire pressure warning
light illuminates to indicate a TPMS mal-
function.
• The CHECK TIRE PRES warning appears each time the ignition switch is placed in
the ON position as long as the low tire
pressure warning light remains illumi-
nated.
• Tire pressure rises and falls depending on the heat caused by the vehicle’s opera-
tion and the outside temperature. Do not
reduce the tire pressure af ter driving be-
cause the tire pressure rises af ter driving.
Low outside temperature can lower the
temperature of the air inside the tire
which can cause a lower tire inflation
pressure. This may cause the low tire
pressure warning light to illuminate. If the
warning light illuminates, check the tire
pressure for all four tires.
• The Tire and Loading Information label is located in the driver's door opening.
For additional information, refer to “Low tire
pressure warning light” in the “Instruments
and controls” section and “Tire Pressure
Monitoring System (TPMS)” in the “In case of
emergency” section of this manual.
5-4Starting and driving
Page 313 of 492
WARNING
• Radio waves could adversely affect
electric medical equipment. Those
who use a pacemaker should contact
the electric medical equipment
manufacturer for the possible influ-
ences before use.
• If the low tire pressure warning light
illuminates while driving, avoid sud-
den steering maneuvers or abrupt
braking, reduce vehicle speed, pull
off the road to a safe location and
stop the vehicle as soon as possible.
Driving with under-inflated tires may
permanently damage the tires and
increase the likelihood of tire failure.
Serious vehicle damage could occur
and may lead to an accident and
could result in serious personal in-
jury. Check the tire pressure for all
four tires. Adjust the tire pressure to
the recommended COLD tire pres-
sure shown on the Tire and Loading
Information label to turn the low tire
pressure warning light off. If you have
a flat tire, replace it with a spare tire
as soon as possible. For additional
information, refer to “Flat tire” in the
“In case of emergency ” section of this
manual for changing a flat tire. •
When replacing a wheel without the
TPMS such as the spare tire, when a
spare tire is mounted or a wheel is
replaced, the TPMS will not function
and the low tire pressure warning
light will flash for approximately 1
minute. The light will remain on af ter
1 minute. Have your tires replaced
and/or TPMS system reset as soon as
possible. It is recommended that you
visit a NISSAN dealer for this service.
• Replacing tires with those not origi-
nally specified by NISSAN could af-
fect the proper operation of the
TPMS.
• Do not inject any tire liquid or aerosol
tire sealant into the tires, as this may
cause a malfunction of the tire pres-
sure sensors.
CAUTION
Do not place metalized film or any
metal parts (antenna, etc.) on the win-
dows. This may cause poor reception of
the signals from the tire pressure sen-
sors, and the TPMS will not function
properly. Some devices and transmitters may tem-
porarily interfere with the operation of the
TPMS and cause the low tire pressure
warning light to illuminate.
Some examples are:
• Facilities or electric devices using similar
radio frequencies are near the vehicle.
• If a transmitter set to similar frequencies is being used in or near the vehicle.
• If a computer (or similar equipment) or a DC/AC converter is being used in or near
the vehicle.
The low tire pressure warning light may
illuminate in the following cases:
• If the vehicle is equipped with a wheel and tire without TPMS.
• If the TPMS has been replaced and the ID has not been registered.
• If the wheel is not originally specified by NISSAN.
Starting and driving5-5
Page 316 of 492
4. Gradually steer the vehicle to a safe lo-cation off the road and away from traffic
if possible.
5. Lightly apply the brake pedal to gradu- ally stop the vehicle.
6. Turn on the hazard warning flashers and contact a roadside emergency service
to change the tire. For additional infor-
mation, refer to “Changing a flat tire” in
the “In case of emergency” section of
this manual.
DRINKING ALCOHOL/DRUGS AND
DRIVING
Page 317 of 492
•If your engine stalls or you cannot
make it to the top of a steep hill,
never attempt to turn around. Your
vehicle could tip or roll over. Always
back straight down in R (Reverse)
gear. Never back down in N (Neutral),
using only the brake, as this could
cause loss of control.
• Heavy braking going down a hill
could cause your brakes to overheat
and fade, resulting in loss of control
and an accident. Apply brakes lightly
and use a low gear to control your
speed. Use the hill descent control
feature (if so equipped).
• Unsecured cargo can be thrown
around when driving over rough ter-
rain. Properly secure all cargo so it
will not be thrown forward and cause
injury to you or your passengers.
• To avoid raising the center of gravity
excessively, do not exceed the rated
capacity of the roof rack (if so
equipped) and evenly distribute the
load. Secure heavy loads in the cargo
area as far forward and as low as
possible. Do not equip the vehicle
with tires larger than specified in this
manual. This could cause your ve-
hicle to roll over. •
Do not grip the inside or spokes of
the steering wheel when driving off-
road. The steering wheel could move
suddenly and injure your hands. In-
stead drive with your fingers and
thumbs on the outside of the rim.
• Before operating the vehicle, ensure
that the driver and all passengers
have their seat belts fastened.
• Always drive with the floor mats in
place as the floor may become hot.
• Lower your speed when encounter-
ing strong crosswinds. With a higher
center of gravity, your NISSAN is more
affected by strong side winds. Slower
speeds ensure better vehicle control.
• Do not drive beyond the perfor-
mance capability of the tires, even
with 4WD engaged (if so equipped).
• For 4WD equipped vehicles, do not
attempt to raise two wheels off the
ground and shif t the transmission to
any drive or reverse position with the
engine running. Doing so may result
in drivetrain damage or unexpected
vehicle movement which could result
in serious vehicle damage or per-
sonal injury. •
Do not attempt to test a 4WD
equipped vehicle on a 2-wheel dyna-
mometer (such as the dynamom-
eters used by some states for emis-
sions testing), or similar equipment
even if the other two wheels are
raised off the ground. Make sure you
inform test facility personnel that
your vehicle is equipped with 4WD
before it is placed on a dynamom-
eter. Using the wrong test equipment
may result in drivetrain damage or
unexpected vehicle movement
which could result in serious vehicle
damage or personal injury.
• Accelerating quickly, sharp steering
maneuvers or sudden braking may
cause loss of control.
• If at all possible, avoid sharp turning
maneuvers, particularly at high
speeds. Your NISSAN 4WD vehicle has
a higher center of gravity than a pas-
senger car. The vehicle is not de-
signed for cornering at the same
speeds as passenger cars. Failure to
operate this vehicle correctly could
result in loss of control and/or a roll-
over accident.
Starting and driving5-9