2021 NISSAN FRONTIER garage door opener
[x] Cancel search: garage door openerPage 166 of 492
The HomeLink® Universal Transceiver pro-
vides a convenient way to consolidate the
functions of up to three individual hand-
held transmitters into one built-in device.
HomeLink® Universal Transceiver:
• Will operate most radio frequency de-vices such as garage doors, gates, home
and office lighting, entry door locks and
security systems.
• Is powered by your vehicle's battery. No separate batteries are required. If the ve-
hicle's battery is discharged or is discon-
nected, HomeLink® will retain all pro-
gramming.
When the HomeLink® Universal Trans-
ceiver is programmed, retain the original
transmitter for future programming pro-
cedures (Example: new vehicle pur-
chases). Upon sale of the vehicle, the
programmed HomeLink® Universal
Transceiver buttons should be erased for
security purposes. For additional infor-
mation, refer to “Programming
HomeLink®” in this section.WARNING
• Your vehicle's engine should be
turned off while programming the
HomeLink® Universal Transceiver. Do
not breathe exhaust gases; they con-
tain colorless and odorless carbon
monoxide. Carbon monoxide is dan-
gerous. It can cause unconscious-
ness or death.
• Do not use the HomeLink® Universal
Transceiver with any garage door
opener that lacks safety stop and re-
verse features as required by federal
safety standards. (These standards
became effective for opener models
manufactured af ter April 1, 1982). A
garage door opener which cannot
detect an object in the path of a clos-
ing garage door and then automati-
cally stop and reverse, does not meet
current federal safety standards. Us-
ing a garage door opener without
these features increases the risk of
serious injury or death. •
During the programming procedure
your garage door or security gate will
open and close (if the transmitter is
within range). Make sure that people
or objects are clear of the garage
door, gate, etc. that you are
programming.
PROGRAMMING HOMELINK®
If you have any questions or are having
difficulty programming your HomeLink®
buttons, refer to the HomeLink® web site at:
www.homelink.com or call 1-800-355-3515.
NOTE:
Place the ignition switch in the ON posi-
tion (without starting the engine) when
programming HomeLink®. It is also rec-
ommended that a new battery be placed
in the hand-held transmitter of the de-
vice being programmed to HomeLink®
for quicker programming and accurate
transmission of the radio frequency.
HOMELINK® UNIVERSAL
TRANSCEIVER (if so equipped)
2-56Instruments and controls
Page 167 of 492
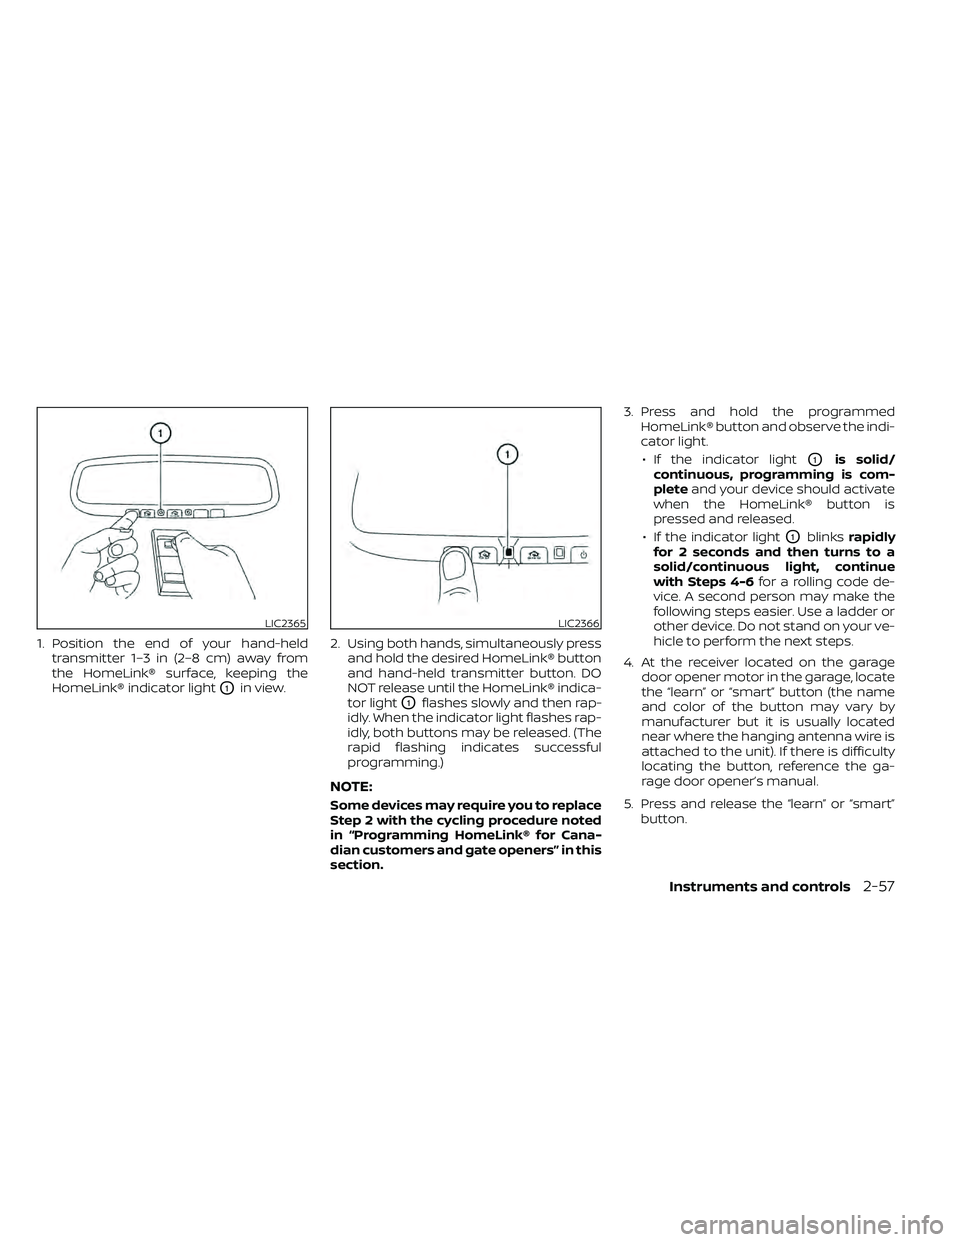
1. Position the end of your hand-heldtransmitter 1–3 in (2–8 cm) away from
the HomeLink® surface, keeping the
HomeLink® indicator light
O1in view. 2. Using both hands, simultaneously press
and hold the desired HomeLink® button
and hand-held transmitter button. DO
NOT release until the HomeLink® indica-
tor light
O1flashes slowly and then rap-
idly. When the indicator light flashes rap-
idly, both buttons may be released. (The
rapid flashing indicates successful
programming.)
NOTE:
Some devices may require you to replace
Step 2 with the cycling procedure noted
in “Programming HomeLink® for Cana-
dian customers and gate openers” in this
section. 3. Press and hold the programmed
HomeLink® button and observe the indi-
cator light.
• If the indicator light
O1is solid/
continuous, programming is com-
plete and your device should activate
when the HomeLink® button is
pressed and released.
• If the indicator light
O1blinks rapidly
for 2 seconds and then turns to a
solid/continuous light, continue
with Steps 4-6 for a rolling code de-
vice. A second person may make the
following steps easier. Use a ladder or
other device. Do not stand on your ve-
hicle to perform the next steps.
4. At the receiver located on the garage door opener motor in the garage, locate
the “learn” or “smart” button (the name
and color of the button may vary by
manufacturer but it is usually located
near where the hanging antenna wire is
attached to the unit). If there is difficulty
locating the button, reference the ga-
rage door opener’s manual.
5. Press and release the “learn” or “smart” button.
LIC2365LIC2366
Page 168 of 492
NOTE:
Once the button is pressed, you have ap-
proximately 30 seconds to initiate the
next step.
6. Return to the vehicle and firmly pressand hold the trained HomeLink® button
for 2 seconds and release. Repeat the
“press/hold/release” sequence up to
three times to complete the training
process. HomeLink® should now acti-
vate your rolling code equipped device.
7. If you have any questions or are having difficulty programming your HomeLink®
buttons, refer to the HomeLink® web site
at: www.homelink.com or call
1-800-355-3515.
PROGRAMMING HOMELINK® FOR
CANADIAN CUSTOMERS AND GATE
OPENERS
Canadian radio-frequency laws require
transmitter signals to “time-out” (or quit)
af ter several seconds of transmission –
which may not be long enough for
HomeLink® to pick up the signal during
training. Similar to this Canadian law, some
U.S. gate operators are designed to “tim-
eout” in the same manner. If you live in Canada or you are having diffi-
culties training a gate operator
orgarage
door opener by using the “Training” proce-
dures, replace “Programming HomeLink®”
step 2 with the following:
NOTE:
When programming a garage door
opener, etc., unplug the device during
the “cycling” process to prevent possible
damage to the garage door opener
components.
1. For additional information, refer to “Pro-
gramming HomeLink®” step 1 in this
section.
2. Using both hands, simultaneously press and hold the desired HomeLink® button
and the hand-held transmitter button.
During training, your hand-held trans-
mitter may automatically stop transmit-
ting. Continue to press and hold the de-
sired HomeLink® button while you press
and re-press (“cycle”) your hand-held
transmitter every 2 seconds until the
frequency signal has been learned. The
HomeLink® indicator light will flash
slowly and then rapidly af ter several
seconds upon successful training. DO
NOT release until the HomeLink® indica-
tor light flashes slowly and then rapidly. When the indicator light flashes rapidly,
both buttons may be released. The rapid
flashing indicates successful training.
Proceed with “Programming
HomeLink®” step 3 to complete.
If the device was unplugged during the
programming procedure, remember to
plug it back in when programming is
completed.
OPERATING THE HOMELINK®
UNIVERSAL TRANSCEIVER
The HomeLink® Universal Transceiver, af ter
it is programmed, can be used to activate
the programmed device. To operate, sim-
ply press and release the appropriate pro-
grammed HomeLink® Universal Trans-
ceiver button. The amber indicator light will
illuminate while the signal is being trans-
mitted.
For convenience, the hand-held transmit-
ter of the device may also be used at any
time.
2-58Instruments and controls
Page 479 of 492
EngineBefore starting the engine........5-13Capacities and recommended
fuel/lubricants...............10-2Changing engine coolant.........8-5Changing engine oil............8-6Changing engine oil filter.........8-6Checking engine coolant level......8-5Checking engine oil level.........8-6Engine coolant temperature gauge. . .2-7Engine cooling system...........8-4Engine oil.................. .8-6Engine oil and oil filter
recommendation.............10-7Engine oil pressure warning light. . . .2-17Engine oil viscosity.............10-7Engine serial number...........10-11Engine specifications...........10-9Engine Block Heater.............5-41Engine coolant temperature gauge. . . .2-7Enter button...............4-5, 4-10Event Data recorders............10-40Exhaust gas (Carbon monoxide)......5-2Explanation of maintenance items.....9-2Explanation of scheduled maintenance
items...................... .9-5Extended storage switch..........8-23Eyeglass case.................2-45
F
First aid kit....................6-2
Flashers
(See hazard warning flasher switch). . . .6-2Flat tire.................. .6-3, 6-4Floor mat positioning aid...........7-6Fluid
Brake fluid..................8-11Capacities and recommended
fuel/lubricants...............10-2Engine coolant................8-4Engine oil.................. .8-6Power steering fluid............8-10Windshield-washer fluid.........8-12Fog light switch................2-33Front air bag system
(See supplemental restraint system). . .1-77Front power seat adjustment........1-5Front seats....................1-2Front-door pocket..............2-40Fuel
Capacities and recommended
fuel/lubricants
...............10-2Fuel economy................5-23Fuel gauge................. .2-8Fuel octane rating.............10-6Fuel recommendation..........10-4Fuel-filler cap................3-13Fuel-filler lid.................3-13Loose fuel cap warning..........2-6Fuel efficient driving tips...........5-21Fuel gauge................... .2-8Fuel-filler door.................3-13Fuses......................8-20Fusible links..................8-22
G
Garage door opener, HomeLink® Universal
Transceiver............2-56, 2-58, 2-59Gas cap.....................3-13Gauge
Engine coolant temperature gauge. . .2-7Fuel gauge................. .2-8Odometer.................. .2-5Speedometer................2-5Tachometer..................2-7Trip computer................2-9Trip odometer................2-5General maintenance.............9-2Glove box................... .2-44
H
Hands-free phone system, Bluetooth®. .4-96Hazard warning flasher switch........6-2Head restraints.................1-10Headlight and turn signal switch.....2-30Headlight control switch...........2-30Headlights...................8-26Heated seat switches............2-35Heater
Heater and air conditioner controls. .4-34Heater operation..........4-25, 4-35Hill descent control switch.........2-36Hill descent control system.........5-37Hill start assist system............5-38HomeLink® Universal
Transceiver............2-56, 2-58, 2-59
11-3