Page 399 of 492

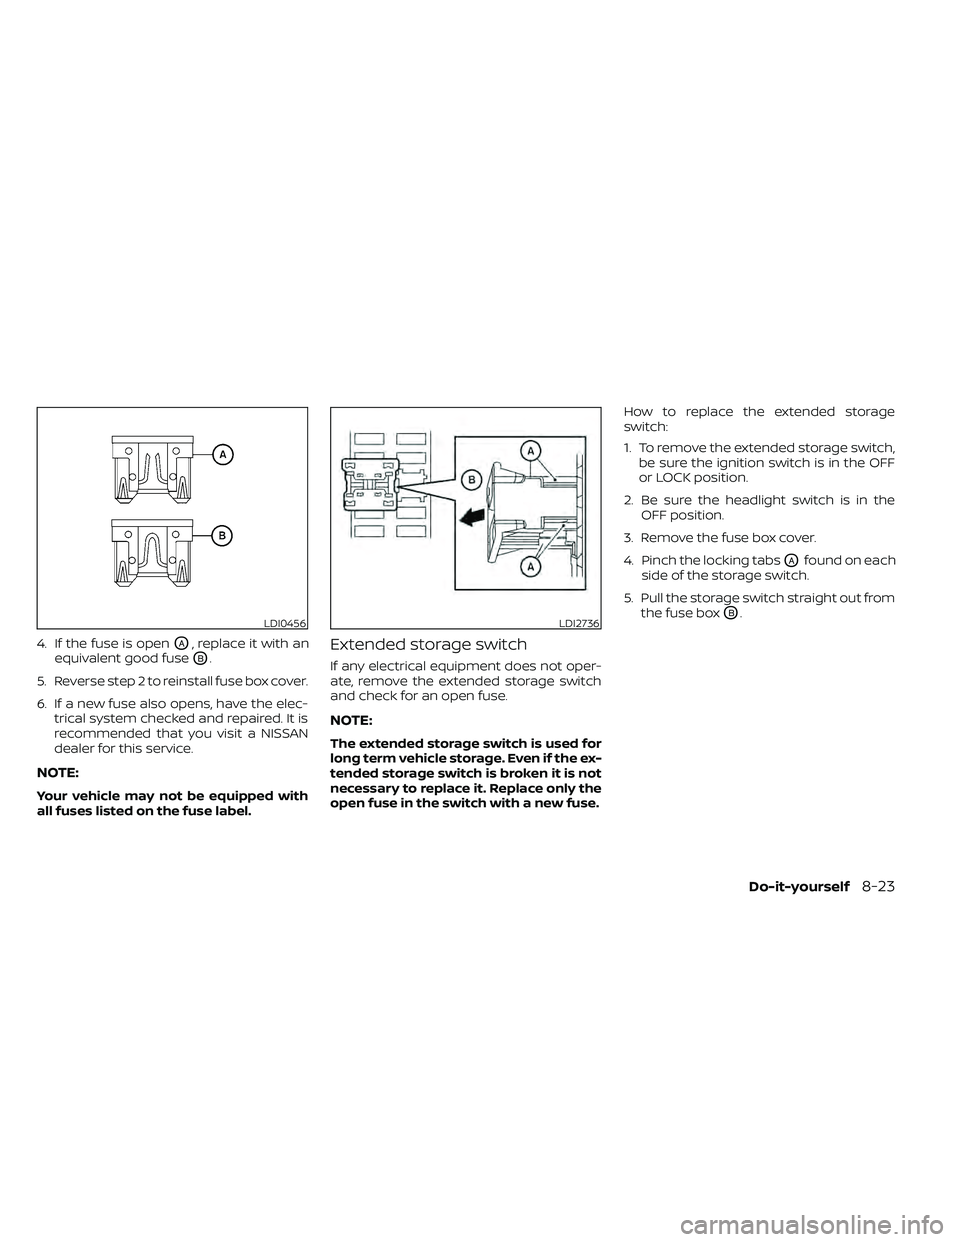
4. If the fuse is openOA, replace it with an
equivalent good fuse
OB.
5. Reverse step 2 to reinstall fuse box cover.
6. If a new fuse also opens, have the elec- trical system checked and repaired. It is
recommended that you visit a NISSAN
dealer for this service.
NOTE:
Your vehicle may not be equipped with
all fuses listed on the fuse label.
Extended storage switch
If any electrical equipment does not oper-
ate, remove the extended storage switch
and check for an open fuse.
NOTE:
The extended storage switch is used for
long term vehicle storage. Even if the ex-
tended storage switch is broken it is not
necessary to replace it. Replace only the
open fuse in the switch with a new fuse. How to replace the extended storage
switch:
1. To remove the extended storage switch,
be sure the ignition switch is in the OFF
or LOCK position.
2. Be sure the headlight switch is in the OFF position.
3. Remove the fuse box cover.
4. Pinch the locking tabs
OAfound on each
side of the storage switch.
5. Pull the storage switch straight out from the fuse box
OB.LDI0456LDI2736
Page 402 of 492
HEADLIGHTS
The headlight is a semi-sealed beam type
which uses a replaceable headlight (halo-
gen) bulb. A bulb can be replaced from in-
side the engine compartment without re-
moving the headlight assembly.
WDI0294
LIGHTS
Page 403 of 492
4. Turn the bulb retaining ringOAcounter-
clockwise until it is free from the head-
light reflector and then remove it.
5. Carefully remove the headlight bulb. Do not shake or rotate the bulb
OBwhen
removing it.
Replacing the headlight bulb
1. Insert the bulb.
DO NOT TOUCH THE BULB WITH BARE
HANDS.
2. Install and tighten the bulb retainer. • Be sure the lip of the bulb socket con-tacts the headlight body.
3. Push the electrical connector into the bulb plastic base until it snaps and
stops.
4. Connect the negative (-) battery cable.
5. Close the hood.
FOG LIGHTS (if so equipped)
For additional information on fog light bulb
replacement, refer to the instructions out-
lined in this section.
Replacing the fog light bulb
If fog light bulb replacement is required, it is
recommended that you visit a NISSAN
dealer for this service.
Page 404 of 492
EXTERIOR AND INTERIOR LIGHTS
ItemWattage (W)Bulb No.*
Headlight assembly High/Low/Daytime running lights (if so
equipped) 60/55
HB5
Turn/Park 28/8W28/8W
Side marker 3.8194
Fog lights (if so equipped)* 55H11
Map light 8—
Room light* 8—
Vanity mirror light (if so equipped)* 2.1—
High-mounted stop light/Cargo light* 12.8912
Rear combination light Turn 273156AK
Stop/Tail 27/73157K
Back-up 16921
License plate light 5W5W
* It is recommended that you visit an NISSAN retailer for replacement.
Always check with the Parts Department at a NISSAN dealer for the latest parts
information.
1. Map light
2. Room light
3. High-mounted stop light/Cargo light
4. License plate light
5. Rear combination light
6. Fog light (if so equipped)
7. Headlight assembly/Daytime running light
LDI0713
8-28Do-it-yourself
Page 405 of 492
Replacement procedures
All other lights are either type A, B, C or D.
When replacing a bulb, first remove the lens
and/or cover using a cloth and suitable tool.
: Indicates bulb removal
: Indicates bulb installationUse a cloth
O1to protect the housing.
WDI0306
LDI0478
Map light
Do-it-yourself8-29
Page 406 of 492
To replace the license plate light:
1. Apply force as shown in image to re-move tension that locks bulb assembly
to the bumper.
2. Pivot bulb assembly away from bumper to release fully.
3. Rotate the bulb retainer as shown in the image.
4. Pull the bulb out to remove and replace. *Lef t side assembly is shown. Right side
assembly is mirror. If you have a flat tire, refer to “Flat tire” in
the “In case of emergency ” section of
this manual.
TIRE PRESSURE
Tire Pressure Monitoring System
(TPMS)
LDI3134
License plate light
WHEELS AND TIRES
Page 407 of 492

TPMS will activate only when the vehicle is
driven at speeds above 16 mph (25 km/h).
Also, this system may not detect a sudden
drop in tire pressure (for example, a flat tire
while driving).
For additional information, refer to “Low tire
pressure warning light” in the “Instruments
and controls” section, “Tire Pressure Moni-
toring System (TPMS)” in the “Starting and
driving” section, and “Flat tire” in the “In case
of emergency” section of this manual.
Tire inflation pressure
Check the tire pressures (including the
spare) of ten and always prior to long dis-
tance trips. The recommended tire pres-
sure specifications are shown on the
F.M.V.S.S./C.M.V.S.S. certification label or the
Tire and Loading Information label under
the “Cold Tire Pressure” heading. The Tire
and Loading Information label is affixed to
the driver side center pillar. Tire pressures
should be checked regularly because:
• Most tires naturally lose air over time.
• Tires can lose air suddenly when drivenover potholes or other objects or if the
vehicle strikes a curb while parking. The tire pressures should be checked
when the tires are cold. The tires are con-
sidered COLD af ter the vehicle has been
parked for 3 or more hours, or driven less
than 1 mile (1.6 km) at moderate speeds.
Incorrect tire pressure, including under
inflation, may adversely affect tire life
and vehicle handling.
WARNING
• Improperly inflated tires can fail sud-
denly and cause an accident.
• The Gross Vehicle Weight Rating
(GVWR) is located on the F.M.V.S.S./
C.M.V.S.S. certification label. The ve-
hicle weight capacity is indicated on
the Tire and Loading Information la-
bel. Do not load your vehicle beyond
this capacity. Overloading your ve-
hicle may result in reduced tire life,
unsafe operating conditions due to
premature tire failure, or unfavorable
handling characteristics and could
also lead to a serious accident. Load-
ing beyond the specified capacity
may also result in failure of other ve-
hicle components. •
Before taking a long trip, or when-
ever you heavily load your vehicle,
use a tire pressure gauge to ensure
that the tire pressures are at the
specified level.
• For additional information regarding
tires, refer to “Important Tire Safety
Information” (US) or “Tire Safety In-
formation” (Canada) in the Warranty
Information Booklet.
Do-it-yourself8-31
Page 416 of 492

•If the wheels are changed for any
reason, always replace with wheels
which have the same off-set dimen-
sion. Wheels of a different off-set
could cause premature tire wear, de-
grade vehicle handling characteris-
tics, affect the VDC system and/or in-
terference with the brake discs. Such
interference can lead to decreased
braking efficiency and/or early brake
pad wear. For additional information
on wheel off-set dimensions, refer to
“Wheels and tires” in the “Technical
and consumer information” section
of this manual.
• When replacing a wheel without the
TPMS such as the spare tire, the TPMS
will not function and the low tire
pressure warning light will flash for
approximately 1 minute. The light will
remain on af ter 1 minute. Have your
tires replaced and/or TPMS system
reset as soon as possible. It is recom-
mended that you visit a NISSAN
dealer for this service.
• Replacing tires with those not origi-
nally specified by NISSAN could af-
fect the proper operation of the
TPMS. •
The TPMS sensor may be damaged if
it is not handled correctly. Be careful
when handling the TPMS sensor.
• When replacing the TPMS sensor, the
ID registration may be required. It is
recommended that you visit a
NISSAN dealer for ID registration.
• Do not use a valve stem cap that is
not specified by NISSAN. The valve
stem cap may become stuck.
• Be sure that the valve stem caps are
correctly fitted. Otherwise the valve
may be clogged up with dirt and
cause a malfunction or loss of
pressure.
• Do not install a damaged or de-
formed wheel or tire even if it has
been repaired. Such wheels or tires
could have structural damage and
could fail without warning.
• The use of retread tires is not
recommended.
• For additional information regarding
tires, refer to “Important Tire Safety
Information” (US) or “Tire Safety In-
formation” (Canada) in the Warranty
Information Booklet.