Page 41 of 54

ALWAYS CHECK THE OWNER’S MANUAL FOR COMPLETE OPER ATING INFORMATION AND SAFET Y WARNINGS. *IF EQUIPPED †LEGAL DISCL AIMERS ON BACK INSIDE COVER39
SEATING
OTHER KEY FEATURES
Folding Rear Seats†1 6
To F o l d :
1. Adjust the Front Seatback to the upright position and/or slide the
Front Seat forward
2. Insert the rear seat belt buckle into the pocket* between the Rear
Seatback and Seat Cushion D. Insert the rear seat belt strap into
the guide on the side panel next to the Seatback
3. Lower the Rear Headrests to the lowest position
4. Pull on the Rear Seatback folding lever E, then fold the seat towards
the front
REMINDER: When you return the seatback to its upright position, always be sure it has locked into position by pushing on the top of the seatback.
To U n f o l d :
1. Lift and pull the Seatback backward by pulling on the folding lever E.
Pull the Seatback firmly until it clicks and is locked into place
2. Return the rear seat belt to the proper position
It may be necessary to remove the headrests and/or adjust the front seatbacks to fully lower rear seats.
QUICK TIP
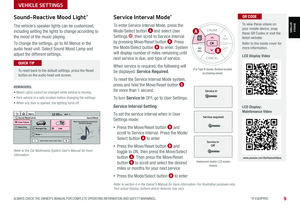
Unfastening Center Seat Belt
1. If Seat Belt is buckled, press the release
button on the buckle
2. To retract the 2nd-Row Center Seatbelt A into the headliner, press the “release
button” on the buckle by inserting the
seat belt tongue plate B in the small
slot on the center buckle C
Unfastening Center Seat Belt Video To view a video on your mobile device, snap this QR Code or visit the listed website.
Refer to the inside cover for more information.
www.youtube.com/KiaFeatureVideos
QR CODE
Refer to section 3 in the Owner’s Manual for more information.
Refer to section 3 in the Owner’s Manual for more information.
A
C
D
E
B
Page 42 of 54

40SOUL FEATURES & FUNCTIONS GUIDE*IF EQUIPPED †LEGAL DISCL AIMERS ON BACK INSIDE COVER
OTHER KEY FEATURES
OTHER KEY FEATURES
REMINDERS:
•Sunvisor may not shield all direct light
•
The Sunvisor may impair visibility if not adjusted properly. Do not operate the vehicle if Sunvisor is impairing your visibility
•
Be aware of seating position when adjusting or swinging Sunvisor around to or from the front or side windows
•Do not operate the vehicle if Sunvisor is impairing your visibility
Use the Sunvisor to shield direct light through the
front or side windows. Slide the Sunvisor out and
adjust as needed.
Sunvisor†2 2
•
•When doors are unlocked by the Smart Key*, the lamp turns ON for approximately 30 seconds
•If your vehicle is equipped with the theft alarm system, the interior lights automatically turn off approximately 3 seconds after the system is in armed stage
•Using interior lights for an extended period of time may cause battery discharge
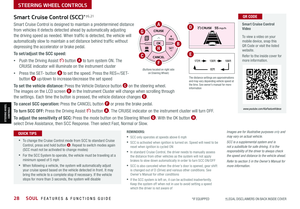
QUICK TIPS
Map/Room Lamp Operation: Push the lens A to turn the Map Lamp ON/OFF. This light
produces a spot beam for convenient use as a map lamp or personal lamp for the driver or
front passenger.
Door Mode: When the door button B is pressed, the Map Lamp turns ON when any
door is opened.
Front/Rear Room Lamps: When the room button C is pressed, the Map and Room
Lamps turn ON.
Automatic turn off function*: The interior lights automatically turn off approximately
30 seconds after the Engine System Start /Stop button* is OFF.
Map/Room Lamps
( Type B)
AA
CB
Refer to section 4 in the Owner’s Manual for more information.
Refer to section 4 in the Owner’s Manual for more information.
Page 43 of 54

HOLDHOLD
H")
ALWAYS CHECK THE OWNER’S MANUAL FOR COMPLETE OPER ATING INFORMATION AND SAFET Y WARNINGS. *IF EQUIPPED41
OTHER KEY FEATURES
OTHER KEY FEATURES
Lock
Unlock
( Type B; Driver’s door only)
HOLDHOLD
HOLD
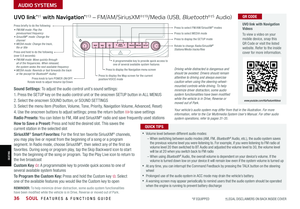
Smart Key Fob:
A Press to lock All Doors; Press twice within 2 seconds to sound the horn
B Press to unlock Driver’s Door. Press twice in 4 seconds to unlock All Doors
C Press and hold for more than 1 second to unlock Liftgate. Then lift by the handle to manually
open Liftgate
REMINDER: The Liftgate unlocks when the Smart Key fob is within close proximity of the rear liftgate.
D Press and hold more than 1 second for Panic Alarm. To turn off Alarm, press any button
E Press to release Mechanical Key
F Remote Start Button*: Press for more than two (2) seconds
within four (4) seconds after locking doors to start the vehicle.
Press once to turn off
REMINDER: If the Smart Key battery is weak or not working properly, hold the Smart Key fob up to the Engine Start /Stop button (Lock button side closest) and press to start engine
Driver’s Door Lock/Unlock button G:
•Press button once to unlock driver’s door
•Press again within 4 seconds to unlock all doors
•Press again to lock all doors
Mechanical Key H:
Use to unlock /lock Driver’s Door
1. Remove door handle keyhole cover with Mechanical Key
by pressing up into slot as shown I
2. Insert Mechanical Key H and turn right to Unlock Driver’s
Door. Turn twice within 4 seconds to Unlock all doors
3. Insert Mechanical Key and turn left to Lock Driver’s Door
4. Return keyhole cover to its original position
Use to lock and unlock the glove box
• The Smart Key’s signal can be blocked by the normal operation of a cellphone or smartphone. To help prevent this, store each device separately
• If the Smart Key battery is weak or not working properly, hold the Smart Key fob up to the Engine Start /Stop button (Lock button side closest) and press to start engine
• When reinserting the mechanical key into the fob, make sure it is pushed all the way in until there is a click sound
QUICK TIPS
To view videos on your mobile device, snap these QR Codes or visit the listed website. Refer to the inside cover for more information.
Engine Start/Stop Button & Smart Key Video
Kia Key Fob Video
www.youtube.com/KiaFeatureVideos
QR CODESmart Key*
Refer to section 3 in the Owner’s Manual for more information.
Refer to section 4 in the Owner’s Manual for more information.
A
C
D
E
F
HG
I
B
Page 44 of 54

42SOUL FEATURES & FUNCTIONS GUIDE*IF EQUIPPED
OTHER KEY FEATURES
OTHER KEY FEATURES
HOLD
To view videos on your mobile device, snap these QR Codes or visit the listed website. Refer to the inside cover for more information.
One-Click Fuel Cap Video
Kia Key Fob Video
www.youtube.com/KiaFeatureVideos
QR CODE
(Lever located on the driver’s floor near door sill)
Fuel Door
Release Lever
Lift the F lever upwards to
release the fuel door.
Remote Keyless Entry (Folding Key)*
A Press the release button to release the
key
B Press to Lock All Doors
C Press to unlock Driver’s Door. Press
twice in 4 seconds to unlock All Doors
and Liftgate
D Press and hold for more than 1 second
to unlock Liftgate and manually open
E Press and hold more than 1 second for
Panic Alarm. To turn OFF Alarm, press
any button
REMINDERS:
•
The Liftgate does not automatically open when the button D is pressed
•
The Liftgate unlocks when the Smart Key fob is within close proximity of the rear liftgate
•
Remote button configuration may vary depending on vehicle options
Double-Turn Lock / Unlock All
•Turn counterclockwise once to unlock Driver’s Door
•Turn counterclockwise again within 4 seconds to unlock All Doors
•Turn clockwise once to Lock All Doors
Fuel Cap Open Warning
Indicator*
Tighten for ONE CLICK to prevent Fuel Cap Open
Warning Indicator or from illuminating.
REMINDERS:
•
The Fuel Door Release Lever is located on the lower part of the driver’s door sill
•
It is normal operation when tightening to hear one click and then when Fuel Cap is released, it clicks back
A
C
D
E
F
B
Refer to section 4 in the Owner’s Manual for more information.
Refer to section 4 in the Owner’s Manual for more information.
Refer to section 4 in the Owner’s Manual for more information.Refer to section 4 in the Owner’s Manual for more information.
Page 45 of 54

For illustrative purposes only. Display may")
ALWAYS CHECK THE OWNER’S MANUAL FOR COMPLETE OPER ATING INFORMATION AND SAFET Y WARNINGS. *IF EQUIPPED 43
OTHER KEY FEATURES
OTHER KEY FEATURES
( Type A )
For illustrative purposes only. Display may vary
Sunroof Operation Video To view a video on your mobile device, snap this QR Code or visit the listed website.
Refer to the inside cover for more information.
www.youtube.com/KiaFeatureVideos
QR CODE
Do not adjust the sunroof or sunshade while driving. This could result in loss of control of the vehicle. Refer to section 4 in the Owner’s Manual for more information.
Sunroof Open Warning*
If the Sunroof is not fully closed, the warning will chime and display
on the Instrument Cluster LCD screen* B when:
•The ignition is turned off (Smart Key*)
•The ignition key is removed
•The driver’s door is opened
To stop the Sunroof/Sunshade at any position, push or pull the sunroof control lever in any direction (one detent).
QUICK TIP
REMINDERS:
•If open, the Sunroof will also close when the toggle button is pressed
•Sunshade needs to remain OPEN while Sunroof is open and vehicle is moving
The sunroof and sunshade operation is controlled through a multidirectional button/lever A.
The ignition needs to be in the ON position to operate the Sunroof and Sunshade.
To slide the Sunshade and Sunroof:
•Open automatically: Slide the lever A backward to the farthest
position (second detent)
•Close automatically (sunroof only): Slide the lever A forward
to the farthest position (second detent)
Tilt the Sunroof:
•Raise: Push lever A upward
•Lower: Push lever A forward
•Auto Close: Slide the lever A forward
Sunroof Operation with Sunshade*
A
B
•
While driving with the rear windows down or with the sunroof* in an open or partially open position, a wind buffeting or pulsation noise may be heard. This noise is a normal occurrence and can be reduced or eliminated by the following:
• If the noise occurs with one or both of the rear windows down, partially lower both front windows approximately 1 inch
• If the noise occurs with the sunroof open, slightly reduce the size of the sunroof opening
QUICK TIPS
Page 46 of 54
(Rear-Camera Display)
P
R
N
DSHIFTL OC")
44SOUL FEATURES & FUNCTIONS GUIDE*IF EQUIPPED †LEGAL DISCL AIMERS ON BACK INSIDE COVER
OTHER KEY FEATURES
OTHER KEY FEATURES
(Rear Camera)(Rear-Camera Display)
P
R
N
DSHIFTL OCK
RELEASE
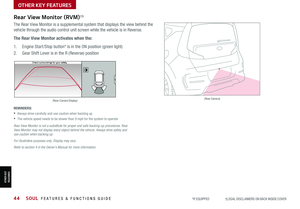
Check surroundings for your safety
Rear View Monitor (RVM)†6
The Rear View Monitor is a supplemental system that displays the view behind the
vehicle through the audio control unit screen while the vehicle is in Reverse.
The Rear View Monitor activates when the:
1. Engine Start /Stop button* is in the ON position (green light)
2.
Gear Shift Lever is in the R (Reverse) position
Rear View Monitor is not a substitute for proper and safe backing-up procedures. Rear View Monitor may not display every object behind the vehicle. Always drive safely and use caution when backing up.
For illustrative purposes only. Display may vary.
Refer to section 4 in the Owner’s Manual for more information.
REMINDERS:
•Always drive carefully and use caution when backing up
•
The vehicle speed needs to be slower than 9 mph for the system to operate
Page 47 of 54

ALWAYS CHECK THE OWNER’S MANUAL FOR COMPLETE OPER ATING INFORMATION AND SAFET Y WARNINGS. *IF EQUIPPED †LEGAL DISCL AIMERS ON BACK INSIDE COVER45
OTHER KEY FEATURES
OTHER KEY FEATURES
Opening the Hood:
1. Located on the bottom left of the driver’s panel, pull the Hood
Release Lever A to unlatch the Hood
2. In the front of the vehicle, lift the Hood slightly, push the
secondary Latch B inside of the Hood’s center to the left, and
lift the Hood
(Button is located underneath the Liftgate lid)
Hood Release Lever and Latch
Closing the Hood:
Lower the Hood by pressing the front center of the Hood. Then, press
down to securely lock in place.
REMINDERS:
• While lowering and closing, keep hands away from under the Hood
• Open the Hood only after turning the engine off, on a flat surface, with the gear shift in P (Park) position and setting the parking brake
• Make sure the hood is securely closed before driving
Liftgate Release Button
With Liftgate unlocked, press the Liftgate Release button C and pull
the Liftgate lid up by the handle to open.
•
•The Liftgate must be unlocked before it can be opened by the Liftgate Release Button
•The Liftgate unlocks automatically and then can be opened manually when the Smart Key* is within close proximity to the vehicle
QUICK TIPS
A
C
B
Refer to section 4 in the Owner’s Manual for more information.
Refer to section 4 in the Owner’s Manual for more information.
Page 48 of 54

46SOUL FEATURES & FUNCTIONS GUIDE*IF EQUIPPED †LEGAL DISCL AIMERS ON BACK INSIDE COVERSAFETYFEATURES
SAFETY FEATURES
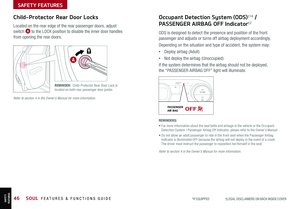
ODS is designed to detect the presence and position of the front
passenger and adjusts or turns off airbag deployment accordingly.
Depending on the situation and type of accident, the system may:
•Deploy airbag (Adult)
•Not deploy the airbag (Unoccupied)
If the system determines that the airbag should not be deployed,
the “PASSENGER AIRBAG OFF” light will illuminate.
REMINDERS:
• For more information about the seat belts and airbags in the vehicle or the Occupant Detection System / Passenger Airbag Off Indicator, please refer to the Owner’s Manual
• Do not allow an adult passenger to ride in the front seat when the Passenger Airbag Indicator is illuminated OFF because the airbag will not deploy in the event of a crash. The driver must instruct the passenger to reposition her/himself in the seat
Child-Protector Rear Door Locks
Located on the rear edge of the rear passenger doors, adjust
switch A to the LOCK position to disable the inner door handles
from opening the rear doors.
REMINDER: Child-Protector Rear Door Lock is located on both rear passenger door jambs.
OFF
AUTOOFFSYNC
AC
PASSENGER
AIR BAGOFF
PASSENGER
AIR BAG
Occupant Detection System (ODS)†1 4 /
PASSENGER AIRBAG OFF Indicator†2
A
Refer to section 4 in the Owner’s Manual for more information.
Refer to section 4 in the Owner’s Manual for more information.