Page 9 of 54

VEHICLESETTINGS
VEHICLE SETTINGS
ALWAYS CHECK THE OWNER’S MANUAL FOR COMPLETE OPER ATING INFORMATION AND SAFET Y WARNINGS. *IF EQUIPPED 7
The Trip Computer is a driver information system
that displays information related to driving on
the display when the ignition switch or the Engine
Start /Stop button* is in the ON position.
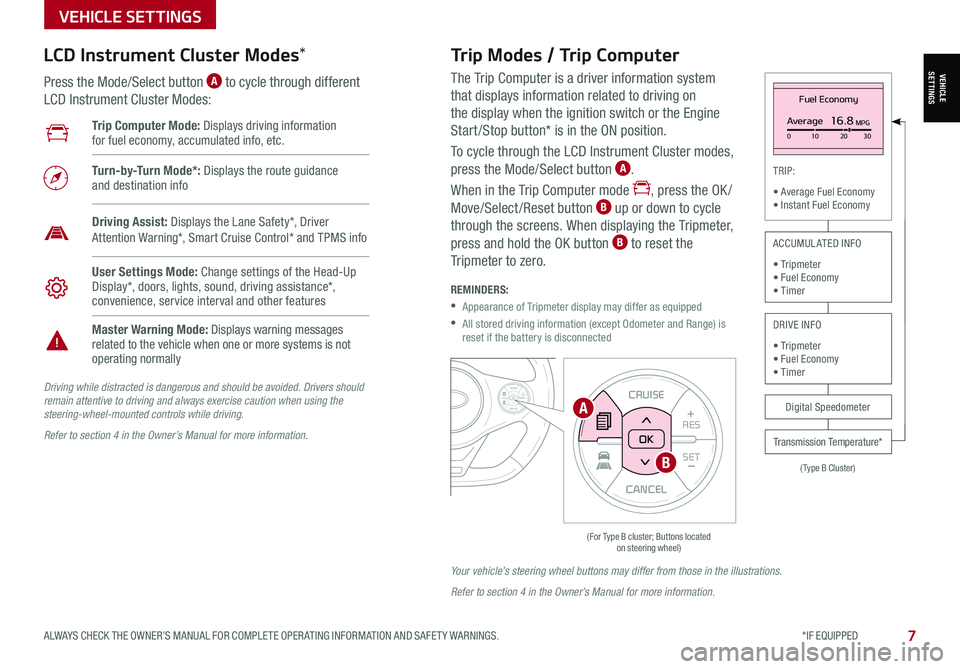
To cycle through the LCD Instrument Cluster modes,
press the Mode/Select button A.
When in the Trip Computer mode , press the OK /
Move/Select /Reset button B up or down to cycle
through the screens. When displaying the Tripmeter,
press and hold the OK button B to reset the
Tripmeter to zero.
REMINDERS:
•
Appearance of Tripmeter display may differ as equipped
•
All stored driving information (except Odometer and Range) is reset if the battery is disconnected
CANCEL
RES
SET+ _CRUISE
RES
SET+ _<<+>>-MODE
+>>-
MODE
CRUISE
CANCELOK
<
(For Type B cluster; Buttons located on steering wheel)
Fuel Economy
Average16.8MPG0 10 2030
(Type B Cluster)
TRIP:
• Average Fuel Economy• Instant Fuel Economy
Digital Speedometer
Transmission Temperature*
ACCUMULATED INFO
• Tripmeter• Fuel Economy• Timer
DRIVE INFO
• Tripmeter • Fuel Economy • Timer
Trip Computer Mode: Displays driving information for fuel economy, accumulated info, etc.
Turn-by-Turn Mode*: Displays the route guidance and destination info
User Settings Mode: Change settings of the Head-Up Display*, doors, lights, sound, driving assistance*, convenience, service interval and other features
Master Warning Mode: Displays warning messages related to the vehicle when one or more systems is not operating normally
Driving Assist: Displays the Lane Safety*, Driver Attention Warning*, Smart Cruise Control* and TPMS info
LCD Instrument Cluster Modes*
Press the Mode/Select button A to cycle through different
LCD Instrument Cluster Modes:
Trip Modes / Trip Computer
Driving while distracted is dangerous and should be avoided. Drivers should remain attentive to driving and always exercise caution when using the steering-wheel-mounted controls while driving.
Refer to section 4 in the Owner’s Manual for more information.
Your vehicle’s steering wheel buttons may differ from those in the illustrations.
Refer to section 4 in the Owner’s Manual for more information.
CANCEL
RES
SET+ _
CRUISE
RES
SET+ _<
<+>>-
MODE
+>
>-
MODE
CRUISE
CANCEL
OK
<
<
OK
A
B
Page 10 of 54

VEHICLESETTINGS
VEHICLE SETTINGS
8SOUL FEATURES & FUNCTIONS GUIDE*IF EQUIPPED
CANCEL
RESSET+ _
CRUISE
RES
SET+ _<<+>>-
MODE
+>
>-
MODE
CRUISE
CANCELOK
<
<
OK
CANCEL
RES SET+ _
CRUISE
RES
SET+ _<
<+>>-
MODE
+>
>-
MODE
CRUISE
CANCEL
OK
<
<
OK
(For Type B cluster; Buttons located on steering wheel)
User Settings Mode*
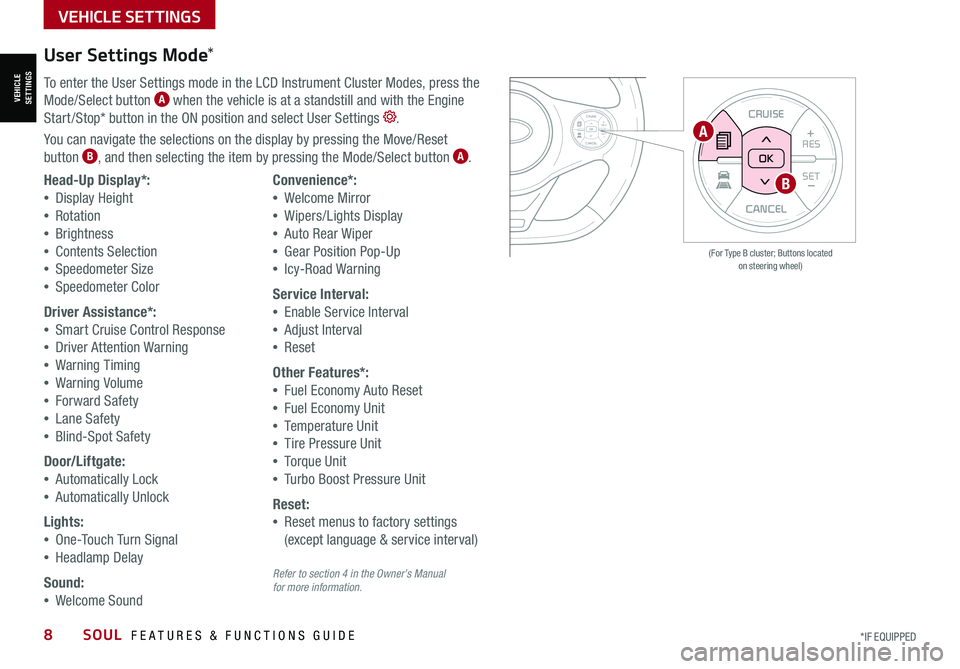
To enter the User Settings mode in the LCD Instrument Cluster Modes, press the
Mode/Select button A when the vehicle is at a standstill and with the Engine
Start /Stop* button in the ON position and select User Settings .
You can navigate the selections on the display by pressing the Move/Reset
button B, and then selecting the item by pressing the Mode/Select button A.
Head-Up Display*:
•Display Height
•Rotation
•Brightness
•Contents Selection
•Speedometer Size
•Speedometer Color
Driver Assistance*:
•Smart Cruise Control Response
•Driver Attention Warning
•Warning Timing
•Warning Volume
•Forward Safety
•Lane Safety
•Blind-Spot Safety
Door/Liftgate:
•Automatically Lock
•Automatically Unlock
Lights:
•One-Touch Turn Signal
•Headlamp Delay
Sound:
•Welcome Sound
Convenience*:
•Welcome Mirror
•Wipers/Lights Display
•Auto Rear Wiper
•Gear Position Pop-Up
•Icy-Road Warning
Service Interval:
•Enable Service Interval
•Adjust Interval
•Reset
Other Features*:
•Fuel Economy Auto Reset
•Fuel Economy Unit
•Temperature Unit
•Tire Pressure Unit
•Torque Unit
•Turbo Boost Pressure Unit
Reset:
•Reset menus to factory settings
(except language & service interval)
A
B
Refer to section 4 in the Owner’s Manual for more information.
Page 11 of 54

To view these videos on your mobile device, snap these QR Codes or visit the listed website.
Refer to the inside cover for more information.
LCD Display Video
LCD Display: Maintenance Video
www.youtube.com/KiaFeatureVideos
QR CODEService Interval Mode*
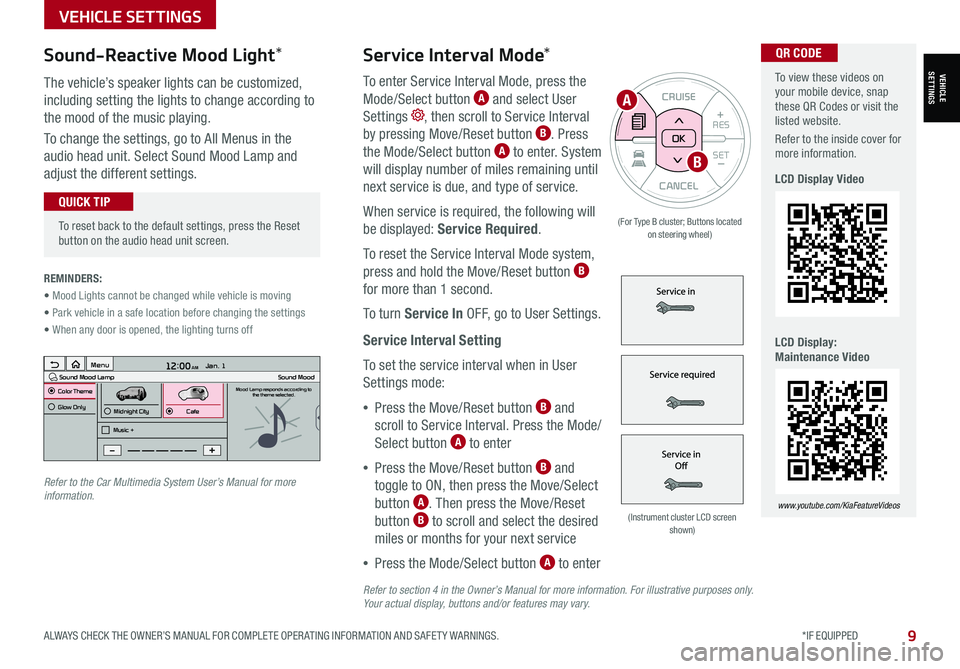
To enter Service Interval Mode, press the
Mode/Select button A and select User
Settings , then scroll to Service Interval
by pressing Move/Reset button B. Press
the Mode/Select button A to enter. System
will display number of miles remaining until
next service is due, and type of service.
When service is required, the following will
be displayed: Service Required.
To reset the Service Interval Mode system,
press and hold the Move/Reset button B
for more than 1 second.
To turn Service In OFF, go to User Settings.
Service Interval Setting
To set the service interval when in User
Settings mode:
•Press the Move/Reset button B and
scroll to Service Interval. Press the Mode/
Select button A to enter
•Press the Move/Reset button B and
toggle to ON, then press the Move/Select
button A. Then press the Move/Reset
button B to scroll and select the desired
miles or months for your next service
•Press the Mode/Select button A to enter
3 6 days1,10 0 mi
VEHICLESETTINGS
VEHICLE SETTINGS
ALWAYS CHECK THE OWNER’S MANUAL FOR COMPLETE OPER ATING INFORMATION AND SAFET Y WARNINGS. *IF EQUIPPED9
CANCEL
RES
SET+ _
CRUISE
RES
SET+ _<
<+>>-
MODE
+>
>-
MODE
CRUISE
CANCELOK
<
<
OK
(For Type B cluster; Buttons located on steering wheel)
•
To reset back to the default settings, press the Reset button on the audio head unit screen.
QUICK TIP
REMINDERS:
• Mood Lights cannot be changed while vehicle is moving
• Park vehicle in a safe location before changing the settings
• When any door is opened, the lighting turns off
Sound-Reactive Mood Light*
The vehicle’s speaker lights can be customized,
including setting the lights to change according to
the mood of the music playing.
To change the settings, go to All Menus in the
audio head unit. Select Sound Mood Lamp and
adjust the different settings.
(Instrument cluster LCD screen shown)
12:00 AM Jan. 1
MenuSound Mood LampColor ThemeSound MoodMood Lamp responds according to
the theme selected.
Glow Only
Music +Midnight CityCafe
A
B
Refer to the Car Multimedia System User’s Manual for more information.
Refer to section 4 in the Owner’s Manual for more information. For illustrative purposes only. Your actual display, buttons and/or features may vary.