2021 HYUNDAI SANTA FE CALLIGRAPHY run flat
[x] Cancel search: run flatPage 82 of 636

Seats & Safety System
3-50
How does the air bags system
operate?
OTMH030008N
The SRS consists of the following
components:
(1)
Driver's fr
ont air bag module
(2)
Passenger's fr
ont air bag module
(3)
Side air bag modules
(4)
Curtain air bag modules
(5)
Re
tractor pre-tensioner
(6)
Air bag warning ligh
t
(7)
SRS contr
ol module (SRSCM)/
Rollover sensor
(8)
Fr
ont impact sensors
(9)
Side impact sensors
(10) Side pressure sensors
(11) Seat belt buckle sensor
(12) Emergency fastening device system
(13) Occupant classification system
The SRSCM continually monitors all SRS
components while the ignition switch
is ON to determine if a crash impact
is severe enough to require air bag
deployment or pre-tensioner seat belt
deployment.
SRS warning light
The SRS (Supplemental Restraint System)
air bag warning light on the instrument
panel displays the air bag symbol
depicted in the illustration. The system
checks the air bag electrical system for
malfunctions. The light indicates that
there is a potential problem with your
air bag system, which could include
your side and/or curtain air bags used
for rollover protection (if equipped with
rollover sensor).
WARNING
If your SRS malfunctions, the air bag
may not inflate properly during an
accident increasing the risk of serious
injury or death.
If any of the following conditions occur,
your SRS is malfunctioning:
• The light does not turn on for
approximately three to six seconds
when the Engine Start/Stop button is
in the ON position.
• The light stays on after illuminating
for approximately three to six
seconds.
• The light comes on while the vehicle
is in motion.
• The light blinks when the engine is
running.
We recommend that an authorized
HYUNDAI dealer inspect the SRS
as soon as possible if any of these
conditions occur.
Page 179 of 636
05
5-35
Auto door lock/unlock features
Your vehicle is equipped with features
that will automatically lock or unlock
your vehicle based on settings you select
in the infotainment system screen.
Auto LOCK Enable on speed
When this feature is set in the
infotainment system screen, all the doors
will be locked automatically when the
vehicle exceeds 9 mph (15 km/h).
Auto LOCK Enable on shift
When this feature is set in the
infotainment system screen, all the doors
will be locked automatically when the
vehicle is shifted out of P (Park) while the
engine is running.
Auto UNLOCK On Shift to P
When this feature is set in the
infotainment system screen, all the doors
will be unlocked automatically when the
vehicle is shifted back into P (Park) while
the engine is running.
Auto UNLOCK Vehicle off
When this feature is set in the
infotainment system screen, all the doors
will be unlocked automatically when the
vehicle is turned off.
See additional information in supplied
Infotainment Manual.
Additional unlock safety feature air
bag deployment
As an additional safety feature, all doors
will be automatically unlocked when an
impact causes the air bags to deploy.
Child-protector rear door locks
(if equipped)
OTM048005
The child safety lock is provided to help
prevent children seated in the rear from
accidentally opening the rear doors. The
rear door safety locks should be used
whenever children are in the vehicle.
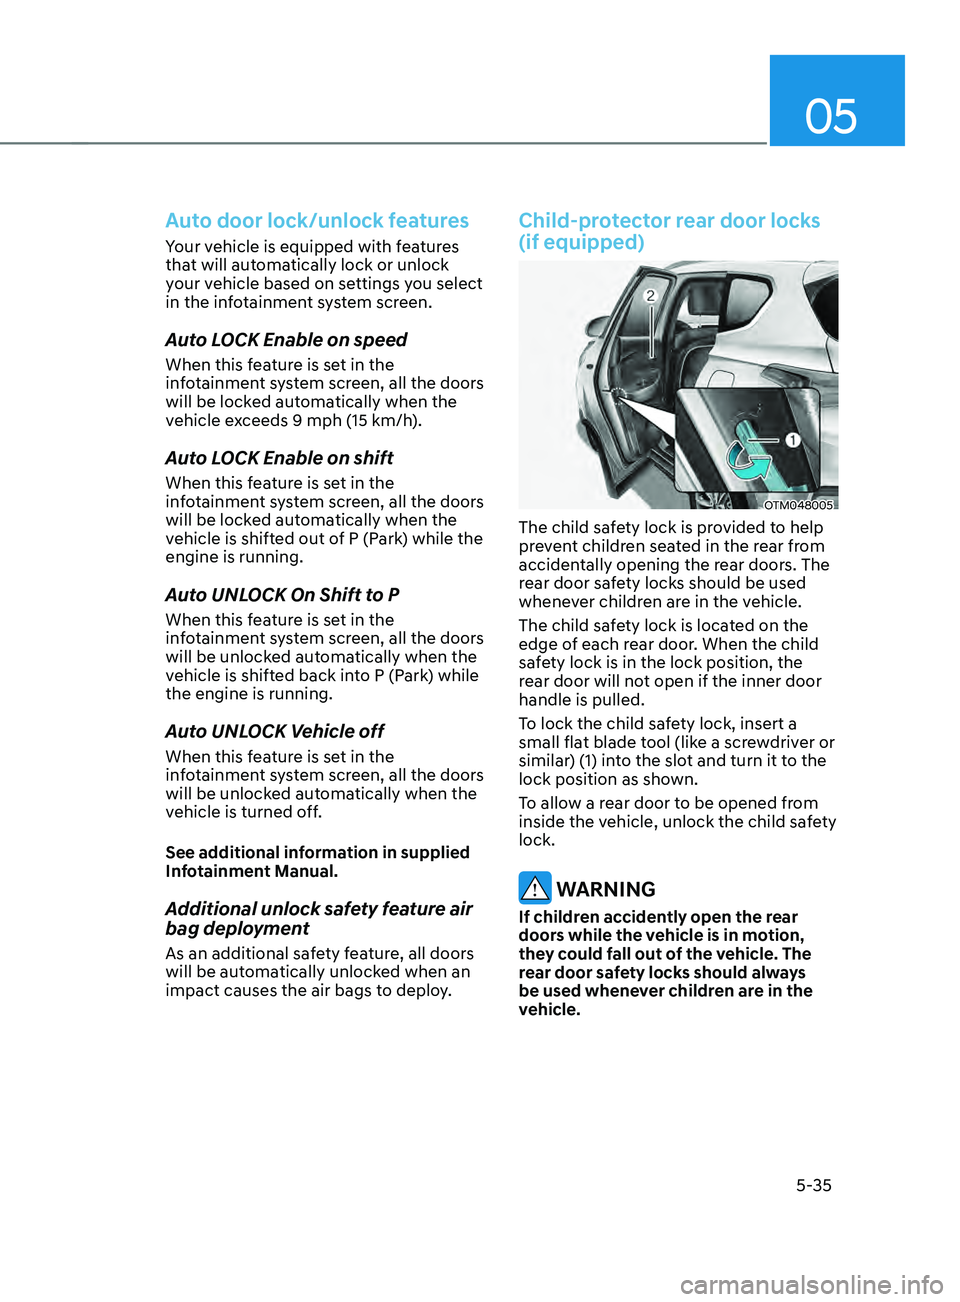
The child safety lock is located on the
edge of each rear door. When the child
safety lock is in the lock position, the
rear door will not open if the inner door
handle is pulled.
To lock the child safety lock, insert a
small flat blade tool (like a screwdriver or
similar) (1) into the slot and turn it to the
lock position as shown.
To allow a rear door to be opened from
inside the vehicle, unlock the child safety
lock.
WARNING
If children accidently open the rear
doors while the vehicle is in motion,
they could fall out of the vehicle. The
rear door safety locks should always
be used whenever children are in the
vehicle.
Page 327 of 636
06
6-39
Parking brake warning light
Check the Parking Brake
warning light by pressing the
Engine Stop/Start button to the
ON position.
This light will be illuminated when the
parking brake is applied with the Engine
Stop/Start button in the START or ON
position.
Before driving, be sure the parking
brake is released and the Parking Brake
warning light is OFF.
If the Parking Brake warning light
remains on after the parking brake is
released while the engine is running,
there may be a malfunction in the
brake system. Immediate attention is
necessary.
If at all possible, cease driving the vehicle
immediately. If that is not possible,
use extreme caution while operating
the vehicle and only continue to drive
the vehicle until you can reach a safe
location.
When the EPB (Electronic Parking
Brake) does not release
If the EPB does not release normally,
we recommend that you contact an
authorized HYUNDAI dealer by loading
the vehicle on a flatbed tow truck and
have the system checked.
Auto Hold (if equipped)
Auto Hold maintains the vehicle in a
standstill even though the brake pedal is
not depressed after the driver brings the
vehicle to a complete stop by depressing
the brake pedal.
To apply:
OTM060010
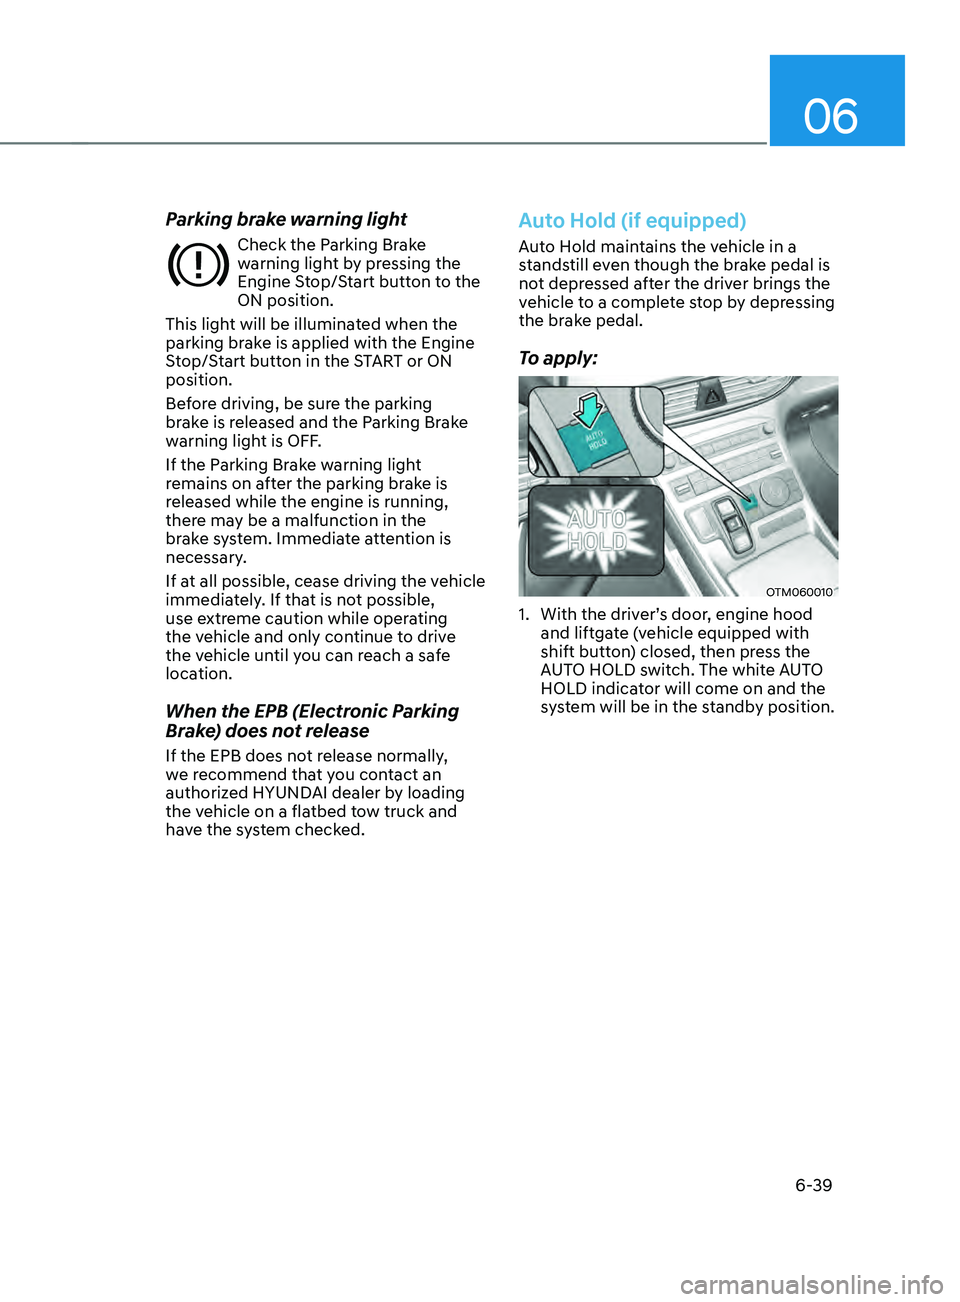
1. With the driver’ s door, engine hood
and liftgate (vehicle equipped with
shift button) closed, then press the
AUTO HOLD switch. The white AUTO
HOLD indicator will come on and the
system will be in the standby position.
Page 347 of 636
06
6-59
Towing
4WD vehicles must be towed with
a wheel lift and dollies or flatbed
equipment with all the wheels off the
ground. For more details, refer to
"Towing" section in chapter 8.
Vehicle inspection
• If the vehicle needs to be operated on
a vehicle lift do not attempt to stop
any of the four wheels from turning.
This could damage the 4WD system.
• Never engage the parking brake while
running the engine on a car lift. This
may damage the 4WD system.
Dynamometer testing
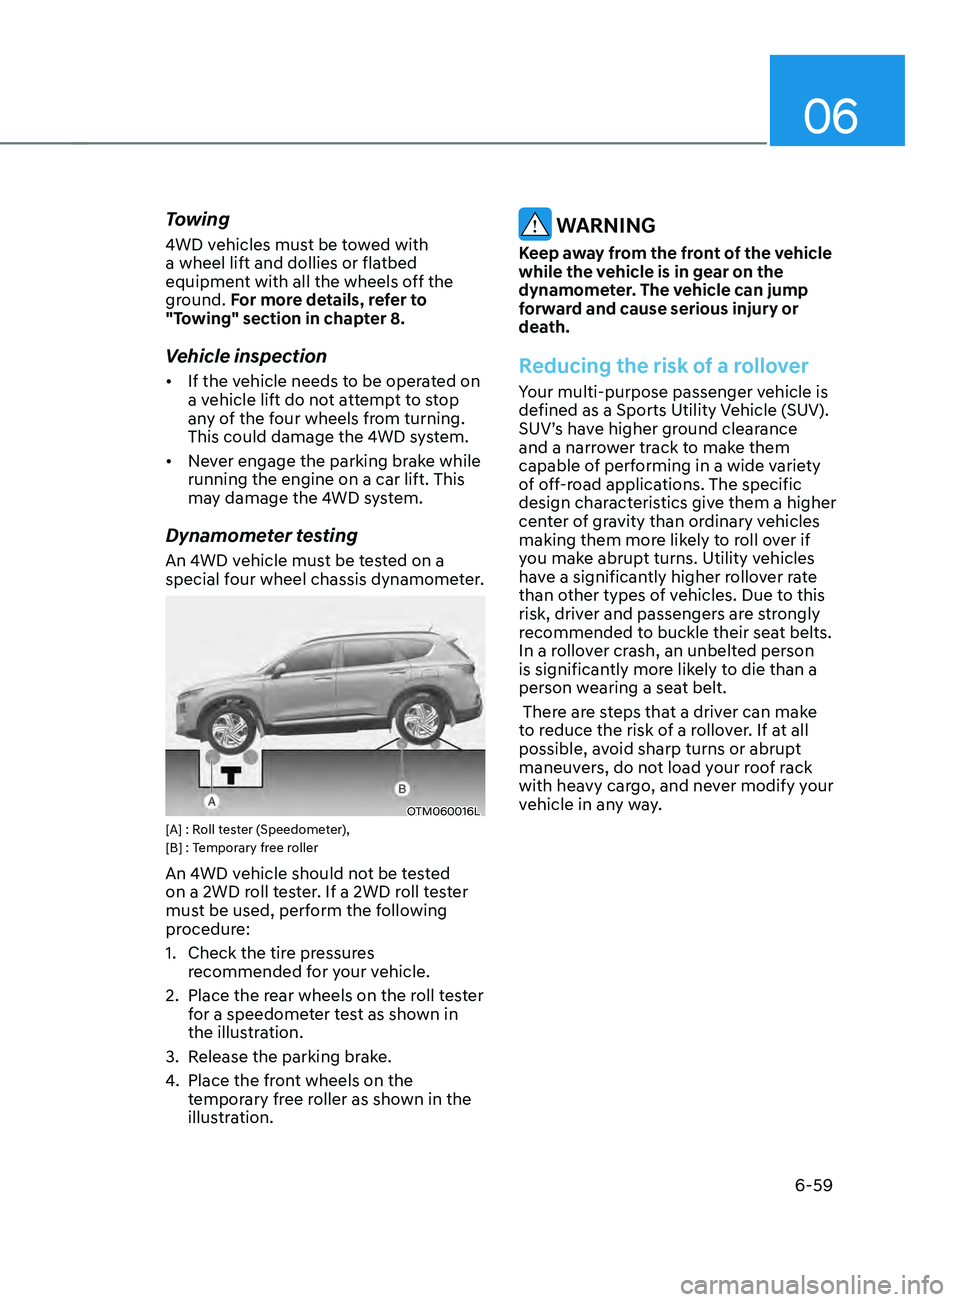
An 4WD vehicle must be tested on a
special four wheel chassis dynamometer.
OTM060016L[A] : Roll tester (Speedometer),
[B] : Temporary free roller
An 4WD vehicle should not be tested
on a 2WD roll tester. If a 2WD roll tester
must be used, perform the following
procedure:
1.
Check the tire pr
essures
recommended for your vehicle.
2.
Place the rear wheels on the r
oll tester
for a speedometer test as shown in
the illustration.
3.
Release the parking br
ake.
4.
Place the fron
t wheels on the
temporary free roller as shown in the
illustration.
WARNING
Keep away from the front of the vehicle
while the vehicle is in gear on the
dynamometer. The vehicle can jump
forward and cause serious injury or
death.
Reducing the risk of a rollover
Your multi-purpose passenger vehicle is
defined as a Sports Utility Vehicle (SUV).
SUV’s have higher ground clearance
and a narrower track to make them
capable of performing in a wide variety
of off-road applications. The specific
design characteristics give them a higher
center of gravity than ordinary vehicles
making them more likely to roll over if
you make abrupt turns. Utility vehicles
have a significantly higher rollover rate
than other types of vehicles. Due to this
risk, driver and passengers are strongly
recommended to buckle their seat belts.
In a rollover crash, an unbelted person
is significantly more likely to die than a
person wearing a seat belt.
There are steps that a driver can make
to reduce the risk of a rollover. If at all
possible, avoid sharp turns or abrupt
maneuvers, do not load your roof rack
with heavy cargo, and never modify your
vehicle in any way.
Page 528 of 636
Emergency situations
8-10
Tire pressure monitoring system
WARNING
Over-inflation or under-inflation can
reduce tire life, adversely affect vehicle
handling, and lead to sudden tire failure
that may cause loss of vehicle control
resulting in an accident.
Each tire, including the spare (if
provided), should be checked monthly
when cold and inflated to the inflation
pressure recommended by the vehicle
manufacturer on the vehicle placard
or tire inflation pressure label. (If your
vehicle has tires of a different size than
the size indicated on the vehicle placard
or tire inflation pressure label, you should
determine the proper tire inflation
pressure for those tires.)
As an added safety feature, your
vehicle has been equipped with a tire
pressure monitoring system (TPMS)
that illuminates a low tire pressure
telltale when one or more of your tires is
significantly under-inflated. Accordingly,
when the low tire pressure telltale
illuminates, you should stop and check
your tires as soon as possible, and inflate
them to the proper pressure. Driving on
a significantly under-inflated tire causes
the tire to overheat and can lead to tire
failure.
Under-inflation also reduces fuel
efficiency and tire tread life, and may
affect the vehicle’s handling and
stopping ability.
Please note that the TPMS is not a
substitute for proper tire maintenance,
and it is the driver’s responsibility to
maintain correct tire pressure, even if
under-inflation has not reached the level
to trigger illumination of the TPMS low
tire pressure telltale.
Your vehicle has also been equipped with
a TPMS malfunction indicator to indicate
when the system is not operating
properly. The TPMS malfunction
indicator is combined with the low
tire pressure telltale. When the system
detects a malfunction, the telltale will
flash for approximately one minute and
then remain continuously illuminated.
This sequence will continue upon
subsequent vehicle start-ups as long as
the malfunction exists.
When the malfunction indicator is
illuminated, the system may not be able
to detect or signal low tire pressure as
intended. TPMS malfunctions may occur
for a variety of reasons, including the
installation of replacement or alternate
tires or wheels on the vehicle that
prevent the TPMS from functioning
properly.
Always check the TPMS malfunction
telltale after replacing one or more tires
or wheels on your vehicle to ensure that
the replacement or alternate tires and
wheels allow the TPMS to continue to
function properly.
NOTICE
If any of the below happens, we
recommend that you have the system
checked by an authorized HYUNDAI
dealer.
1.
The Lo
w Tire Pressure Telltale/ TPMS
Malfunction Indicator does not
illuminate for 3 seconds when the
Engine Start/Stop button is pressed
to the ON position or when the
engine is running.
2.
The TPMS Malfunction Indica
tor
remains illuminated after blinking for
approximately 1 minute.
3.
The Lo
w Tire Pressure Position
Telltale remains illuminated.
Page 541 of 636
08
8-23
WARNING
Do not use the TMK if a tire is severely
damaged by driving run flat or with
insufficient air pressure.
Only punctured areas located within the
tread region of the tire can be sealed
using the TMK.
Notes on the safe use of the Tire
Mobility Kit
• Park your car at the side of the road
so that you can work with the Tire
Mobility Kit away from moving traffic.
• To be sure your vehicle will not move,
even when you’re on fairly level
ground, always set your parking brake.
• Only use the Tire Mobility Kit for
sealing/inflation passenger car tires.
Only punctured areas located within
the tread region of the tire can be
sealed using the tire mobility kit.
• Do not use on motorcycles, bicycles
or any other type of tires.
• When the tire and wheel are
damaged, do not use Tire Mobility Kit
for your safety.
• Use of the Tire Mobility Kit may not be
effective for tire damage larger than
approximately 4 mm (16 inch).
Please contact the nearest HYUNDAI
dealer if the tire cannot be made
roadworthy with the Tire Mobility Kit. •
Do not use the Tire Mobility Kit if a tire
is severely damaged by driving run flat
or with insufficient air pressure.
• Do not remove any foreign objects
such as nails or screws that have
penetrated the tire.
• Provided the car is outdoors, leave the
engine running. Otherwise operating
the compressor may eventually drain
the car battery.
• Never leave the Tire Mobility Kit
unattended while it is being used.
• Do not leave the compressor running
for more than 10 minutes at a time or
it may overheat.
• Do not use the Tire Mobility Kit if the
ambient temperature is below -22°F
(30°C).
• In case of skin contact with the
sealant, wash the area thoroughly
with plenty of water. If the irritation
persists, seek medical attention.
• In case of eye contact with the
sealant, flush your eyes for at least 15
minutes. If the irritation persists, seek
medical attention.
• In case of swallowing the sealant,
rinse the mouth and drink plenty of
water. However, never give anything
to an unconscious person and seek
medical attention immediately.
• Long time exposure to the sealant
may cause damage to bodily tissue
such as kidney, etc.
Page 545 of 636
![HYUNDAI SANTA FE CALLIGRAPHY 2021 Owners Manual 08
8-27
9. With the engine running, switch
on the compressor by pressing [I]
and let it run for approximately 5~7
minutes to fill the sealant up to proper
pressure. (Refer to “Tire and Wheels” HYUNDAI SANTA FE CALLIGRAPHY 2021 Owners Manual 08
8-27
9. With the engine running, switch
on the compressor by pressing [I]
and let it run for approximately 5~7
minutes to fill the sealant up to proper
pressure. (Refer to “Tire and Wheels”](/manual-img/35/56181/w960_56181-544.png)
08
8-27
9. With the engine running, switch
on the compressor by pressing [I]
and let it run for approximately 5~7
minutes to fill the sealant up to proper
pressure. (Refer to “Tire and Wheels”
section in chapter 2). The inflation
pressure of the tire after filling is
unimportant and will be checked/
corrected later.
Be careful not to overinflate the tire
and stay away from the tire when
filling it.
CAUTION
Do not attempt to drive your vehicle if
the tire pressure is below 200 kpa (29
psi). This could result in an accident due
to sudden tire failure.
10. Switch off the compressor.
11. Detach the hoses from the sealant
bottle connector and from the tire
valve.
Return the Tire Mobility Kit to its storage
location in the vehicle.
WARNING
Do not leave your vehicle running in
a poorly ventilated area for extended
periods of time. Carbon monoxide
poisoning and suffocation can occur.
Distributing the sealant
OOSH079022L
12. Immediately drive approximately 4~6
miles (7~10 km or about 10 minutes)
to evenly distribute the sealant in the
tire.
Do not exceed a speed of 50 mph (80
km/h). If possible, do not fall below a
speed of 12 mph (20 km/h).
While driving, if you experience any
unusual vibration, ride disturbance or
noise, reduce your speed and drive with
caution until you can safely pull off of the
side of the road.
Call for road side service or towing.
Page 546 of 636
Emergency situations
8-28
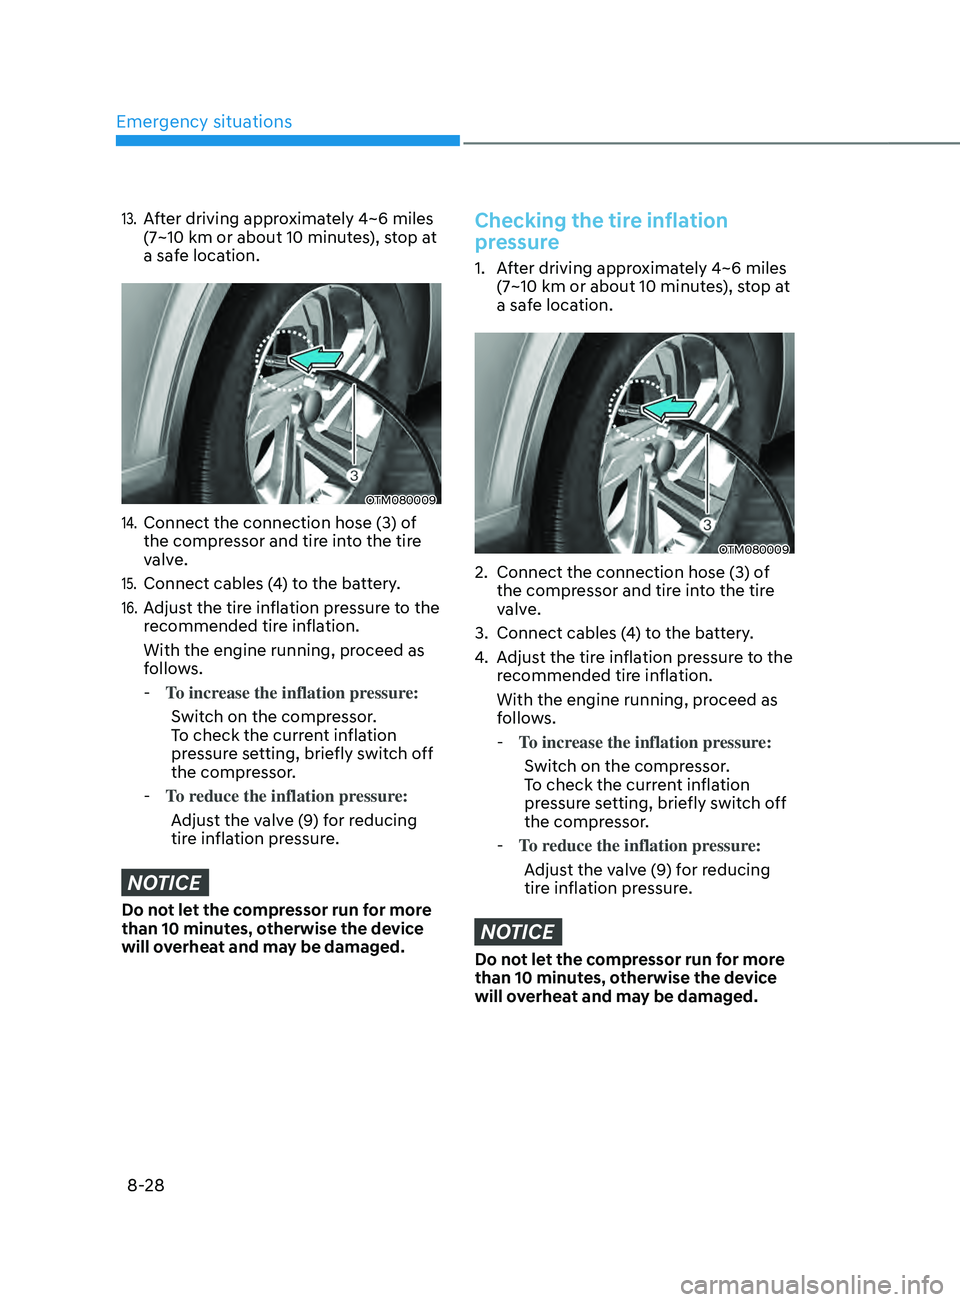
13. After driving approximately 4~6 miles
(7~10 km or about 10 minutes), stop at
a safe location.
OTM080009
14. Connect the connection hose (3) of
the compressor and tire into the tire
valve.
15. Connect cables (4) to the battery.
16. Adjust the tire inflation pressure to the
recommended tire inflation.
With the engine running, proceed as
follows.
-To incr
ease the inflation pressure:
Switch on the compressor.
To check the current inflation
pressure setting, briefly switch off
the compressor.
- To r
educe the inflation pressure:
Adjust the valve (9) for reducing
tire inflation pressure.
NOTICE
Do not let the compressor run for more
than 10 minutes, otherwise the device
will overheat and may be damaged.
Checking the tire inflation
pressure
1. After driving approximately 4~6 miles
(7~10 km or about 10 minut es), stop at
a safe location.
OTM080009
2. Connect the connection hose (3) o f
the compressor and tire into the tire
valve.
3.
Connect cables (4
) to the battery.
4.
Adjus
t the tire inflation pressure to the
recommended tire inflation.
With the engine running, proceed as
follows.
- To incr
ease the inflation pressure:
Switch on the compressor.
To check the current inflation
pressure setting, briefly switch off
the compressor.
- To r
educe the inflation pressure:
Adjust the valve (9) for reducing
tire inflation pressure.
NOTICE
Do not let the compressor run for more
than 10 minutes, otherwise the device
will overheat and may be damaged.