2021 HYUNDAI SANTA FE CALLIGRAPHY Chapter 5
[x] Cancel search: Chapter 5Page 486 of 636
Driver assistance system
7-104
WARNING
• Even though the warning message
does not appear on the cluster, Rear
Cross-Traffic Safety system may not
operate properly.
• Rear Cross-Traffic Safety system may
not operate properly in an area (for
example: open terrain), where any
substance are not detected after
turning ON the engine.
CAUTION
Turn off Rear Cross-Traffic Safety
system to install a trailer, carrier, etc.,
or remove the trailer, carrier, etc. to use
Rear Cross-Traffic Safety system.
Limitations of the system
Rear Cross-Traffic Safety system may
not operate normally, or the system
may operate unexpectedly under the
following circumstances:
• Departing from where trees or grass
are overgrown
• Departing from where roads are wet
• Speed of the approaching vehicle is
fast or slow
Braking control may not work, driver’s
attention is required in the following
circumstances:
• The vehicle severely vibrates while
driving over a bumpy road, uneven
road or concrete patch
• Driving on a slippery surface due to
snow, water puddle, ice, etc.
• The tire pressure is low or a tire is
damaged
• The brake is reworked
• Remote Smart Parking Assist is
operating (if equipped)
CAUTION
For more details on the limitations of
the rear corner radar, refer to “Blind-
Spot Collision-Avoidance Assist (BCA)”
section in chapter 7.
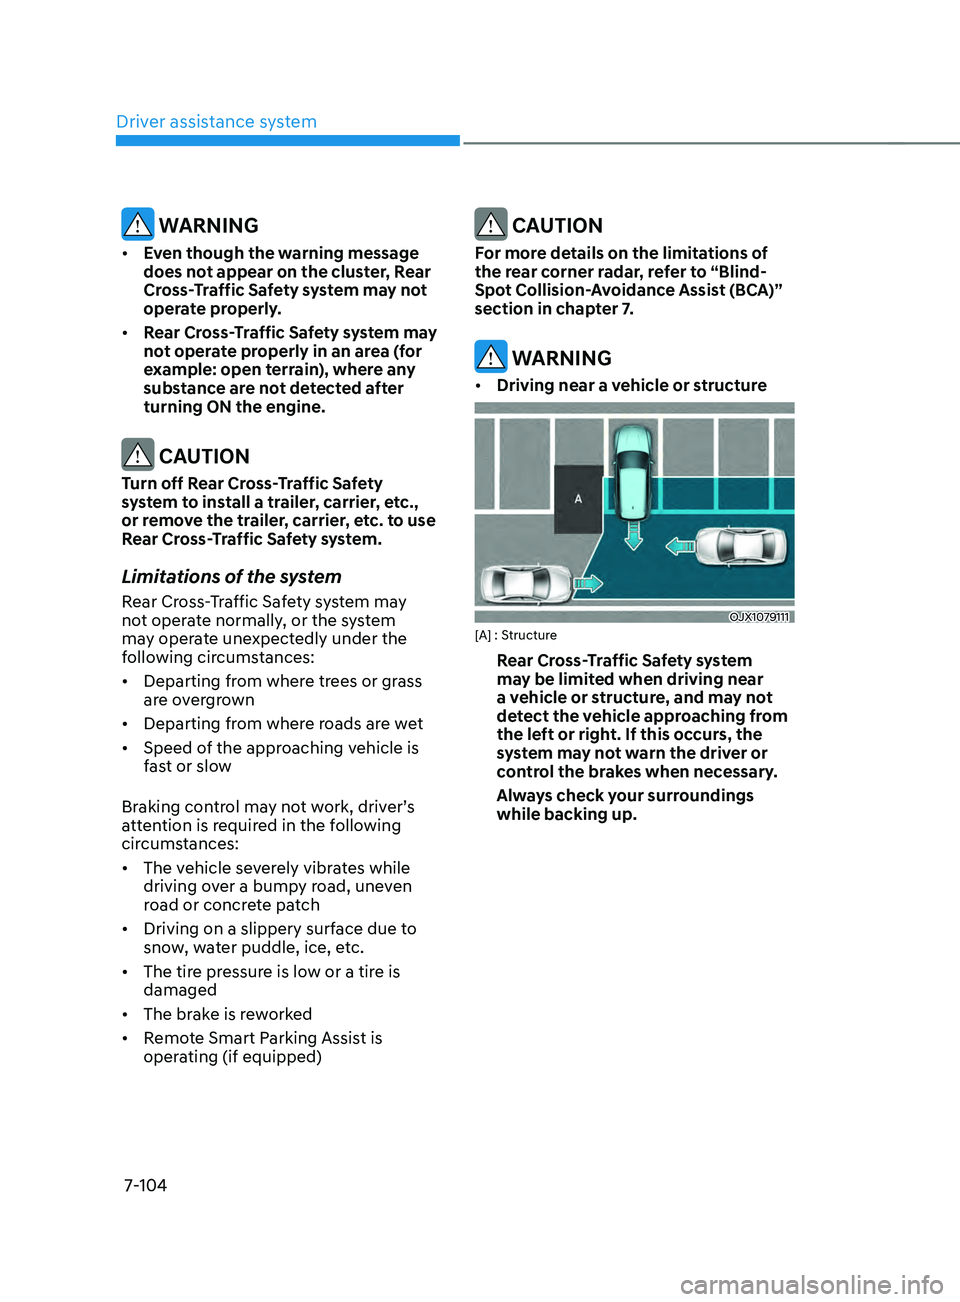
WARNING
• Driving near a vehicle or structure
OJX1079111[A] : Structure
Rear Cross-Traffic Safety system
may be limited when driving near
a vehicle or structure, and may not
detect the vehicle approaching from
the left or right. If this occurs, the
system may not warn the driver or
control the brakes when necessary.
Always check your surroundings
while backing up.
Page 505 of 636
07
7-123
REmOTE smART pARkIng AssIsT (RspA) (IF EQUIppED)
Remote Smart Parking Assist uses
vehicle sensors to help the driver park
and exit parking spaces remotely from
outside the vehicle by controlling the
steering wheel, vehicle speed and
gearshifts.
Function Description
Remote
Forward/
Backward Remotely moving forward
or in reverse
OJX1079037
• Remote Forward/Backward function
helps the driver move the vehicle
forward or in reverse from outside the
vehicle using the smart key.
• When Remote Smart Parking Assist
operates, Surround View Monitor and
Parking Distance Warning will also
operate. For more details, refer to
“Surround View Monitor (SVM) and
“Parking Distance Warning (PDW)”
sections in chapter 7.
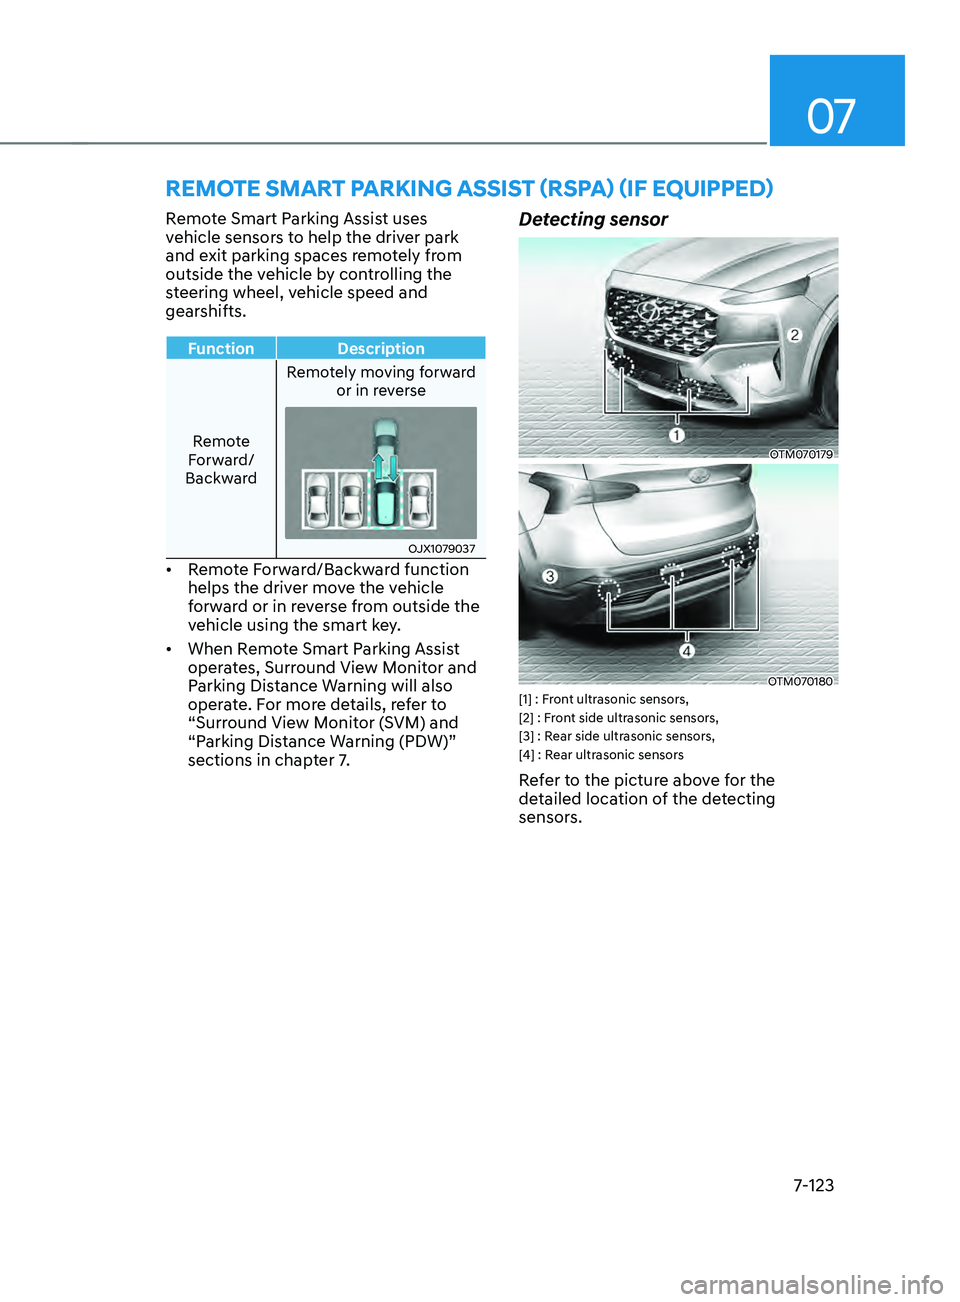
Detecting sensor
OTM070179
OTM070180[1] : Front ultrasonic sensors,
[2] : Front side ultrasonic sensors,
[3] : Rear side ultrasonic sensors,
[4] : Rear ultrasonic sensors
Refer to the picture above for the
detailed location of the detecting
sensors.
Page 508 of 636
Driver assistance system
7-126
Remote Forward/Backward
Operating order
Remote Forward/Backward operates in
the following order:
1.
Getting r
eady to remotely move
forward and in reverse
2.
Remo
tely moving forward and in
reverse
1. Getting ready to remotely move forward
and in r
everse
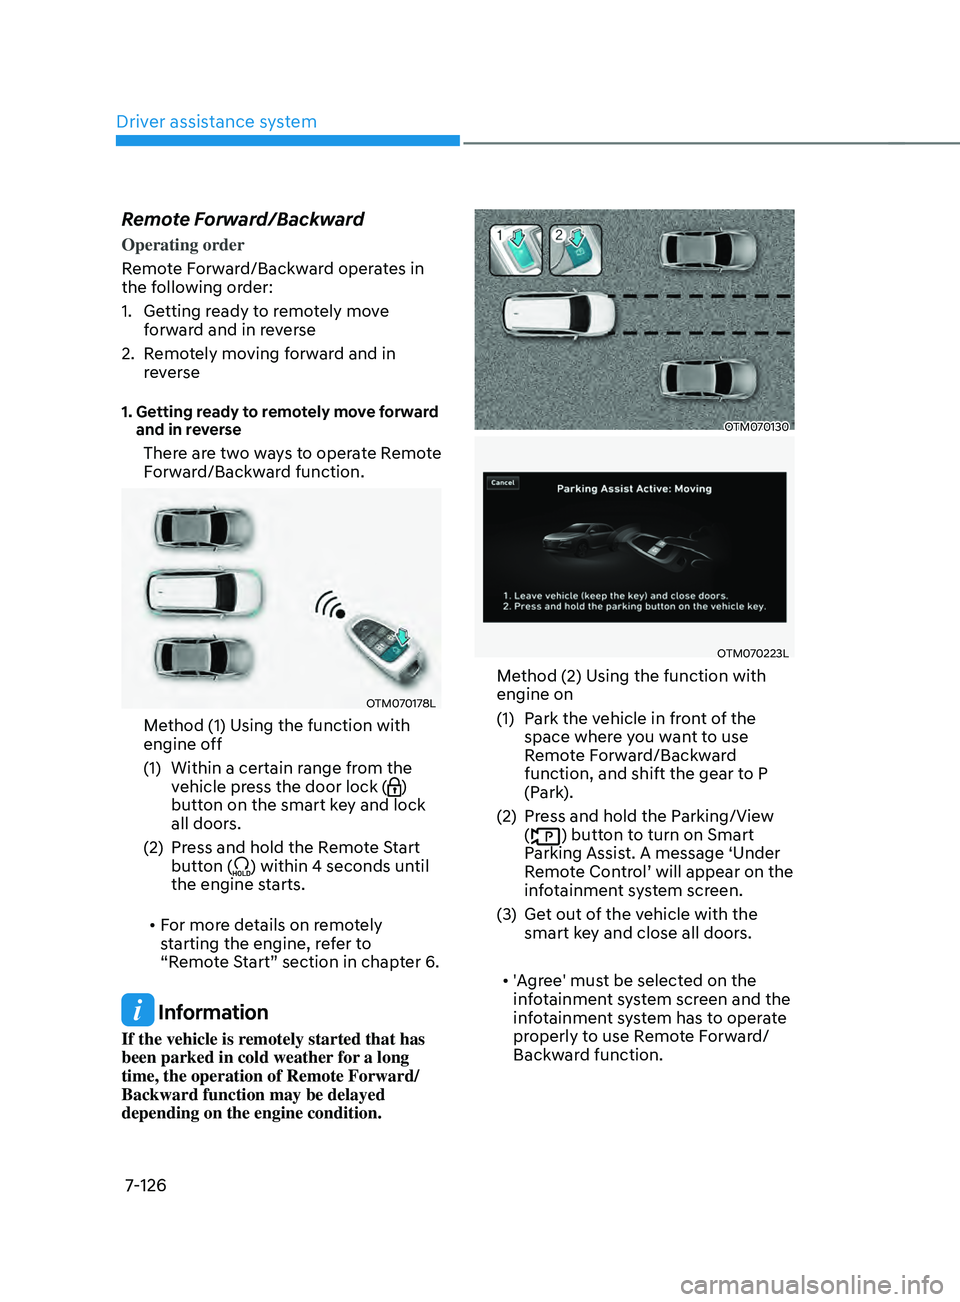
There are two ways to operate Remote
Forward/Backward function.
OTM070178L
Method (1) Using the function with
engine off
(1)
Within a certain range fr
om the
vehicle press the door lock (
)
button on the smart key and lock
all doors.
(2)
Press and hold the R
emote Start
button (
) within 4 seconds until
the engine starts.
• For more details on remotely
starting the engine, refer to
“Remote Start” section in chapter 6.
Information
If the vehicle is remotely started that has
been parked in cold weather for a long
time, the operation of Remote Forward/
Backward function may be delayed
depending on the engine condition.
OTM070130
OTM070223L
Method (2) Using the function with
engine on
(1)
Park the v
ehicle in front of the
space where you want to use
Remote Forward/Backward
function, and shift the gear to P
(Park).
(2)
Press and hold the P
arking/View
(
) button to turn on Smart
Parking Assist. A message ‘Under
Remote Control’ will appear on the
infotainment system screen.
(3)
Get out o
f the vehicle with the
smart key and close all doors.
• 'Agree' must be selected on the
infotainment system screen and the
infotainment system has to operate
properly to use Remote Forward/
Backward function.
Page 521 of 636

08
8-3
If you have a flat tire while
driving
If a tire goes flat while you are driving:
• Take your foot off the accelerator
pedal and let the vehicle slow down
while driving straight ahead. Do not
apply the brakes immediately or
attempt to pull off the road as this
may cause loss of vehicle control
resulting in an accident. When the
vehicle has slowed to such a speed
that it is safe to do so, brake carefully
and pull off the road. Drive off the
road as far as possible and park on
firm, level ground. If you are on a
divided highway, do not park in the
median area between the two traffic
lanes.
• When the vehicle is stopped, press the
hazard warning flasher button, shift
the gear to P (Park), apply the parking
brake, and press the Engine Start/Stop
button to the OFF position.
• Have all passengers get out of the
vehicle. Be sure they all get out on the
side of the vehicle that is away from
traffic.
• When changing a flat tire, follow the
instructions provided later in this
chapter.
IF THE ENGINE WILL NOT
S TA
RT
• Be sure to shift the gear to N (Neutral)
or P (Park). The engine starts only
when the gear is in N (Neutral) or P
(Park).
• Turn on the interior light. If the light
dims or goes out when you operate
the starter, the battery is drained.
See instructions for “Jump Starting”
provided in this chapter.
• Check the fuel level and add fuel if
necessary.
If the vehicle still does not start, we
recommend that you call an authorized
HYUNDAI dealer for assistance.
NOTICE
Push or pull starting the vehicle may
cause the catalytic converter to
overload which can lead to damage to
the emission control system.
Page 527 of 636
08
8-9
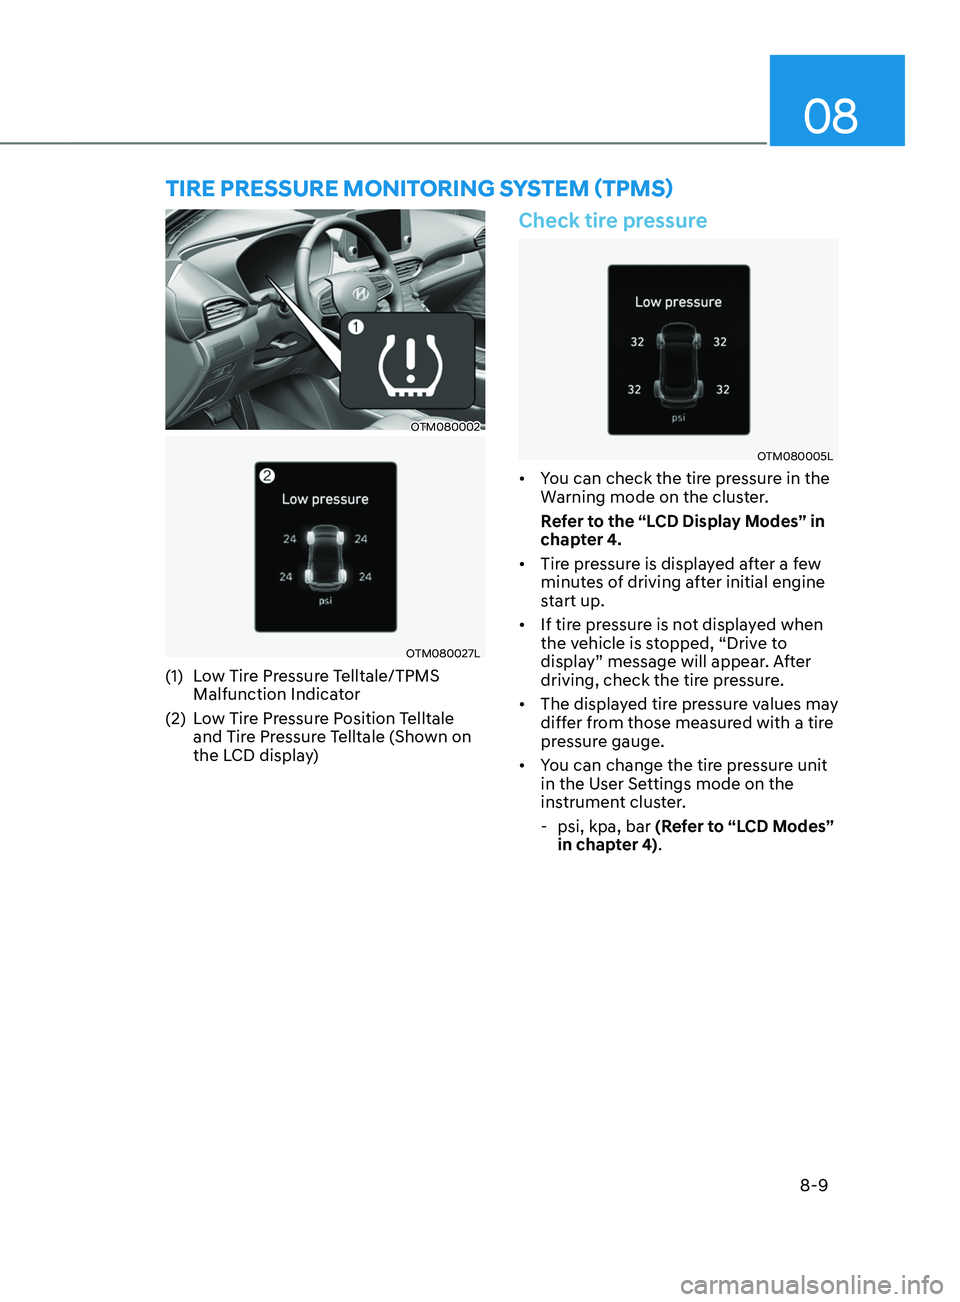
OTM080002
OTM080027L
(1) Low Tire Pressure Telltale/TPMS
Malfunction Indicator
(2)
Lo
w Tire Pressure Position Telltale
and Tire Pressure Telltale (Shown on
the LCD display)
Check tire pressure
OTM080005L
• You can check the tire pressure in the
Warning mode on the cluster.
Refer to the “LCD Display Modes” in
chapter 4.
• Tire pressure is displayed after a few
minutes of driving after initial engine
start up.
• If tire pressure is not displayed when
the vehicle is stopped, “Drive to
display” message will appear. After
driving, check the tire pressure.
• The displayed tire pressure values may
differ from those measured with a tire
pressure gauge.
• You can change the tire pressure unit
in the User Settings mode on the
instrument cluster.
- psi, kpa, bar (R
efer to “LCD Modes”
in chapter 4).
TIRE pREssURE mOnITORIng sYsTEm (Tpms)
Page 536 of 636
Emergency situations
8-18
WARNING
Wheels may have sharp edges. Handle
them carefully to avoid possible severe
injury. Before putting the wheel into
place, be sure that there is nothing on
the hub or wheel (such as mud, tar,
gravel, etc.) that interferes with the
wheel from fitting solidly against the
hub.
If there is, remove it. If there is not
good contact on the mounting surface
between the wheel and hub, the wheel
nuts could come loose and cause the
loss of a wheel. Loss of a wheel may
result in loss of control of the vehicle.
This may cause serious injury or death.
10. To reinstall the wheel, hold it on the
studs, put the wheel nuts on the studs
and tighten them finger tight. The
nuts should be installed with their
tapered small diameter ends directed
inward. Jiggle the tire to be sure it is
completely seated, then tighten the
nuts as much as possible with your
fingers again.
11. Lower the vehicle to the ground
by turning the wheel lug wrench
counterclockwise.
OTM080045L
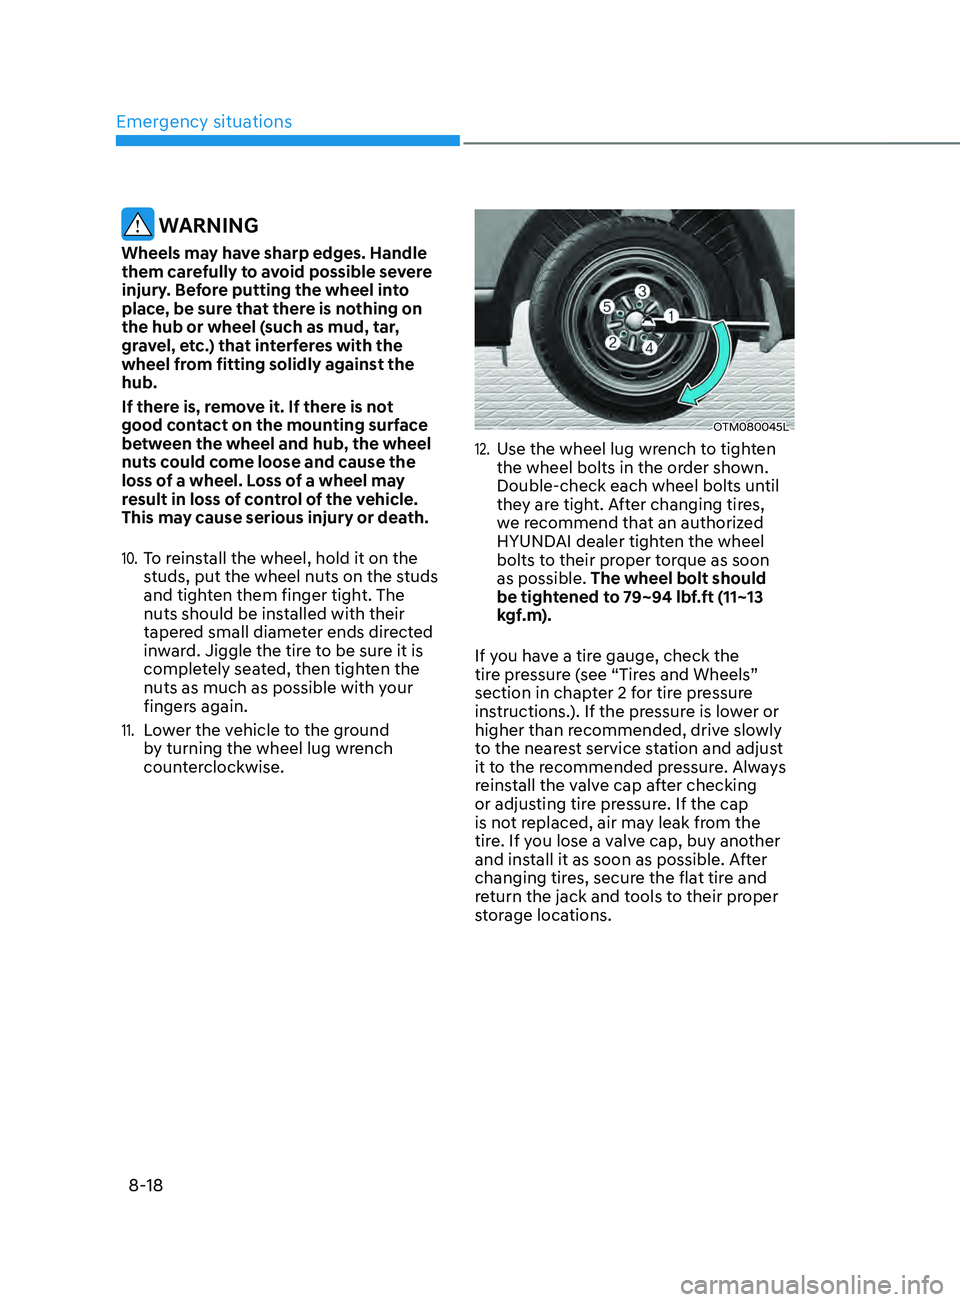
12. Use the wheel lug wrench to tighten
the wheel bolts in the order shown.
Double-check each wheel bolts until
they are tight. After changing tires,
we recommend that an authorized
HYUNDAI dealer tighten the wheel
bolts to their proper torque as soon
as possible. The wheel bolt should
be tightened to 79~94 lbf.ft (11~13
kgf.m).
If you have a tire gauge, check the
tire pressure (see “Tires and Wheels”
section in chapter 2 for tire pressure
instructions.). If the pressure is lower or
higher than recommended, drive slowly
to the nearest service station and adjust
it to the recommended pressure. Always
reinstall the valve cap after checking
or adjusting tire pressure. If the cap
is not replaced, air may leak from the
tire. If you lose a valve cap, buy another
and install it as soon as possible. After
changing tires, secure the flat tire and
return the jack and tools to their proper
storage locations.
Page 545 of 636
![HYUNDAI SANTA FE CALLIGRAPHY 2021 Owners Manual 08
8-27
9. With the engine running, switch
on the compressor by pressing [I]
and let it run for approximately 5~7
minutes to fill the sealant up to proper
pressure. (Refer to “Tire and Wheels” HYUNDAI SANTA FE CALLIGRAPHY 2021 Owners Manual 08
8-27
9. With the engine running, switch
on the compressor by pressing [I]
and let it run for approximately 5~7
minutes to fill the sealant up to proper
pressure. (Refer to “Tire and Wheels”](/manual-img/35/56181/w960_56181-544.png)
08
8-27
9. With the engine running, switch
on the compressor by pressing [I]
and let it run for approximately 5~7
minutes to fill the sealant up to proper
pressure. (Refer to “Tire and Wheels”
section in chapter 2). The inflation
pressure of the tire after filling is
unimportant and will be checked/
corrected later.
Be careful not to overinflate the tire
and stay away from the tire when
filling it.
CAUTION
Do not attempt to drive your vehicle if
the tire pressure is below 200 kpa (29
psi). This could result in an accident due
to sudden tire failure.
10. Switch off the compressor.
11. Detach the hoses from the sealant
bottle connector and from the tire
valve.
Return the Tire Mobility Kit to its storage
location in the vehicle.
WARNING
Do not leave your vehicle running in
a poorly ventilated area for extended
periods of time. Carbon monoxide
poisoning and suffocation can occur.
Distributing the sealant
OOSH079022L
12. Immediately drive approximately 4~6
miles (7~10 km or about 10 minutes)
to evenly distribute the sealant in the
tire.
Do not exceed a speed of 50 mph (80
km/h). If possible, do not fall below a
speed of 12 mph (20 km/h).
While driving, if you experience any
unusual vibration, ride disturbance or
noise, reduce your speed and drive with
caution until you can safely pull off of the
side of the road.
Call for road side service or towing.
Page 547 of 636
08
8-29
Information
The pressure gauge may show higher than
actual reading when the compressor is
running. To get an accurate tire pressure,
the compressor needs to be turned off.
CAUTION
If the inflation pressure is not
maintained, drive the vehicle a second
time, refer to Distributing the sealant.
Then repeat steps 1 to 4.
Use of the TMK may be ineffectual for
tire damage larger than approximately
4 mm (0.16 in).
We recommend that you contact an
authorized HYUNDAI dealer if the tire
cannot be made roadworthy with the
Tire Mobility Kit.
WARNING
The tire inflation pressure must be
inflated to the proper pressure (Refer to
“Tire and Wheels” section in chapter 2).
If it is not, do not continue driving.
Call for road side service or towing.
CAUTION
Tire pressure sensor
The sealant on the tire pressure sensor
and wheel should be removed when
you replace the tire with a new one and
inspect the tire pressure sensors. We
recommend that you get this done at an
authorized dealer.
Information
When reinstalling the repaired or replaced
tire and wheel on the vehicle, tighten the
wheel bolt to 79~94 lbf.ft (11~13 kgf.m).