2021 HYUNDAI SANTA FE CALLIGRAPHY Chapter 5
[x] Cancel search: Chapter 5Page 303 of 636
06
6-15
The indicator in the instrument cluster
displays the shift lever/button position
when the ignition switch is in the ON
position.
WARNING
To reduce the risk of serious injury or
death:
• ALWAYS check the surrounding
areas near your vehicle for people,
especially children, before shifting a
vehicle into D (Drive) or R (Reverse).
• Before leaving the driver’s seat,
always make sure the shift lever
is in the P (Park) position, then set
the parking brake, and place the
ignition switch in the LOCK/OFF
position. Unexpected and sudden
vehicle movement can occur if these
precautions are not followed.
• When using the paddle shifter
(manual shift mode), do not use
engine braking (shifting from a
high gear to lower gear) rapidly on
slippery roads. The vehicle may slip
causing an accident.
P (Park)
Always come to a complete stop before
shifting into P (Park).
To shift from P (Park), you must depress
firmly on the brake pedal and make sure
your foot is off the accelerator pedal.
If you have done all of the above and
still cannot shift the lever out of P
(Park), see "Shift-Lock Release" in this
chapter. (shift lever type)
The shift lever/button must be in P (Park)
before turning the engine off.
WARNING
• Shifting into P (Park) while the
vehicle is in motion may cause you to
lose control of the vehicle.
• After the vehicle has stopped, always
make sure the shift lever is in P
(Park), apply the parking brake, and
turn the engine off.
• When parking on an incline, shift
the gear to P (Park) and apply the
parking brake to prevent the vehicle
from rolling downhill.
• Do not use the P (Park) position in
place of the parking brake.
R (Reverse)
Use this position to drive the vehicle
backward.
NOTICE
Always come to a complete stop before
shifting into or out of R (Reverse); you
may damage the transmission if you
shift into R (Reverse) while the vehicle is
in motion.
When the vehicle is stopped in R
(Reverse) or D (Drive) position, if you
open the driver’s door with the seat
belt unfastened, the gear is shifted to P
(Park) position automatically.
However when the vehicle moves in R
(Reverse) or D (Drive) position, if you
open the driver’s door with the seat belt
unfastened, the gear may be not shifted
to P (Park) position automatically for
protecting the automatic transmission.
Page 305 of 636
06
6-17
4. Press and hold the OK button on
the steering wheel for more than 1
second.
5.
When the message ‘Vehicle will s
tay in
(N). Change gear to cancel’ (or ‘N will
stay engaged when the vehicle is Off’)
will appear on the cluster LCD display,
press the Engine Start/Stop button
while depressing the brake pedal.
However, if you open the driver's
door, the gear will automatically
shift to P (Park) and the Engine Start/
Stop button will change to the OFF
position.
NOTICE
With the gear in N (Neutral) the Engine
Start/Stop button will be in the ACC
position. Note that the doors cannot be
locked in the ACC position. The battery
may discharge if left in the ACC position
for a long period.
D (Drive)
This is the normal driving position. The
transmission will automatically shift
through an 8-gear sequence, providing
the best fuel economy and power.
To start the vehicle forward, push the D
(Drive) button by depressing the brake
pedal with the engine ON. (button type)
Then depress the accelerator pedal
smoothly.
For extra power when passing another
vehicle or driving uphill, depress the
accelerator fully. The transmission will
automatically downshift to the next
lower gear (or gears, as appropriate).
When the vehicle is stopped in D (Drive)
position, if you open the driver’s door
with the seat belt unfastened, the gear is
shifted to P (Park) position automatically.
(button type)
However while the vehicle is moving in D
(Drive) position, if you open the driver’s
door with the seat belt unfastened, the
gear may not shift to P (Park) position
automatically to protect the automatic
transmission.
The DRIVE MODE switch, located on the
shift lever console, allows the driver to
switch from NORMAL/COMFORT mode
to SPORT or ECO mode. (if equipped)
For more Details, refer to "Drive Mode
Integrated Control System" later in this
chapter.
Page 306 of 636

Driving your vehicle
6-18
Shift-lock system
For your safety, the automatic
transmission has a shift-lock system
which prevents shifting the transmission
from P (Park) into R (Reverse) unless the
brake pedal is depressed.
To shift the transmission from P (Park)
into R (Reverse):
1.
Depress and hold the br
ake pedal.
2.
Start the engine or place the ignition
s
witch in the ON position.
3.
Depress the br
ake pedal and push the
R (Reverse) button. (button type)
Ignition key interlock system
(if equipped)
The ignition key cannot be removed
unless the shift lever is in the P (Park)
position.
When the battery is discharged:
The shift buttons will not function when
the battery is discharged.
In emergencies, do the following to
move the shift button to N (Neutral) on a
level ground.
1.
Connect the batt
ery cables from
another vehicle or from a another
battery to the jump-starting terminals
inside the engine compartment.
For more details, refer to “Jump
Starting” in chapter 7.
2.
Release the parking br
ake with the
ignition switch in the ON position.
3.
Shift the gear to the N(N
eutral)
position refer to the “Stay in Neutral
when vehicle is Off” in this chapter.
Parking
Always come to a complete stop and
continue to depress the brake pedal.
Move the shift lever/button into the P
(Park) position, apply the parking brake,
and place the ignition switch in the
LOCK/OFF position. Take the Key with
you when exiting the vehicle.
WARNING
When you stay in the vehicle with
the engine running, be careful not to
depress the accelerator pedal for a long
period of time. The engine or exhaust
system may overheat and start a fire.
The exhaust gas and the exhaust system
are very hot. Keep away from the
exhaust system components.
Do not stop or park over flammable
materials, such as dry grass, paper or
leaves. They may ignite and cause a fire.
Page 317 of 636

06
6-29
D (Drive)
This is the normal driving position. The
transmission will automatically shift
through a 8-gear sequence, providing
the best fuel economy and power.
To start the vehicle forward, push the D
(Drive) button by depressing the brake
pedal with the engine ON. Then depress
the accelerator pedal smoothly. For extra
power when passing another vehicle or
driving uphill, depress the accelerator
fully. The transmission will automatically
downshift to the next lower gear (or
gears, as appropriate). When the vehicle
is stopped in D (Drive) position, if you
open the driver’s door with the seat belt
unfastened, the gear is shifted to P (Park)
position automatically.
However when the vehicle moves in D
(Drive) position, if you open the driver’s
door with the seat belt unfastened,
the gear may be not shifted to P (Park)
position automatically for protecting the
dual clutch transmission.
The DRIVE MODE switch, located on
the shift lever/button console, allows
the driver to switch from NORMAL/
COMFORT mode to SPORT or ECO mode.
(if equipped)
For more details, refer to “Drive Mode
Integrated Control System” later in this
chapter. Shift-lock system
For your safety, the automatic
transmission has a shift-lock system
which prevents shifting the transmission
from P (Park) or N (Neutral) to R
(Reverse) or D (Drive) unless the brake
pedal is depressed.
To shift the transmission from P (Park)
into R (Reverse):
1.
Depress and hold the br
ake pedal.
2.
Start the engine or place the ignition
s
witch in the ON position.
3.
Depress the br
ake pedal and move the
shift lever to R (Reverse). (shift lever
type)
Depress the brake pedal and push the
R (Reverse) button. (shift button type)
When the battery is discharged:
The shift buttons will not function when
the battery is discharged.
In emergencies, do the following
to move the shift lever/button to N
(Neutral) on a level ground.
1.
Connect the batt
ery cables from
another vehicle or from a another
battery to the jump-starting terminals
inside the engine compartment.
For more details, refer to “Jump
Starting” in chapter 7.
2.
Release the parking br
ake with the
ignition switch in the ON position.
3.
Shift the gear to the N(N
eutral)
position refer to the “Stay in Neutral
when vehicle is Off” in this chapter.
Page 333 of 636
06
6-45
ESC operation
ESC ON condition
When the Engine Start/Stop button is
in the ON position, ESC and the ESC
OFF indicator lights illuminate for
approximately three seconds. After both
lights go off, ESC is enabled.
When operating
When ESC is in operation, the
ESC indicator light blinks:
• When you apply your brakes under
conditions which may lock the wheels,
you may hear sounds from the brakes,
or feel a corresponding sensation in
the brake pedal. This is normal and it
means your ESC is active.
• When ESC activates, the engine may
not respond to the accelerator as it
does under routine conditions.
• If Cruise Control was in use when ESC
activates, Cruise Control automatically
disengages. Cruise Control can be
reengaged when the road conditions
allow. See “Cruise Control System”
section in chapter 7 (if equipped).
• When moving out of the mud or
driving on a slippery road, the engine
rpm (revolutions per minute) may
not increase even if you press the
accelerator pedal deeply. This is to
maintain the stability and traction of
the vehicle and does not indicate a
problem. ESC OFF condition
To cancel ESC operation:
• State 1
Press the ESC OFF button briefly. The
ESC OFF indicator light and/or message
'Traction Control disabled' will illuminate.
In this state, the traction control function
of ESC (engine management) is disabled,
but the brake control function of ESC
(braking management) still operates.
• State 2
Press and hold the ESC OFF button
continuously for more than 3 seconds.
The ESC OFF indicator light and/or
message 'Traction & Stability Control
disabled' illuminates and a warning
chime sounds. In this state, both the
traction control function of ESC (engine
management) and the brake control
function of ESC (braking management)
are disabled.
If the Engine Start/Stop button is pressed
to the OFF position when ESC is off, ESC
remains off. Upon restarting the vehicle,
ESC will automatically turn on again.
Page 340 of 636
Driving your vehicle
6-52
Four Wheel Drive (4WD) delivers engine
power to front and rear wheels for
maximum traction. 4WD is useful when
extra traction is required, such as when
driving on, muddy, wet, or snow-covered
roads.
WARNING
To reduce the risk of SERIOUS INJURY
or DEATH:
• Do not drive in conditions that
exceed the vehicles intended
design such as challenging off-road
conditions.
• Avoid high speeds when cornering or
turning.
• Do not make quick steering wheel
movements, such as sharp lane
changes or fast, sharp turns.
• The risk of a rollover is greatly
increased if you lose control of your
vehicle at highway speeds.
• Loss of control often occurs if two or
more wheels drop off the roadway
and the driver over steers to reenter
the roadway.
• In the event your vehicle leaves
the roadway, do not steer sharply.
Instead, slow down before pulling
back into the travel lanes.
NOTICE
• Do not drive in water if the level
is higher than the bottom of the
vehicle.
• Check your brake condition once
you are out of mud or water. Depress
the brake pedal several times as you
move slowly until you feel normal
braking return.
• Shorten your scheduled
maintenance interval if you drive in
off-road conditions such as sand,
mud or water (see "Maintenance
Under Severe Usage Conditions"
section in chapter 9).
• Always wash your vehicle thoroughly
after off road use, especially the
bottom of the vehicle.
• Be sure to equip the vehicle with four
tires of the same size and type.
• Make sure that a full time 4WD
vehicle is towed by a flat bed tow
truck.
FOUR WhEEL DRIVE (4 WD) (IF E QUIppED)
Page 344 of 636
Driving your vehicle
6-56
For safe 4WD operation
Before driving
• Make sure all passengers are wearing
seat belts.
• Sit upright and closer to the steering
wheel than usual. Adjust the steering
wheel to a position comfortable for
you to drive.
Driving on snow-covered or icy roads
• Start off slowly by applying the
accelerator pedal gently.
• Use snow tires or tire chains.
• Keep sufficient distance between your
vehicle and the vehicle in front of you.
• Apply engine braking during
deceleration by using the paddle
shifter (manual shift mode) and
manually selecting a lower gear.
• Avoid speeding, rapid acceleration,
sudden brake applications, and sharp
turns to prevent skids.
Information
When using Snow Tires, mount them on
all four wheels.
If a full set of chains is not available for
an 4WD vehicle when using tire chains,
chains may be installed on the front wheels
only.
For more details on Snow Tires and Tire
Chains, refer to "Winter Driving" section
later in this chapter.
CAUTION
Mud or snow
If one of the front or rear wheels
begins to spin in mud, snow, etc. the
vehicle can sometimes be driven out by
engaging the accelerator pedal further;
however avoid running the engine
continuously at high rpm because doing
so could damage the AWD system.
Driving in sand or mud
• Maintain slow and constant speed.
Operate the accelerator pedal slowly
to ensure safe driving (wheel-slip
prevention).
• Keep sufficient distance between your
vehicle and the vehicle in front of you.
• Reduce vehicle speed and always
check the road condition.
• Avoid speeding, rapid acceleration,
sudden brake applications, and sharp
turns to prevent getting stuck.
• When the vehicle is stuck in snow,
sand or mud, the tires may not
operate.
• This is to protect the transmission and
not a malfunction.
NOTICE
Moving the vehicle forcibly to get out
of mud or sand can cause damage/
overheat of the engine or damage/
breakdown of the transmission,
differential or 4WD system as well as
damage to tires. If excessive wheel slip
occurs after entering a sandy/muddy
road, the vehicle may fall into the sand/
mud. When it happens, put a stone or
a tree branch under the tire, and then
try to pull out the vehicle, or try to get it
unstuck by repeatedly moving forwards
and backwards.
Page 347 of 636
06
6-59
Towing
4WD vehicles must be towed with
a wheel lift and dollies or flatbed
equipment with all the wheels off the
ground. For more details, refer to
"Towing" section in chapter 8.
Vehicle inspection
• If the vehicle needs to be operated on
a vehicle lift do not attempt to stop
any of the four wheels from turning.
This could damage the 4WD system.
• Never engage the parking brake while
running the engine on a car lift. This
may damage the 4WD system.
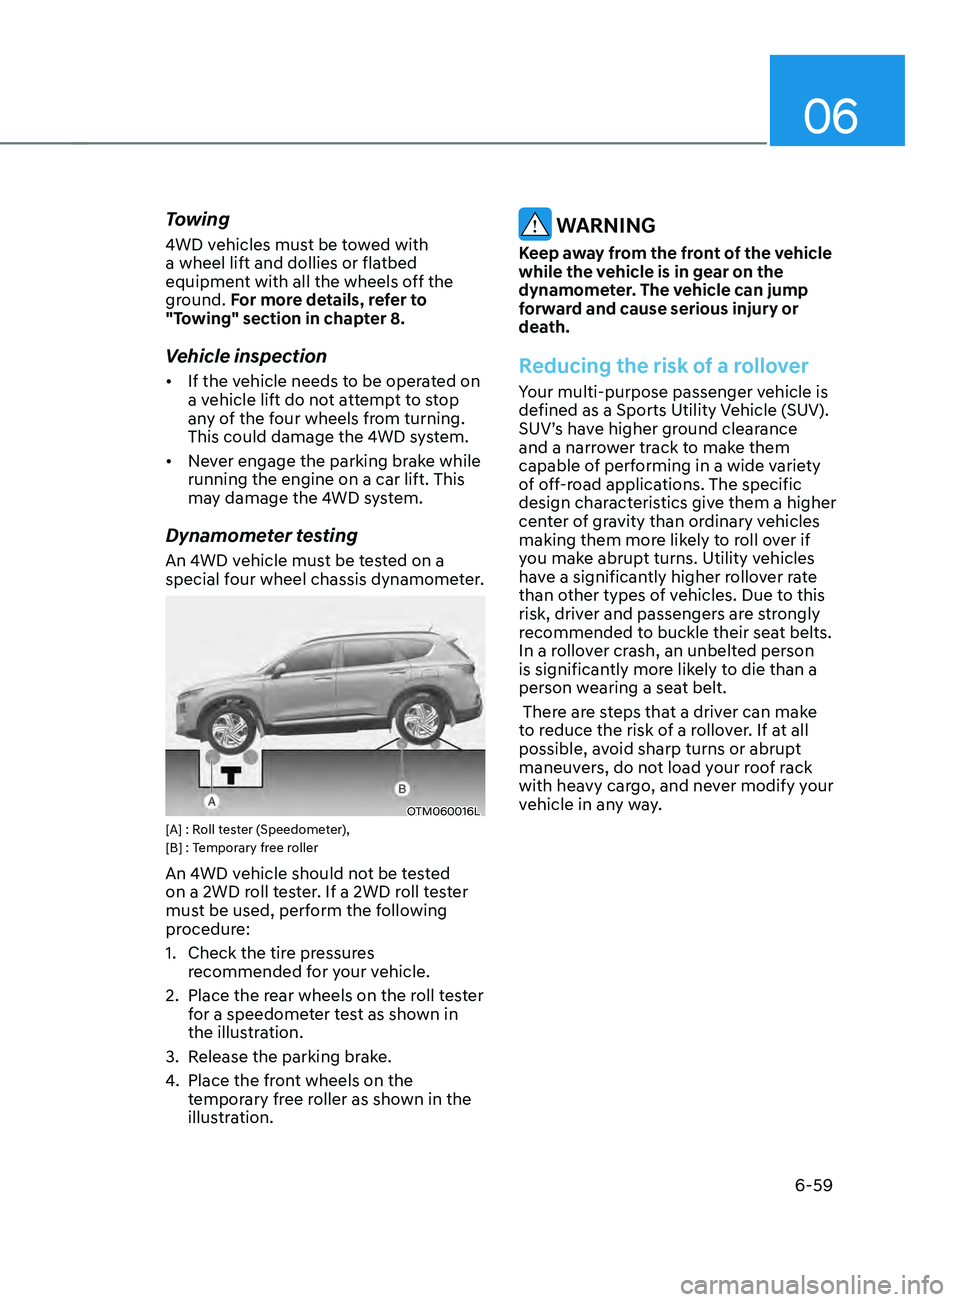
Dynamometer testing
An 4WD vehicle must be tested on a
special four wheel chassis dynamometer.
OTM060016L[A] : Roll tester (Speedometer),
[B] : Temporary free roller
An 4WD vehicle should not be tested
on a 2WD roll tester. If a 2WD roll tester
must be used, perform the following
procedure:
1.
Check the tire pr
essures
recommended for your vehicle.
2.
Place the rear wheels on the r
oll tester
for a speedometer test as shown in
the illustration.
3.
Release the parking br
ake.
4.
Place the fron
t wheels on the
temporary free roller as shown in the
illustration.
WARNING
Keep away from the front of the vehicle
while the vehicle is in gear on the
dynamometer. The vehicle can jump
forward and cause serious injury or
death.
Reducing the risk of a rollover
Your multi-purpose passenger vehicle is
defined as a Sports Utility Vehicle (SUV).
SUV’s have higher ground clearance
and a narrower track to make them
capable of performing in a wide variety
of off-road applications. The specific
design characteristics give them a higher
center of gravity than ordinary vehicles
making them more likely to roll over if
you make abrupt turns. Utility vehicles
have a significantly higher rollover rate
than other types of vehicles. Due to this
risk, driver and passengers are strongly
recommended to buckle their seat belts.
In a rollover crash, an unbelted person
is significantly more likely to die than a
person wearing a seat belt.
There are steps that a driver can make
to reduce the risk of a rollover. If at all
possible, avoid sharp turns or abrupt
maneuvers, do not load your roof rack
with heavy cargo, and never modify your
vehicle in any way.