2021 HYUNDAI SANTA FE CALLIGRAPHY engine
[x] Cancel search: enginePage 221 of 636
05
5-77
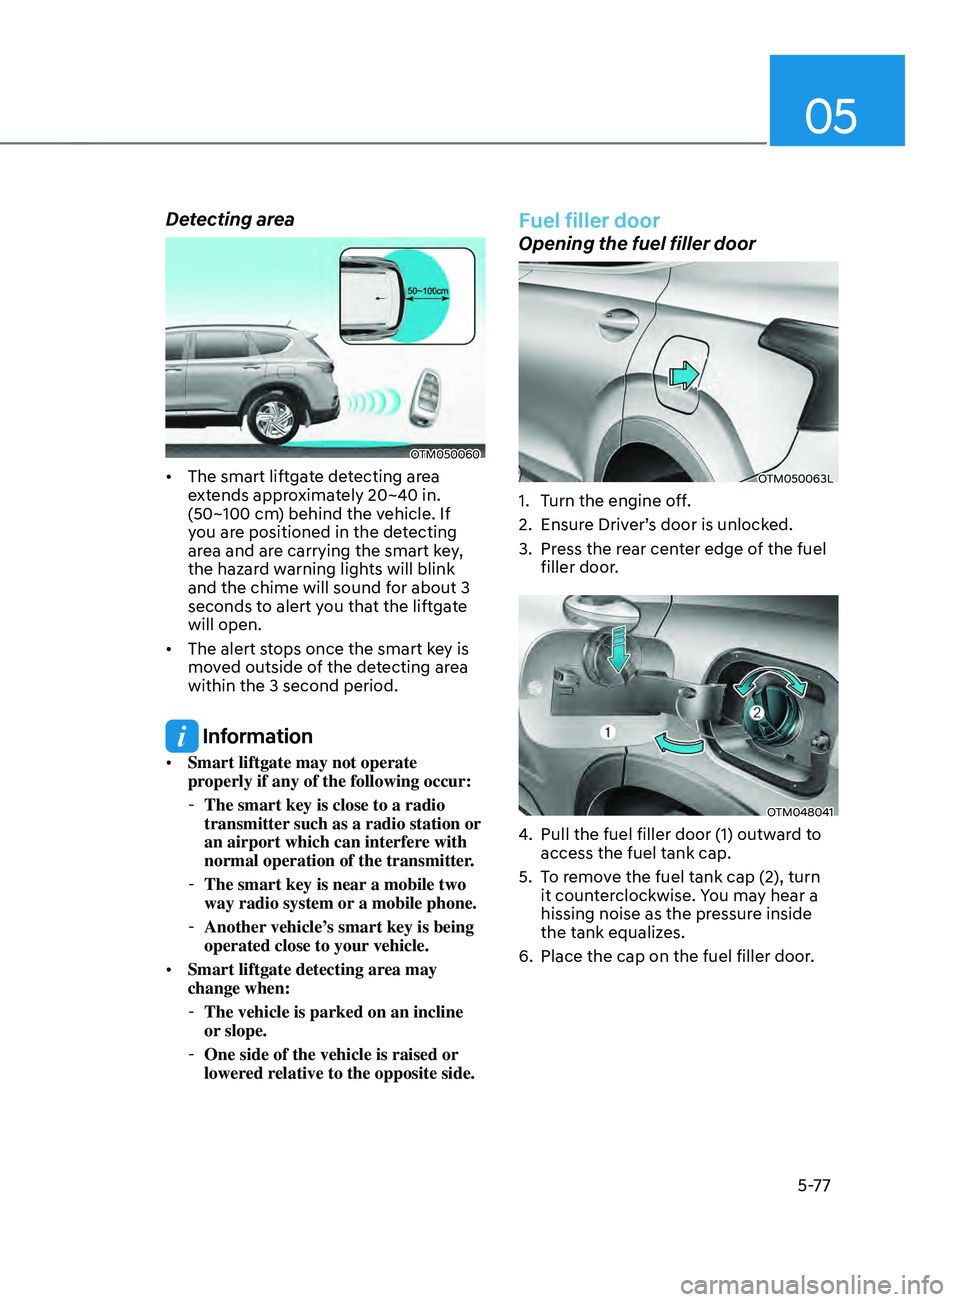
Detecting area
OTM050060
• The smart liftgate detecting area
extends approximately 20~40 in.
(50~100 cm) behind the vehicle. If
you are positioned in the detecting
area and are carrying the smart key,
the hazard warning lights will blink
and the chime will sound for about 3
seconds to alert you that the liftgate
will open.
• The alert stops once the smart key is
moved outside of the detecting area
within the 3 second period.
Information
• Smart liftgate may not operate
properly if any of the following occur:
-The smart key is close to a radio
transmitter such as a radio station or
an airport which can interfere with
normal operation of the transmitter.
- The smart key is near a mobile two
way radio system or
a mobile phone.
-Another vehicle’
s smart key is being
operated close to your vehicle.
• Smart liftgate detecting area may
change when:
-The vehicle is parked on an incline
or slope.
-One side of the vehicle is raised or
lower
ed relative to the opposite side.
Fuel filler door
Opening the fuel filler door
OTM050063L
1. Turn the engine off.
2.
Ensur
e Driver’s door is unlocked.
3.
Press the r
ear center edge of the fuel
filler door.
OTM048041
4. Pull the fuel filler door (1) outwar d to
access the fuel tank cap.
5.
To r
emove the fuel tank cap (2), turn
it counterclockwise. You may hear a
hissing noise as the pressure inside
the tank equalizes.
6.
Place the cap on the fuel filler door.
Page 223 of 636
05
5-79
• Do not get back into a vehicle
once you have begun refueling.
You can generate a buildup of
static electricity by touching,
rubbing or sliding against any item
or fabric capable of producing
static electricity. Static electricity
discharge can ignite fuel vapors
causing a fire. If you must re-enter
the vehicle, you should once again
eliminate potentially dangerous
static electricity discharge by
touching a metal part of the vehicle,
away from the fuel filler neck, nozzle
or other fuel source, with your bare
hand.
• When using an approved portable
fuel container, be sure to place the
container on the ground prior to
refueling. Static electricity discharge
from the container can ignite fuel
vapors causing a fire.
Once refueling has begun, contact
between your bare hand and the
vehicle should be maintained until
the filling is complete.
• Use only approved portable plastic
fuel containers designed to carry and
store fuel.
• When refueling, always shift the
gear to the P (Park) position, set
the parking brake, and press the
Engine Start/Stop button to the
OFF position. Sparks produced by
electrical components related to the
engine can ignite fuel vapors causing
a fire.
• Do not use matches or a lighter and
do not smoke or leave a lit cigarette
in your vehicle while at a gas station,
especially during refueling.• Do not over-fill or top-off your
vehicle tank, which can cause fuel
spillage.
• If a fire breaks out during refueling,
leave the vicinity of the vehicle, and
immediately contact the manager
of the gas station and then contact
the local fire department. Follow any
safety instructions they provide.
• If pressurized fuel sprays out, it can
cover your clothes or skin and thus
subject you to the risk of fire and
burns. Always remove the fuel cap
carefully and slowly. If the cap is
venting fuel or if you hear a hissing
sound, wait until the condition stops
before completely removing the cap.
• Always check that the fuel cap is
installed securely to prevent fuel
spillage in the event of an accident.
Information
Make sure to refuel your vehicle according
to the “Fuel Requirements” section in
suggested in chapter 1.
NOTICE
• Do not spill fuel on the exterior
surfaces of the vehicle. Any type of
fuel spilled on painted surfaces may
damage the paint.
• If the fuel filler cap requires
replacement, we recommend that
you use only a genuine HYUNDAI cap
or the equivalent specified for your
vehicle. An incorrect fuel filler cap
can result in a serious malfunction of
the fuel system or emission control
system.
Page 230 of 636
Convenient features
5-86
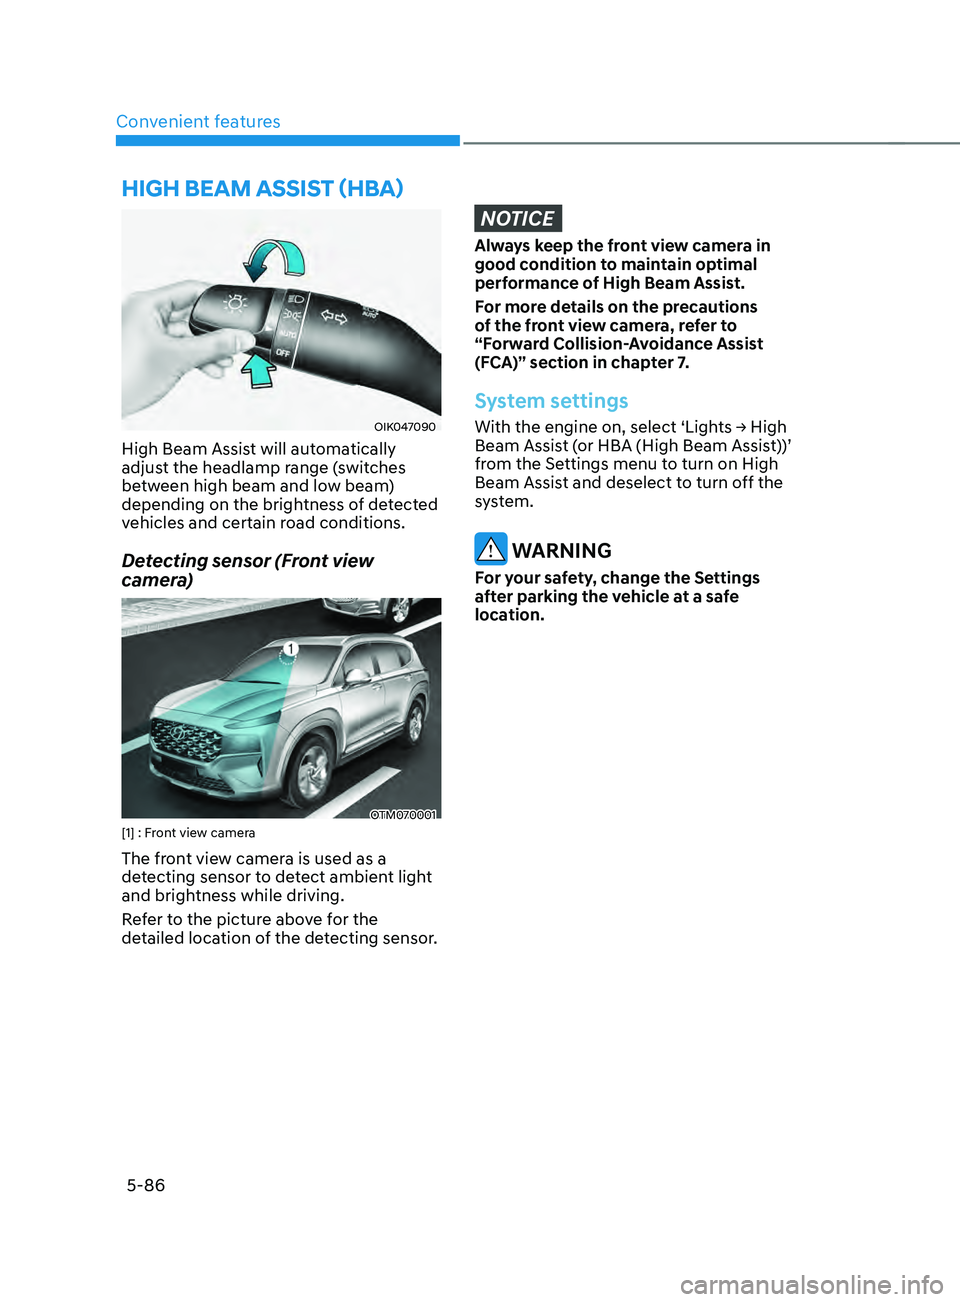
OIK047090
High Beam Assist will automatically
adjust the headlamp range (switches
between high beam and low beam)
depending on the brightness of detected
vehicles and certain road conditions.
Detecting sensor (Front view
camera)
OTM070001[1] : Front view camera
The front view camera is used as a
detecting sensor to detect ambient light
and brightness while driving.
Refer to the picture above for the
detailed location of the detecting sensor.
NOTICE
Always keep the front view camera in
good condition to maintain optimal
performance of High Beam Assist.
For more details on the precautions
of the front view camera, refer to
“Forward Collision-Avoidance Assist
(FCA)” section in chapter 7.
System settings
With the engine on, select ‘Lights → High Beam Assist (or HBA (High Beam Assist))’
from the Settings menu to turn on High
Beam Assist and deselect to turn off the
system.
WARNING
For your safety, change the Settings
after parking the vehicle at a safe
location.
hIgh bEAm AssIsT (hbA)
Page 233 of 636
05
5-89
INTERIOR LIGHTS
WARNING
Do not use the interior lights when
driving in the dark. The interior lights
may obscure your view and cause an
accident.
NOTICE
Do not use the interior lights for
extended periods when the vehicle is
turned off or the battery will discharge.
Interior lamp AUTO cut
The interior lamps will automatically go
off approximately 10 minutes after the
vehicle is turned off and the doors are
closed. If a door is opened, the lamp
will go off 40 minutes after the vehicle
is turned off. If the doors are locked by
the smart key and the vehicle enters the
armed stage of the theft alarm system,
the lamps will go off five seconds later.
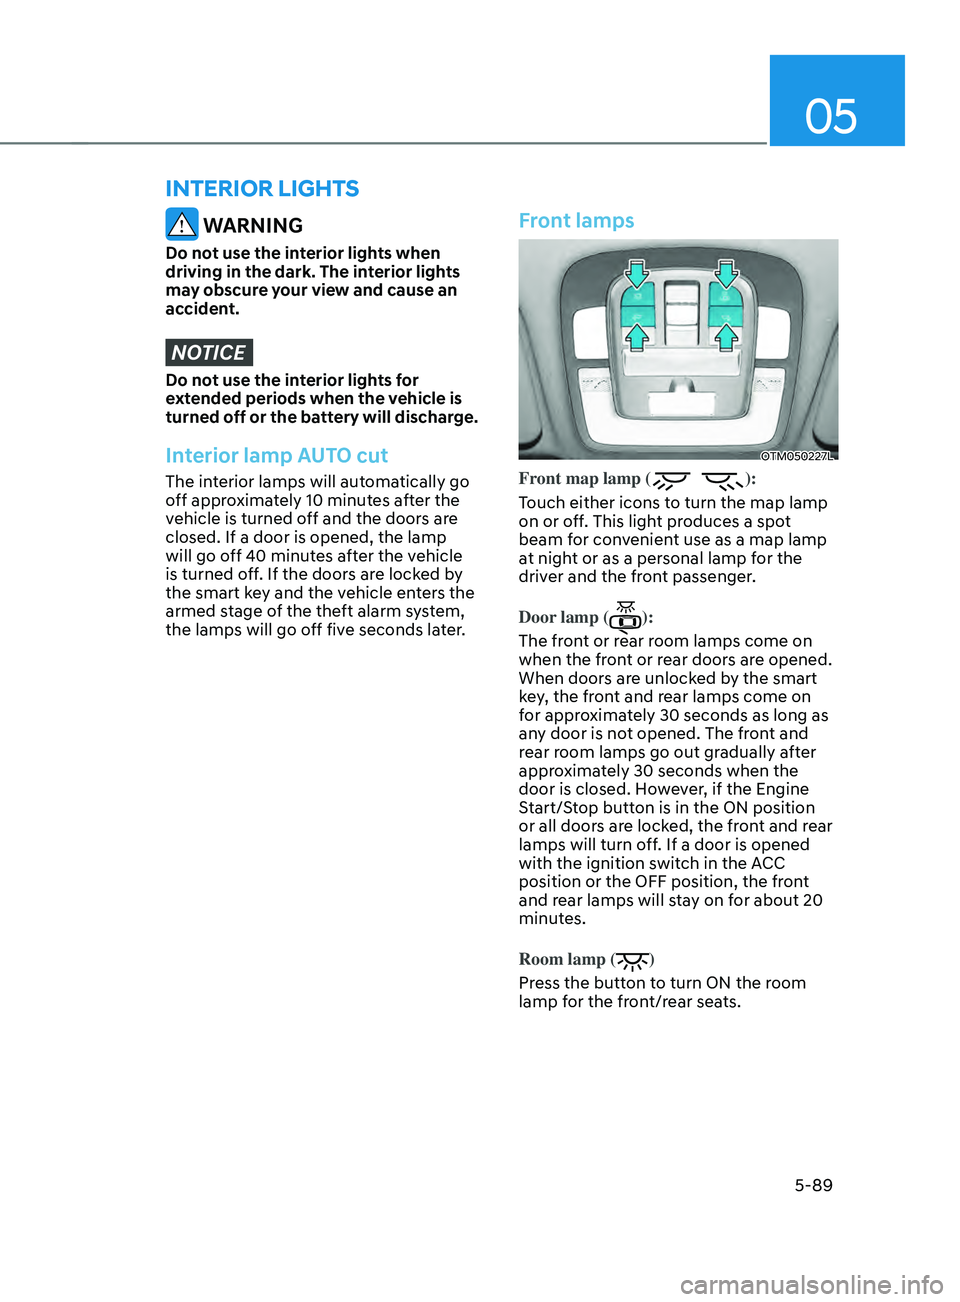
Front lamps
OTM050227L
Front map lamp ():
Touch either icons to turn the map lamp
on or off. This light produces a spot
beam for convenient use as a map lamp
at night or as a personal lamp for the
driver and the front passenger.
Door lamp (
):
The front or rear room lamps come on
when the front or rear doors are opened.
When doors are unlocked by the smart
key, the front and rear lamps come on
for approximately 30 seconds as long as
any door is not opened. The front and
rear room lamps go out gradually after
approximately 30 seconds when the
door is closed. However, if the Engine
Start/Stop button is in the ON position
or all doors are locked, the front and rear
lamps will turn off. If a door is opened
with the ignition switch in the ACC
position or the OFF position, the front
and rear lamps will stay on for about 20
minutes.
Room lamp (
)
Press the button to turn ON the room
lamp for the front/rear seats.
Page 235 of 636
05
5-91
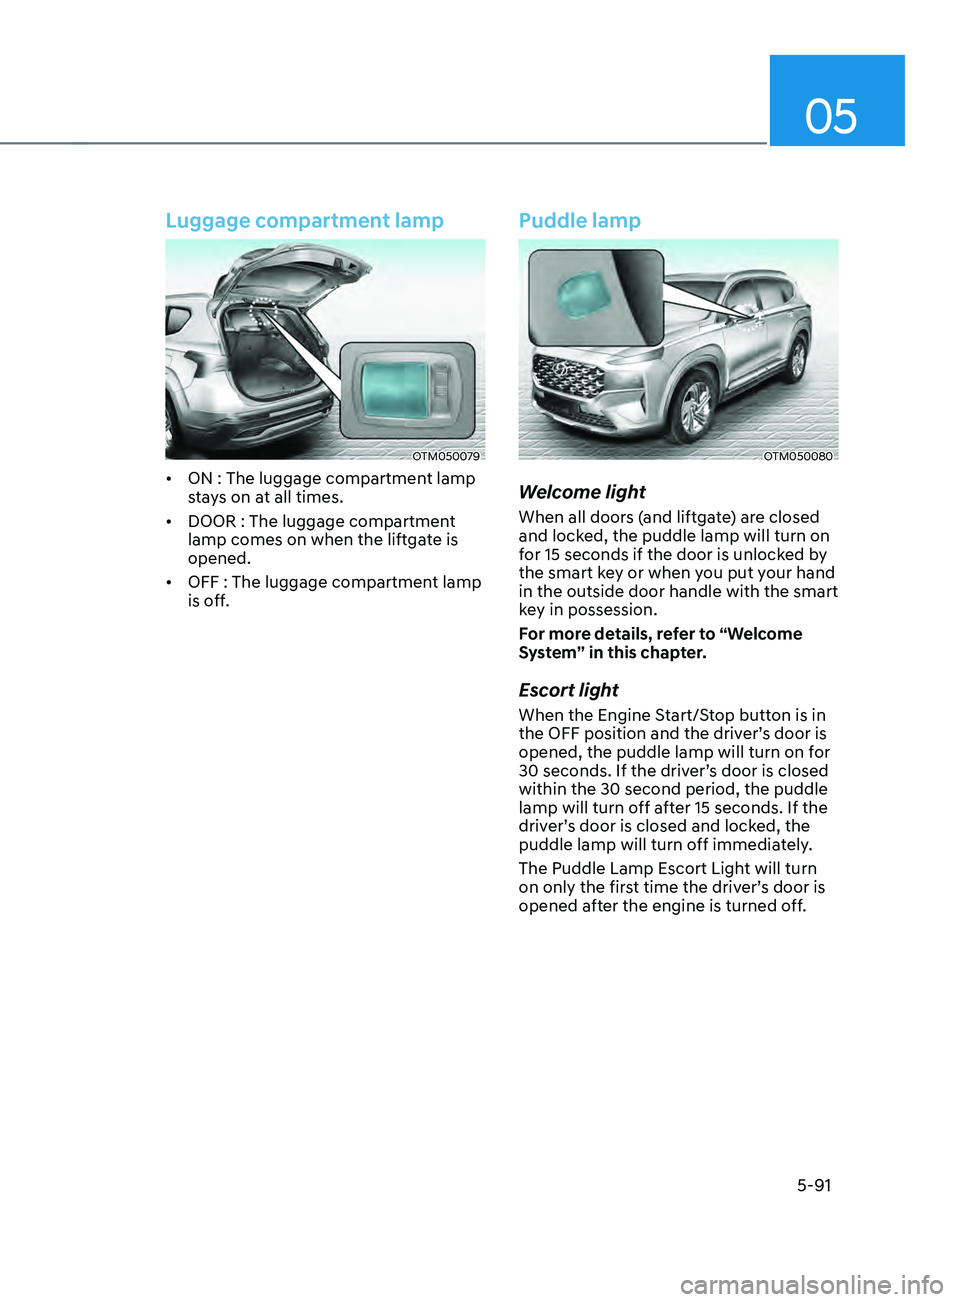
Luggage compartment lamp
OTM050079
• ON : The luggage compartment lamp
stays on at all times.
• DOOR : The luggage compartment
lamp comes on when the liftgate is
opened.
• OFF : The luggage compartment lamp
is off.
Puddle lamp
OTM050080
Welcome light
When all doors (and liftgate) are closed
and locked, the puddle lamp will turn on
for 15 seconds if the door is unlocked by
the smart key or when you put your hand
in the outside door handle with the smart
key in possession.
For more details, refer to “Welcome
System” in this chapter.
Escort light
When the Engine Start/Stop button is in
the OFF position and the driver’s door is
opened, the puddle lamp will turn on for
30 seconds. If the driver’s door is closed
within the 30 second period, the puddle
lamp will turn off after 15 seconds. If the
driver’s door is closed and locked, the
puddle lamp will turn off immediately.
The Puddle Lamp Escort Light will turn
on only the first time the driver’s door is
opened after the engine is turned off.
Page 238 of 636
Convenient features
5-94
AUTO (Automatic) control
(if equipped)
The rain sensor located on the upper
end of the windshield glass senses
the amount of rainfall and controls the
wiping cycle for the proper interval.
The wiper operation time will be
automatically controlled depends on
rainfall.
When the rain stops, the wiper stops.
To vary the sensitivity setting, turn the
sensitivity control knob.
If the wiper switch is set in AUTO mode
when the Engine Start/Stop button is in
the ON position, the wiper will operate
once to perform a self-check of the
system. Set the wiper to the OFF (O)
position when the wiper is not in use.
WARNING
To avoid personal injury from the
windshield wipers, when the engine
is running and the windshield wiper
switch is placed in the AUTO mode:
• Do not touch the upper end of the
windshield glass facing the rain
sensor.
• Do not wipe the upper end of the
windshield glass with a damp or wet
cloth.
• Do not put pressure on the
windshield glass.
NOTICE
• When washing the vehicle, set the
wiper switch in the OFF (O) position
to stop the auto wiper operation. The
wiper may operate and be damaged
if the switch is set in the AUTO mode
while washing the vehicle.
• Do not remove the sensor cover
located on the upper end of the
passenger side windshield glass.
Damage to system components
could occur and may not be covered
by your vehicle warranty.
• Because of using a photo sensor,
temporary malfunction could occur
according to sudden ambient light
change made by stone and dust
while driving.
Page 242 of 636
Convenient features
5-98
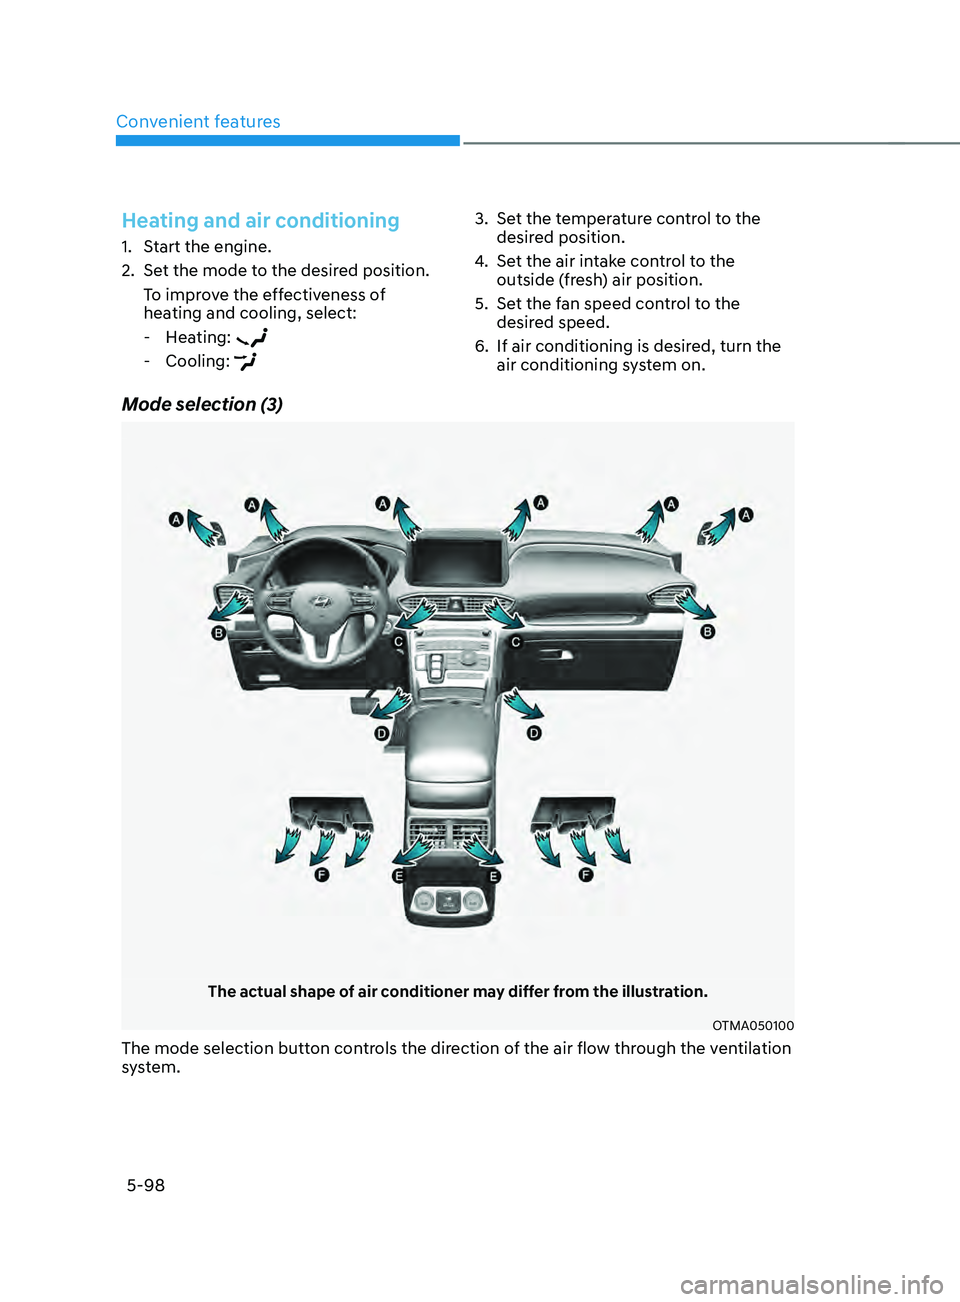
Mode selection (3)
The actual shape of air conditioner may differ from the illustration.
OTMA050100
The mode selection button controls the direction of the air flow through the ventilation
system.
Heating and air conditioning
1. Start the engine.
2.
Set the mode t
o the desired position.
To improve the effectiveness of
heating and cooling, select:
- Hea
ting:
- Cooling:
3. Set the temperature control to the
desired position.
4.
Set the air in
take control to the
outside (fresh) air position.
5.
Set the f
an speed control to the
desired speed.
6.
If air conditioning is desired, turn the
air conditioning s
ystem on.
Page 245 of 636
05
5-101
WARNING
• Continued climate control system
operation in the recirculated air
position may allow humidity to
increase inside the vehicle which
may fog the glass and obscure
visibility.
• Do not sleep in a vehicle with the air
conditioning or heating system on. It
may cause serious harm or death due
to a drop in the oxygen level and/or
body temperature.
• Continued climate control system
operation in the recirculated air
position can cause drowsiness
or sleepiness, and loss of vehicle
control. Set the air intake control
to the outside (fresh) air position as
much as possible while driving.
Fan speed control
Turn the knob to the right to increase
the fan speed and airflow. Turn the knob
to the left to decrease fan speed and
airflow.
Setting the fan speed control knob to the
“0” position turns off the fan.
NOTICE
Operating the fan speed when the
ignition switch is in the ON position
could cause the battery to discharge.
Operate the fan speed when the engine
is running.
Air conditioning (A/C) (if equipped)
Press the A/C button to turn the air
conditioning system on (indicator light
will illuminate). Press the button again to
turn the air conditioning system off.
System operation
Ventilation
1. Set the mode to the position.
2.
Set the air in
take control to the
outside (fresh) air position.
3.
Set the t
emperature control to the
desired position.
4.
Set the f
an speed control to the
desired speed.
Heating
1. Set the mode to the position.
2.
Set the air in
take control to the
outside (fresh) air position.
3.
Set the t
emperature control to the
desired position.
4.
Set the f
an speed control to the
desired speed.
5.
If dehumidified heating is desir
ed,
turn the air conditioning system (if
equipped) on.
If the windshield fogs up, set the mode
to the
or position.
Operation Tips
• To help keep dust or unpleasant fumes
from entering the vehicle through the
ventilation system, temporarily set the
air intake control to the recirculated
air position. Be sure to return the
control to the fresh air position when
the irritation has passed to keep fresh
air in the vehicle. This will help keep
the driver alert and comfortable.
• To prevent interior fog on the
windshield, set the air intake control
to the fresh air position and fan speed
to the desired position, turn on the air
conditioning system, and adjust the
temperature control to the desired
temperature.