2021 HYUNDAI SANTA FE CALLIGRAPHY door lock
[x] Cancel search: door lockPage 18 of 636

2-4
Vehicle Information, Consumer Information and Reporting Safety Defects
1. Inside door handle .................................
5- 32
2.
Po
wer window switches
...................... 5-58
3.
Po
wer window lock button /
............... 5-60
Electr
onic child safety lock button
......5-
36
4.
Side view mirr
or folding button
.................5-56
5.
Side view mirr
or control switch
.................5-56
6.
Centr
al door lock switch
...................... 5-
33
7.
Instrumen
t panel illumination control
switch
...................................................... 4-5
8.
Lane Saf
ety button
................................ 7
-19
9.
Po
wer Liftgate open/close button
......5-
7010. ESC (Electronic S
tability Control) OFF
button
.................................................... 6-44
11.
EPB (Electronic P
arking Brake)
switch
.................................................... 6-35
12.
St
eering wheel
......................................5-42
13.
St
eering wheel tilt/telescopic switch.. 5-43
14.
Fuse bo
x
................................................9-42
15.
Hood r
elease lever
................................5-67
16.
Seat .......................................................... 3-3
INTERIOR OVERVIEW
The actual shape may differ from the illustration.
OTMA020001C
Page 46 of 636
Seats & Safety System
3-14
Armrest
OTM030048
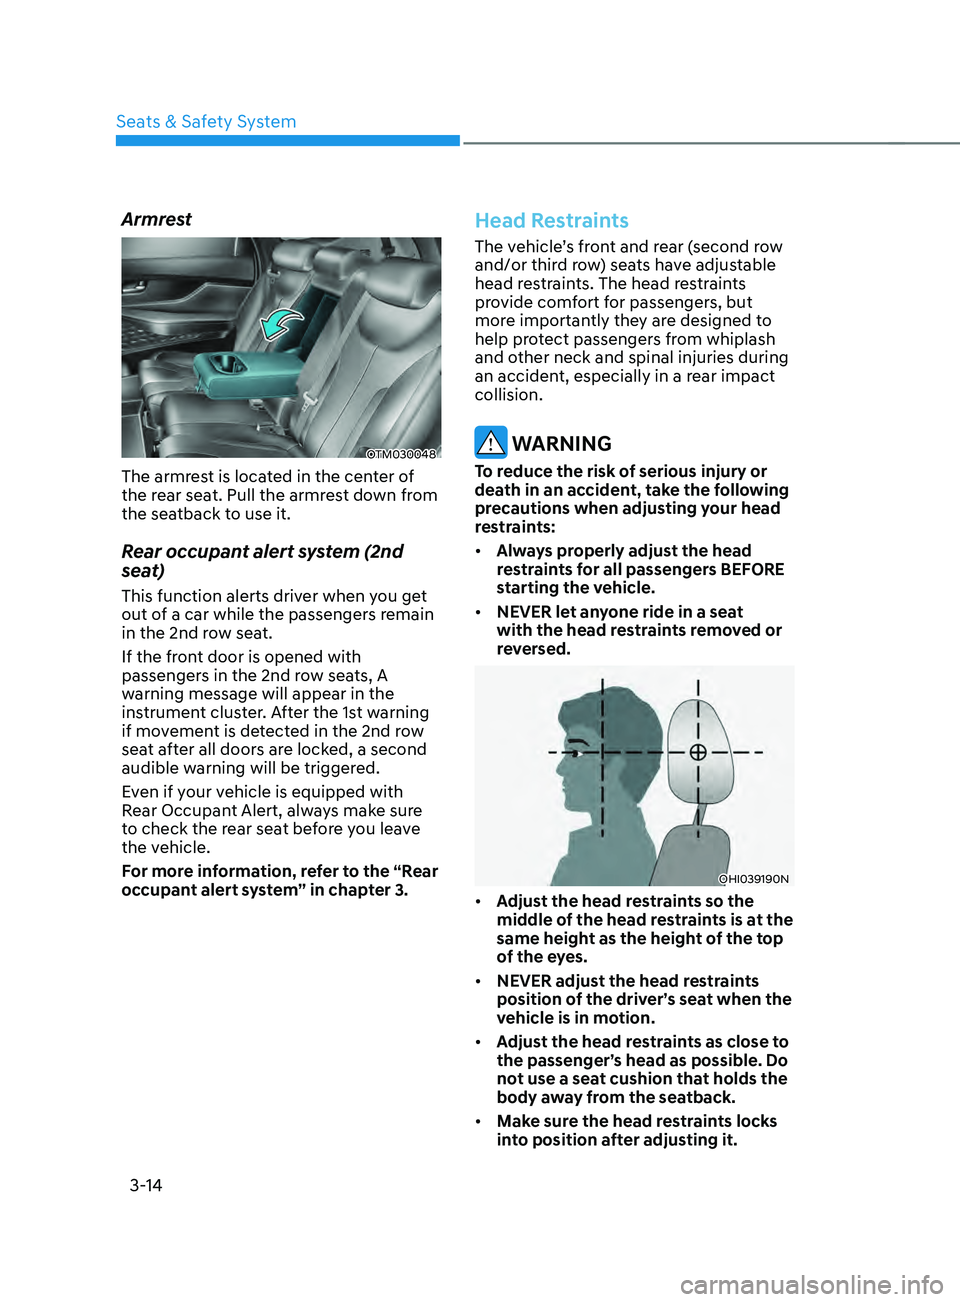
The armrest is located in the center of
the rear seat. Pull the armrest down from
the seatback to use it.
Rear occupant alert system (2nd
seat)
This function alerts driver when you get
out of a car while the passengers remain
in the 2nd row seat.
If the front door is opened with
passengers in the 2nd row seats, A
warning message will appear in the
instrument cluster. After the 1st warning
if movement is detected in the 2nd row
seat after all doors are locked, a second
audible warning will be triggered.
Even if your vehicle is equipped with
Rear Occupant Alert, always make sure
to check the rear seat before you leave
the vehicle.
For more information, refer to the “Rear
occupant alert system” in chapter 3.
Head Restraints
The vehicle’s front and rear (second row
and/or third row) seats have adjustable
head restraints. The head restraints
provide comfort for passengers, but
more importantly they are designed to
help protect passengers from whiplash
and other neck and spinal injuries during
an accident, especially in a rear impact
collision.
WARNING
To reduce the risk of serious injury or
death in an accident, take the following
precautions when adjusting your head
restraints:
• Always properly adjust the head
restraints for all passengers BEFORE
starting the vehicle.
• NEVER let anyone ride in a seat
with the head restraints removed or
reversed.
OHI039190N
• Adjust the head restraints so the
middle of the head restraints is at the
same height as the height of the top
of the eyes.
• NEVER adjust the head restraints
position of the driver’s seat when the
vehicle is in motion.
• Adjust the head restraints as close to
the passenger’s head as possible. Do
not use a seat cushion that holds the
body away from the seatback.
• Make sure the head restraints locks
into position after adjusting it.
Page 53 of 636
03
3-21
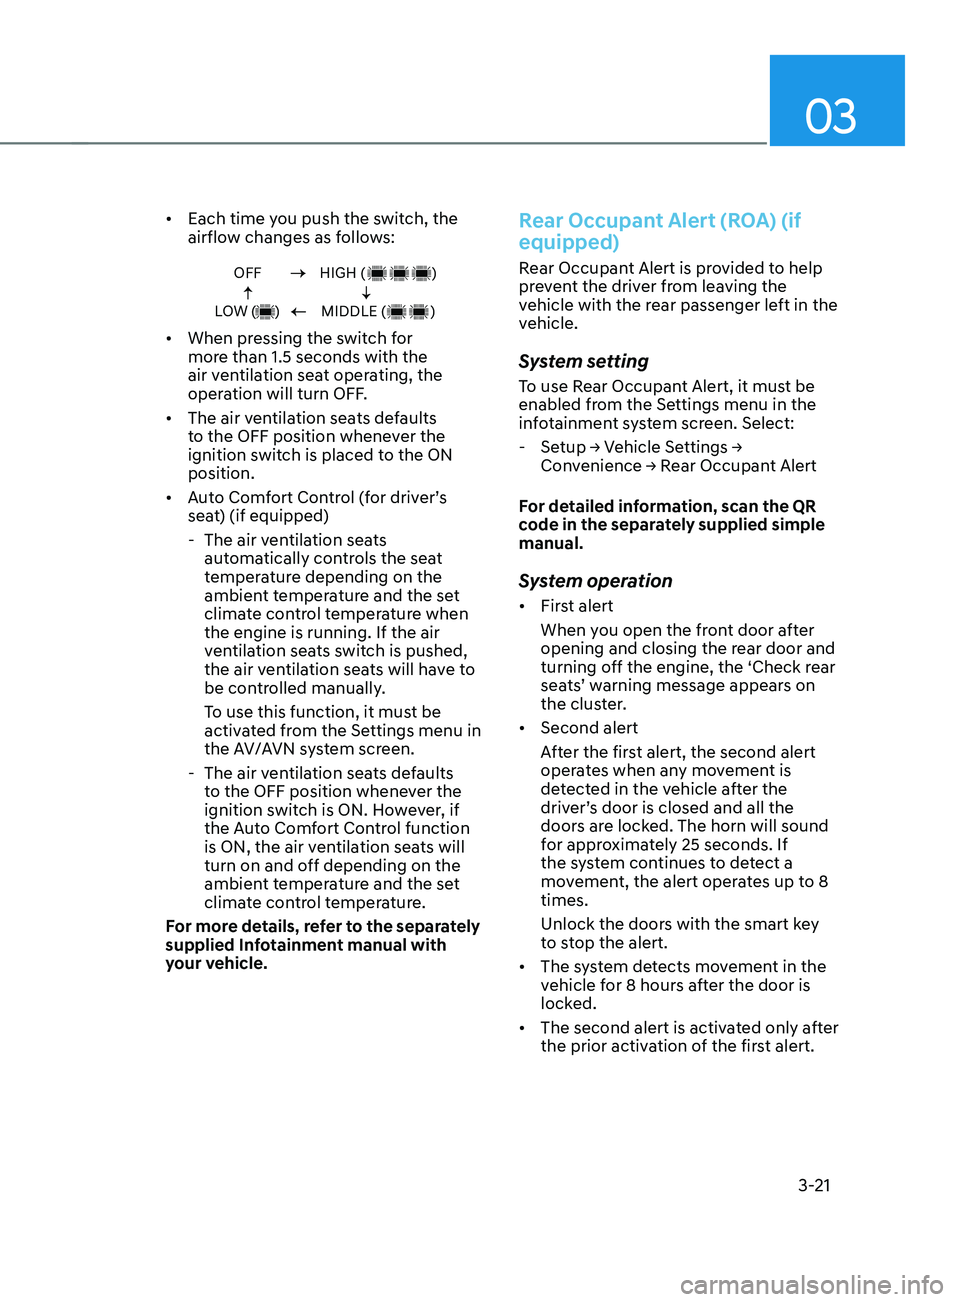
• Each time you push the switch, the
airflow changes as follows:
OFF
LOW ( )HIGH ( )
MIDDLE ( )
• When pressing the switch for
more than 1.5 seconds with the
air ventilation seat operating, the
operation will turn OFF.
• The air ventilation seats defaults
to the OFF position whenever the
ignition switch is placed to the ON
position.
• Auto Comfort Control (for driver’s
seat) (if equipped)
- The air ven
tilation seats
automatically controls the seat
temperature depending on the
ambient temperature and the set
climate control temperature when
the engine is running. If the air
ventilation seats switch is pushed,
the air ventilation seats will have to
be controlled manually.
To use this function, it must be
activated from the Settings menu in
the AV/AVN system screen.
- The air ven
tilation seats defaults
to the OFF position whenever the
ignition switch is ON. However, if
the Auto Comfort Control function
is ON, the air ventilation seats will
turn on and off depending on the
ambient temperature and the set
climate control temperature.
For more details, refer to the separately
supplied Infotainment manual with
your vehicle.
Rear Occupant Alert (ROA) (if
equipped)
Rear Occupant Alert is provided to help
prevent the driver from leaving the
vehicle with the rear passenger left in the
vehicle.
System setting
To use Rear Occupant Alert, it must be
enabled from the Settings menu in the
infotainment system screen. Select:
- Setup → V
ehicle
Se
ttings
→ Conv
enience
→ R
ear
Occupan
t
Alert
F
or detailed information, scan the QR
code in the separately supplied simple
manual.
System operation
• First alert
When you open the front door after
opening and closing the rear door and
turning off the engine, the ‘Check rear
seats’ warning message appears on
the cluster.
• Second alert
After the first alert, the second alert
operates when any movement is
detected in the vehicle after the
driver’s door is closed and all the
doors are locked. The horn will sound
for approximately 25 seconds. If
the system continues to detect a
movement, the alert operates up to 8
times.
Unlock the doors with the smart key
to stop the alert.
• The system detects movement in the
vehicle for 8 hours after the door is
locked.
• The second alert is activated only after
the prior activation of the first alert.
Page 54 of 636

Seats & Safety System
3-22
System precautions
• Make sure that all the windows are
closed. If the window is open, the
alert may operate by the sensor
detecting an unintended movement
(e.g. wind or bugs).
• „„Cluster „„Steering wheel
OTM048165LOTM050216
If you do not want to use Rear
Occupant Alert, press the OK button
on the steering wheel when the first
alert is displayed on the cluster. Doing
so will deactivate the second alert one
time.
• An alert can occur if the there is an
impact on the roof.
• If boxes or objects are stacked in the
vehicle, the system may not detect
the boxes or objects. Or, the alert may
operate if the boxes or objects fall off.
• The sensor may not operate normally
if the senor is obscured by foreign
substances.
• The alert may operate if movement
in the driver or passenger seat is
detected.
• The alert may operate with the doors
locked due to car wash or surrounding
vibration or noise.
• If the vehicle is started remotely (if
equipped with Remote Start), inside
movement detection will stop.
WARNING
Even if your vehicle is equipped with
Rear Occupant Alert, always make sure
to check the rear seat before you leave
the vehicle.
Rear Occupant Alert may not operate
when:
• Movement does not continue for
a certain period of time or the
movement is small.
• The rear passenger is covered with
an object such as a blanket.
• Always be cautious of the
passenger’s safety as the detection
function and second alert may
not operate depending on the
surrounding environment and
certain conditions.
Page 58 of 636
Seats & Safety System
3-26
Information
If you are not able to smoothly pull
enough of the seat belt out from the
retractor, firmly pull the seat belt out and
release it. After release, you will be able to
pull the belt out smoothly.
Height adjustment
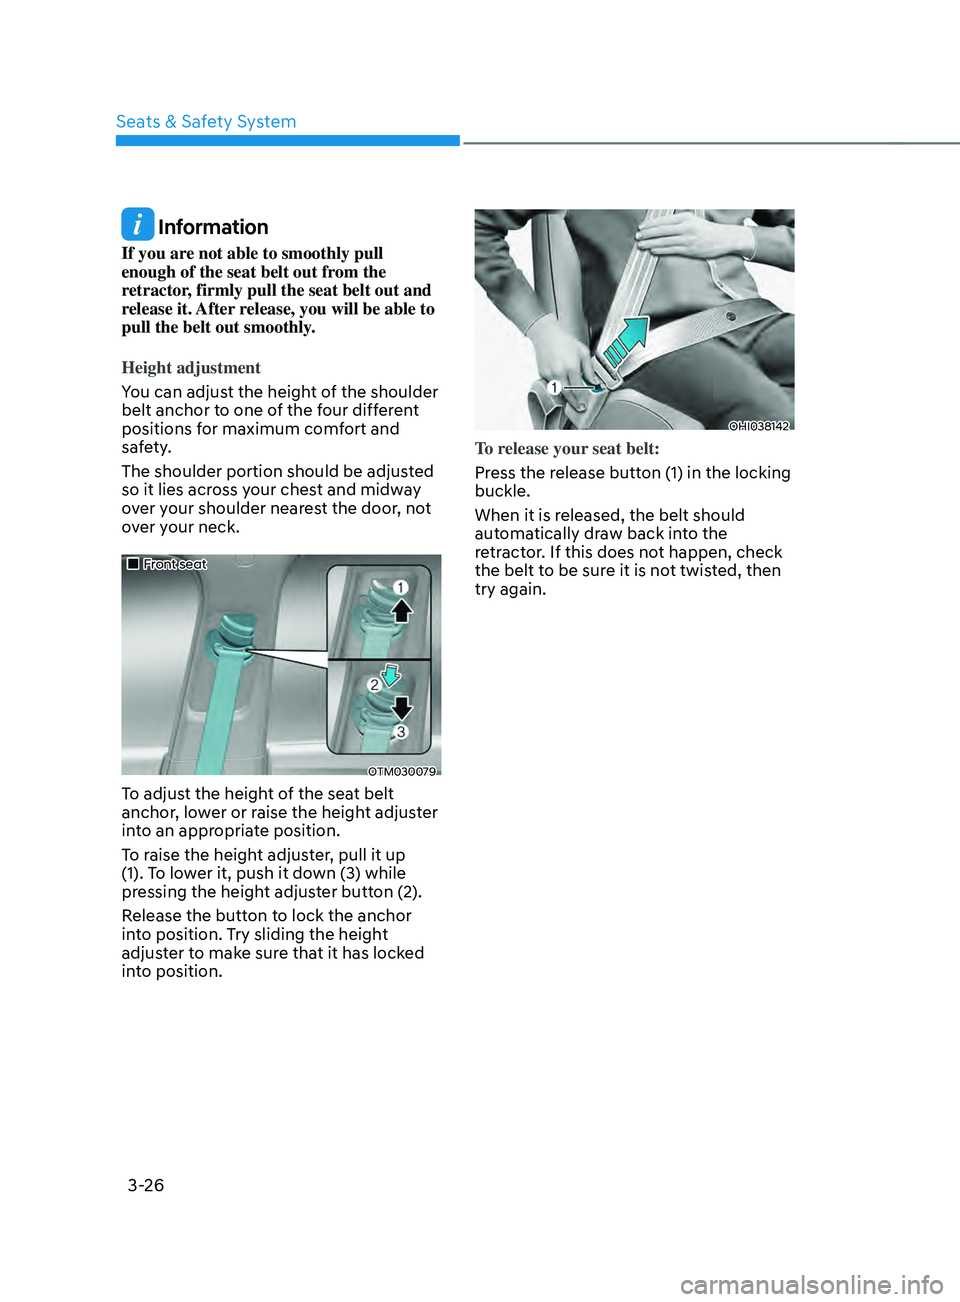
You can adjust the height of the shoulder
belt anchor to one of the four different
positions for maximum comfort and
safety.
The shoulder portion should be adjusted
so it lies across your chest and midway
over your shoulder nearest the door, not
over your neck.
„„Front seat
OTM030079
To adjust the height of the seat belt
anchor, lower or raise the height adjuster
into an appropriate position.
To raise the height adjuster, pull it up
(1). To lower it, push it down (3) while
pressing the height adjuster button (2).
Release the button to lock the anchor
into position. Try sliding the height
adjuster to make sure that it has locked
into position.
OHI038142
To release your seat belt:
Press the release button (1) in the locking
buckle.
When it is released, the belt should
automatically draw back into the
retractor. If this does not happen, check
the belt to be sure it is not twisted, then
try again.
Page 80 of 636

Seats & Safety System
3-48
Side air bags
„„Side air bag
OTM030029
OTM030030
Your vehicle is equipped with a side air
bag in each front seat. The purpose of
the air bag is to provide the vehicle’s
driver and the front passenger with
additional protection than that offered by
the seat belt alone.
The side air bags are designed to deploy
during certain side impact collisions,
depending on the crash severity, angle,
speed and point of impact.
The side air bags on both sides of the
vehicle are designed to deploy when a
rollover is detected by a rollover sensor.
(if equipped with rollover sensor)
The side air bags are not designed to
deploy in all side impact or rollover
situations.
WARNING
To reduce the risk of serious injury or
death from an inflating side air bag and
front center air bag, take the following
precautions:
• Seat belts must be worn at all times
to help keep occupants positioned
properly.
• Do not allow passengers to lean their
heads or bodies onto doors, put their
arms on the doors, stretch their arms
out of the window, or place objects
between the doors and seats.
• Hold the steering wheel at the 9
o’clock and 3 o’clock positions, to
minimize the risk of injuries to your
hands and arms.
• Do not use any accessory seat
covers. This could reduce or prevent
the effectiveness of the system.
• Do not hang other objects except
clothes. In an accident it may cause
vehicle damage or personal injury
especially when air bag is inflated.
• Do not place any objects over the
air bag or between the air bag and
yourself. Also, do not attach any
objects around the area the air bag
inflates such as the door, side door
glass, front and rear pillar.
• Do not place any objects between
the door and the seat. They may
become dangerous projectiles if the
side air bag inflates.
• Do not install any accessories on the
side or near the side air bags.
• Do not cause impact to the doors
when the Engine Start/Stop button
is in the ON or START position as this
may cause the side air bags to inflate.
• If the seat or seat cover is damaged,
we recommend that the system be
serviced by an authorized HYUNDAI
dealer.
Page 100 of 636
AUTO STOP indicator light ........................................................................\
..............4-20
T urn signal indicator light ........................................................................\
................. 4-
21
High beam indicator light
........................................................................\
................ 4-
21
High Beam Assist indicator light
........................................................................\
...... 4-
21
Cruise Indicator Light
........................................................................\
....................... 4-
21
SPORT Mode Indicator Light
........................................................................\
........... 4-
22
ECO Mode Indicator Light
........................................................................\
............... 4-
22
SMART Mode Indicator Light
........................................................................\
.......... 4-22
Mas
ter warning light
........................................................................\
........................ 4-
22
LCD display messages
........................................................................\
....................... 4-
23
Shift to P (for smart key system)
........................................................................\
..... 4-
23
Low key battery (for smart key system).................................................................. 4-23
Press START button while turning wheel (for smart key system)
......................... 4-
23
Check steering wheel lock system
(for smart key system)
........................................................................\
..................... 4-
23
Press brake pedal to start engine (for smart key system)
.................................... 4-
23
Key not in vehicle (for smart key system)
............................................................... 4-23
K
ey not detected (for smart key system)................................................................ 4-23
Press START button again (for smart key system)
................................................ 4-
23
Press START button with key (for smart key system)
........................................... 4
-24
Check BRAKE SWITCH fuse (for smart key system)
............................................. 4
-24
Shift to P or N to start engine (for smart key system)
.......................................... 4
-24
Battery discharging due to external electrical devices
......................................... 4
-24
Door, Hood, Liftgate open indicator
....................................................................... 4-25
Sunr
oof open indicator
........................................................................\
.................... 4-
25
Low tire pressure
........................................................................\
............................. 4-
25
Lights
........................................................................\
................................................ 4-
26
Wiper
........................................................................\
.....................................
...........4-26
Low washer fluid
........................................................................\
.............................. 4-
26
Low fuel
........................................................................\
.....................................
.......4-26
Low engine oil
........................................................................\
.................................. 4-
26
Engine overheated / Engine has overheated
......................................................... 4-
27
Check exhaust system
........................................................................\
..................... 4-
27
Check headlight
........................................................................\
............................... 4-
27
Check turn signal
........................................................................\
............................. 4-
27
Check headlamp LED
........................................................................\
...................... 4-
27
Check Forward Collision-Avoidance Assist system
............................................... 4-
28
Check Lane Keeping Assist system
........................................................................\
4-28
Check Blind-
Spot Collision Warning system..........................................................4-28
Check Driver Attention Warning system
................................................................ 4-
28
Check High Beam Assist system
........................................................................\
..... 4-
28
Check Smart Cruise Control system
....................................................................... 4-28
4
Page 136 of 636
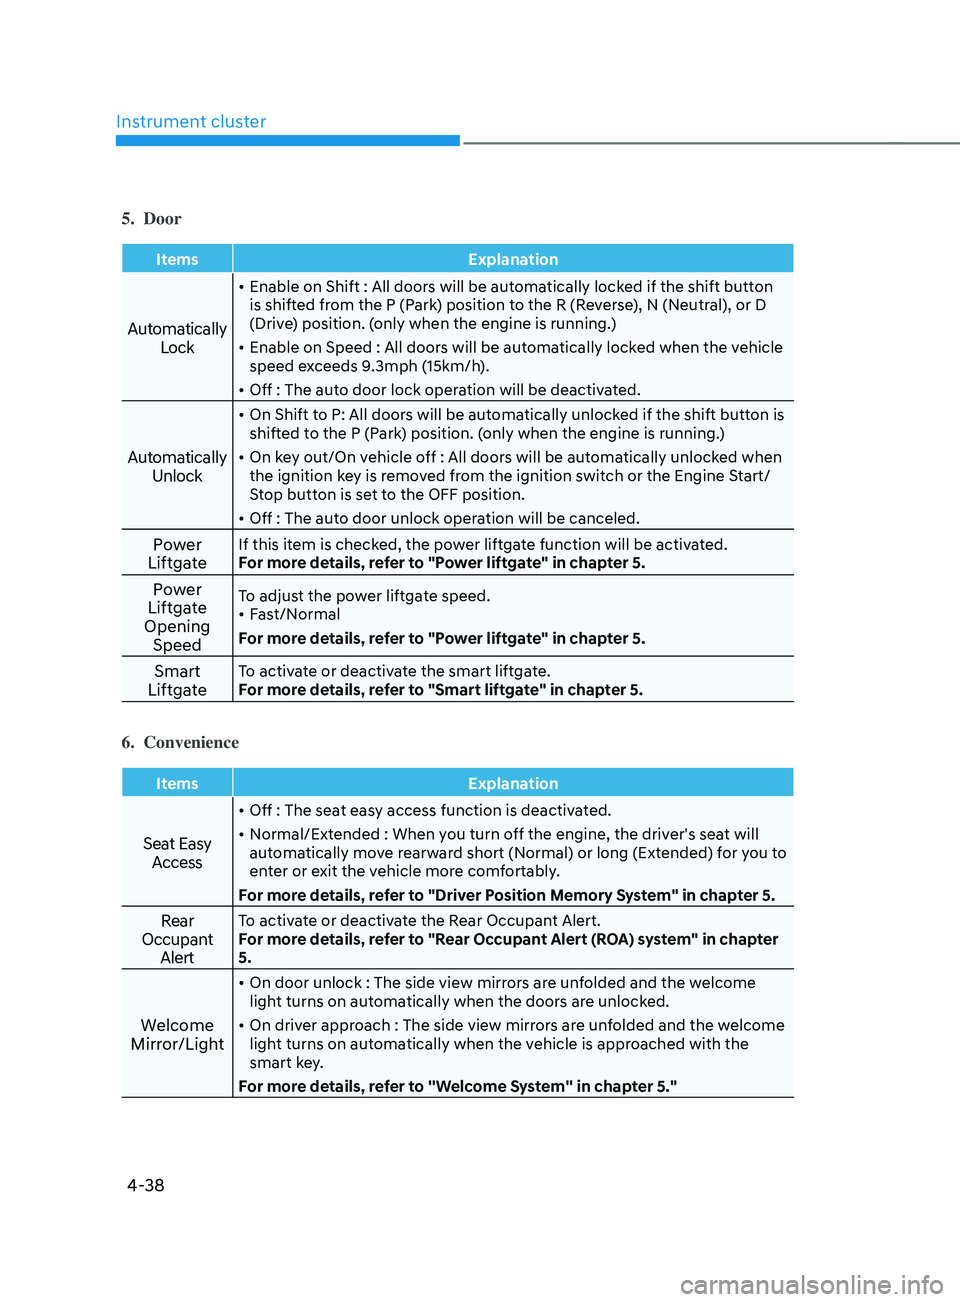
Instrument cluster
4-38
5. Door
ItemsExplanation
Automatically
Lock
• Enable on Shift : All doors will be automatically locked if the shift button
is shifted from the P (Park) position to the R (Reverse), N (Neutral), or D
(Drive) position. (only when the engine is running.)
• Enable on Speed : All doors will be automatically locked when the vehicle
speed exceeds 9.3mph (15km/h).
• Off : The auto door lock operation will be deactivated.
Automatically
Unlock
• On Shift to P: All doors will be automatically unlocked if the shift button is
shifted to the P (Park) position. (only when the engine is running.)
• On key out/On vehicle off : All doors will be automatically unlocked when
the ignition key is removed from the ignition switch or the Engine Start/
Stop button is set to the OFF position.
• Off : The auto door unlock operation will be canceled.
Power
LiftgateIf this item is checked, the power liftgate function will be activated.
For more details, refer to "Power liftgate" in chapter 5.
Power
Liftgate
Opening SpeedTo adjust the power liftgate speed.
• Fast/Normal
For more details, refer to "Power liftgate" in chapter 5.
Smart
LiftgateTo activate or deactivate the smart liftgate.
For more details, refer to "Smart liftgate" in chapter 5.
6. Convenience
Items Explanation
Seat Easy
Access
• Off : The seat easy access function is deactivated.
• Normal/Extended : When you turn off the engine, the driver's seat will
automatically move rearward short (Normal) or long (Extended) for you to
enter or exit the vehicle more comfortably.
For more details, refer to "Driver Position Memory System" in chapter 5.
Rear
Occupant AlertTo activate or deactivate the Rear Occupant Alert.
For more details, refer to "Rear Occupant Alert (ROA) system" in chapter
5.
Welcome
Mirror/Light
• On door unlock : The side view mirrors are unfolded and the welcome
light turns on automatically when the doors are unlocked.
• On driver approach : The side view mirrors are unfolded and the welcome
light turns on automatically when the vehicle is approached with the
smart key.
For more details, refer to ''Welcome System'' in chapter 5."