Page 535 of 636

08
8-17
OTM080033L
6. Loosen the wheel bolts
counterclockwise one turn each in
the order shown above, but do not
remove any wheel bolts until the tire
has been raised off of the ground.
OTM080034L
7. Place the jack at the designa ted
jacking position under the frame
closest to the tire you are changing.
The jacking positions are plates
welded to the frame with two
notches. Never jack at any other
position or part of the vehicle. Doing
so may damage the side seal molding
or other parts of the vehicle.
OTM080035L
8. Insert the jack handle int o the jack
and turn it clockwise, raising the
vehicle until the tire clears the ground.
Make sure the vehicle is stable on the
jack.
9.
Loosen a wheel bolt with the wheel
lug wr
ench and remove it with your
fingers.
Slide the wheel off the studs and lay
it flat so it cannot roll away. To put the
wheel on the hub, pick up the spare
tire, line up the holes with the studs
and slide the wheel onto them. If this
is difficult, tip the wheel slightly and
get the top hole in the wheel lined
up with the top stud. Then jiggle the
wheel back and forth until the wheel
can be slid over the other studs.
Page 536 of 636

Emergency situations
8-18
WARNING
Wheels may have sharp edges. Handle
them carefully to avoid possible severe
injury. Before putting the wheel into
place, be sure that there is nothing on
the hub or wheel (such as mud, tar,
gravel, etc.) that interferes with the
wheel from fitting solidly against the
hub.
If there is, remove it. If there is not
good contact on the mounting surface
between the wheel and hub, the wheel
nuts could come loose and cause the
loss of a wheel. Loss of a wheel may
result in loss of control of the vehicle.
This may cause serious injury or death.
10. To reinstall the wheel, hold it on the
studs, put the wheel nuts on the studs
and tighten them finger tight. The
nuts should be installed with their
tapered small diameter ends directed
inward. Jiggle the tire to be sure it is
completely seated, then tighten the
nuts as much as possible with your
fingers again.
11. Lower the vehicle to the ground
by turning the wheel lug wrench
counterclockwise.
OTM080045L
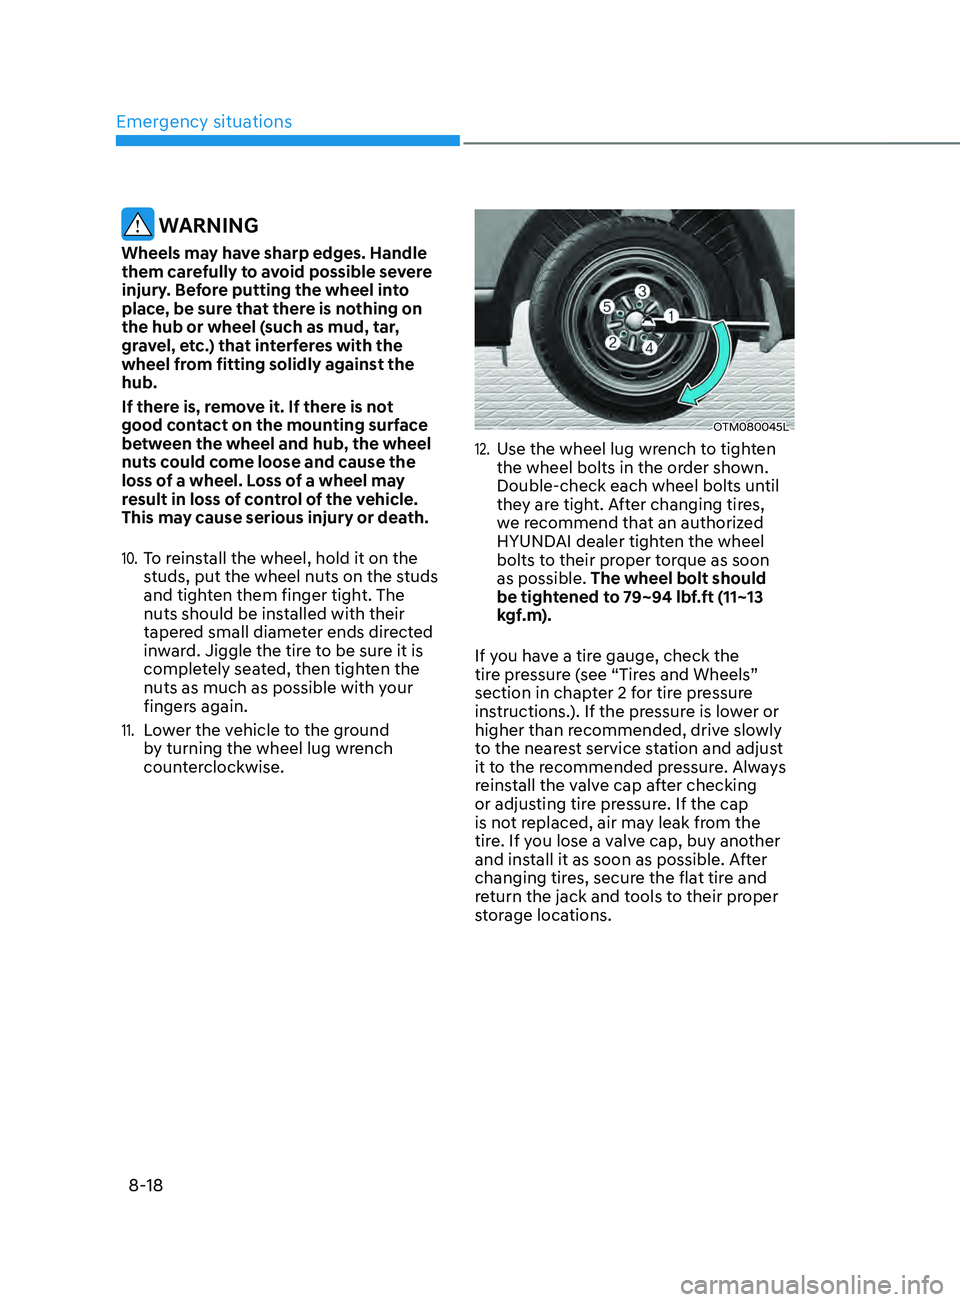
12. Use the wheel lug wrench to tighten
the wheel bolts in the order shown.
Double-check each wheel bolts until
they are tight. After changing tires,
we recommend that an authorized
HYUNDAI dealer tighten the wheel
bolts to their proper torque as soon
as possible. The wheel bolt should
be tightened to 79~94 lbf.ft (11~13
kgf.m).
If you have a tire gauge, check the
tire pressure (see “Tires and Wheels”
section in chapter 2 for tire pressure
instructions.). If the pressure is lower or
higher than recommended, drive slowly
to the nearest service station and adjust
it to the recommended pressure. Always
reinstall the valve cap after checking
or adjusting tire pressure. If the cap
is not replaced, air may leak from the
tire. If you lose a valve cap, buy another
and install it as soon as possible. After
changing tires, secure the flat tire and
return the jack and tools to their proper
storage locations.
Page 537 of 636

08
8-19
NOTICE
Check the tire pressure as soon as
possible after installing a spare tire.
Adjust it to the recommended pressure.
CAUTION
Your vehicle has metric threads on the
studs and wheel bolts. Make certain
during tire changing that the same bolts
that were removed are reinstalled. If
you have to replace your wheel bolts
make sure they have metric threads to
avoid damaging the studs and ensure
the wheel is properly secured to the
hub. We recommend that you consult
an authorized HYUNDAI dealer for
assistance.
WARNING
Wheel studs
If the studs are damaged, they may lose
their ability to retain the wheel. This
could lead to the loss of the wheel and a
collision resulting in serious injuries.
If any of the equipment such as the jack,
wheel bolts, studs, or other equipment
is damaged or in poor condition, do not
attempt to change the tire and call for
assistance.
Use of compact spare tires
(if equipped)
Compact spare tires are designed for
emergency use only. Drive carefully on
the compact spare tire and always follow
the safety precautions.
WARNING
To prevent compact spare tire failure
and loss of control possibly resulting in
an accident:
• Use the compact spare tire only in an
emergency.
• NEVER operate your vehicle over 50
mph (80 km/h).
• Do not exceed the vehicle’s
maximum load rating or the load
carrying capacity shown on the
sidewall of the compact spare tire.
• Do not use the compact spare tire
continuously. Repair or replace the
original tire as soon as possible to
avoid failure of the compact spare
tire.
Page 566 of 636

Maintenance
9-16
ENGINE OIL
Brake discs, pads, calipers and
rotors
Check the pads, the disc, and the rotor
for any excessive wear-out. Inspect
calipers for any fluid leakage.
For more information on checking the
pads or lining wear limit, refer to the
HYUNDAI web site.
(http://service.hyundai-motor.com)
Propeller shaft
Check the propeller shaft, boots, clamps,
rubber couplings and center-bearing
rubber for cracks, deterioration, or
damage. Replace any damaged parts
and if necessary, repack the grease.
Suspension mounting bolts
Check the suspension connections for
looseness or damage. Retighten to the
specified torque.
Steering gear box, linkage &
boots/lower arm ball joint
With the vehicle stopped and the engine
off, check for excessive free-play in the
steering wheel. Check the linkage for
bends or damage. Check the dust boots
and ball joints for deterioration, cracks,
or damage.
Replace any damaged parts.
Drive shafts and boots
Check the drive shafts, boots and clamps
for cracks, deterioration, or damage.
Replace any damaged parts and, if
necessary, repack the grease.
Air conditioning refrigerant
Check the air conditioning lines and
connections for leakage and damage.
Checking the engine oil level
Gasoline engine
1. Follow all of the oil manufacturer’s
precautions.
2.
Be sure the v
ehicle is on the level
ground in P (Park) with the parking
brake set and the wheels blocked.
3.
Turn the engine on and allo
w the
engine to reach normal operating
temperature.
4.
Turn the engine o
ff and wait about 15
minutes for the oil to return to the oil
pan.
5.
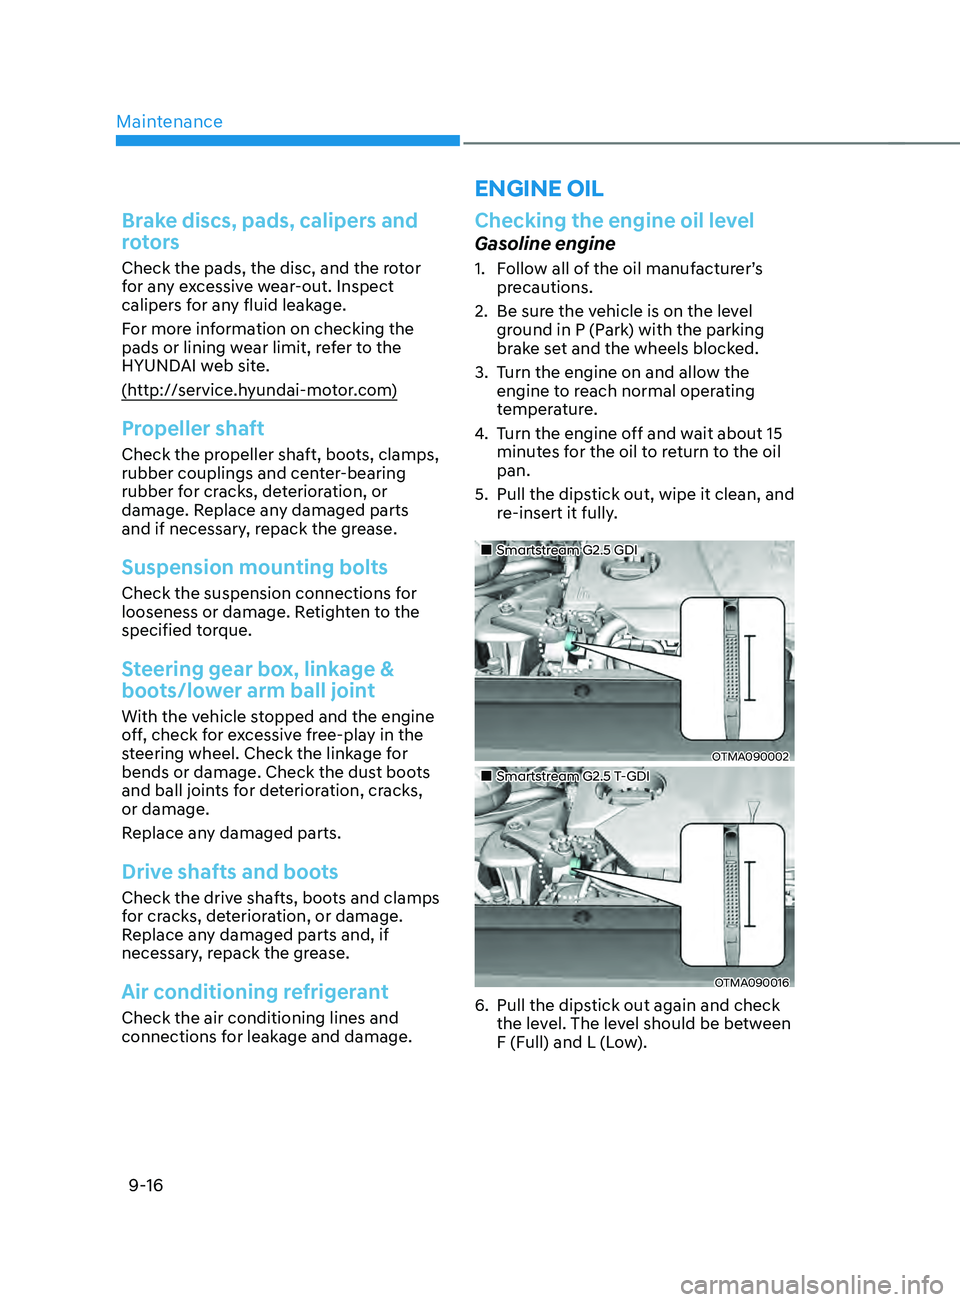
Pull the dipstick out, wipe it clean, and
r
e-insert it fully.
„„Smartstream G2.5 GDI
OTMA090002
„„Smartstream G2.5 T-GDI
OTMA090016
6. Pull the dipstick out again and check
the le vel. The level should be between
F (Full) and L (Low).