Page 7 of 659

Contents
Child Safety P. 64Exhaust Gas Hazard P. 78Safety Labels P. 79
Opening and Closing the Trunk P. 181 Security System P. 184 Windows P. 187
Operating the Switches Around the Steering Wheel P. 191 Mirrors P. 210
Interior Convenience Items P. 223 Climate Control System P. 240
Audio Error Messages P. 328General Information on the Audio System P. 330
Bluetooth ® HandsFreeLink ® P. 375 Refuel Recommend P. 401
When Driving P. 414 Honda Sensing ® P. 455 Braking P. 510 Parki ng Your Vehicle P. 520
Fuel Economy and CO
2 Emissions P. 536 Turbo Engine Vehicle P. 537
Maintenance Under the Hood P. 550 Replacing Light Bulbs P. 566
Checking and Maintaining Tires P. 577 Battery P. 586 Remote Transmitter Care P. 588
Cleaning P. 590 Accessories and Modifications P. 595
Engine Does Not Start P. 605 If the Battery Is Dead P. 608 Shift Lever Does Not Move P. 611
Fuses P. 622 Emergency Towing P. 628 If You Cannot Unlock the Fuel Fill Door P. 629
Refueling P. 632
Devices that Emit Radio Waves P. 639 Reporting Safety Defects P. 640
Authorized Manuals P. 646 Customer Service Information P. 647
Quick Reference GuideP. 6
Safe DrivingP. 33
Instrument PanelP. 81
ControlsP. 165
FeaturesP. 245
DrivingP. 403
MaintenanceP. 539
Handling the UnexpectedP. 597
InformationP. 633
IndexP. 648
Page 9 of 659
7
Quick Reference Guide❚Headlights/Turn Signals (P 194, 195)
❚Fog Lights* (P 197)
❚Paddle Shifter (Shift down)* (P 428, 434)
❚Left Selector Wheel (P 140)
❚ (home) Button (P 140)
❚Adaptive Cruise Control (ACC) with Low
Speed Follow Buttons
(P 473)
❚Wipers/Washers (P 202)
❚Paddle Shifter (Shift up)* (P 428, 434)
❚Lane Keeping Assist System (LKAS) Button
(P 490)
❚Interval Button (P 482, 486)
❚Steering Wheel Adjustments (P 209)
❚Bluetooth® HandsFreeLink ® System Voice Control Buttons (P 375)
❚Audio Remote Controls (P 250)
❚Horn (Press an area around .)
❚ (HUD) Button* (P161 )
❚Heated Steering Wheel* (P 236)
Canadian models
* Not available on all models
Page 21 of 659
19
Quick Reference Guide
Features (P 245)
Audio Remote Controls
(P 250)
●VOL(+/VOL( - (Volume) Buttons
Press to adjust the volume up/down.
●Left Selector Wheel
When selecting the audio mode
Press the (home) button, then roll up
or down to select Audio on the driver
information interface, and then press the
left selector wheel.
/
(Seek/Skip) Buttons
Left Selector
Wheel
VOL
( +/VOL(- (Volume) Buttons
(home) Button
FM
AM
SiriusXM ®*
USB1(USB)
USB2*
Bluetooth ® Audio
Smartphone Connection
(Apple CarPlay/Android Auto)
Roll up or down: To cycle through the
audio modes, roll up or down and then
press the left selector wheel:● / (Seek/Skip) Buttons
Radio: Press / to change the
preset station.
iPod, USB device, Bluetooth® Audio or
Smartphone Connection:
Press / to skip to the
beginning of the next song or
return to the beginning of the
current song.
USB device:
Press and hold / to
change a folder.
* Not available on all models
Page 161 of 659

159
uuGauges and Displays uHead-Up Display*
Continued
Instrument Panel
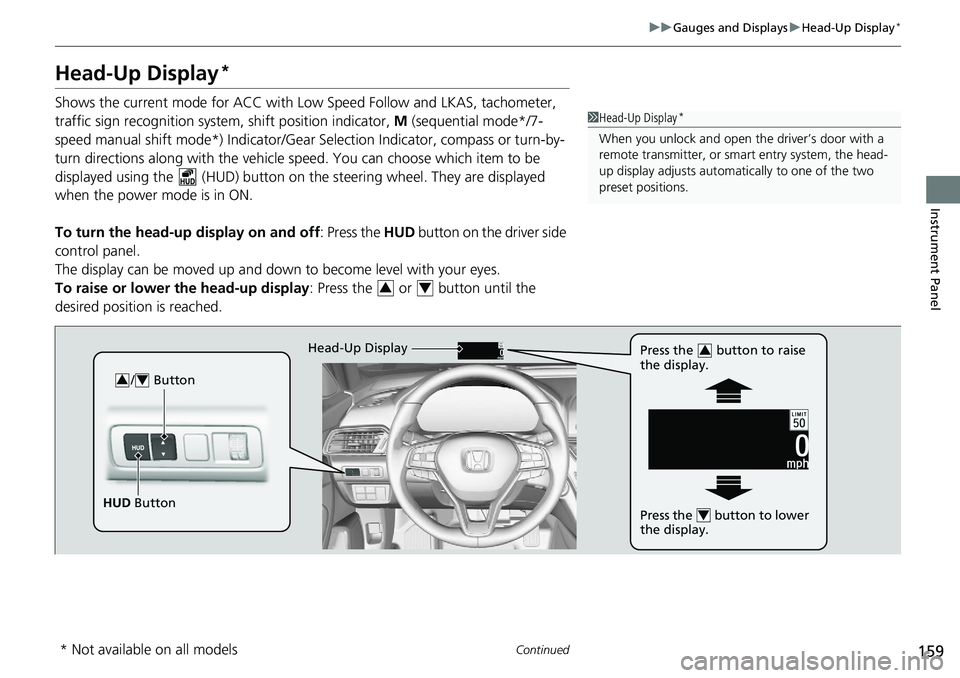
Head-Up Display*
Shows the current mode for ACC with Lo w Speed Follow and LKAS, tachometer,
traffic sign recognition system, shift position indicator, M (sequential mode*/7-
speed manual shift mode*) Indicator/Gear Selection Indicator, compass or turn-by-
turn directions along with the vehicle speed. You can choose which item to be
displayed using the (HUD) button on th e steering wheel. They are displayed
when the power mode is in ON.
To turn the head-up display on and off: Press the HUD button on the driver side
control panel.
The display can be moved up and down to become level with your eyes.
To raise or lower the head-up display : Press the or button until the
desired position is reached.1 Head-Up Display*
When you unlock and open the driver’s door with a
remote transmitter, or smart entry system, the head-
up display adjusts automati cally to one of the two
preset positions.
34
/ Button34
HUD Button Head-Up Display
Press the button to raise
the display.
3
Press the button to lower
the display.4
* Not available on all models
Page 167 of 659

165
Controls
This chapter explains how to operate the various controls necessary for driving.
Clock.................................................. 166
Locking and Unlocking the Doors
Key .................................................. 167
Low Remote Signal Strength ............ 169
Locking/Unlocking the Doors from the Outside .......................................... 170
Locking/Unlocking the Doors from the
Inside ............................................. 177
Childproof Door Locks ..................... 179
Auto Door Locking/Unlocking .......... 180
Opening and Closing the Trunk ....... 181
Security System
Immobilizer System .......................... 184
Security System Alarm ...................... 185
Windows ........................................... 187 Moonroof*........................................ 190
Operating the Switches Around the
Steering Wheel ENGINE START/STOP Button............. 191
Turn Signals ..................................... 194
Light Switches.................................. 195
Fog Lights
*...................................... 197
Daytime Running Lights ................... 198
Auto High-Beam .............................. 199
Wipers and Washers ........................ 202
Rear Defogger/Heat ed Door Mirror
*
Button ........................................... 204 Heated Windshield Button ............... 204
Brightness Control ........................... 205
Driving Position Memory System
*.... 207
Adjusting the Steering Wheel .......... 209
Mirrors Interior Rearview Mirror ................... 210
Power Door Mirrors ......................... 211
Seats .................................................. 212
Interior Convenience Items .............. 223
Climate Control System Using Automatic Climate Control .... 240
Automatic Climate Control Sensors ... 243
Canadian models
* Not available on all models
Page 169 of 659

167Continued
Controls
Locking and Unlocking the Doors
Key
This vehicle comes with the following keys:
Use the key to start and stop the engine, and to lock and unlock all the doors, fuel
fill door and to open the trunk.1 Key
All the keys have an immobilizer system. The
immobilizer system helps to protect against vehicle
theft. 2 Immobilizer System P. 184
Follow the advice below to prevent damage to the
keys:
•Do not leave the keys in direct sunlight, or in
locations with high temperature or high humidity.
•Do not drop the keys or set heavy objects on them.•Keep the keys away from liquids, dust and sand.
•Do not take the keys apart except for replacing the
battery.
If the circuits in the keys are damaged, the engine
may not start, and the remote transmitter may not
work.
If the keys do not work properly, have them
inspected by a dealer.
You can remotely start the engine using the remote.
2 Remote Engine Start
* P. 416
Models with remote engine starter
Models without smart entry systemModels with smart entry system
* Not available on all models
Page 170 of 659
uuLocking and Unlocking the Doors uKey
168
Controls
The built-in key can be used to lock/unlock the
doors or open the trunk when the remote
battery becomes weak and the power door
lock/unlock operation is disabled.
To remove the built-in key, slide the release
knob and then pull out the key. To reinstall
the built-in key, push th e built-in key into the
remote until it clicks.
Contains a number that you will need if you
purchase a replacement key.
■Built-in Key
Built-in Key
Release Knob
■Key Number Tag1
Key Number Tag
Keep the key number tag separate from the key in a
safe place outside of your vehicle.
If you wish to purchase an additional key, contact a
dealer.
If you lose your key and you cannot start the engine,
contact a dealer.
Page 171 of 659

169
uuLocking and Unlocking the Doors uLow Remote Signal Strength
Controls
Low Remote Signal Strength
The vehicle transmits radio waves to locate the remote when locking/unlocking* the
doors, and fuel fill door, opening* the trunk, or to start the engine.
In the following cases, locking/unlocking
* the doors, and fuel fill door, opening* the
trunk, or to start the engine may be inhibited or operation may be unstable:
• Strong radio waves are being transmitted by nearby equipment.
• You are carrying the remote together with telecommunications equipment,
laptop computers, cell phones, or wireless devices.
• A metallic object is touching or covering the remote.
1Low Remote Signal Strength
Communication between the remote and the vehicle
consumes the remote’s battery.
Battery life is about two years, but this varies
depending on re gularity of use.
The battery is consumed whenever the remote is
receiving strong radio waves. Avoid placing it near
electrical appliances such as televisions and personal
computers.
* Not available on all models