Page 163 of 659
161
uuGauges and Displays uHead-Up Display*
Continued
Instrument Panel
Each time you press the (HUD) bu tton on the steering wheel, the head-up
display content will change.
■To Change Head-Up Display Content
Head-Up Display Current Mode for ACC with
Low Speed Follow and the
LKAS, Vehicle Speed, Traffic
Sign Recognition System Vehicle Speed, Traffic
Sign Recognition
System
Tachometer, Shift Position Indicator,
M
(sequential mode
*/7-speed manual
shift mode*) Indicator/Gear Selection
Indicator, Vehicle Speed, Traffic Sign
Recognition System
Traffic Sign
Recognition System,
Vehicle Speed Turn-by-Turn
Directions, Vehicle
Speed, Traffic Sign
Recognition System Compass, Vehicle
Speed, Traffic Sign
Recognition System
(HUD)
Button
* Not available on all models
Page 164 of 659
uuGauges and Displays uHead-Up Display*
162
Instrument Panel
Shows your driving speed in mph or km/h.
Shows the number of engine revolutions as a bar graph.
Shows the current shift position.
2 Shift Position Indicator P. 88
Shows the current mode for the sequential mode*/7-speed manual shift mode*.
Shows the current mode for ACC wi th Low Speed Follow and LKAS.
2Adaptive Cruise Control (ACC) with Low Speed Follow P. 472
2 Lane Keeping Assist System (LKAS) P. 488
■Vehicle Speed
■Tachometer
■Shift Position Indicator
■M (sequential mode*/7-speed manual shift mode*)
Indicator/Gear Selection Indicator
■Current Mode for ACC with Low Speed Follow and LKAS
1 Vehicle Speed
Switch between mph and km/h by using the driver
information interface or cu stomized features on the
audio/information screen. 2 Speed/Distance Units P. 151
2 Customized Features P. 352
* Not available on all models
Page 165 of 659
163
uuGauges and Displays uHead-Up Display*
Instrument Panel
■Compass
Shows the compass screen.
■Turn-by-Turn Directions
When driving guidance is provided by the navigation system, Android Auto or Apple
CarPlay, turn-by-turn directions to your destination appear.
2Refer to the Navigation System Manual
2 Android Auto P. 321
2 Apple CarPlay P. 314
Shows the traffic sign recognition system.
2Traffic Sign Recognition System P. 500
■Navigation
■Traffic Sign Recognition System
1Navigation
You can select whether th e turn-by-turn display
comes on during the route guidance.
2 Customized Features P. 352
Page 168 of 659

166
Controls
Clock
Adjusting the Clock
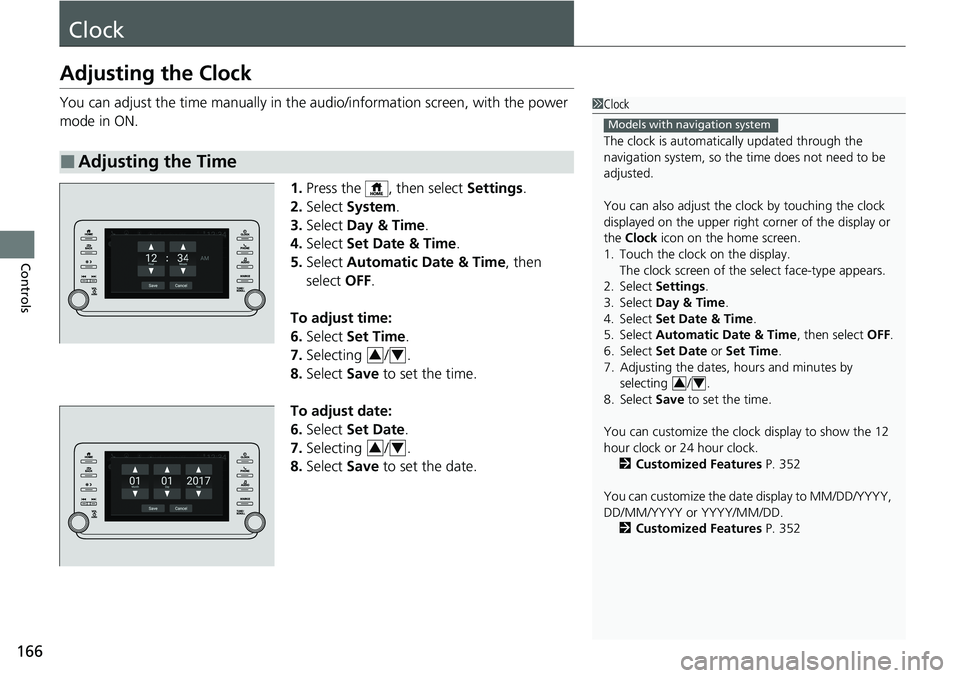
You can adjust the time manually in the audio/information screen, with the power
mode in ON.
1.Press the , then select Settings.
2. Select System .
3. Select Day & Time .
4. Select Set Date & Time .
5. Select Automatic Date & Time , then
select OFF.
To adjust time:
6. Select Set Time .
7. Selecting / .
8. Select Save to set the time.
To adjust date:
6. Select Set Date .
7. Selecting / .
8. Select Save to set the date.
■Adjusting the Time
1Clock
The clock is automatica lly updated through the
navigation system, so the ti me does not need to be
adjusted.
You can also adjust the clock by touching the clock
displayed on the upper right corner of the display or
the Clock icon on the home screen.
1. Touch the clock on the display. The clock screen of the select face-type appears.
2. Select Settings .
3. Select Day & Time .
4. Select Set Date & Time .
5. Select Automatic Date & Time , then select OFF.
6. Select Set Date or Set Time.
7. Adjusting the dates, hours and minutes by selecting / .
8. Select Save to set the time.
You can customize the clock display to show the 12
hour clock or 24 hour clock. 2 Customized Features P. 352
You can customize the date display to MM/DD/YYYY,
DD/MM/YYYY or YYYY/MM/DD. 2 Customized Features P. 352
Models with navigation system
34
34
34
Page 208 of 659
206
uuOperating the Switches Around the Steering Wheel uBrightness Control
Controls
When the head-up display is on, press and
hold the HUD button until its brightness level
indicator on the driver information interface.
To brighten: Press the button.
To dim: Press the button.
The driver information interface will return to
its original state several seconds after you
adjust the brightness.
■Brightness level indicator
The brightness level is shown on the driver
information interface wh ile you are adjusting
it.
■Adjusting the Head-Up Display Brightness*
/ Button34
HUD Button
3
4
* Not available on all models
Page 242 of 659

240
Controls
Climate Control System
Using Automatic Climate Control
The automatic climate control system maintains the interior temperature you select.
The system also selects the proper mix of heated or cooled air that raises or lowers
the interior temperature to your preference as quickly as possible.
Use the system when the engine is running.
1. Press the AUTO button.
2. Adjust the interior temperature using the dr iver’s side or passenger’s side control
dial.
3. Press the (ON/OFF) button to cancel.
■Switching between the recirc ulation and fresh air modes
Press the (recirculation) button and switch the mode depending on
environmental conditions.
Recirculation mode (indicator on): Recirculates air from the vehicle’s interior through
the system.
Fresh air mode (indicator off): Maintains out side ventilation. Keep the system in
fresh air mode in normal situations.
1 Using Automatic Climate Control
If any buttons are presse d while using the climate
control system in auto, the function of the button
that was pressed will take priority.
The AUTO indicator will go off, but functions
unrelated to the button th at was pressed will be
controlled automatically.
During idle-stops, air-conditioning is suspended, and
only the blower remains active.
If you do not want air-cond itioning suspended, press
the Auto Idle Stop OFF button to cancel idle-stop.
To prevent cold air from bl owing in from outside, the
fan may not start i mmediately when the AUTO
button is pressed.
If the interior is very warm, you can cool it down
more rapidly by partial ly opening the windows,
turning the system on auto, and setting the
temperature to low. Change the fresh air mode to
recirculation mode until the temperature cools down.
When you set the temperat ure to the lower or upper
limit, Lo or Hi is displayed.
Pressing the button switches the climate
control system between on and off. When turned on,
the system returns to your last selection.
While ECON mode is active, the climate control
system may have reduced cooling performance.
Models with Auto Idle Stop
All models
Floor and
defroster
vents
Floor vents
Dashboard and floor
vents, and back of
the center console
*
Dashboard vents
and back of the
center console
*
AUTO Button
Driver’s Side
Temperature
Control Dial
(Recirculation)
Button
Fan Control Dial
A/C (Air Conditioning)
Button Passenger’s Side
Temperature
Control Dial
(ON/OFF) Button
* Not available on all models
Page 247 of 659

245
Features
This chapter describes how to operate technology features.
Audio SystemAbout Your Audio System ................ 246
USB Ports ......................................... 247
Audio System Theft Protection ......... 249
Audio Remote Controls .................... 250
Audio System Basic Operation ........ 253
Audio/Information Screen ................ 254
System Updates
*............................. 266
Adjusting the Sound ........................ 272
Display Setup ................................... 273
Voice Control Operation .................. 275
Playing AM/FM Radio ....................... 278
Playing SiriusXM ® Radio
*................. 282
Playing an iPod ................................ 293 Playing a USB Flash Drive ................. 296
Playing
Bluetooth ® Audio................. 299
HondaLink ®..................................... 301
HondaLink ® Service
*........................ 305
Wi-Fi Connection ............................. 310
AT&T Hotspot
*................................ 312
Siri Eyes Free*.................................. 313
Apple CarPlay .................................. 314
Android Auto................................... 321
Audio Error Messages ...................... 328
General Information on the Audio System ............................................. 330
Customized Features ........................ 352
HomeLink ® Universal Transceiver
*..... 372 Bluetooth®
HandsFreeLink® ............. 375
Refuel Recommend .............................. 401
* Not available on all models
Page 249 of 659

247
uuAudio System uUSB Ports
Continued
Features
USB Ports
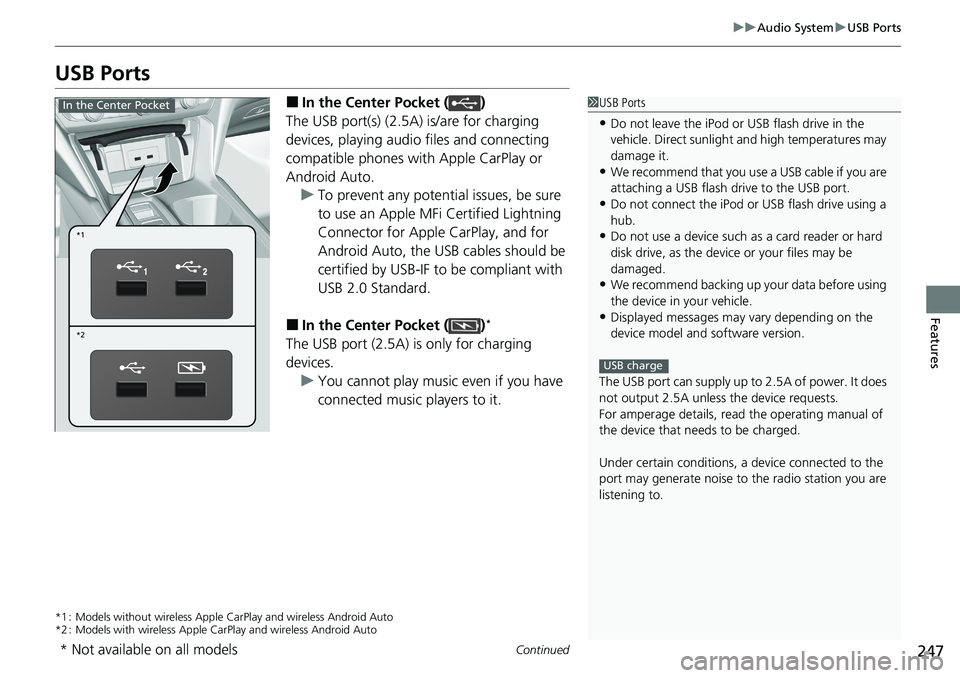
■In the Center Pocket ( )
The USB port(s) (2.5A) is/are for charging
devices, playing audio files and connecting
compatible phones with Apple CarPlay or
Android Auto. u To prevent any potenti al issues, be sure
to use an Apple MFi Certified Lightning
Connector for Apple CarPlay, and for
Android Auto, the USB cables should be
certified by USB-IF to be compliant with
USB 2.0 Standard.
■In the Center Pocket ( )*
The USB port (2.5A) is only for charging
devices. u You cannot play music even if you have
connected music players to it.
*1 : Models without wireless Apple Ca rPlay and wireless Android Auto
*2 : Models with wireless Apple CarPlay and wireless Android Auto
1USB Ports
•Do not leave the iPod or USB flash drive in the
vehicle. Direct sunlight and high temperatures may
damage it.
•We recommend that you us e a USB cable if you are
attaching a USB flash drive to the USB port.
•Do not connect the iPod or USB flash drive using a
hub.
•Do not use a device such as a card reader or hard
disk drive, as the device or your files may be
damaged.
•We recommend backing up yo ur data before using
the device in your vehicle.
•Displayed messages may vary depending on the
device model and software version.
The USB port can supply up to 2.5A of power. It does
not output 2.5A unless the device requests.
For amperage details, read the operating manual of
the device that ne eds to be charged.
Under certain condi tions, a device connected to the
port may generate noise to the radio station you are
listening to.
USB charge
*1
*2
In the Center Pocket
* Not available on all models