2021 FORD F650/750 change
[x] Cancel search: changePage 266 of 390
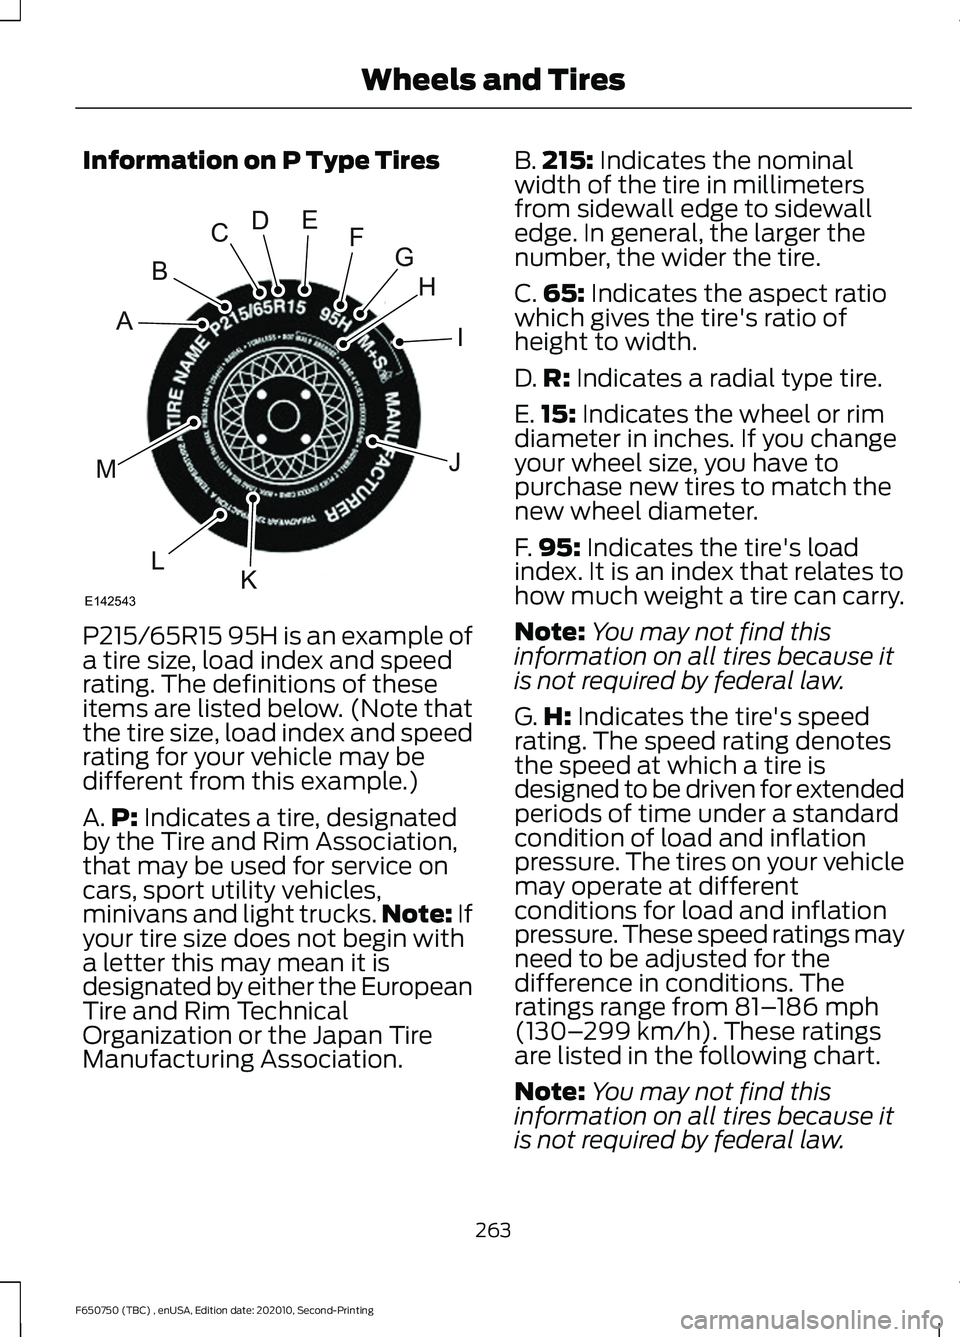
Information on P Type Tires
P215/65R15 95H is an example of
a tire size, load index and speed
rating. The definitions of these
items are listed below. (Note that
the tire size, load index and speed
rating for your vehicle may be
different from this example.)
A.
P: Indicates a tire, designated
by the Tire and Rim Association,
that may be used for service on
cars, sport utility vehicles,
minivans and light trucks. Note:
If
your tire size does not begin with
a letter this may mean it is
designated by either the European
Tire and Rim Technical
Organization or the Japan Tire
Manufacturing Association. B.
215:
Indicates the nominal
width of the tire in millimeters
from sidewall edge to sidewall
edge. In general, the larger the
number, the wider the tire.
C. 65:
Indicates the aspect ratio
which gives the tire's ratio of
height to width.
D. R:
Indicates a radial type tire.
E. 15:
Indicates the wheel or rim
diameter in inches. If you change
your wheel size, you have to
purchase new tires to match the
new wheel diameter.
F. 95:
Indicates the tire's load
index. It is an index that relates to
how much weight a tire can carry.
Note: You may not find this
information on all tires because it
is not required by federal law.
G. H:
Indicates the tire's speed
rating. The speed rating denotes
the speed at which a tire is
designed to be driven for extended
periods of time under a standard
condition of load and inflation
pressure. The tires on your vehicle
may operate at different
conditions for load and inflation
pressure. These speed ratings may
need to be adjusted for the
difference in conditions. The
ratings range from
81– 186 mph
(130– 299 km/h). These ratings
are listed in the following chart.
Note: You may not find this
information on all tires because it
is not required by federal law.
263
F650750 (TBC) , enUSA, Edition date: 202010, Second-Printing Wheels and TiresH
I
J
KL
M
A
B
CDEFG
E142543
Page 270 of 390
C.
80: Indicates the aspect ratio
which gives the tire's ratio of
height to width. Numbers of 70 or
lower indicate a short sidewall.
D. D:
Indicates a diagonal type tire.
R:
Indicates a radial type tire.
E. 16:
Indicates the wheel or rim
diameter in inches. If you change
your wheel size, you have to
purchase new tires to match the
new wheel diameter.
Inflating Your Tires
Safe operation of your vehicle
requires that your tires are
properly inflated. Remember that
a tire can lose up to half of its air
pressure without appearing flat.
Every day before you drive, check
your tires. If one looks lower than
the others, use a tire gauge to
check pressure of all tires and
adjust if required.
At least once a month and before
long trips, inspect each tire and
check the tire pressure with a tire
gauge (including spare, if
equipped). Inflate all tires to the
inflation pressure recommended
by Ford Motor Company.
You are strongly urged to buy a
reliable tire pressure gauge, as
automatic service station gauges
may be inaccurate. Ford
recommends the use of a digital
or dial-type tire pressure gauge
rather than a stick-type tire
pressure gauge. Use the recommended cold
inflation pressure for optimum tire
performance and wear.
Under-inflation or over-inflation
may cause uneven treadwear
patterns
WARNING: Under-inflation
is the most common cause of
tire failures and may result in
severe tire cracking, tread
separation or blowout, with
unexpected loss of vehicle
control and increased risk of
injury. Under-inflation increases
sidewall flexing and rolling
resistance, resulting in heat
buildup and internal damage to
the tire. It also may result in
unnecessary tire stress, irregular
wear, loss of vehicle control and
accidents. A tire can lose up to
half of its air pressure and not
appear to be flat!
Always inflate your tires to the
Ford recommended inflation
pressure even if it is less than the
maximum inflation pressure
information found on the tire. The
Ford recommended tire inflation
pressure is found on the Safety
Compliance Certification Label or
Tire Label. Failure to follow the tire
pressure recommendations can
cause uneven treadwear patterns
and adversely affect the way your
vehicle handles.
267
F650750 (TBC) , enUSA, Edition date: 202010, Second-Printing Wheels and Tires
Page 271 of 390
Maximum Inflation Pressure is
the tire manufacturer's maximum
permissible pressure and the
pressure at which the maximum
load can be carried by the tire. This
pressure is normally higher than
the manufacturer ’s recommended
cold inflation pressure which can
be found on the Safety
Compliance Certification Label or
Tire Label. The cold inflation
pressure should never be set lower
than the recommended pressure
on the Safety Compliance
Certification Label or Tire Label.
When weather temperature
changes occur, tire inflation
pressures also change. A 10°F
(6°C) temperature drop can
cause a corresponding drop of
1 psi (7 kPa)
in inflation pressure.
Check your tire pressures
frequently and adjust them to the
proper pressure which can be
found on the Safety Compliance
Certification Label or Tire Label.
To check the pressure in your
tire(s):
1. Make sure the tires are cool, meaning they are not hot from
driving even a mile. Note:
If you are checking tire
pressure when the tire is hot, for
example, driven more than
1 mi
(1.6 km), never bleed or reduce air
pressure. The tires are hot from
driving and it is normal for
pressures to increase above
recommended cold pressures. A
hot tire at or below recommended
cold inflation pressure could be
significantly under-inflated.
Note: If you have to drive a
distance to get air for your tire(s),
check and record the tire pressure
first and add the appropriate air
pressure when you get to the
pump. It is normal for tires to heat
up and the air pressure inside to go
up as you drive.
2. Remove the cap from the valve
on one tire, then firmly press
the tire gauge onto the valve
and measure the pressure.
3. Add enough air to reach the
recommended air pressure.
Note: If you overfill the tire, release
air by pressing on the metal stem
in the center of the valve. Then
recheck the pressure with your tire
gauge.
4. Replace the valve cap.
5. Repeat this procedure for each
tire, including the spare.
268
F650750 (TBC) , enUSA, Edition date: 202010, Second-Printing Wheels and Tires
Page 280 of 390
Sometimes irregular tire wear can
be corrected by rotating the tires.
USING SNOW CHAINS
WARNING: Snow tires must be the
same size, load index, and speed rating
as those originally provided by Ford. Use
of any tire or wheel not recommended
by Ford can affect the safety and
performance of your vehicle, which could
result in an increased risk of loss of
vehicle control, vehicle rollover, personal
injury, and death. Additionally, the use
of non-recommended tires and wheels
could cause steering, suspension, axle,
transfer case, or power transfer unit
failure. It is also strongly advised to
follow the Ford recommended tire
inflation pressure found on the Safety
Compliance Certification Label (affixed
to either the door hinge pillar, door-latch
post, or the door edge that meets the
door-latch post, next to the driver ’s
seating position), or Tire Label which is
located on the B-Pillar or the edge of the
driver door. Failure to follow the tire
pressure recommendations can cause
uneven treadwear patterns and
adversely affect the way your vehicle
handles.
The tires on your vehicle have all-weather
treads to provide traction in rain and snow.
However, in some climates, you may need
to use snow tires and cables. If you need
to use cables, it is recommended that steel
wheels (of the same size and
specifications) be used, as cables may chip
aluminum wheels.
Note: The suspension insulation and
bumpers help prevent vehicle damage. Do
not remove these components from your
vehicle when using snow tires and chains. Follow these guidelines when using snow
tires and chains:
•
If possible, avoid fully loading your
vehicle.
• Use only SAE Class S chains.
• Install chains securely, verifying that
the chains do not touch any wiring,
brake lines or fuel lines.
• Drive cautiously. If you hear the chains
rub or bang against your vehicle, stop
and retighten the chains. If this does
not work, remove the chains to prevent
damage to your vehicle.
• Remove the tire chains when they are
no longer needed. Do not use tire
chains on dry roads.
If you have any questions regarding snow
chains or cables, please contact your
authorized dealer.
CHANGING A ROAD WHEEL
If you get a flat tire while driving, do not
apply the brake heavily. Instead, gradually
decrease your speed. Hold the steering
wheel firmly and slowly move to a safe
place on the side of the road.
Tire Change Procedure WARNING:
Do not work on your
vehicle when the jack is the only support
as your vehicle could slip off the jack.
Failure to follow this instruction could
result in personal injury or death.
277
F650750 (TBC) , enUSA, Edition date: 202010, Second-Printing Wheels and Tires
Page 281 of 390

WARNING: To help prevent your
vehicle from moving when changing a
wheel, shift the transmission into park
(P), set the parking brake and use an
appropriate block or wheel chock to
secure the wheel diagonally opposite to
the wheel being changed. For example,
when changing the front left wheel,
place an appropriate block or wheel
chock on the right rear wheel. WARNING:
Do not get under a
vehicle that is supported by a jack. WARNING:
Do not attempt to
change a tire on the side of the vehicle
close to moving traffic. Pull far enough
off the road to avoid the danger of being
hit when operating the jack or changing
the wheel.
Note: Passengers should not remain in the
vehicle when the vehicle is being jacked.
Park on a level surface, set the parking
brake and activate the hazard flashers. 1.
Turn the engine off and block the wheel
that is diagonally opposite of the flat
tire using a wheel chock. 2. Loosen each wheel lug nut ½ turn
counterclockwise, but do not remove
them until the wheel is raised off the
ground.
3. Replace the flat tire with the spare tire,
making sure the valve stem is facing
outward on all front and inboard rear
wheels. If you are replacing the
outboard wheel, the valve stem must
be facing inward. Reinstall the lug nuts
until the wheel is snug against the hub.
Do not fully tighten the lug nuts until
the wheel has been lowered.
4. Lower the wheel and fully tighten the lug nuts in the order shown below. See
Technical Specifications (page 279).
5. Unblock the wheels. 8-lug nut torque sequence.
10-lug nut torque sequence.
278
F650750 (TBC) , enUSA, Edition date: 202010, Second-Printing Wheels and TiresE142551 E161441
13
4
27
6
5
8 1
2
3
4
5
6
7 8
9
10
E169375
Page 292 of 390
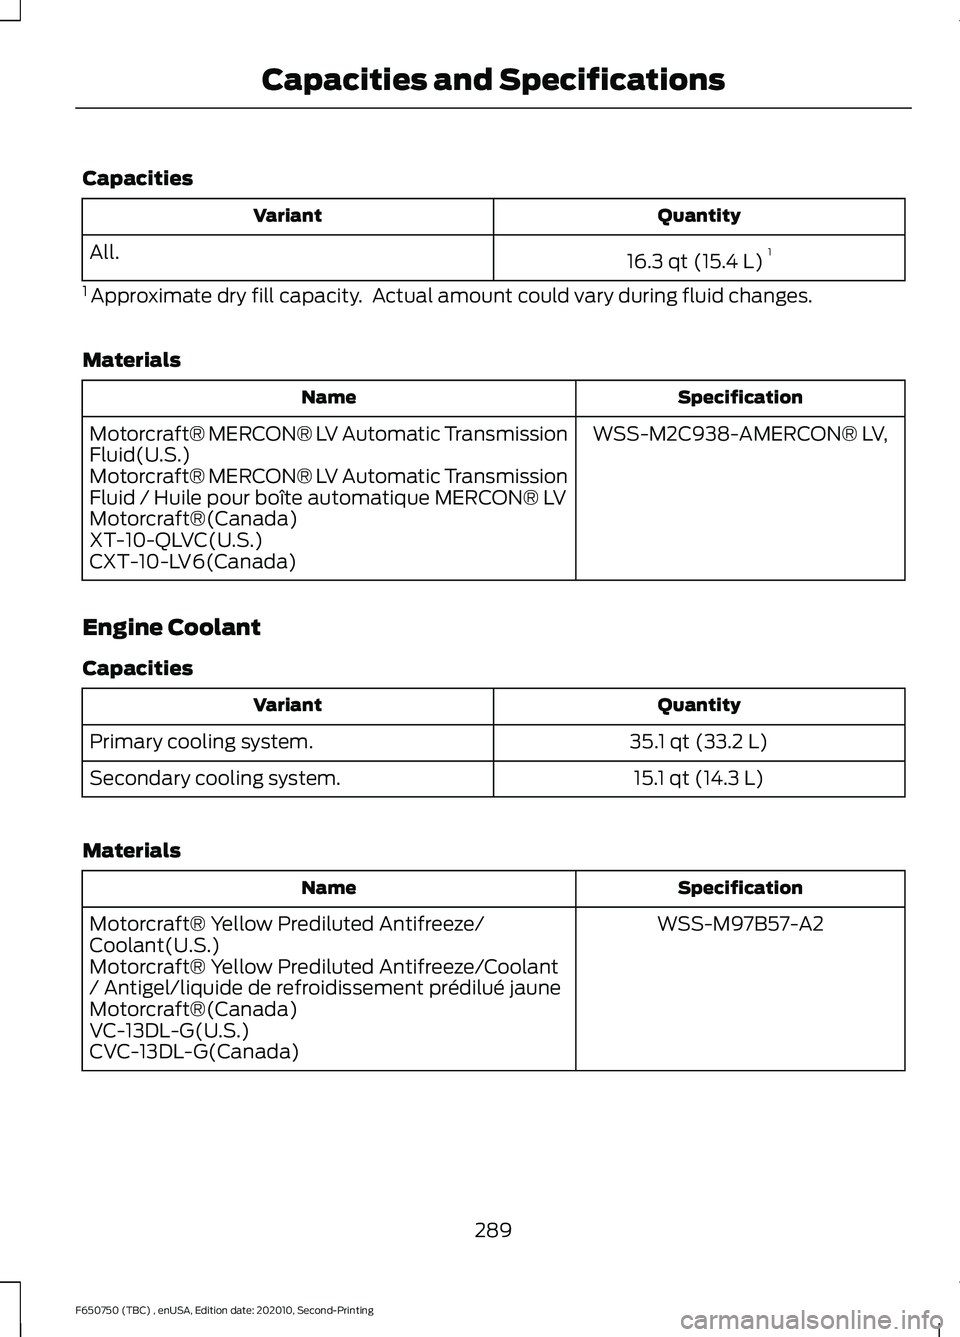
Capacities
Quantity
Variant
16.3 qt (15.4 L)1
All.
1 Approximate dry fill capacity. Actual amount could vary during fluid changes.
Materials Specification
Name
WSS-M2C938-AMERCON® LV,
Motorcraft® MERCON® LV Automatic Transmission
Fluid(U.S.)
Motorcraft® MERCON® LV Automatic Transmission
Fluid / Huile pour boîte automatique MERCON® LV
Motorcraft®(Canada)
XT-10-QLVC(U.S.)
CXT-10-LV6(Canada)
Engine Coolant
Capacities Quantity
Variant
35.1 qt (33.2 L)
Primary cooling system.
15.1 qt (14.3 L)
Secondary cooling system.
Materials Specification
Name
WSS-M97B57-A2
Motorcraft® Yellow Prediluted Antifreeze/
Coolant(U.S.)
Motorcraft® Yellow Prediluted Antifreeze/Coolant
/ Antigel/liquide de refroidissement prédilué jaune
Motorcraft®(Canada)
VC-13DL-G(U.S.)
CVC-13DL-G(Canada)
289
F650750 (TBC) , enUSA, Edition date: 202010, Second-Printing Capacities and Specifications
Page 301 of 390
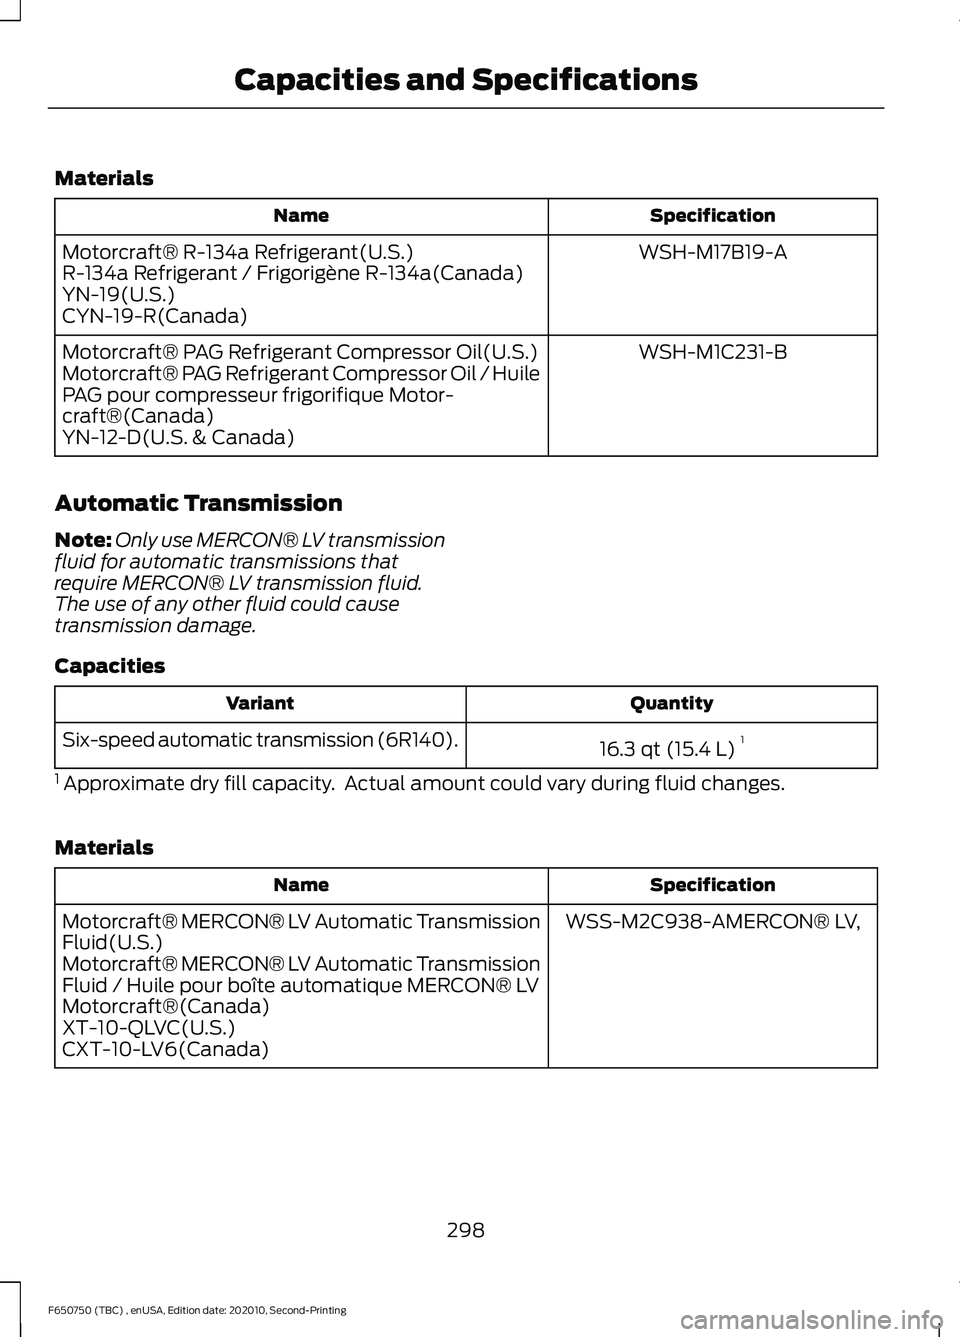
Materials
Specification
Name
WSH-M17B19-A
Motorcraft® R-134a Refrigerant(U.S.)
R-134a Refrigerant / Frigorigène R-134a(Canada)
YN-19(U.S.)
CYN-19-R(Canada)
WSH-M1C231-B
Motorcraft® PAG Refrigerant Compressor Oil(U.S.)
Motorcraft® PAG Refrigerant Compressor Oil / Huile
PAG pour compresseur frigorifique Motor-
craft®(Canada)
YN-12-D(U.S. & Canada)
Automatic Transmission
Note: Only use MERCON® LV transmission
fluid for automatic transmissions that
require MERCON® LV transmission fluid.
The use of any other fluid could cause
transmission damage.
Capacities Quantity
Variant
16.3 qt (15.4 L)1
Six-speed automatic transmission (6R140).
1 Approximate dry fill capacity. Actual amount could vary during fluid changes.
Materials Specification
Name
WSS-M2C938-AMERCON® LV,
Motorcraft® MERCON® LV Automatic Transmission
Fluid(U.S.)
Motorcraft® MERCON® LV Automatic Transmission
Fluid / Huile pour boîte automatique MERCON® LV
Motorcraft®(Canada)
XT-10-QLVC(U.S.)
CXT-10-LV6(Canada)
298
F650750 (TBC) , enUSA, Edition date: 202010, Second-Printing Capacities and Specifications
Page 309 of 390
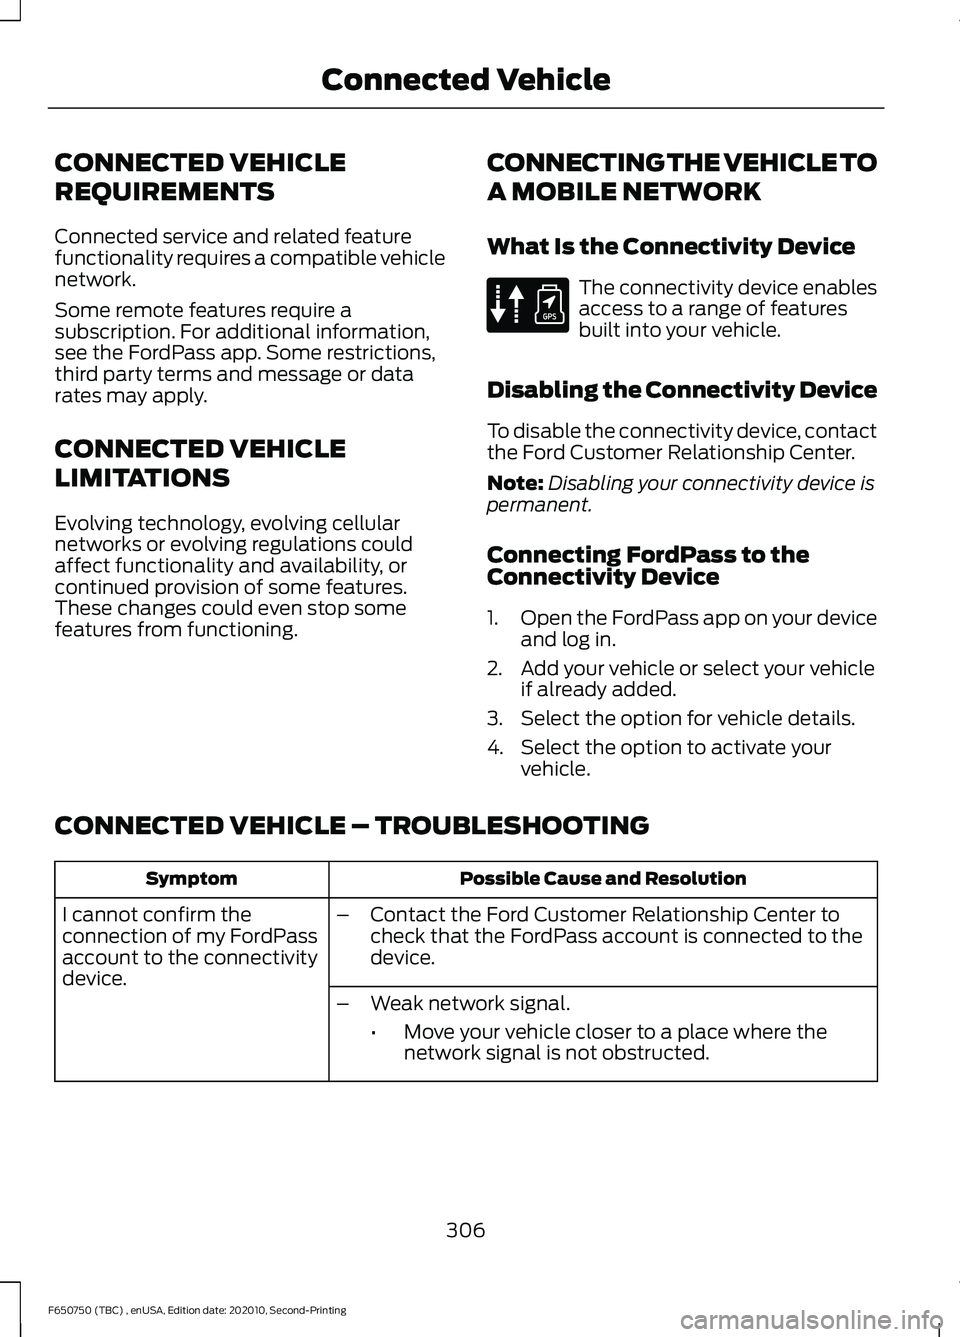
CONNECTED VEHICLE
REQUIREMENTS
Connected service and related feature
functionality requires a compatible vehicle
network.
Some remote features require a
subscription. For additional information,
see the FordPass app. Some restrictions,
third party terms and message or data
rates may apply.
CONNECTED VEHICLE
LIMITATIONS
Evolving technology, evolving cellular
networks or evolving regulations could
affect functionality and availability, or
continued provision of some features.
These changes could even stop some
features from functioning.
CONNECTING THE VEHICLE TO
A MOBILE NETWORK
What Is the Connectivity Device The connectivity device enables
access to a range of features
built into your vehicle.
Disabling the Connectivity Device
To disable the connectivity device, contact
the Ford Customer Relationship Center.
Note: Disabling your connectivity device is
permanent.
Connecting FordPass to the
Connectivity Device
1. Open the FordPass app on your device
and log in.
2. Add your vehicle or select your vehicle if already added.
3. Select the option for vehicle details.
4. Select the option to activate your vehicle.
CONNECTED VEHICLE – TROUBLESHOOTING Possible Cause and Resolution
Symptom
I cannot confirm the
connection of my FordPass
account to the connectivity
device. –
Contact the Ford Customer Relationship Center to
check that the FordPass account is connected to the
device.
– Weak network signal.
•Move your vehicle closer to a place where the
network signal is not obstructed.
306
F650750 (TBC) , enUSA, Edition date: 202010, Second-Printing Connected VehicleE314755