2021 FORD F650/750 hood open
[x] Cancel search: hood openPage 220 of 390
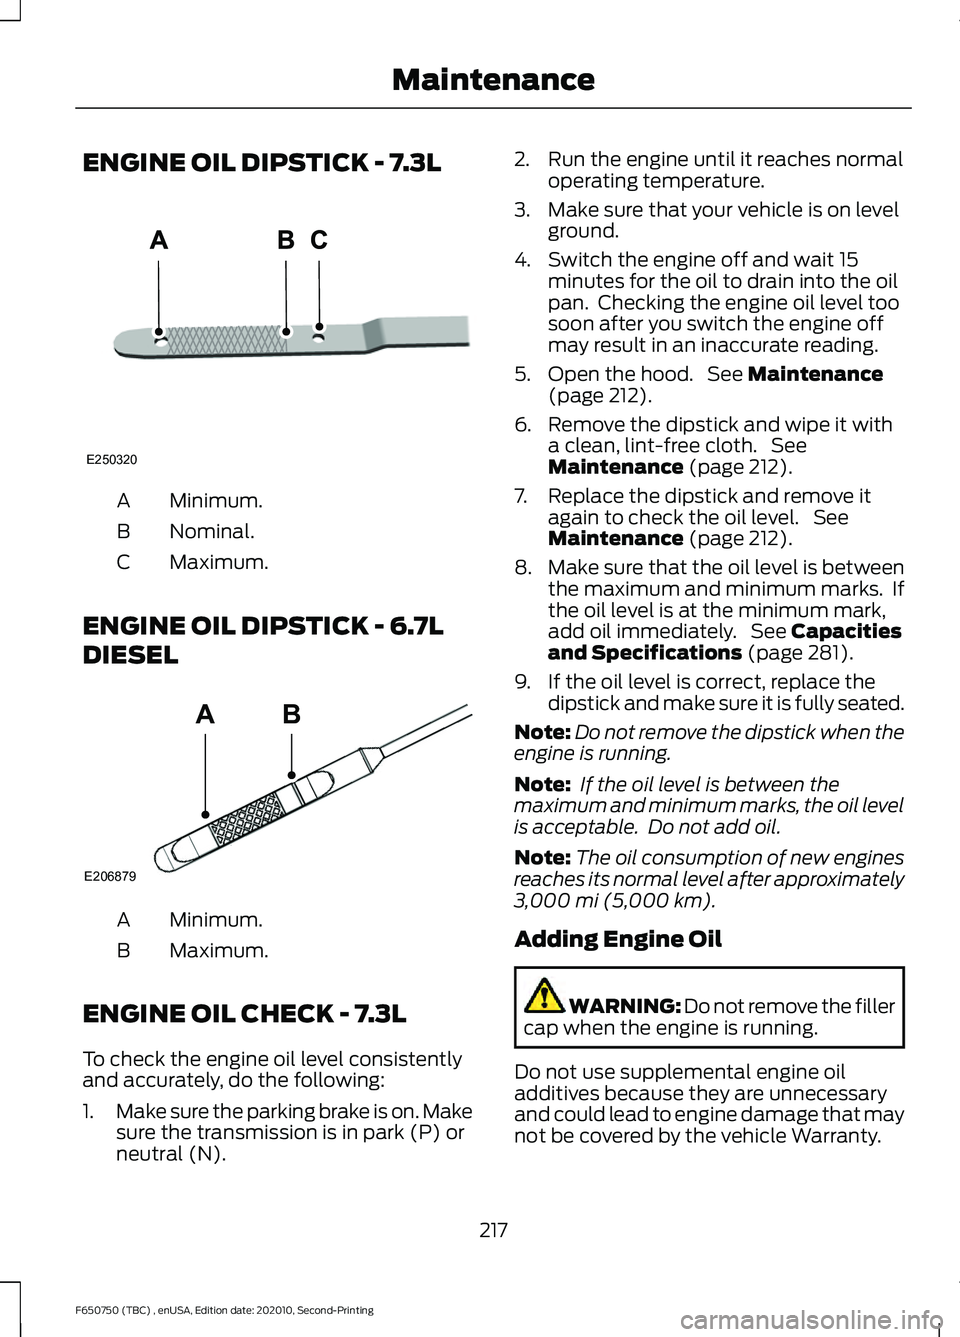
ENGINE OIL DIPSTICK - 7.3L
Minimum.
A
Nominal.
B
Maximum.
C
ENGINE OIL DIPSTICK - 6.7L
DIESEL Minimum.
A
Maximum.
B
ENGINE OIL CHECK - 7.3L
To check the engine oil level consistently
and accurately, do the following:
1. Make sure the parking brake is on. Make
sure the transmission is in park (P) or
neutral (N). 2. Run the engine until it reaches normal
operating temperature.
3. Make sure that your vehicle is on level ground.
4. Switch the engine off and wait 15 minutes for the oil to drain into the oil
pan. Checking the engine oil level too
soon after you switch the engine off
may result in an inaccurate reading.
5. Open the hood. See Maintenance
(page 212).
6. Remove the dipstick and wipe it with a clean, lint-free cloth. See
Maintenance
(page 212).
7. Replace the dipstick and remove it again to check the oil level. See
Maintenance
(page 212).
8. Make sure that the oil level is between
the maximum and minimum marks. If
the oil level is at the minimum mark,
add oil immediately. See
Capacities
and Specifications (page 281).
9. If the oil level is correct, replace the dipstick and make sure it is fully seated.
Note: Do not remove the dipstick when the
engine is running.
Note: If the oil level is between the
maximum and minimum marks, the oil level
is acceptable. Do not add oil.
Note: The oil consumption of new engines
reaches its normal level after approximately
3,000 mi (5,000 km)
.
Adding Engine Oil WARNING: Do not remove the filler
cap when the engine is running.
Do not use supplemental engine oil
additives because they are unnecessary
and could lead to engine damage that may
not be covered by the vehicle Warranty.
217
F650750 (TBC) , enUSA, Edition date: 202010, Second-Printing MaintenanceE250320 E206879
AB
Page 221 of 390
Only use oils certified for gasoline engines
by the American Petroleum Institute (API).
An oil with this trademark symbol
conforms to the current engine and
emission system protection standards and
fuel economy requirements of the
International Lubricants Specification
Advisory Committee (ILSAC).
To top up the engine oil level do the
following:
1. Clean the area surrounding the engine
oil filler cap before you remove it.
2. Remove the engine oil filler cap.
3. Add engine oil that meets the correct specification.
4. Recheck the oil level.
5. If the oil level is correct, replace the dipstick and make sure it is fully seated.
6. Replace the engine oil filler cap. Turn it clockwise until you feel a strong
resistance.
Note: Do not add oil further than the
maximum mark. Oil levels above the
maximum mark may cause engine damage.
Note: Make sure you install the oil filler cap
correctly.
Note: Soak up any spillage with an
absorbent cloth immediately. ENGINE OIL CHECK - 6.7L
DIESEL
To check the engine oil level consistently
and accurately, do the following:
1.
Make sure the parking brake is on. Make
sure the transmission is in park (P) or
neutral (N).
2. Run engine until it reaches normal operating temperature.
3. Make sure that your vehicle is on level ground.
4. Switch the engine off and wait 15 minutes for the oil to drain into the oil
pan. Checking the engine oil level too
soon after you switch the engine off
may result in an inaccurate reading.
5. Open the hood. See Opening and
Closing the Hood (page 213).
6. Remove the dipstick and wipe it with a clean, lint-free cloth. See
Under
Hood Overview (page 215).
7. Replace the dipstick and remove it again to check the oil level. See
Engine Oil Dipstick
(page 217).
8. Make sure that the oil level is between
the maximum and minimum marks. If
the oil level is at the minimum mark,
add oil immediately. See
Capacities
and Specifications (page 288).
9. If the oil level is correct, replace the dipstick and make sure it is fully seated.
Note: Do not remove the dipstick when the
engine is running.
Note: If the oil level is between the
maximum and minimum marks, the oil level
is acceptable. Do not add oil.
Note: The oil consumption of new engines
reaches its normal level after approximately
3,000 mi (5,000 km)
.
218
F650750 (TBC) , enUSA, Edition date: 202010, Second-Printing MaintenanceE142732
Page 222 of 390
Adding Engine Oil
WARNING: Do not remove the filler
cap when the engine is running.
Do not use supplemental engine oil
additives because they are unnecessary
and could lead to engine damage that may
not be covered by the vehicle Warranty.
To top up the engine oil level do the
following:
1. Clean the area surrounding the engine oil filler cap before you remove it.
2. Remove the engine oil filler cap. See Under Hood Overview (page 215).
Turn it counterclockwise and remove
it.
3. Add engine oil of the proper viscosity and grade that meets Ford
specifications. See
Capacities and
Specifications (page 288). You may
have to use a funnel to pour the engine
oil into the opening.
4. Recheck the oil level.
5. If the oil level is correct, replace the dipstick and make sure it is fully seated.
6. Replace the engine oil filler cap. Turn it clockwise until you feel a strong
resistance.
Note: Do not add oil further than the
maximum mark. Oil levels above the
maximum mark may cause engine damage.
Note: Make sure you install the oil filler cap
correctly.
Note: Soak up any spillage with an
absorbent cloth immediately. Engine lubrication for severe
service operation
The following conditions define severe
operation for which engine operation with
SAE 5W-40 oil which meets Ford
specification, WSS-M2C171-F1, is
recommended. Oil and oil filter change
intervals will be determined by the
Intelligent Oil Life Monitor™ as noted
previously.
CHANGING THE ENGINE OIL
AND OIL FILTER
WARNING: Do not handle a hot oil
filter with bare hands. WARNING:
Continuous contact
with used motor oil has caused cancer
in laboratory mice. Protect your skin by
washing with soap and water.
If your vehicle is equipped with a diesel
engine, an Intelligent Oil Life Monitor™
calculates the proper oil change service
interval. When the information display
indicates: OIL CHANGE REQUIRED, change
the engine oil and oil filter. See
Information Displays
(page 70).
The engine oil filter protects your engine
by filtering harmful, abrasive or sludge
particles and particles significantly smaller
than most available will-fit filters. See
Motorcraft Parts
(page 283).
1. Unscrew the oil filter and oil pan drain plug and wait for the oil to drain.
2. Replace the filter.
3. Reinstall the oil pan drain plug.
4. Refill the engine with new oil. See Capacities and Specifications (page
288
).
219
F650750 (TBC) , enUSA, Edition date: 202010, Second-Printing Maintenance
Page 224 of 390
From the main menu scroll to:
Action and Description
Message
Press the down arrow
button, then from this menu
scroll to the following
message.
Truck Info
Press the OK button.
Mainten-
ance
Monitor
Press the down arrow
button, then from this menu
scroll to the following
message.
Oil Life:
xxx%
Press the
OK button.
Oil Life
Press and hold the
OK
button until the instrument
cluster displays the
following message.
Oil Life
Hold OK to
Reset
Oil Life: 100%
When the oil change indic-
ator resets, the instrument
cluster displays 100%.
Repeat the process if the oil
change indicator does not
reset.
CHANGING THE ENGINE AIR
FILTER - 6.7L DIESEL
Air Filter Restriction Gauge WARNING:
To reduce the risk of
vehicle damage and personal burn
injuries, do not start your engine with the
air cleaner removed and do not remove
it while the engine is running. Note:
Operating your vehicle in heavy
snowfall or extreme rain conditions may
allow excessive amounts of snow or water
into the air intake system. This could plug
or soak the air filter and cause the engine to
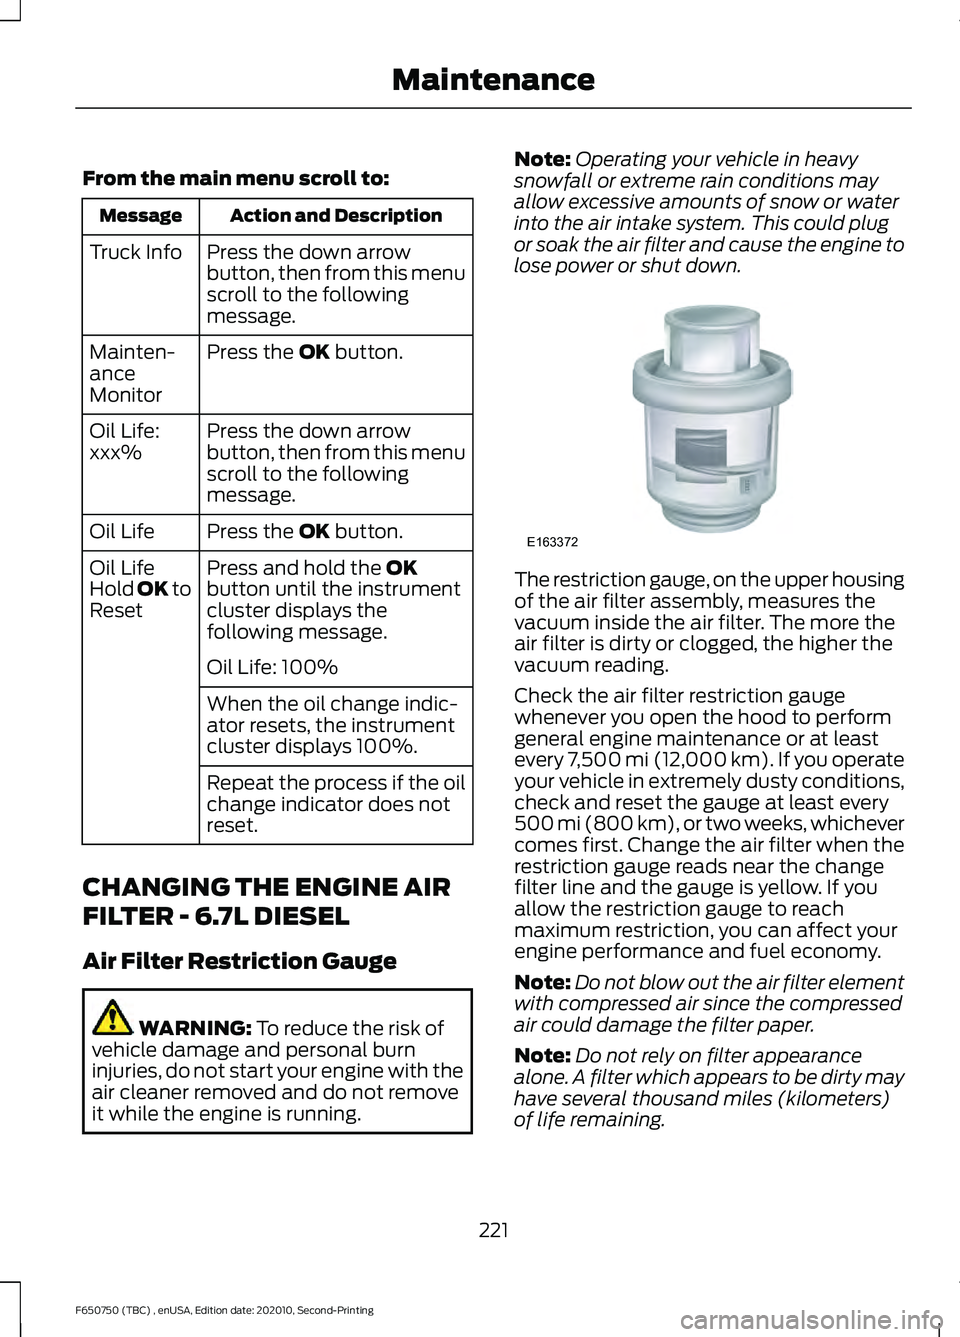
lose power or shut down. The restriction gauge, on the upper housing
of the air filter assembly, measures the
vacuum inside the air filter. The more the
air filter is dirty or clogged, the higher the
vacuum reading.
Check the air filter restriction gauge
whenever you open the hood to perform
general engine maintenance or at least
every 7,500 mi (12,000 km). If you operate
your vehicle in extremely dusty conditions,
check and reset the gauge at least every
500 mi (800 km), or two weeks, whichever
comes first. Change the air filter when the
restriction gauge reads near the change
filter line and the gauge is yellow. If you
allow the restriction gauge to reach
maximum restriction, you can affect your
engine performance and fuel economy.
Note:
Do not blow out the air filter element
with compressed air since the compressed
air could damage the filter paper.
Note: Do not rely on filter appearance
alone. A filter which appears to be dirty may
have several thousand miles (kilometers)
of life remaining.
221
F650750 (TBC) , enUSA, Edition date: 202010, Second-Printing MaintenanceE163372
Page 225 of 390
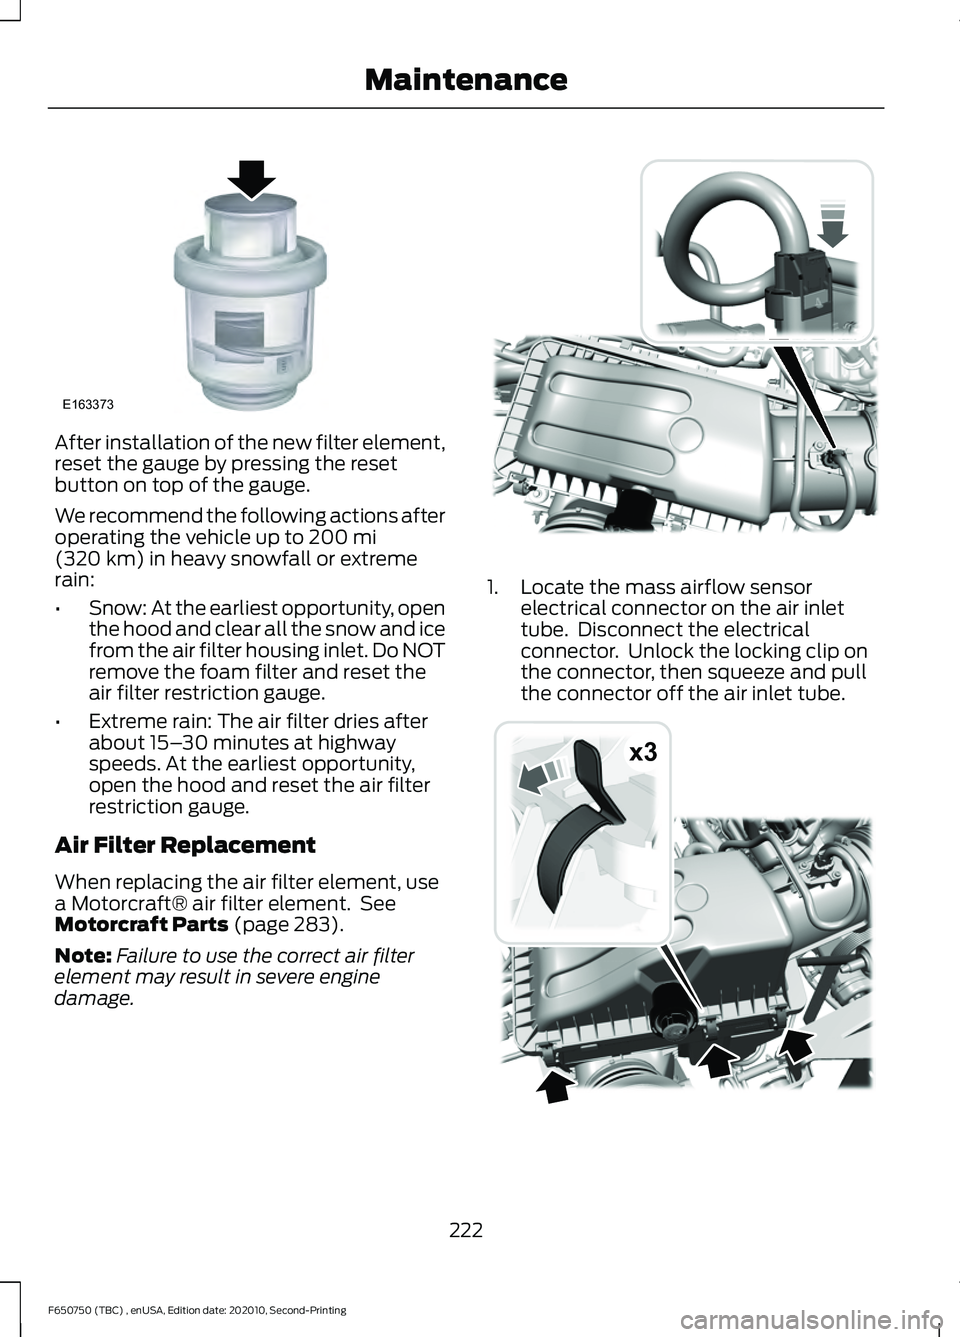
After installation of the new filter element,
reset the gauge by pressing the reset
button on top of the gauge.
We recommend the following actions after
operating the vehicle up to 200 mi
(320 km) in heavy snowfall or extreme
rain:
• Snow: At the earliest opportunity, open
the hood and clear all the snow and ice
from the air filter housing inlet. Do NOT
remove the foam filter and reset the
air filter restriction gauge.
• Extreme rain: The air filter dries after
about 15– 30 minutes at highway
speeds. At the earliest opportunity,
open the hood and reset the air filter
restriction gauge.
Air Filter Replacement
When replacing the air filter element, use
a Motorcraft® air filter element. See
Motorcraft Parts
(page 283).
Note: Failure to use the correct air filter
element may result in severe engine
damage. 1. Locate the mass airflow sensor
electrical connector on the air inlet
tube. Disconnect the electrical
connector. Unlock the locking clip on
the connector, then squeeze and pull
the connector off the air inlet tube. 222
F650750 (TBC) , enUSA, Edition date: 202010, Second-Printing MaintenanceE163373 E317651 x3E317652
Page 239 of 390

AUTOMATIC TRANSMISSION
FLUID CHECK
The transmission does not consume fluid.
However, check the fluid level if the
transmission is not working properly, for
example if the transmission slips, shifts
slowly or if there are signs of fluid loss.
Replace the transmission fluid and filter
on your vehicle at the specified service
interval. See Scheduled Maintenance
(page 319).
Automatic transmission fluid expands
when warmed. To check the fluid level
consistently and accurately, do the
following:
1. Drive the vehicle until it reaches normal
operating temperature. This may take
up to
20 mi (30 km). Make sure that
the transmission fluid temperature
gauge on the instrument cluster is
within normal operating temperature
196– 215°F (91– 102°C)
before
checking.
2. Make sure that your vehicle is on level ground.
3. With the engine running, parking brake
engaged and your foot on the brake
pedal, move the gearshift lever through
all of the gear ranges. Allow sufficient
time for each gear to engage.
4. Make sure the parking brake is on. Make
sure the transmission is in park (P) or
neutral (N) and leave the engine
running.
5. Open the hood. See
Opening and
Closing the Hood (page 213).
6. Remove the dipstick and wipe it with a clean, lint-free cloth. See
Under
Hood Overview (page 215).
7. Replace the dipstick and remove it again to check the fluid level. 8. If the fluid level is correct, replace the
dipstick and make sure it is fully seated.
Note: If the fluid level is between the
maximum and minimum marks, the fluid
level is acceptable. Do not add fluid.
Transmission Fluid Level
Low Fluid Level If the fluid level is at or below the minimum
mark, add fluid immediately. See
Capacities and Specifications
(page
288).
Note: If there is no indication of fluid on the
dipstick, have your vehicle checked
immediately.
Correct Fluid Level Make sure that the fluid level is between
the maximum and minimum marks.
236
F650750 (TBC) , enUSA, Edition date: 202010, Second-Printing MaintenanceE163740 E163742
Page 244 of 390
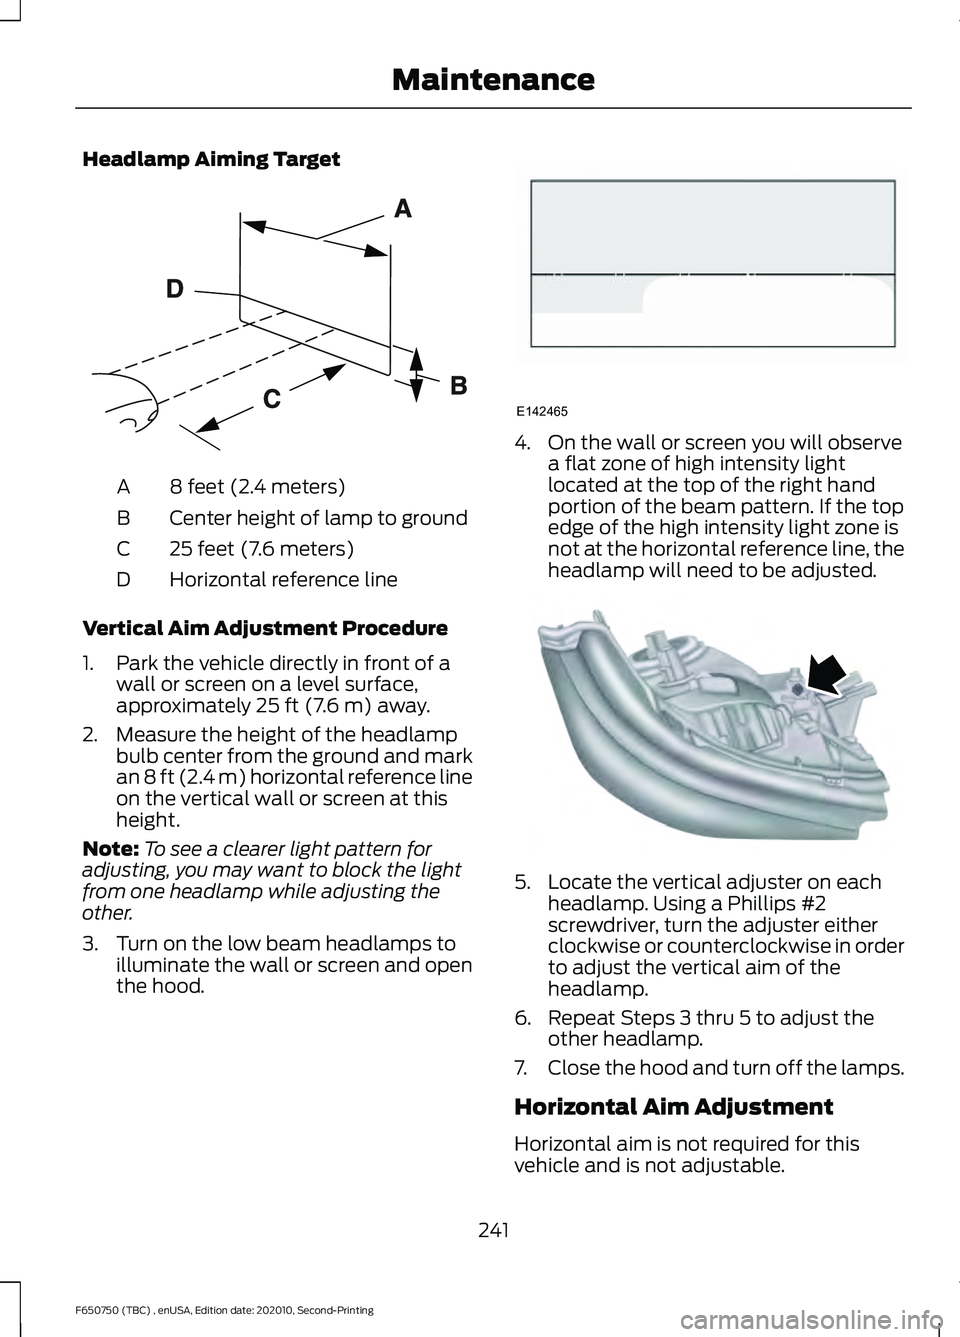
Headlamp Aiming Target
8 feet (2.4 meters)
A
Center height of lamp to ground
B
25 feet (7.6 meters)
C
Horizontal reference line
D
Vertical Aim Adjustment Procedure
1. Park the vehicle directly in front of a wall or screen on a level surface,
approximately 25 ft (7.6 m) away.
2. Measure the height of the headlamp bulb center from the ground and mark
an
8 ft (2.4 m) horizontal reference line
on the vertical wall or screen at this
height.
Note: To see a clearer light pattern for
adjusting, you may want to block the light
from one headlamp while adjusting the
other.
3. Turn on the low beam headlamps to illuminate the wall or screen and open
the hood. 4. On the wall or screen you will observe
a flat zone of high intensity light
located at the top of the right hand
portion of the beam pattern. If the top
edge of the high intensity light zone is
not at the horizontal reference line, the
headlamp will need to be adjusted. 5. Locate the vertical adjuster on each
headlamp. Using a Phillips #2
screwdriver, turn the adjuster either
clockwise or counterclockwise in order
to adjust the vertical aim of the
headlamp.
6. Repeat Steps 3 thru 5 to adjust the other headlamp.
7. Close the hood and turn off the lamps.
Horizontal Aim Adjustment
Horizontal aim is not required for this
vehicle and is not adjustable.
241
F650750 (TBC) , enUSA, Edition date: 202010, Second-Printing MaintenanceE142592 E142465 E163806
Page 381 of 390

Auxiliary Switches........................................315
Upfitter Interface Module................................ 316
Axle Inspection..............................................251
Front Axle............................................................... 251
B
Battery See: Changing the 12V Battery..................... 239
Bonnet Lock See: Opening and Closing the Hood...........213
Booster Seats
..................................................32
Types of Booster Seats...................................... 33
Brake Fluid Check.........................................237 Brake Fluid Service Interval............................ 238
Brakes...............................................................130 General Information.......................................... 130
Brake System Inspection..........................248 Air Brakes.............................................................. 249
Driveline Parking Brake..................................... 251
Hydraulic Brakes................................................ 250
Breaking-In......................................................179
Bulb Specification Chart
..........................305
C
Canceling the Set Speed...........................155
Capacities and Specifications - 6.7L Diesel
............................................................288
Air Conditioning System................................. 288
Alternative Engine Oil for Biodiesel Fuel Blends (B20 Max)......................................... 291
Alternative Engine Oil for Extremely Cold Climates............................................................ 291
Alternative Engine Oil for Severe Duty Service............................................................... 292
Alternative Rear Axle Fluid for Severe Duty Service.............................................................. 296
Automatic Transmission................................ 288
Diesel Exhaust Fluid (DEF) Tank.................293
Engine Coolant................................................... 289
Engine Oil............................................................. 290
Front Wheel Bearing Oil.................................. 295
Fuel Tank............................................................... 292
Grease.................................................................... 293
Hydraulic Brake System.................................. 293
Locks...................................................................... 294
Power Steering System................................... 294Rear Axle...............................................................
295
Washer Reservoir............................................... 296
Capacities and Specifications - 7.3L..................................................................297
Air Conditioning System.................................. 297
Alternative Engine Oil for Extremely Cold Climates.......................................................... 300
Alternative Rear Axle Fluid for Severe Duty Service.............................................................. 304
Automatic Transmission................................ 298
Engine Coolant................................................... 299
Engine Oil............................................................. 299
Front Wheel Bearing Oil.................................. 303
Fuel Tank............................................................... 301
Grease..................................................................... 301
Hydraulic Brake System................................... 301
Locks...................................................................... 302
Power Steering System................................... 302
Rear Axle............................................................... 303
Washer Reservoir.............................................. 304
Capacities and Specifications
.................281
Car Wash See: Cleaning the Exterior.............................. 256
Catalytic Converter
.......................................110
On-Board Diagnostics (OBD-II)...................... 111
Readiness for Inspection and Maintenance (I/M) Testing...................................................... 111
Changing a Bulb
...........................................243
Brake Lamp, Rear Lamp, Rear Direction
Indicator, License Plate Lamp and
Reverse Lamp................................................ 244
Front Clearance and Identification Lamp.................................................................. 243
Headlamp Bulbs................................................ 243
Changing a Fuse...........................................201 Fuses....................................................................... 201
Changing a Road Wheel............................277 Tire Change Procedure..................................... 277
Changing the 12V Battery.........................239 Battery Management System (If
Equipped)....................................................... 240
Changing the Engine Air Filter - 6.7L Diesel..............................................................221
Air Filter Replacement...................................... 222
Air Filter Restriction Gauge.............................. 221
Changing the Engine Air Filter - 7.3L..................................................................223
378
F650750 (TBC) , enUSA, Edition date: 202010, Second-Printing Index