2021 FORD F650/750 height adjustment
[x] Cancel search: height adjustmentPage 4 of 390

Introduction
About This Manual
..........................................7
Symbols Glossary ..........................................
10
Data Recording ................................................
13
Perchlorate ........................................................
17
Ford Credit .........................................................
17
Replacement Parts Recommendation ........................................................................\
....
17
Special Notices ...............................................
18
Mobile Communications Equipment ........................................................................\
...
19
Export Unique Options ................................
19
Federal Highway Administration Regulation ...................................................
20
Entering, Exiting or Climbing on This Vehicle ...........................................................
20
Environment
Protecting the Environment .......................
21
Noise Pollution Control ................................
21
At a Glance
Instrument Panel ...........................................
22
Child Safety
General Information .....................................
24
Installing Child Restraints ..........................
26
Booster Seats .................................................
32
Child Restraint Positioning ........................
34
Child Safety Locks ........................................
36
Seatbelts
Principle of Operation ..................................
37
Fastening the Seatbelts .............................
38
Seatbelt Height Adjustment ......................
41
Seatbelt Warning Lamp and Indicator Chime ............................................................
42
Seatbelt Reminder ........................................
42
Child Restraint and Seatbelt Maintenance ...............................................
44
Seatbelt Extensions .....................................
44Keys and Remote Controls
General Information on Radio
Frequencies .................................................
45
Remote Control .............................................
46
Replacing a Lost Key or Remote Control ........................................................................\
..
48
Doors and Locks
Locking and Unlocking ...............................
49
Security
Passive Anti-Theft System .........................
51
Steering Wheel
Adjusting the Steering Wheel ...................
52
Cruise Control - Vehicles With: Adaptive Cruise Control .............................................
52
Cruise Control - Vehicles With: Cruise Control ..........................................................
53
Information Display Control ......................
53
Horn ....................................................................
53
Wipers and Washers
Windshield Wipers ........................................
54
Windshield Washers ....................................
54
Lighting
General Information .....................................
55
Lighting Control .............................................
55
Autolamps .......................................................
56
Instrument Lighting Dimmer ....................
56
Headlamp Exit Delay ...................................
56
Daytime Running Lamps ............................
57
Automatic High Beam Control .................
57
Direction Indicators ......................................
58
Interior Lamps ................................................
58
Windows and Mirrors
Power Windows ............................................
59
Exterior Mirrors ..............................................
60
1
F650750 (TBC) , enUSA, Edition date: 202010, Second-Printing Table of Contents
Page 43 of 390

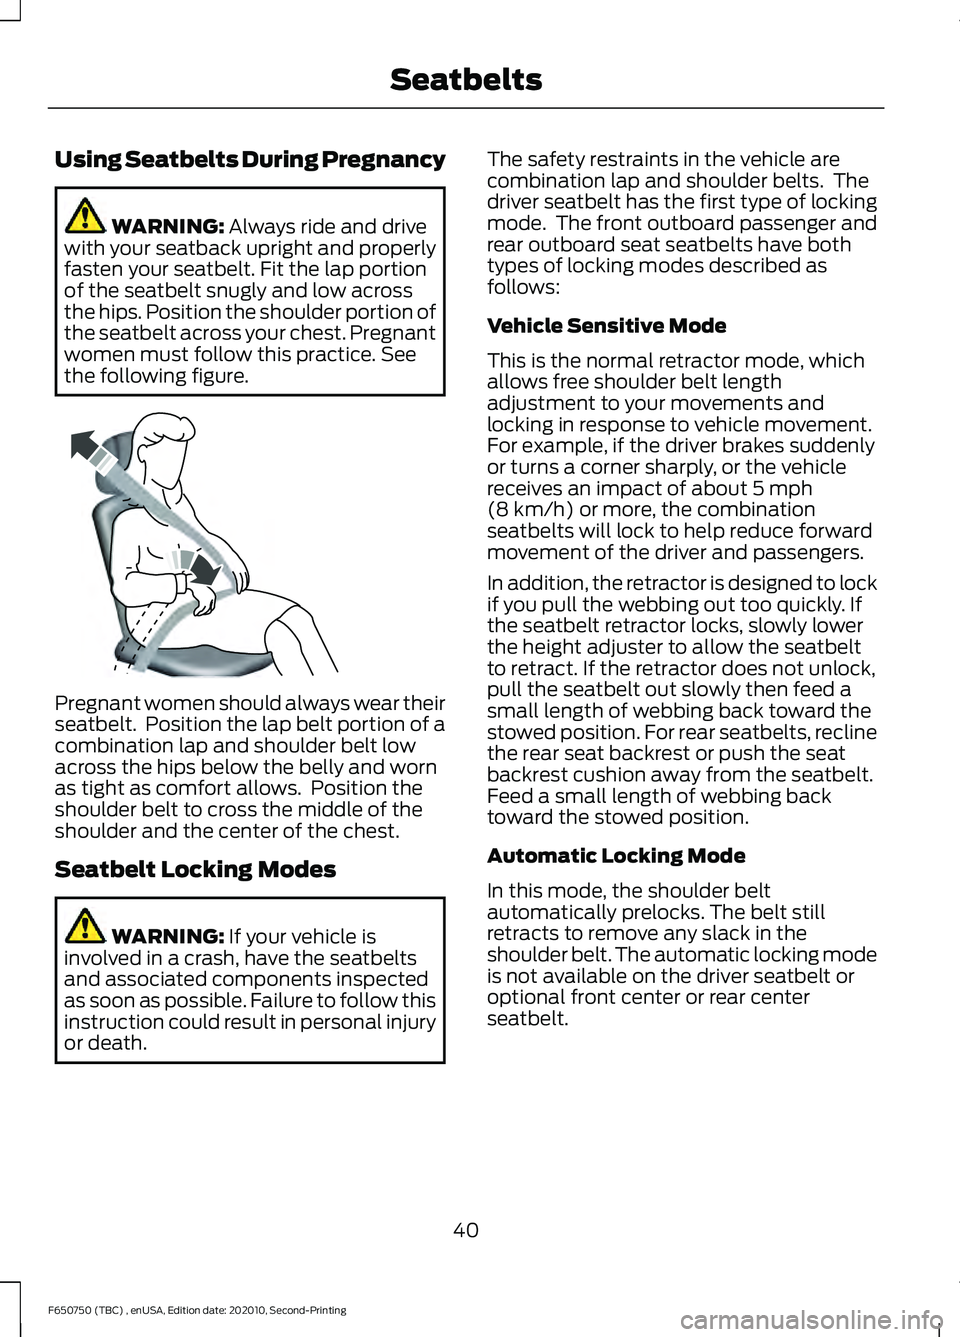
Using Seatbelts During Pregnancy
WARNING: Always ride and drive
with your seatback upright and properly
fasten your seatbelt. Fit the lap portion
of the seatbelt snugly and low across
the hips. Position the shoulder portion of
the seatbelt across your chest. Pregnant
women must follow this practice. See
the following figure. Pregnant women should always wear their
seatbelt. Position the lap belt portion of a
combination lap and shoulder belt low
across the hips below the belly and worn
as tight as comfort allows. Position the
shoulder belt to cross the middle of the
shoulder and the center of the chest.
Seatbelt Locking Modes
WARNING:
If your vehicle is
involved in a crash, have the seatbelts
and associated components inspected
as soon as possible. Failure to follow this
instruction could result in personal injury
or death. The safety restraints in the vehicle are
combination lap and shoulder belts. The
driver seatbelt has the first type of locking
mode. The front outboard passenger and
rear outboard seat seatbelts have both
types of locking modes described as
follows:
Vehicle Sensitive Mode
This is the normal retractor mode, which
allows free shoulder belt length
adjustment to your movements and
locking in response to vehicle movement.
For example, if the driver brakes suddenly
or turns a corner sharply, or the vehicle
receives an impact of about
5 mph
(8 km/h) or more, the combination
seatbelts will lock to help reduce forward
movement of the driver and passengers.
In addition, the retractor is designed to lock
if you pull the webbing out too quickly. If
the seatbelt retractor locks, slowly lower
the height adjuster to allow the seatbelt
to retract. If the retractor does not unlock,
pull the seatbelt out slowly then feed a
small length of webbing back toward the
stowed position. For rear seatbelts, recline
the rear seat backrest or push the seat
backrest cushion away from the seatbelt.
Feed a small length of webbing back
toward the stowed position.
Automatic Locking Mode
In this mode, the shoulder belt
automatically prelocks. The belt still
retracts to remove any slack in the
shoulder belt. The automatic locking mode
is not available on the driver seatbelt or
optional front center or rear center
seatbelt.
40
F650750 (TBC) , enUSA, Edition date: 202010, Second-Printing SeatbeltsE142590
Page 44 of 390

When to Use the Automatic Locking
Mode
Use this mode any time a child safety seat,
except a booster, is installed in passenger
front or rear seating positions. Properly
restrain children 12 years old and under in
a rear seating position whenever possible.
See Child Safety (page 24).
How to Use the Automatic Locking Mode 1. Buckle the combination lap and
shoulder belt.
2. Grasp the shoulder portion and pull downward until you pull the entire belt
out.
3. Allow the belt to retract. As the belt retracts, you will hear a clicking sound.
This indicates the seatbelt is now in the
automatic locking mode.
How to Disengage the Automatic Locking
Mode
Unbuckle the combination lap and
shoulder belt and allow it to retract
completely to disengage the automatic
locking mode and activate the vehicle
sensitive (emergency) locking mode. Energy Management Feature
•
This vehicle has a seatbelt system with
an energy management feature at the
front outboard seating positions to
help further reduce the risk of injury in
the event of a head-on crash.
• The front outboard seatbelt systems
have a retractor assembly that is
designed to pay out webbing in a
controlled manner. This feature is
designed to help reduce the belt force
acting on the occupant’ s chest.
SEATBELT HEIGHT
ADJUSTMENT WARNING:
Position the safety belt
height adjuster so that the belt rests
across the middle of your shoulder.
Failure to adjust the safety belt properly
could reduce the effectiveness of the
safety belt and increase the risk of injury
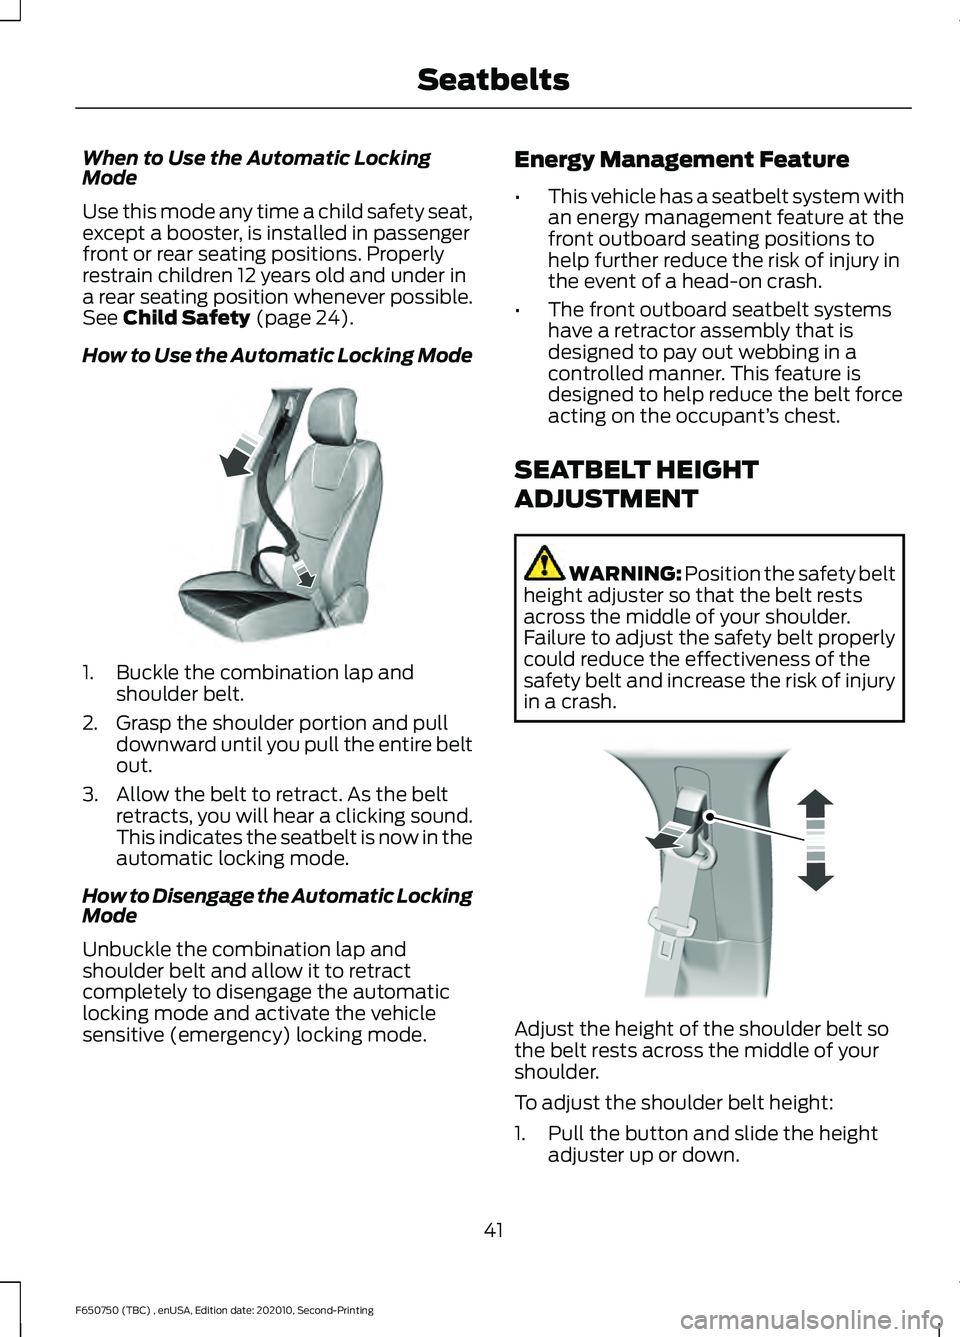
in a crash. Adjust the height of the shoulder belt so
the belt rests across the middle of your
shoulder.
To adjust the shoulder belt height:
1. Pull the button and slide the height
adjuster up or down.
41
F650750 (TBC) , enUSA, Edition date: 202010, Second-Printing SeatbeltsE142591 E145664
Page 244 of 390

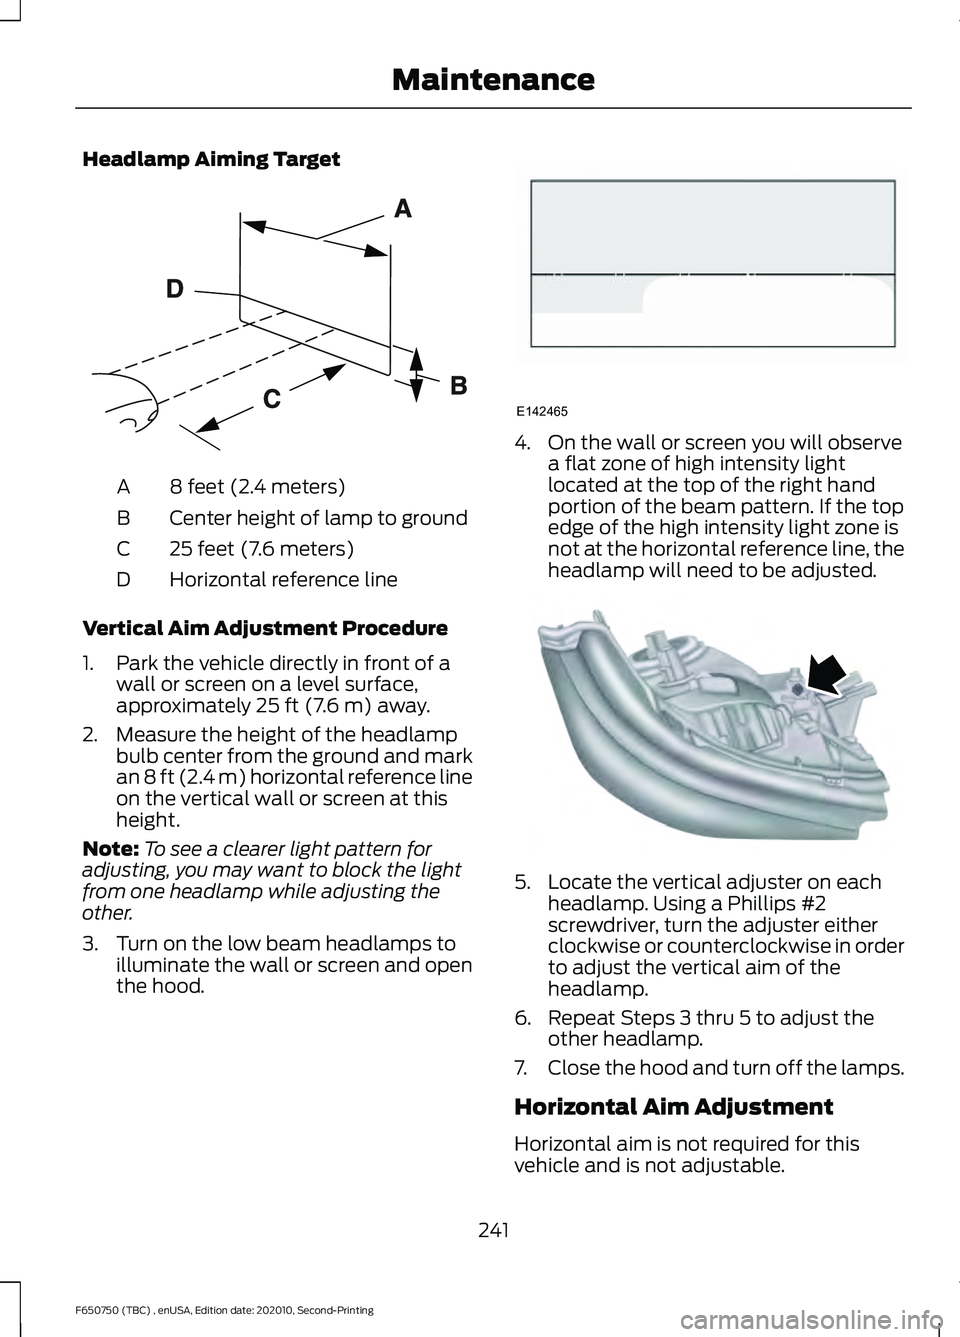
Headlamp Aiming Target
8 feet (2.4 meters)
A
Center height of lamp to ground
B
25 feet (7.6 meters)
C
Horizontal reference line
D
Vertical Aim Adjustment Procedure
1. Park the vehicle directly in front of a wall or screen on a level surface,
approximately 25 ft (7.6 m) away.
2. Measure the height of the headlamp bulb center from the ground and mark
an
8 ft (2.4 m) horizontal reference line
on the vertical wall or screen at this
height.
Note: To see a clearer light pattern for
adjusting, you may want to block the light
from one headlamp while adjusting the
other.
3. Turn on the low beam headlamps to illuminate the wall or screen and open
the hood. 4. On the wall or screen you will observe
a flat zone of high intensity light
located at the top of the right hand
portion of the beam pattern. If the top
edge of the high intensity light zone is
not at the horizontal reference line, the
headlamp will need to be adjusted. 5. Locate the vertical adjuster on each
headlamp. Using a Phillips #2
screwdriver, turn the adjuster either
clockwise or counterclockwise in order
to adjust the vertical aim of the
headlamp.
6. Repeat Steps 3 thru 5 to adjust the other headlamp.
7. Close the hood and turn off the lamps.
Horizontal Aim Adjustment
Horizontal aim is not required for this
vehicle and is not adjustable.
241
F650750 (TBC) , enUSA, Edition date: 202010, Second-Printing MaintenanceE142592 E142465 E163806
Page 255 of 390

Follow the tire manufacturer's
recommended cold inflation pressure for
the tire size, load range (ply rating) and
steer axle loading typical for their operation
(each steer axle tire equals ½ steer axle
loading).
Special applications may warrant a setting
based on experience with the type of tire
operating loads and conditions. Radial tires
are more sensitive to toe-in setting than
bias ply tires. Fine tuning school bus
alignment to line-haul truck standards
does not drastically improve tire tread life.
STEERING SYSTEM
INSPECTION
WARNING: Failure to maintain the
steering system in proper condition can
cause reduced steering ability resulting
in property damage, personal injury or
death.
Note: Have any steering problems
immediately corrected by a qualified service
technician.
Ask your service technician to examine the
steering mechanism. Only minor
adjustments may be necessary.
Regular inspections should include:
• Checking the tie rod, drag link end
clamp bolts and ball joints for proper
tightness.
• Checking for installation and spread of
cotter pins and tightness of nuts at
both ends of the tie rod and drag link.
• Checking that the pitman arm (steering
arm at steering gear) mounting is tight
and locked. Check system for leaks or
hose chafing. Repair immediately, if
necessary. •
Maintaining proper steering gear and
power steering pump lubricant levels.
• Checking steering column joint bolts
and steering linkage, particularly for
body-to-chassis clearance.
Steering Column Joint Bolts
As a good maintenance practice, check
steering column joint bolt tightness every
60,000 mi (96,000 km)
or annually,
whichever occurs first. Do not overtighten
the bolts.
Hydraulic System
Whenever draining and refilling the power
steering's hydraulic system for any reason,
bleed air from the system before returning
the vehicle to service. Failure to bleed the
hydraulic system properly can result in
degradation of power system performance.
Consult an authorized dealer who is aware
of the proper procedures for filling and
bleeding the system.
SUSPENSION SYSTEM
INSPECTION
Note: Do not adjust air suspension height
to any setting other than the specified
setting. Altering the height setting changes
the driveline angle and may result in
unwarrantable component damage, such
as transmission component damage.
Verify drive axle air suspension height and
height control valve performance at engine
oil change intervals.
Periodically check:
• Condition of spring leaves for evidence
of fatigue, bending or breakage.
• Condition of suspension mounting
brackets and bushings.
• Torque rod mounting fasteners for
tightness.
252
F650750 (TBC) , enUSA, Edition date: 202010, Second-Printing Maintenance
Page 387 of 390

Blocked Sensors.................................................
166
Distance Indication and Alert........................ 165
Using the Pre-Collision Assist System............................................................... 164
Protecting the Environment........................21
Puncture See: Changing a Road Wheel........................ 277
R
Rear Axle Fluid Check.................................253 Changing the Fluid............................................ 253
Checking the Fluid Level................................. 253
Rear Axle..........................................................128 General Information.......................................... 128
Rear Seat Armrest.........................................88
Rear Seats
........................................................86
Folding the Rear Seat Back (Crew Cab)
........................................................................\
........ 87
Folding up the Rear Seat Cushion.................. 87
Returning the Seat to the Seating Position............................................................... 87
Recommended Towing Weights.............172
Refueling - Diesel
.........................................104
Fuel Filler Cap...................................................... 105
Fuel Fill Rate......................................................... 105
Refueling - Gasoline
....................................105
Fuel Filler Cap...................................................... 106
Remote Control
..............................................46
Car Finder................................................................ 47
Changing the Remote Control Battery........46
Reprogramming the Remote Control..........46
Sounding the Panic Alarm................................ 47
Removing a Headlamp..............................243
Repairing Minor Paint Damage..............259
Replacement Parts Recommendation .........................................
17
Collision Repairs..................................................... 17
Scheduled Maintenance and Mechanical Repairs.................................................................. 17
Warranty on Replacement Parts..................... 17
Replacing a Lost Key or Remote Control............................................................48
Reporting Safety Defects (Canada Only)...............................................................192
Reporting Safety Defects (U.S. Only)................................................................191
Resuming the Set Speed
...........................155 Roadside Assistance
....................................181
Vehicles Sold in Canada: Getting Roadside
Assistance........................................................ 182
Vehicles Sold in the United States: Getting Roadside Assistance..................................... 181
Vehicles Sold in the United States: Using Roadside Assistance..................................... 181
Roadside Emergencies................................181
Running-In See: Breaking-In.................................................. 179
Running Out of Fuel - Diesel....................103 Purging Air From the System......................... 104
Starting the Engine............................................ 104
Running Out of Fuel - Gasoline..............104
S
Safety Precautions
........................................99
Low Fuel Pressure.............................................. 100
Scheduled Maintenance Record
............337
Scheduled Maintenance............................319
Seatbelt Extensions......................................44
Seatbelt Height Adjustment.......................41
Seatbelt Reminder.........................................42 Belt-Minder™........................................................ 42
Seatbelts............................................................37 Principle of Operation......................................... 37
Seatbelt Warning Lamp and Indicator Chime...............................................................42
Conditions of operation..................................... 42
Seats...................................................................82
Security...............................................................51
Selective Catalytic Reductant System - Diesel...............................................................112
Contaminated Diesel Exhaust Fluid or Inoperative Selective Catalytic Reduction
System................................................................ 116
Diesel Exhaust Fluid Guidelines and Information....................................................... 115
Diesel Exhaust Fluid Level................................ 112
Diesel Exhaust Fluid Warning Messages and Vehicle Operations................................ 114
Filling the Diesel Exhaust Fluid Tank............112
Setting the Cruise Control Speed..........154 Changing the Set Speed.................................. 154
Sitting in the Correct Position...................82
Snow Chains See: Using Snow Chains.................................. 277
384
F650750 (TBC) , enUSA, Edition date: 202010, Second-Printing Index