2021 FORD F-150 ECU
[x] Cancel search: ECUPage 482 of 796
WARNING: Secure the floor mat
to both retention devices so that it
cannot slip out of position and interfere
with the pedals. Failure to follow this
instruction could result in the loss of
control of your vehicle, personal injury or
death. WARNING: Do not place additional
floor mats or any other covering on top
of the original floor mats. This could
result in the floor mat interfering with the
operation of the pedals. Failure to follow
this instruction could result in the loss of
control of your vehicle, personal injury or
death. WARNING:
Always make sure that
objects cannot fall into the driver foot
well while your vehicle is moving. Objects
that are loose can become trapped
under the pedals causing a loss of
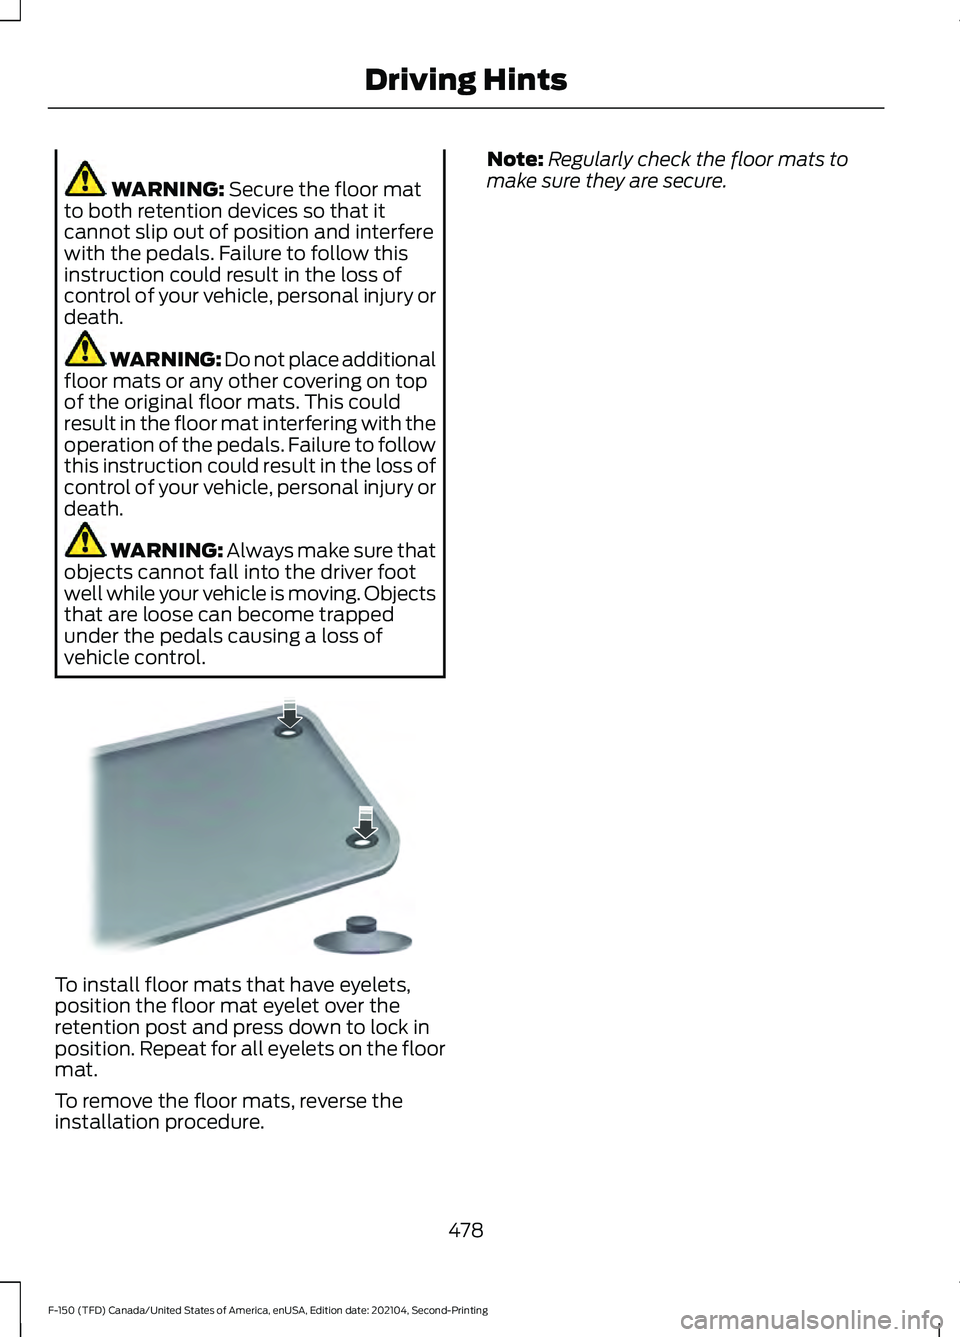
vehicle control. To install floor mats that have eyelets,
position the floor mat eyelet over the
retention post and press down to lock in
position. Repeat for all eyelets on the floor
mat.
To remove the floor mats, reverse the
installation procedure. Note:
Regularly check the floor mats to
make sure they are secure.
478
F-150 (TFD) Canada/United States of America, enUSA, Edition date: 202104, Second-Printing Driving HintsE142666
Page 492 of 796
RECOVERY TOWING
ACCESSING THE FRONT TOWING
POINT
WARNING: Using recovery hooks
is dangerous and should only be done by
a person familiar with proper vehicle
recovery safety practices. Improper use
of recovery hooks may cause hook failure
or separation from the vehicle and could
result in serious injury or death. WARNING:
Slowly remove the
slack from the recovery strap prior to
pulling. Failure to do so can introduce
significantly higher loads which can
cause the recovery hooks to break off, or
the recovery strap to fail which can cause
serious injury or death. WARNING:
Never link two straps
together with a clevis pin. These heavy
metal objects could become projectiles
if the strap breaks and can cause serious
injury or death. WARNING:
Switch the ignition off
before removing the recovery hook.
Failure to do so could result in personal
injury. WARNING: The recovery hook can
become hot. Let the recovery hook cool
down before removing it. Failure to do
so could result in personal injury.
Your vehicle has frame-mounted front
recovery hooks.
Note: Do not apply a load to the recovery
hooks that is greater than the gross vehicle
weight rating of your vehicle. Before using recovery hooks:
•
Make sure all attaching points are
secure and capable of withstanding
the applied load.
• Do not use chains, cables or tow straps
with metal hook ends.
• Only use recovery straps that have a
minimum breaking strength two to
three times the gross vehicle weight of
the stuck vehicle.
• Make sure the recovery strap is in good
condition and free of visible cuts, tears
or damage.
• Use a damper device such as a tarp,
heavy blanket or piece of carpet, and
place it over the recovery strap to help
absorb the energy in the event the
strap breaks.
• Make sure the stuck vehicle is not
loaded heavier than its gross vehicle
weight rating specified on the
certification label.
• Align the tow vehicle and stuck vehicle
in a straight line, within 10 degrees.
• Keep bystanders to the sides of the
vehicle, at a distance of at least twice
the length of the recovery strap. This
helps avoid injury from the hazard of a
recovery hook or strap breaking, or a
vehicle lurching into their path.
488
F-150 (TFD) Canada/United States of America, enUSA, Edition date: 202104, Second-Printing Crash and Breakdown Information
Page 494 of 796
TOWING YOUR VEHICLE
PRECAUTIONS
Use the following guidelines when towing
your vehicle. Failure to follow this
instruction could result in vehicle damage
not covered by the vehicle warranty.
Note:
Make sure you properly secure your
vehicle to the tow vehicle.
Note: If you are unsure of the vehicle ’s
configuration, contact an authorized dealer.
RECREATIONALLY TOWING
YOUR VEHICLE - 4X4 WARNING: Do not disconnect the
battery when recreationally towing your
vehicle. This prevents the transfer case
from shifting properly and could cause
the vehicle to roll, even if the
transmission is in park (P). WARNING:
Placing the transfer
case in its neutral position could cause
your vehicle to freely roll. Make sure you
press and hold the brake pedal and the
vehicle is in a secure, safe position when
you place the transfer case in its neutral
position.
Follow these guidelines if you have a need
for recreational towing. An example of
recreational towing would be towing your
vehicle behind a motorhome. These
guidelines are to make sure that you do
not damage the transmission. You can only tow your vehicle with all
wheels on the ground by placing the
transfer case in its neutral position and
engaging the recreational tow feature.
Perform the following steps after
positioning your vehicle behind the tow
vehicle and properly securing them
together.
Note:
Put your climate control system in
recirculated air mode to prevent exhaust
fumes from entering your vehicle.
Note: Failure to put the transfer case in its
neutral position can damage vehicle
components.
Note: You can check the towing status at
any time by opening the driver door or
turning the ignition to the accessory or on
position. Neutral Tow Enabled Leave
Transmission in Neutral
appears in the
instrument cluster display to confirm you
can recreationally tow your vehicle.
Note: If your vehicle has an anti-theft
alarm, make sure you switch perimeter
sensing on when towing. See
Setting the
Alarm Security Level (page 135).
Switching
Neutral Tow On
1. Start your vehicle.
2. Press the 2H button on the four-wheel
drive mode control.
3. Place your vehicle in temporary neutral
mode. See
Entering Temporary
Neutral Mode (page 286).
4. Switch your vehicle off by pressing the
push button ignition switch once or
turning the key as far toward the off
position as possible. A message
appears in the instrument cluster
display.
5. Switch your vehicle to accessory mode
by pressing the push button ignition
switch once without pressing the brake
pedal or by turning the key to the on
position.
490
F-150 (TFD) Canada/United States of America, enUSA, Edition date: 202104, Second-Printing Towing Your Vehicle
Page 495 of 796

6. Press and hold the brake pedal.
7. Using the instrument cluster controls
on the steering wheel, select Settings.
8. Select Neutral Tow.
9. Press and hold the
OK button until a
confirmation message appears in the
information display.
Note: If completed successfully, the
information display shows
Neutral Tow
Enabled Leave Transmission in Neutral.
This indicates that your vehicle is safe to
tow with all wheels on the ground.
Note: If you do not see a confirmation
message in the instrument cluster display,
you must perform the procedure again from
the beginning.
Note: You may hear noise as the transfer
case shifts into its neutral position. This is
normal.
10. Release the brake pedal.
11. Leave the transmission in neutral (N)
and switch your vehicle off by
pressing the push button ignition
switch once without pressing the
brake pedal or turning the key as far
toward the off position.
Note: Vehicles with keys do not turn to the
off position when the transmission is in
neutral (N). You must leave the key in the
ignition when towing. Use the keyless entry
keypad or an extra set of keys to lock and
unlock your vehicle.
Switching
Neutral Tow Off
1. With your vehicle properly secured to the tow vehicle, press and hold the
brake pedal and start the engine.
2. Switch your vehicle off by pressing the
push button ignition switch once or
turning the key as far towards the off
position and release the brake pedal. 3. Place your vehicle in accessory mode
by pressing the push button ignition
switch once without pressing the brake
pedal or by turning the ignition key to
the on position.
4. Press and hold the brake pedal.
5. Shift into park (P).
6. Release the brake pedal.
Note: If completed successfully, the
instrument cluster displays 2H and Neutral
Tow Disabled
.
Note: You must perform the switching
neutral tow on and switching neutral tow
off procedures again from the beginning if
the indicator light and message do not
display.
Note: You may hear a noise as the transfer
case shifts out of its neutral position. This
is normal.
7. Apply the parking brake, then disconnect your vehicle from the tow
vehicle.
8. Release the parking brake, start the engine, and shift into drive (D) to make
sure the transfer case is out of the
neutral tow position.
9. If the transfer case does not successfully shift out of its neutral
position, set the parking brake. Have
your vehicle checked as soon as
possible.
Resolving the
Shift Delayed Drive
Forward Message
1. Press and hold the brake pedal.
2. Start your vehicle.
3. Shift into neutral (N).
4. With the vehicle running, shift into drive
(D) and let the vehicle roll forward up
to
3 ft (1 m).
491
F-150 (TFD) Canada/United States of America, enUSA, Edition date: 202104, Second-Printing Towing Your Vehicle
Page 520 of 796

After operating your vehicle during heavy
snowfall or extreme rain, do the following:
•
Snow: At the earliest opportunity, open
the hood and clear any snow and ice
from the air filter housing inlet and
reset the air filter restriction gauge.
• Extreme rain: The air filter element
dries out after approximately 15– 30
minutes of driving at highway speeds.
At the earliest opportunity, open the
hood and reset the air filter restriction
gauge.
CHANGING THE ENGINE AIR
FILTER - DIESEL WARNING: To reduce the risk of
vehicle damage and personal burn
injuries, do not start your engine with the
air cleaner removed and do not remove
it while the engine is running.
Change the air filter element at the correct
service interval. See
Scheduled
Maintenance (page 664).
Use the correct specification air filter
element. See
Motorcraft Parts (page
581).
Note: Failure to use the correct air filter
element may result in severe engine
damage. Resulting component damage
may not be covered by the vehicle Warranty. 1. Release the clips that secure the air
filter housing cover. Lift and rotate the
air filter housing cover. 2.
Remove the air filter element from the
air filter housing.
3. To install, reverse the removal procedure.
4. After installing a new air filter element,
reset the air filter restriction gauge by
pressing the reset button. See
Checking the Engine Air Filter
Restriction Gauge
(page 515).
516
F-150 (TFD) Canada/United States of America, enUSA, Edition date: 202104, Second-Printing MaintenanceE254171 E254172
Page 521 of 796
CHANGING THE ENGINE AIR
FILTER - GASOLINE
WARNING: To reduce the risk of
vehicle damage and personal burn
injuries, do not start your engine with the
air cleaner removed and do not remove
it while the engine is running.
Change the air filter element at the proper
intervals. See
Scheduled Maintenance
(page 664).
When changing the air filter element, use
only the air filter element listed. See
Capacities and Specifications
(page
574).
Note: Failure to use the correct air filter
element could result in severe engine
damage that the vehicle Warranty may not
cover.
Note: When servicing the air cleaner, do not
allow foreign material to enter the air
induction system. The engine is susceptible
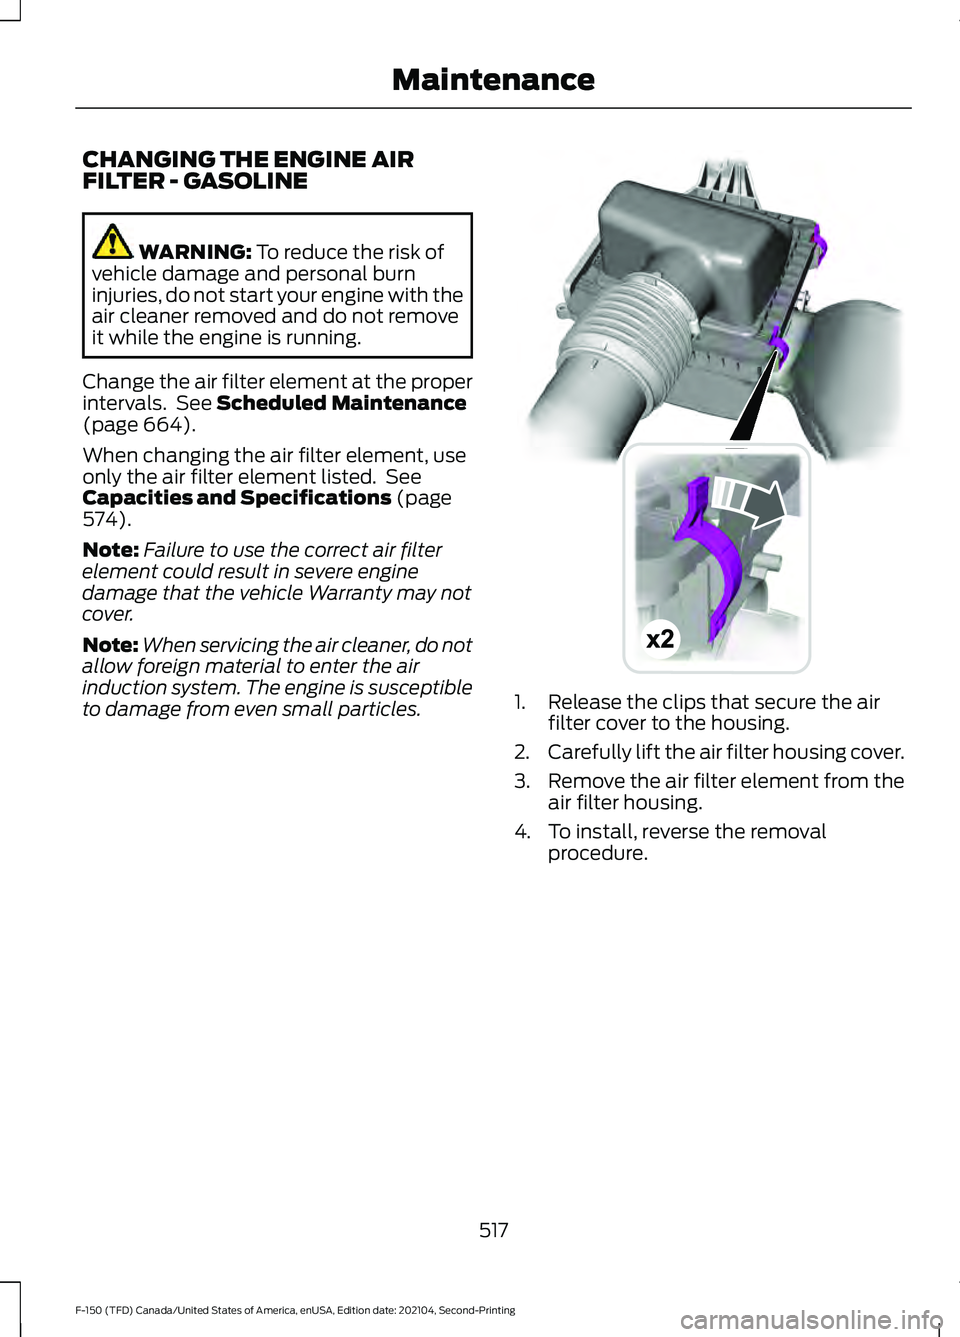
to damage from even small particles. 1. Release the clips that secure the air
filter cover to the housing.
2. Carefully lift the air filter housing cover.
3. Remove the air filter element from the
air filter housing.
4. To install, reverse the removal procedure.
517
F-150 (TFD) Canada/United States of America, enUSA, Edition date: 202104, Second-Printing MaintenanceE191820
Page 524 of 796

For longer, trouble-free operation, keep the
top of the battery clean and dry and the
battery cables tightly fastened to the
battery terminals. If any corrosion is
present on the battery or terminals, remove
the cables from the terminals and clean
with a wire brush. You can neutralize the
acid with a solution of baking soda and
water.
We recommend that you disconnect the
negative battery cable terminal from the
battery if you plan to store your vehicle for
an extended period.
Note:
If you only disconnect the negative
battery cable terminal, make sure it is
isolated or placed away from the battery
terminal to avoid unintended connection or
arcing.
To maintain correct operation of the
battery management system, if you add
any electrical devices to your vehicle, do
not connect the ground connection directly
to the negative battery terminal. A
connection at the negative battery terminal
can cause inaccurate measurements of
the battery condition and potential
incorrect system operation.
Note: If you add electrical accessories or
components to your vehicle this may
adversely affect battery performance,
durability and the performance of other
electrical systems on your vehicle.
If you replace the battery make sure it
matches the electrical requirements of
your vehicle.
If you disconnect or replace the battery
and your vehicle has an automatic
transmission, it must relearn its adaptive
strategy. Because of this, the transmission
may shift firmly when first driven. This is
normal operation while the transmission
fully updates its operation to optimum
shift feel. Remove and Reinstall the Battery
To disconnect or remove the battery, do
the following:
1.
Apply the parking brake and switch the
ignition off.
2. Switch all electrical equipment off, for
example lights and radio.
3. Wait a minimum of two minutes before
disconnecting the battery.
Note: The engine management system has
a power hold function and remains powered
for a period of time after you switch the
ignition off. This is to allow diagnostic and
adaptive tables to be stored. Disconnecting
the battery without waiting can cause
damage not covered by the vehicle
Warranty.
4. Disconnect the negative battery cable terminal.
5. Disconnect the positive battery cable terminal.
6. Remove the battery securing clamp.
7. Remove the battery.
8. To install, reverse the removal procedure.
Note: Before reconnecting the battery,
make sure the ignition remains switched off.
Note: Make sure the battery cable terminals
are fully tightened.
Note: After cleaning or replacing the
battery, make sure you reinstall the battery
cover or shield.
If you disconnect or replace the vehicle
battery, you must reset the following
features:
• Window bounce-back. See Window
Bounce-Back (page 162).
• Clock Settings.
• Pre-set radio stations.
• Steering Angle Sensor.
520
F-150 (TFD) Canada/United States of America, enUSA, Edition date: 202104, Second-Printing Maintenance
Page 571 of 796
Tire Change Procedure
WARNING: To help prevent your
vehicle from moving when changing a
wheel, shift the transmission into park
(P), set the parking brake and use an
appropriate block or wheel chock to
secure the wheel diagonally opposite to
the wheel being changed. For example,
when changing the front left wheel,
place an appropriate block or wheel
chock on the right rear wheel. WARNING:
The jack supplied with
this vehicle is only intended for changing
a flat tire in an emergency. Do not
attempt to do any other work on your
vehicle when it is supported by the jack,
as your vehicle could slip off the jack.
Failure to follow this instruction could
result in personal injury or death. WARNING:
Do not attempt to
change a tire on the side of the vehicle
close to moving traffic. Pull far enough
off the road to not obstruct the flow of
traffic and avoid the danger of being hit
when operating the jack or changing the
wheel. WARNING:
Only use the jack
provided as original equipment with your
vehicle. WARNING:
Do not get under a
vehicle that is supported by a jack. WARNING:
The jack supplied with
this vehicle is only intended for changing
a flat tire in an emergency. Do not
attempt to do any other work on your
vehicle when it is supported by the jack,
as your vehicle could slip off the jack.
Failure to follow this instruction could
result in personal injury or death. WARNING:
The jack should be
used on level firm ground wherever
possible. WARNING:
Never place anything
between the vehicle jack and the ground. WARNING:
Never place anything
between the vehicle jack and your
vehicle. WARNING: It is recommended that
the wheels of the vehicle be chocked,
and that no person should remain in a
vehicle that is being jacked. WARNING:
Switch off the running
boards before jacking or placing any
object under your vehicle. Never place
your hand between the extended running
board and your vehicle. A moving running
board may cause injury.
Park on a level surface, activate the hazard
flashers and set the parking brake. Then,
place the transmission in park (P) and turn
the engine off.
Note: Only use the spare tire carrier to stow
the tire and wheel combination provided
with your vehicle. Other tire and wheel
combinations can cause the tire carrier to
fail.
Note: Do not use impact tools or power
tools operating at over 200 RPM on the
spare tire carrier, this could cause a winch
malfunction and prevent a secure fit.
Note: Passengers should not remain in the
vehicle when the vehicle is being jacked.
Removing the Vehicle Jack and
Tool Bag
The vehicle jack and tool bag are on the
rear passenger side of your vehicle, behind
the passenger seat.
567
F-150 (TFD) Canada/United States of America, enUSA, Edition date: 202104, Second-Printing Changing a Road Wheel