2021 FORD F-150 ECO mode
[x] Cancel search: ECO modePage 455 of 796
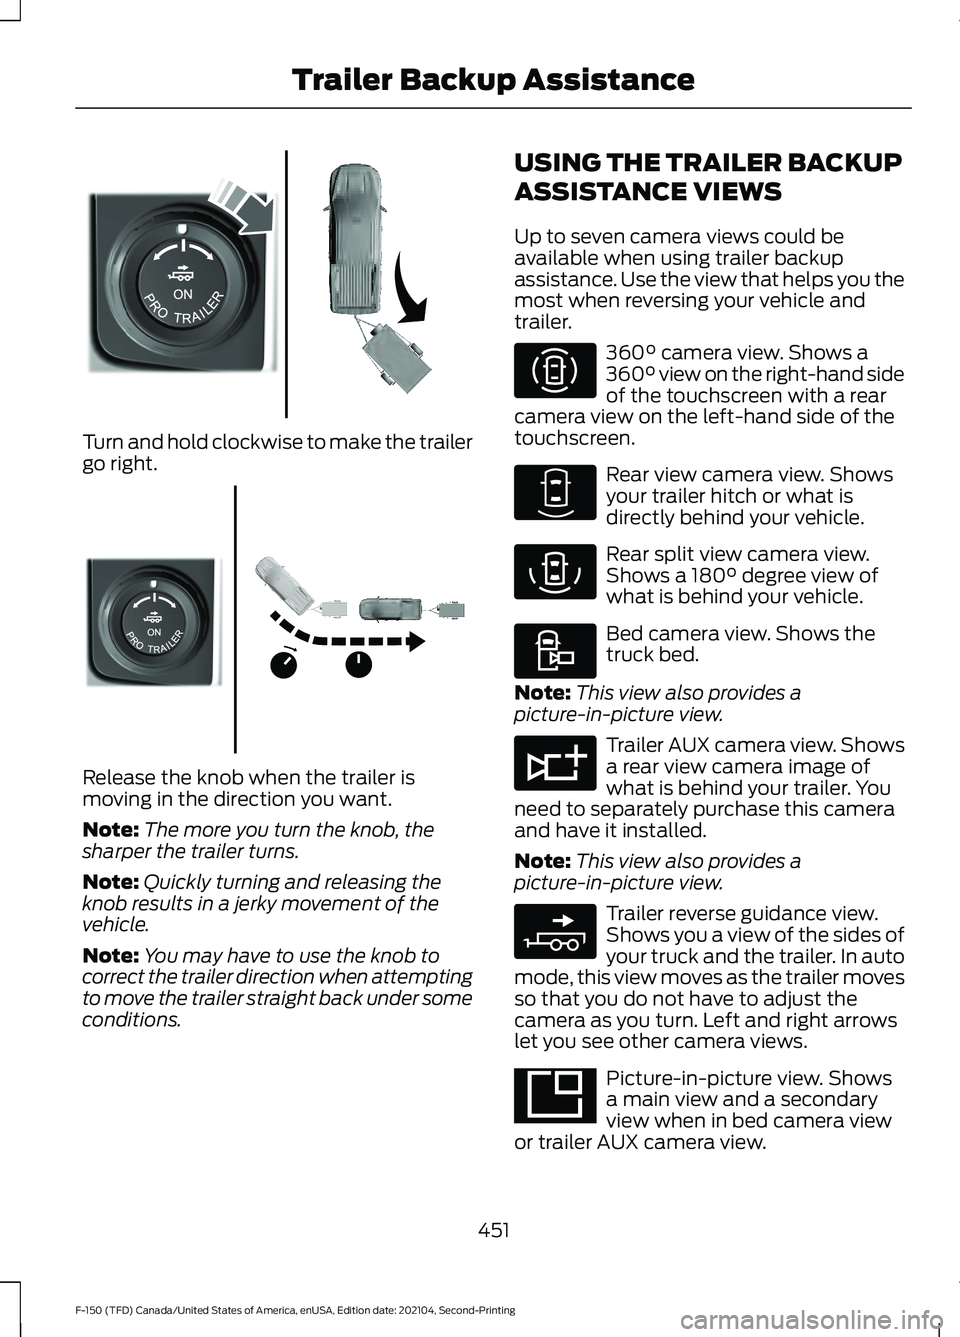
Turn and hold clockwise to make the trailer
go right.
Release the knob when the trailer is
moving in the direction you want.
Note:
The more you turn the knob, the
sharper the trailer turns.
Note: Quickly turning and releasing the
knob results in a jerky movement of the
vehicle.
Note: You may have to use the knob to
correct the trailer direction when attempting
to move the trailer straight back under some
conditions. USING THE TRAILER BACKUP
ASSISTANCE VIEWS
Up to seven camera views could be
available when using trailer backup
assistance. Use the view that helps you the
most when reversing your vehicle and
trailer. 360° camera view. Shows a
360° view on the right-hand side
of the touchscreen with a rear
camera view on the left-hand side of the
touchscreen. Rear view camera view. Shows
your trailer hitch or what is
directly behind your vehicle.
Rear split view camera view.
Shows a
180° degree view of
what is behind your vehicle. Bed camera view. Shows the
truck bed.
Note: This view also provides a
picture-in-picture view. Trailer AUX camera view. Shows
a rear view camera image of
what is behind your trailer. You
need to separately purchase this camera
and have it installed.
Note: This view also provides a
picture-in-picture view. Trailer reverse guidance view.
Shows you a view of the sides of
your truck and the trailer. In auto
mode, this view moves as the trailer moves
so that you do not have to adjust the
camera as you turn. Left and right arrows
let you see other camera views. Picture-in-picture view. Shows
a main view and a secondary
view when in bed camera view
or trailer AUX camera view.
451
F-150 (TFD) Canada/United States of America, enUSA, Edition date: 202104, Second-Printing Trailer Backup AssistanceE313026 E313027 E310996 E310967 E310974 E310995 E311776 E310965 E351663
Page 456 of 796
Note:
If you have a 8 in (20 cm)
touchscreen, picture-in-picture is off by
default. Press the picture-in-picture icon on
the touchscreen to switch picture-in-picture
view on and off.
Note: If you have a
12 in (30 cm)
touchscreen, picture-in-picture is on by
default and cannot be switched off. Swap. Press to swap between
picture-in-picture views.
Auto. Press to return to auto
view.
Note: Auto mode is the default setting.
Hitch Angle Graphic
The hitch angle graphic shows a small
representation of your truck and trailer with
visual feedback to help you monitor the
trailer. The graphic shows two different
colored lines for the trailer hitch angle. A
black line shows you where your trailer is
in relation to your vehicle. The white line
represents the amount the trailer can turn
based on knob input.
The graphic shows a yellow and red zone
for the hitch angle to warn you of a high
angle condition that could require you to
pull forward to reduce the hitch angle. The
angle limits for each zone vary based on
the trailer length. The yellow zone indicates you are
approaching the maximum controllable
trailer angle for the system. When the
trailer enters this zone, it is more difficult
to reduce the trailer turn when backing up.
It may be necessary to put your vehicle
back into drive (D) and pull forward to get
the truck and trailer back to an in-line
position.
The red zone indicates you have exceeded
the maximum controllable trailer angle for
the system. Immediately stop reversing.
Put your vehicle into drive (D) and pull
forward until the trailer is no longer in the
red zone.
Setting the
Trailer Angle Limit
1. Press
Features on the touchscreen.
2. Press
Towing.
3. Press
Manage trailers.
4. Press
Pro Trailer Backup Assist.
5. Press
Trailer Angle Limit.
6. Press a setting.
Normal Control Angle
Default setting. This provides a balanced
limit that returns from a turn to straight
backing with minimal change to the trailer
direction.
Max Control Angle
Increases the trailer angle limit close to the
maximum controllable angle to allow
sharper turns but also causes more change
in the trailer direction when straightening
out from a turn.
452
F-150 (TFD) Canada/United States of America, enUSA, Edition date: 202104, Second-Printing Trailer Backup AssistanceE351662 E315644
Page 467 of 796
Note:
If the trailer was connected just prior
to turning the system on, you may need to
drive forward to initialize the system. Follow
the instructions on the touchscreen to
activate the system.
USING TRAILER REVERSE
GUIDANCE VIEWS
Up to seven camera views could be
available when using trailer reverse
guidance. Use the view that helps you the
most when reversing your vehicle and
trailer. 360° camera view. Shows a
360° view on the right-hand side
of the touchscreen with a rear
camera view on the left-hand side of the
touchscreen. Rear view camera view. Shows
your trailer hitch or what is
directly behind your vehicle.
Rear split view camera view.
Shows a
180° degree view of
what is behind your vehicle. Bed camera view. Shows the
truck bed.
Note: This view also provides a
picture-in-picture view. Trailer AUX camera view. Shows
a rear view camera image of
what is behind your trailer. You
need to separately purchase this camera
and have it installed.
Note: This view also provides a
picture-in-picture view. Trailer reverse guidance view.
Shows you a view of the sides of
your truck and the trailer. In auto
mode, this view moves as the trailer moves
so that you do not have to adjust the
camera as you turn. Left and right arrows
let you see other camera views. Straight backup mode. Shows
which way to turn your steering
wheel to keep the trailer straight.
Use this view when you want to keep your
trailer completely in line with your truck.
Note: This view also provides a
picture-in-picture view.
Note: It may be helpful to shift your vehicle
into drive (D), pull forward and straighten
out the vehicle and trailer before engaging
straight backup mode. Picture-in-picture view. Shows
a main view and a secondary
view when in bed camera view,
trailer AUX camera view or straight backup
mode.
Note: If you have a 8 in (20 cm)
touchscreen, picture-in-picture is off by
default. Press the picture-in-picture icon on
the touchscreen to switch picture-in-picture
view on and off.
Note: If you have a
12 in (30 cm)
touchscreen, picture-in-picture is on by
default for bed camera view and trailer AUX
camera view and cannot be switched off.
Press the picture-in-picture icon on the
touchscreen to switch picture-in-picture
view on and off in straight backup mode. Swap. Press to swap between
picture-in-picture views.
This takes you back to the
360°
camera system and out of the
trailer reverse guidance feature. Auto. Press to return to auto
view.
463
F-150 (TFD) Canada/United States of America, enUSA, Edition date: 202104, Second-Printing Trailer Reverse GuidanceE310996 E310967 E310974 E310995 E311776 E310965 E224484 E351663 E351662 E224486 E315644
Page 468 of 796
Note:
Auto mode is the default setting.
Hitch Angle Graphic
The hitch angle graphic shows a small
representation of your truck and trailer with
visual feedback to help you monitor the
trailer. The graphic shows two different
colored lines for the trailer hitch angle. A
black line shows you where your trailer is
in relation to your vehicle. The white line
represents the amount the trailer can turn
based on steering wheel position.
The graphic shows a yellow and red zone
for the hitch angle to warn you of a high
angle condition that could require you to
pull forward to reduce the hitch angle. The
angle limits for each zone vary based on
the trailer length. The yellow zone indicates you are
approaching the maximum controllable
trailer angle for the system. When the
trailer enters this zone, it is more difficult
to reduce the trailer turn when backing up.
It may be necessary to put your vehicle
back into drive (D) and pull forward to get
the truck and trailer back to an in-line
position.
The red zone indicates you have exceeded
the maximum controllable trailer angle for
the system. Immediately stop reversing.
Put your vehicle into drive (D) and pull
forward until the trailer is no longer in the
red zone.
464
F-150 (TFD) Canada/United States of America, enUSA, Edition date: 202104, Second-Printing Trailer Reverse Guidance
Page 474 of 796
OFF-ROAD DRIVING
WHAT IS OFF-ROAD DRIVING
Off-road driving is driving your vehicle on
unsurfaced roads or trails, made from dirt,
rocks, sand and mud.
OFF-ROAD DRIVING
PRECAUTIONS - RAPTOR
WARNING: If you continue to drive
your vehicle when the engine is
overheating, the engine could stop
without warning. Failure to follow this
instruction could result in the loss of
control of your vehicle.
Before going off-road driving, consult with
all the appropriate government entities to
determine where you are legally allowed
to operate your vehicle and what permits
or registrations are required to do so.
Inspect your vehicle before and after any
off-road driving.
Familiarize yourself with the dimensions
of your vehicle including approach angles,
breakover angles, and ground clearance.
Also familiarize yourself with the features
of your vehicle. Some of these features
such as drive modes and cameras can
improve your off-road driving experience.
Secure loose objects inside your vehicle
and in the cargo area.
BASIC OFF-ROAD DRIVING
TECHNIQUES - RAPTOR
Grip the steering wheel with your thumbs
on the outside of the rim. This reduces the
risk of injury due to abrupt steering wheel
motions that occur when negotiating rough
terrain. If you are driving in a dusty area, be sure to
leave ample distance between your vehicle
and any other vehicles to allow for
adequate vision.
BASIC OFF-ROAD DRIVING
TECHNIQUES
Off-road Driving Hints
Before taking your vehicle off-roading, a
basic vehicle inspection should be done to
make sure that the vehicle is in top working
condition. It is always recommended that
at least two vehicles are used while
off-roading. The buddy system helps make
sure that help is close at hand should a
vehicle become stuck or damaged. It is also
wise to take supplies such as a first aid kit,
supply of water, tow strap, cell or satellite
phone with you any time an off-road
excursion is planned.
1. Grip the steering wheel with thumbs
on the outside of the rim. This will
reduce the risk of injury due to abrupt
steering wheel motions that occur
when negotiating rough terrain.
2. Throttle, brake and steering inputs should be made in a smooth and
controlled manner. Sudden inputs to
the controls can cause loss of traction
or upset the vehicle, especially while
on loose terrain or while crossing
obstacles such as rocks or logs.
3. Look ahead on your route noting upcoming obstacles, or any other
factors which may indicate a change
in available traction, and adjust the
vehicle speed and route accordingly.
4. When driving off-road, if the front or rear suspension is bottoming out
and/or excessive contact with the
skid-plates is encountered, reduce
vehicle speed to avoid potential
damage to the vehicle.
470
F-150 (TFD) Canada/United States of America, enUSA, Edition date: 202104, Second-Printing Driving Hints
Page 478 of 796

DRIVING THROUGH WATER
LIMITATIONS - RAPTOR
Maximum Wading
Depth
Model
32 in (810 mm)
All.
When you are driving though water do not
exceed 4 mph (7 km/h).
WATER WADING WARNING:
Do not attempt to
cross a deep, fast flowing body of water.
Failure to follow this instruction could
result in the loss of control of your
vehicle, personal injury or death.
As the water depth increases, you must
reduce your vehicle speed to avoid
potential vehicle damage. •
Always determine the depth before
attempting a water crossing. Never
drive through water that is higher than
the bottom of the wheel hubs.
• Slowly proceed and avoid splashing
water any more than is necessary. •
Be aware that obstacles and debris
may be beneath the water ’s surface.
• Keep the doors fully closed during the
water crossing.
• After driving through water and as soon
as it is safe to do so check the brakes,
horn, lights, and steering wheel to
confirm those systems are functioning
properly.
Note: Engine damage can occur if water
enters the air filter.
OFF-ROAD DRIVING AIDS -
RAPTOR
Selecting an Off-Road Drive Mode
Using the appropriate drive mode increases
your vehicle's control. See
Drive Mode
Control (page 371).
Using Four-Wheel Drive
Your vehicle has a four-wheel drive system
that offers various modes to help you
optimize traction on any off-road surface.
See
Four-Wheel Drive (page 291).
Using the Cameras Off-Road
Use the 360 degree camera to enhance
your off-road experience. See 360 Degree
Camera
(page 342).
Using the Rear Differential Lock
When engaged, the rear differential lock
provides additional traction to your vehicle
by forcing the two rear wheels to turn at
the same speed.
Note: Rear differential lock is only available
when the vehicle is in 4H or 4L. See
Electronic Locking Differential (page 301).
474
F-150 (TFD) Canada/United States of America, enUSA, Edition date: 202104, Second-Printing Driving HintsE310941
Page 480 of 796

WARNING: Always re-inflate tires
to recommended tire pressures before
the vehicle is operated on-road. The
recommended pressure is located on the
tire label or safety certification label,
located on the B-pillar, inside the driver's
door.
Driving off-road places more stress on your
vehicle than most on-road driving. After
driving off-road check for damage to your
vehicle and, if necessary, have your vehicle
fixed as soon as possible.
Inspect the underbody of your vehicle by
checking tires, body structure, steering,
suspension, and exhaust system for
damage.
Check the radiator for mud and debris and
clean as needed.
Remove accumulations of plants or brush.
These things could be a fire hazard or hide
damage to the fuel lines, brake hoses, and
propeller shafts.
After extended operation in mud, sand,
water, or similar dirty conditions, inspect
the underbody and clean your vehicle as
soon as possible.
If you experience unusual vibration after
driving in mud, slush or similar conditions,
check the wheels for impacted material.
Impacted material can cause vibrations
while driving and wheel imbalance.
Remove the material to resolve the
problem.
COLD WEATHER
PRECAUTIONS
The functional operation of some
components and systems can be affected
at temperatures below approximately
-13°F (-25°C)
. DRIVING ON SNOW AND ICE WARNING:
If you are driving in
slippery conditions that require tire
chains or cables, then it is critical that
you drive cautiously. Keep speeds down,
allow for longer stopping distances and
avoid aggressive steering to reduce the
chances of a loss of vehicle control
which can lead to serious injury or death.
If the rear end of your vehicle slides while
cornering, steer in the direction of the
slide until you regain control of your
vehicle.
On ice and snow, you should drive more
slowly than usual. Your vehicle has a four
wheel anti-lock brake system, do not pump
the brake pedal.
See Anti-Lock Braking
System Limitations (page 308).
BREAKING-IN
Your vehicle requires a break-in period. For
the first 1,000 mi (1,600 km), avoid driving
at high speeds, heavy braking, aggressive
shifting or using your vehicle to tow. During
this time, your vehicle may exhibit some
unusual driving characteristics.
DRIVING ECONOMICALLY
The following helps to improve fuel
consumption:
• There is no need to wait for your engine
to warm up. The vehicle is ready to
drive immediately after starting.
• Your fuel consumption should improve
throughout your hybrid's break-in
period.
• Accelerate and slow down in a smooth,
moderate fashion.
476
F-150 (TFD) Canada/United States of America, enUSA, Edition date: 202104, Second-Printing Driving Hints
Page 481 of 796

•
Moderate braking is particularly
important since it allows you to
maximize the energy captured by the
regenerative braking system.
• Drive at steady speeds without
stopping.
• Anticipate stops; slowing down may
eliminate the need to stop.
• Driving on flat terrain.
• Drive at reasonable speeds and
observe posted speed limits.
• Shut all windows when driving at high
speeds.
• Combine errands and minimize
stop-and-go driving.
• Drive with the tonneau cover installed
if your vehicle comes with one.
• Keep the tires properly inflated and use
only the recommended size.
• Use the recommended engine oil.
• Follow the recommended maintenance
schedule and carry out the
recommended checks.
• Perform all scheduled maintenance.
Note: Having your engine running is not
always an indication of inefficiency. In some
cases, it is actually more efficient than
driving in electric mode.
Avoid these actions; they reduce your fuel
consumption:
• Revving the engine.
• Aggressive driving increases the
amount of energy required to move
your vehicle.
• Driving in lower temperatures during
the first 5–10 mi (12 –16 km) of driving.
• Idle for periods longer than one minute.
• Use the air conditioner or front
defroster. •
Adding certain accessories to your
vehicle like bug deflectors, rollbars,
light bars, running boards, ski racks or
luggage racks.
• Use the speed control in hilly terrain.
• Using fuel blended with alcohol.
• Drive a heavily loaded vehicle or tow a
trailer.
• Driving with the wheels out of
alignment.
DRIVING IN SPECIAL
CONDITIONS
EMERGENCY MANEUVERS
In an unavoidable emergency where you
must make a sudden sharp maneuver, turn
the steering wheel only as rapidly and as
far as required to avoid the emergency.
Apply smooth pressure to the accelerator
pedal or brake pedal as needed. Avoid
abrupt steering, acceleration and braking
changes. Abrupt changes could increase
the risk of vehicle roll over, loss of vehicle
control and personal injury. If possible, use
any available road surfaces to bring your
vehicle under control.
FLOOR MATS WARNING:
Use a floor mat
designed to fit the footwell of your
vehicle that does not obstruct the pedal
area. Failure to follow this instruction
could result in the loss of control of your
vehicle, personal injury or death. WARNING:
Pedals that cannot
move freely can cause loss of vehicle
control and increase the risk of serious
personal injury.
477
F-150 (TFD) Canada/United States of America, enUSA, Edition date: 202104, Second-Printing Driving Hints