2021 FORD F-150 center console
[x] Cancel search: center consolePage 11 of 796

Power Outlet - Vehicles With:
Pickup Bed Power Generator
Outlet
What Is the Power Outlet .........................216
Power Outlet Precautions - Vehicles With: 2kW ...................................................
216
Power Outlet Precautions - Vehicles With: 2.4kW/7.2kW ..................................
217
Locating the Power Outlets .....................
218
Power Outlet Indicators - Vehicles With: 2kW ...............................................................
218
Power Outlet Indicators - Vehicles With: 2.4kW/7.2kW .............................................
219
What Is Utility Idle Mode - Vehicles With: Flip Key ........................................................
219
Switching Utility Idle On and Off - Vehicles With: Flip Key ..........................
219
What Is Generator Mode .........................
220
Switching Generator Mode On and Off ........................................................................\
220
Resetting Ground Fault Detection .......
220
Resetting the Circuit Breaker - Vehicles With: 7.2kW ................................................
221
Power Outlet – Troubleshooting ...........
222
Power Outlet - Vehicles With: 120V Power Outlet
What Is the Power Outlet ........................
225
Power Outlet Precautions .......................
225
Power Outlet Limitations .........................
225
Locating the Power Outlets ....................
225
Power Outlet Indicators ...........................
226
Power Outlet - Vehicles With: 12V Power Outlet
What Is the Power Outlet .........................
227
Power Outlet Precautions ........................
227
Locating the Power Outlets ....................
227Center Console Work Surface
Using the Center Console Work Surface
- Vehicles With: Column Shift ............
228
Using the Center Console Work Surface - Vehicles With: Console Shift ...........
229
Center Console Work Surface – Troubleshooting ......................................
230
Wireless Accessory Charger
What Is the Wireless Accessory Charger ........................................................................\
.
231
Wireless Accessory Charger Precautions ........................................................................\
.
231
Locating the Wireless Accessory Charger ........................................................................\
.
231
Charging a Wireless Device ......................
231
Storage
Cup Holders ..................................................
232
Glove Compartment ..................................
232
Under Seat Storage ....................................
233
Glasses Holder .............................................
235
Starting and Stopping the Engine
Starting and Stopping the Engine – Precautions ...............................................
236
Ignition Switch .............................................
236
Push Button Ignition Switch ...................
237
Starting the Engine .....................................
237
Engine Block Heater ..................................
240
Stopping the Engine ...................................
241
Police Engine Idle - Police Responder ........................................................................\
242
Automatic Engine Stop - Vehicles With: Keyless Entry and Push Button Start
........................................................................\
243
Accessing the Passive Key Backup Position ......................................................
244
Starting and Stopping the Engine – Troubleshooting ......................................
244
7
F-150 (TFD) Canada/United States of America, enUSA, Edition date: 202104, Second-Printing Table of Contents
Page 44 of 796
See Feature Bar (page 638).
F
See
Opening the Glove Compartment (page 232).
G
See
What Is the Power Outlet (page 227).
H
See
Identifying the Climate Control Unit (page 186). See Identifying the
Climate Control Unit (page 191).
I
See
Identifying the Audio Unit (page 626).
J
See
Selecting a Four-Wheel Drive Mode (page 294).
K
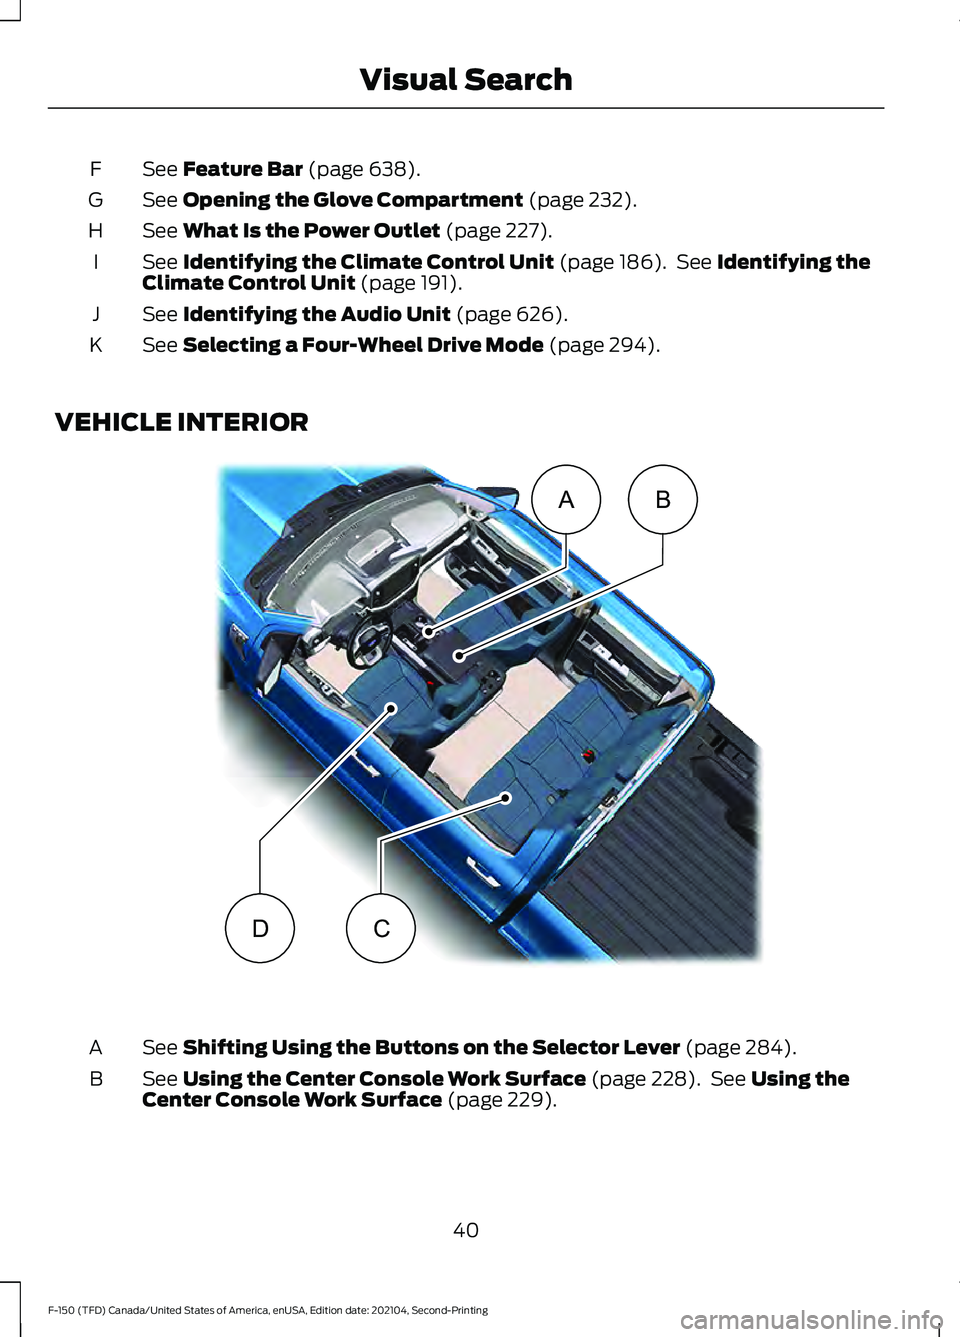
VEHICLE INTERIOR See
Shifting Using the Buttons on the Selector Lever (page 284).
A
See
Using the Center Console Work Surface (page 228). See Using the
Center Console Work Surface (page 229).
B
40
F-150 (TFD) Canada/United States of America, enUSA, Edition date: 202104, Second-Printing Visual SearchAB
CDE320265
Page 45 of 796
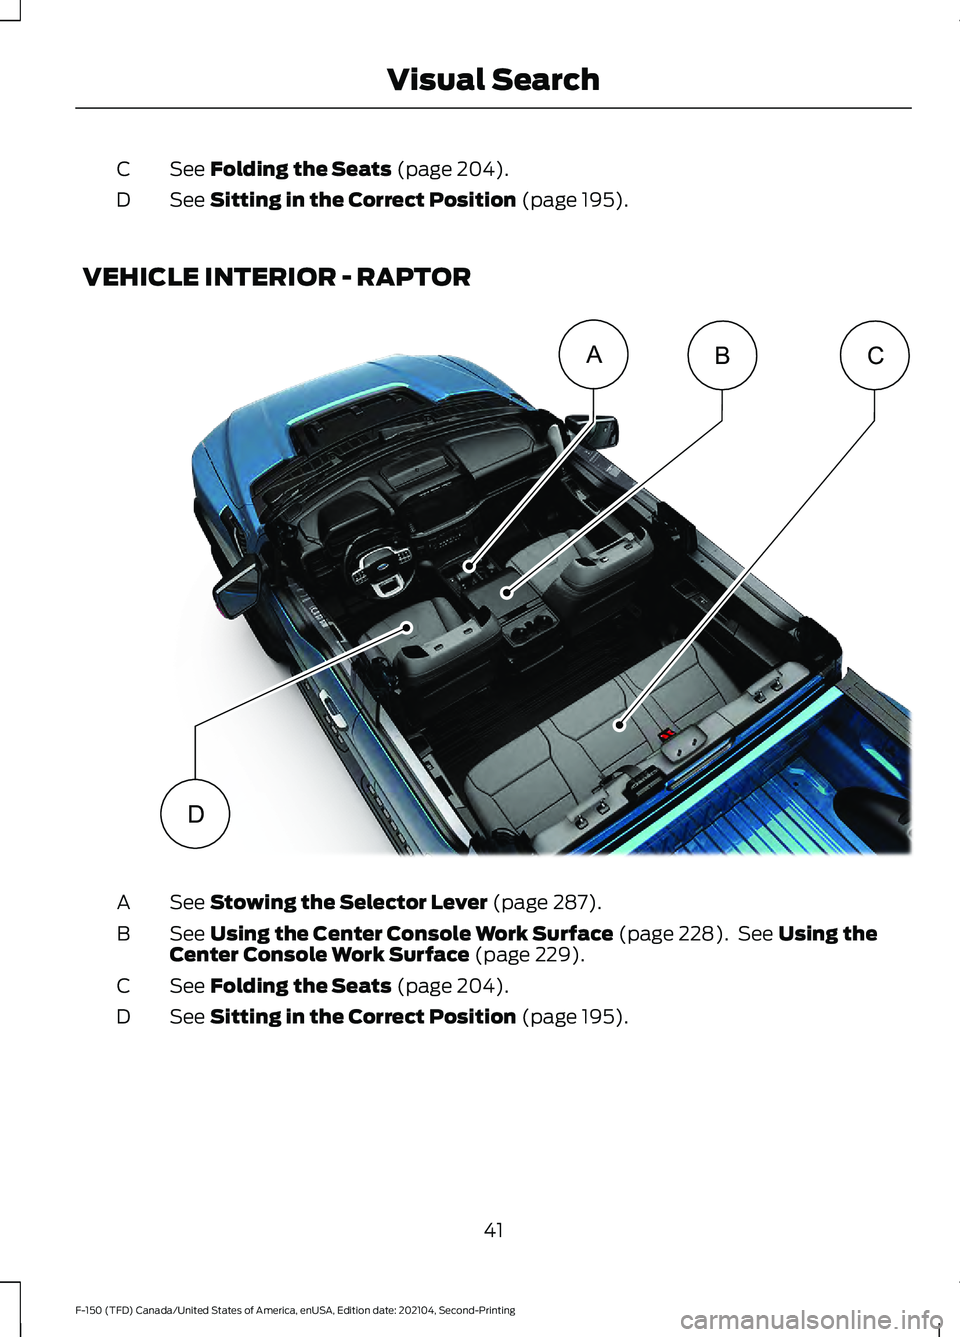
See Folding the Seats (page 204).
C
See
Sitting in the Correct Position (page 195).
D
VEHICLE INTERIOR - RAPTOR See
Stowing the Selector Lever (page 287).
A
See
Using the Center Console Work Surface (page 228). See Using the
Center Console Work Surface (page 229).
B
See
Folding the Seats (page 204).
C
See
Sitting in the Correct Position (page 195).
D
41
F-150 (TFD) Canada/United States of America, enUSA, Edition date: 202104, Second-Printing Visual SearchABC
DE343519
Page 80 of 796
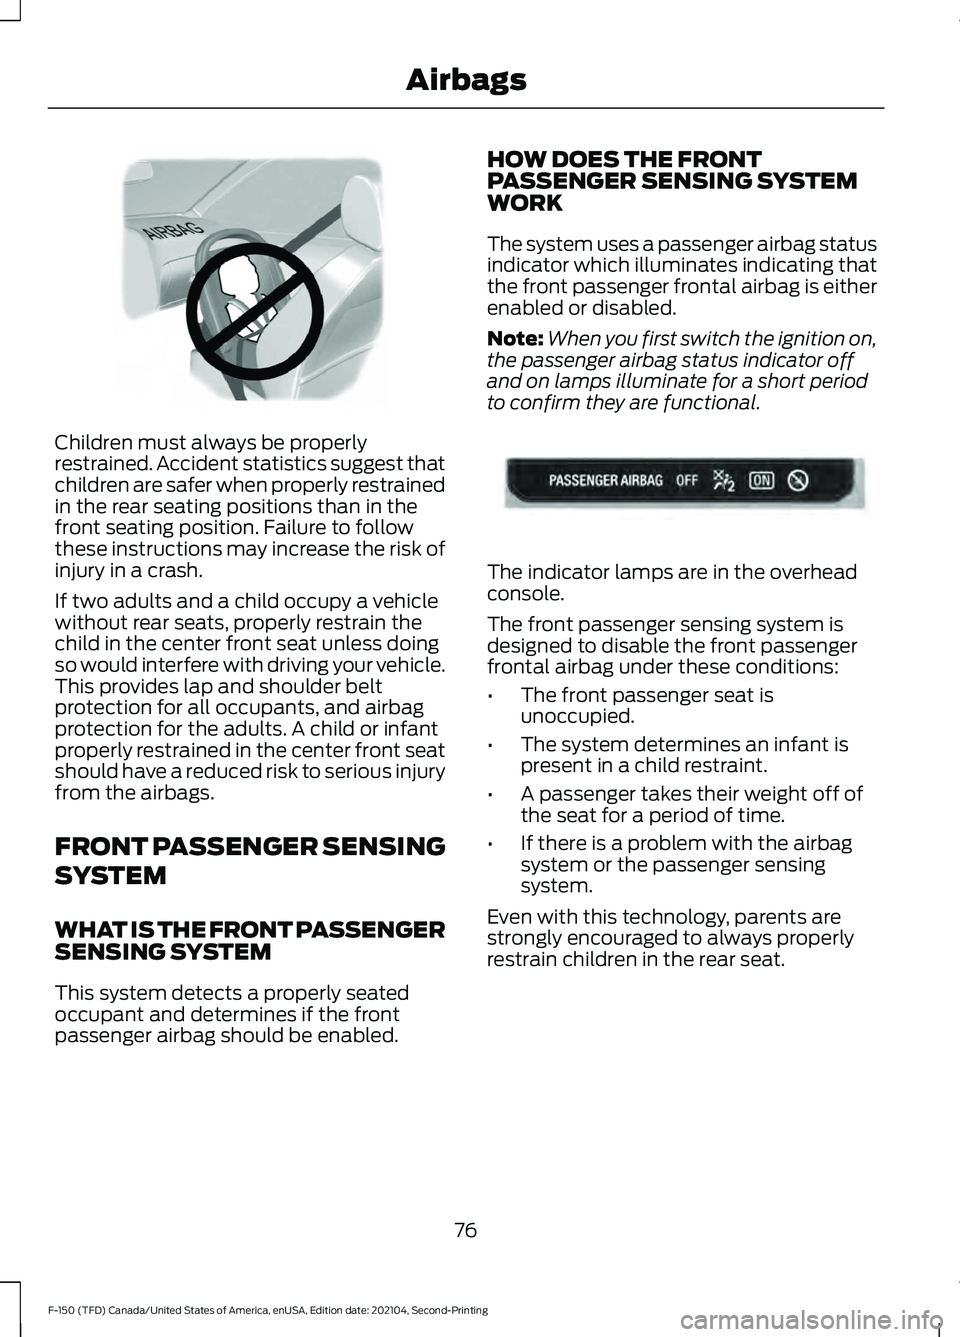
Children must always be properly
restrained. Accident statistics suggest that
children are safer when properly restrained
in the rear seating positions than in the
front seating position. Failure to follow
these instructions may increase the risk of
injury in a crash.
If two adults and a child occupy a vehicle
without rear seats, properly restrain the
child in the center front seat unless doing
so would interfere with driving your vehicle.
This provides lap and shoulder belt
protection for all occupants, and airbag
protection for the adults. A child or infant
properly restrained in the center front seat
should have a reduced risk to serious injury
from the airbags.
FRONT PASSENGER SENSING
SYSTEM
WHAT IS THE FRONT PASSENGER
SENSING SYSTEM
This system detects a properly seated
occupant and determines if the front
passenger airbag should be enabled. HOW DOES THE FRONT
PASSENGER SENSING SYSTEM
WORK
The system uses a passenger airbag status
indicator which illuminates indicating that
the front passenger frontal airbag is either
enabled or disabled.
Note:
When you first switch the ignition on,
the passenger airbag status indicator off
and on lamps illuminate for a short period
to confirm they are functional. The indicator lamps are in the overhead
console.
The front passenger sensing system is
designed to disable the front passenger
frontal airbag under these conditions:
•
The front passenger seat is
unoccupied.
• The system determines an infant is
present in a child restraint.
• A passenger takes their weight off of
the seat for a period of time.
• If there is a problem with the airbag
system or the passenger sensing
system.
Even with this technology, parents are
strongly encouraged to always properly
restrain children in the rear seat.
76
F-150 (TFD) Canada/United States of America, enUSA, Edition date: 202104, Second-Printing AirbagsE142846 E181984
Page 81 of 796

•
When the front passenger sensing
system disables the front passenger
frontal airbag, the passenger airbag
status indicator illuminates the off
lamp.
• If you have installed the child restraint
and the passenger airbag status
indicator illuminates the on lamp,
switch your vehicle off, remove the
child restraint from your vehicle and
reinstall the restraint following the
child restraint manufacturer's
instructions.
The front passenger sensing system works
with sensors that are part of the front
passenger seat and seatbelt. The sensors
are designed to detect the presence of a
properly seated occupant and determine
if the front passenger frontal airbag should
be enabled.
• When the front passenger sensing
system enables the front passenger
frontal airbag, the passenger airbag
status indicator illuminates the on
lamp.
If a person of adult size is sitting in the front
passenger seat, but the passenger airbag
status indicator off lamp is illuminated, it
is possible that the person is not sitting
properly in the seat. If this happens:
• Switch your vehicle off and ask the
person to place the seat backrest in an
upright position.
• Have the person sit upright in the seat,
centered on the seat cushion, with the
person's legs comfortably extended.
• Restart your vehicle and have the
person remain in this position for about
two minutes. This allows the system
to detect that person and enable the
passenger frontal airbag.
• If the indicator off lamp remains
illuminated even after this, you should
advise the person to ride in the rear
seat. After all occupants have adjusted their
seats and put on seatbelts, it is very
important that they continue to sit upright,
leaning against the seat backrest, and
centered on the seat cushion, with their
feet comfortably extended on the floor.
Sitting improperly can increase the chance
of injury in a crash event. For example, if
an occupant slouches, lies down, turns
sideways, sits forward, leans forward or
sideways, or puts one or both feet up, the
chance of injury during a crash greatly
increases.
If you think that the state of the passenger
airbag status indicator lamp is incorrect,
check for the following:
•
Objects lodged underneath the seat.
• Objects between the seat cushion and
the center console.
• Objects hanging off the seat backrest.
• Objects stowed in the seat backrest
map pocket.
• Objects placed on the occupant's lap.
• Cargo interference with the seat
• Other passengers pushing or pulling on
the seat.
• Rear passenger feet and knees resting
or pushing on the seat.
The listed conditions could cause the
weight of a properly seated occupant to
be incorrectly interpreted by the front
passenger sensing system. The person in
the front passenger seat could appear
heavier or lighter due to the conditions
listed. Make sure the front passenger
sensing system is operating
properly. See Crash Sensors
and Airbag Indicator (page 79).
If the airbag readiness light is on, do the
following:
77
F-150 (TFD) Canada/United States of America, enUSA, Edition date: 202104, Second-Printing AirbagsE67017
Page 87 of 796
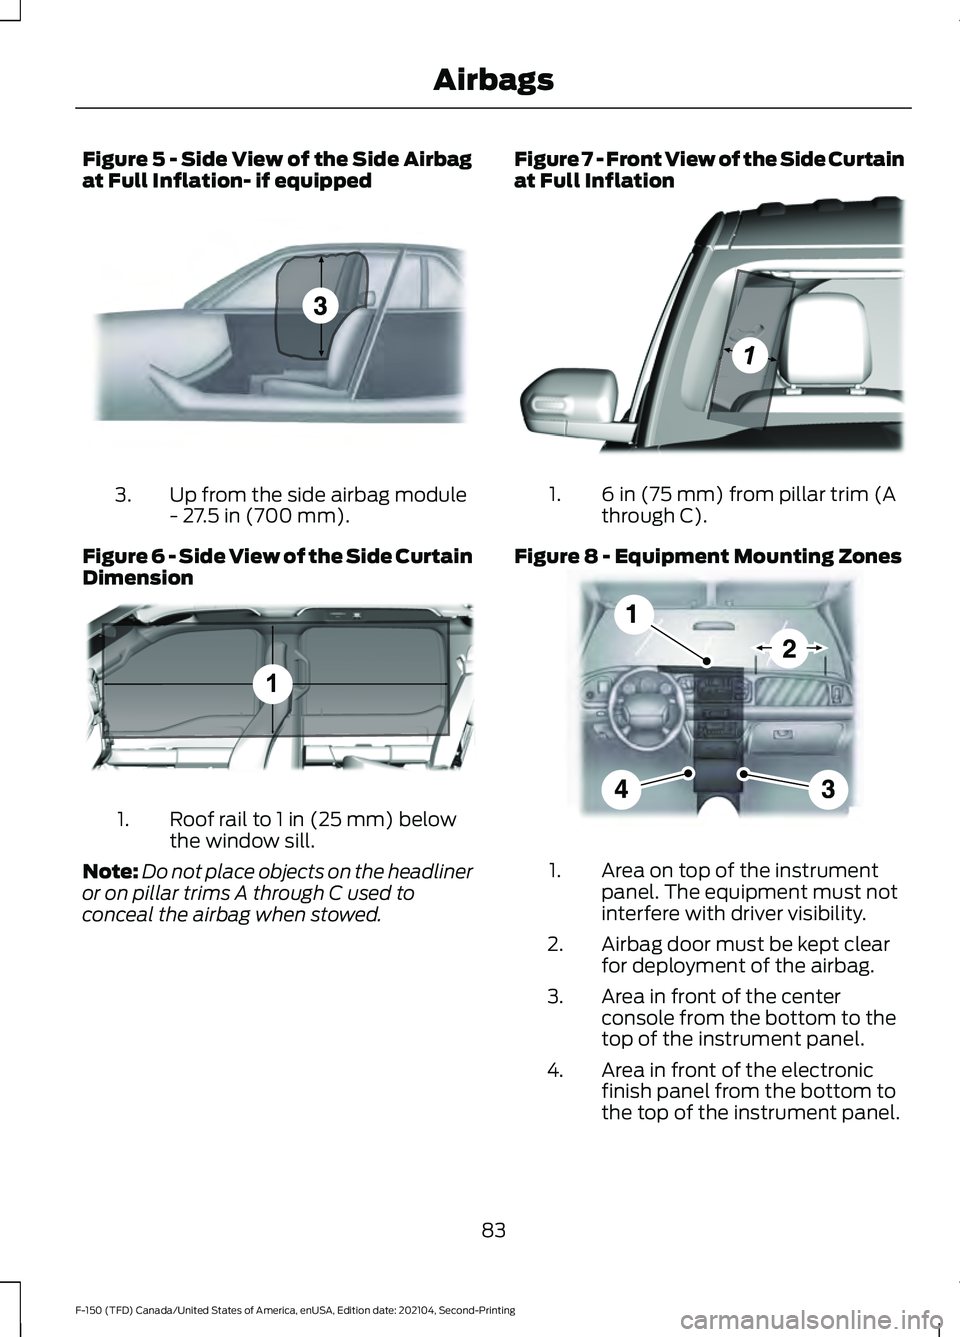
Figure 5 - Side View of the Side Airbag
at Full Inflation- if equipped
Up from the side airbag module
- 27.5 in (700 mm).
3.
Figure 6 - Side View of the Side Curtain
Dimension Roof rail to 1 in (25 mm) below
the window sill.
1.
Note: Do not place objects on the headliner
or on pillar trims A through C used to
conceal the airbag when stowed. Figure 7 - Front View of the Side Curtain
at Full Inflation 6 in (75 mm) from pillar trim (A
through C).
1.
Figure 8 - Equipment Mounting Zones Area on top of the instrument
panel. The equipment must not
interfere with driver visibility.
1.
Airbag door must be kept clear
for deployment of the airbag.
2.
Area in front of the center
console from the bottom to the
top of the instrument panel.
3.
Area in front of the electronic
finish panel from the bottom to
the top of the instrument panel.
4.
83
F-150 (TFD) Canada/United States of America, enUSA, Edition date: 202104, Second-Printing AirbagsE201579 1E350301 E301077 E201581
Page 88 of 796
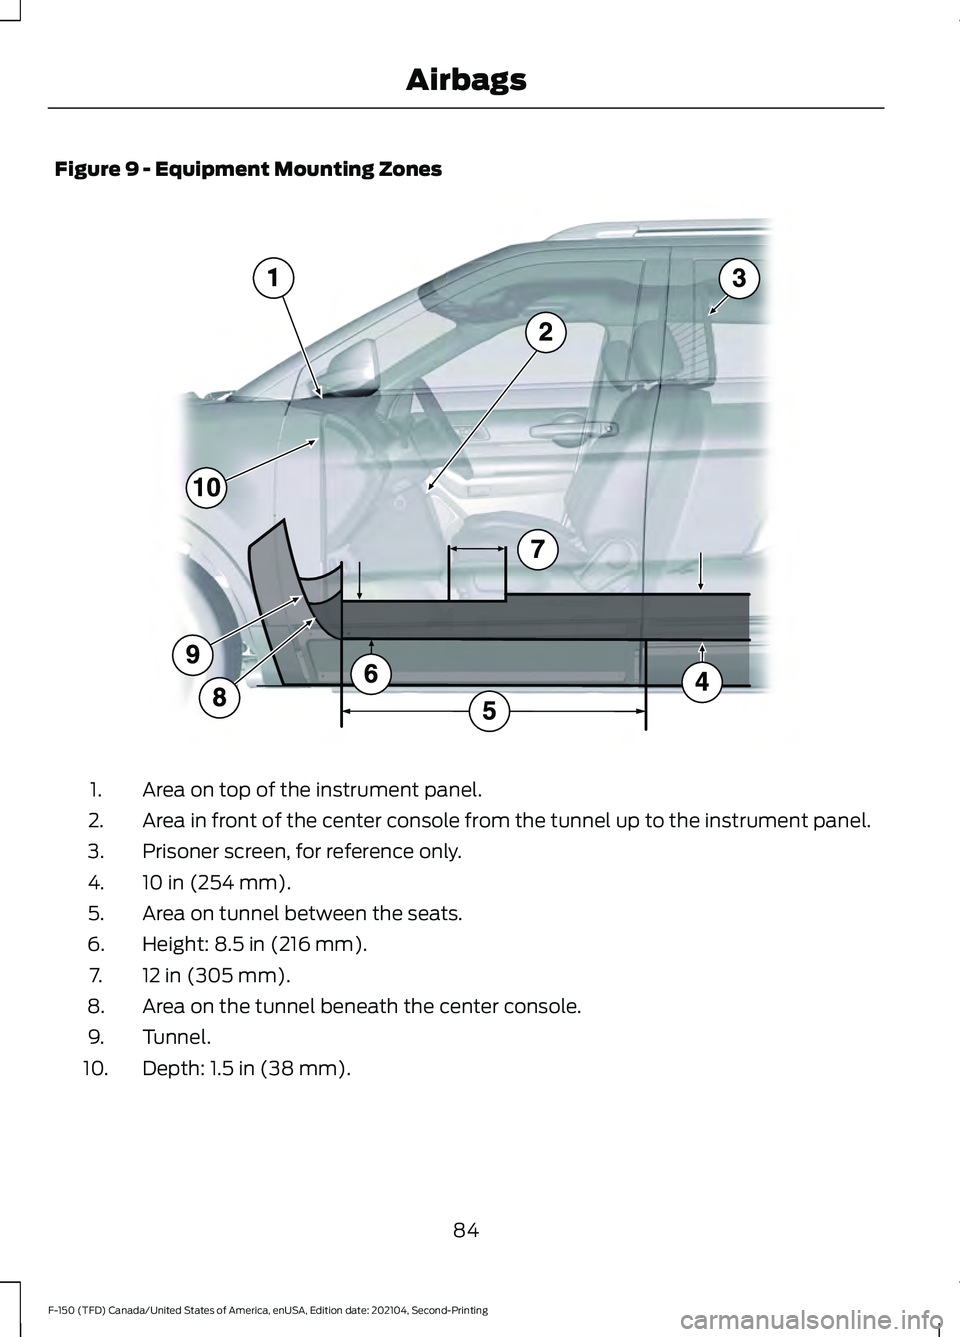
Figure 9 - Equipment Mounting Zones
Area on top of the instrument panel.
1.
Area in front of the center console from the tunnel up to the instrument panel.
2.
Prisoner screen, for reference only.
3.
10 in (254 mm).
4.
Area on tunnel between the seats.
5.
Height: 8.5 in (216 mm).
6.
12 in (305 mm).
7.
Area on the tunnel beneath the center console.
8.
Tunnel.
9.
Depth: 1.5 in (38 mm).
10.
84
F-150 (TFD) Canada/United States of America, enUSA, Edition date: 202104, Second-Printing Airbags E206315
Page 99 of 796

6. Install a new battery with the + facing
up.
7. Replace the battery cover. Dispose of old batteries in an
environmentally friendly way.
Seek advice from your local
authority about recycling old batteries.
Note: Do not wipe off any grease on the
battery terminals or on the back surface of
the circuit board.
Note: Replacing the battery does not erase
the programmed key from your vehicle. The
remote control should operate normally.
REPLACING A LOST KEY OR
REMOTE CONTROL
You can purchase replacement keys or
remote controls from an authorized dealer.
Authorized dealers can program remote
controls for your vehicle. Note:
Your vehicle keys came with a
security label that provides important key
cut information. Keep the label in a safe
place for future reference. PROGRAMMING THE REMOTE
CONTROL - VEHICLES WITH:
PUSH BUTTON START
General Information
You must have two previously
programmed remote controls inside your
vehicle and the new unprogrammed
remote controls readily accessible. Contact
an authorized dealer to have the spare
remote control programmed if two
previously programmed remotes are not
available. Make sure that your vehicle is
off before beginning this procedure. Make
sure that you close all the doors before
beginning and that they remain closed
throughout the procedure. Perform all
steps within 30 seconds of starting the
sequence. Stop and wait for at least one
minute before starting again if you perform
any steps out of sequence.
Read and understand the entire procedure
before you begin.
Note:
You can program a maximum of four
remote controls to your vehicle.
Note: If your programmed remote controls
are lost or stolen and you do not have an
extra coded remote, you need to have your
vehicle towed to an authorized dealer. Store
an extra programmed remote away from
your vehicle in a safe place to help prevent
any inconvenience. Contact an authorized
dealer to purchase additional spare or
replacement remotes.
Steps for Programming Your Spare
Remote Control
Note: Your vehicle is equipped with one of
the following center consoles.
95
F-150 (TFD) Canada/United States of America, enUSA, Edition date: 202104, Second-Printing Keys and Remote ControlsE107998 E151795