2021 FORD EXPLORER key
[x] Cancel search: keyPage 209 of 577
Returning Your Vehicle to Normal
Mode
1.
Reconnect the negative (black) battery
cable to the battery.
2. Apply the parking brake. See Electric
Parking Brake (page 215).
Note: If the vehicle battery is dead, for
example, no electrical power is available,
you require an external power to apply the
parking brake.
3. Fully apply the brake pedal and hold, do not release.
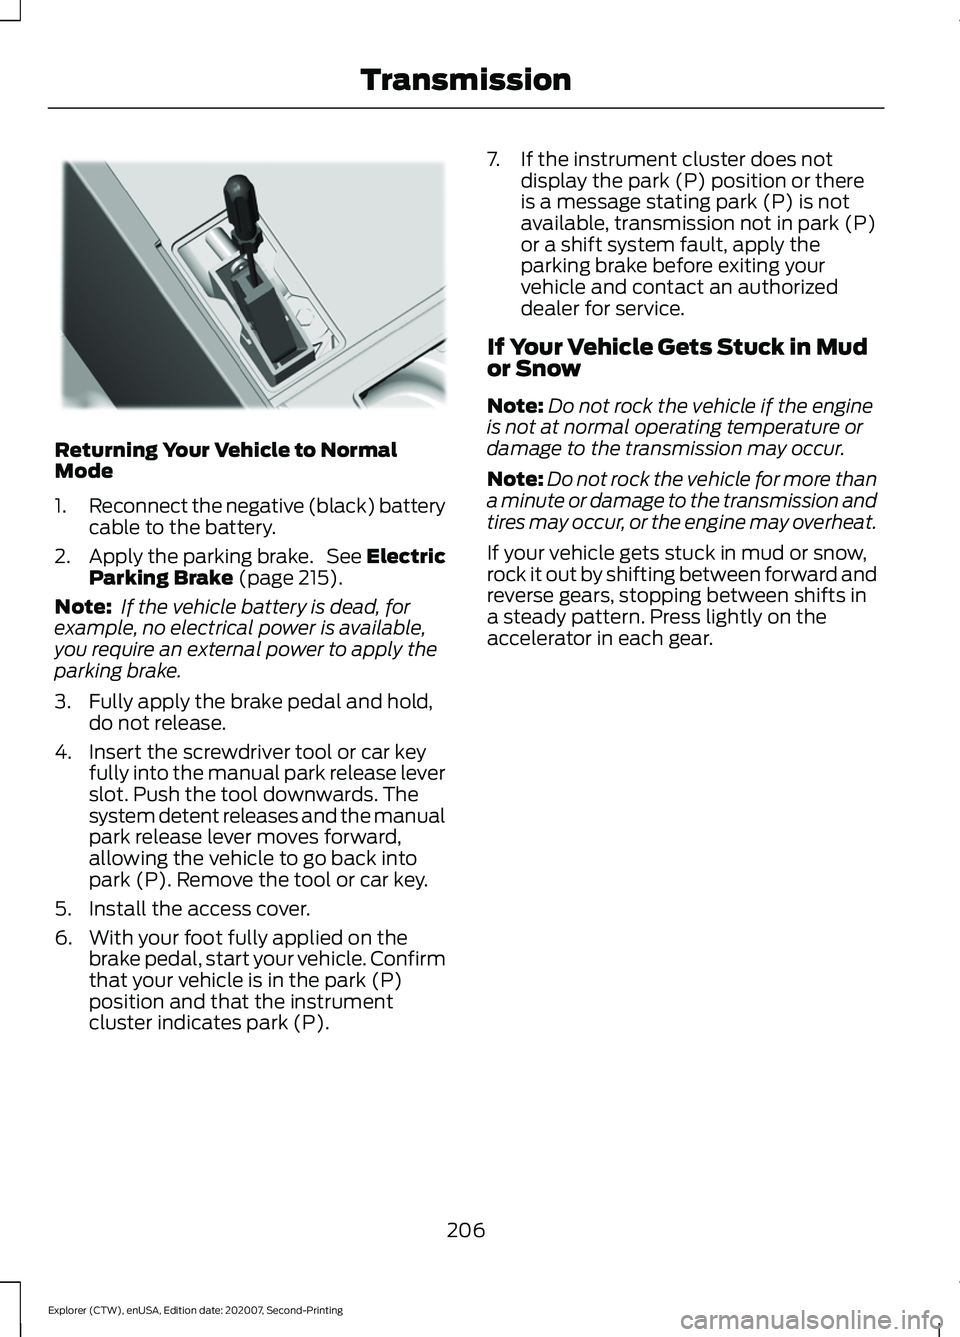
4. Insert the screwdriver tool or car key fully into the manual park release lever
slot. Push the tool downwards. The
system detent releases and the manual
park release lever moves forward,
allowing the vehicle to go back into
park (P). Remove the tool or car key.
5. Install the access cover.
6. With your foot fully applied on the brake pedal, start your vehicle. Confirm
that your vehicle is in the park (P)
position and that the instrument
cluster indicates park (P). 7. If the instrument cluster does not
display the park (P) position or there
is a message stating park (P) is not
available, transmission not in park (P)
or a shift system fault, apply the
parking brake before exiting your
vehicle and contact an authorized
dealer for service.
If Your Vehicle Gets Stuck in Mud
or Snow
Note: Do not rock the vehicle if the engine
is not at normal operating temperature or
damage to the transmission may occur.
Note: Do not rock the vehicle for more than
a minute or damage to the transmission and
tires may occur, or the engine may overheat.
If your vehicle gets stuck in mud or snow,
rock it out by shifting between forward and
reverse gears, stopping between shifts in
a steady pattern. Press lightly on the
accelerator in each gear.
206
Explorer (CTW), enUSA, Edition date: 202007, Second-Printing TransmissionE297270
Page 212 of 577
Driving in Special Conditions With
Four-Wheel drive (4WD)
Note:
Use of the 4WD system in slippery,
deep snow, and sand drive modes on dry
surfaces could produce some vibration,
driveline bind up, or excessive tire wear as
these drive modes are intended for slippery
and loose surfaces.
Note: The design of 4WD vehicles are for
driving on sand, snow, mud and rough roads
and have operating characteristics that are
somewhat different from conventional
vehicles, both on and off the highway.
Basic Operating Principles in Special
Conditions
• Drive slower in strong crosswinds which
can affect the normal steering
characteristics of your vehicle.
• Be extremely careful when driving on
pavement made slippery by loose sand,
water, gravel, snow or ice. If Your Vehicle Goes Off the Edge of the
Pavement
•
If your vehicle goes off the edge of the
pavement, slow down, but avoid severe
brake application, ease the vehicle
back onto the pavement only after
reducing your speed. Do not turn the
steering wheel too sharply while
returning to the road surface.
• It could be safer to stay on the apron
or shoulder of the road and slow down
gradually before returning to the
pavement. You could lose control if you
do not slow down or if you turn the
steering wheel too sharply or abruptly.
• It often could be less risky to strike
small objects, such as highway
reflectors, with minor damage to your
vehicle rather than attempt a sudden
return to the pavement which could
cause the vehicle to slide sideways out
of control or rollover. Remember, your
safety and the safety of others should
be your primary concern.
If Your Vehicle Gets Stuck WARNING: Apply the parking
brake, shift into park (P), switch the
ignition off and remove the key before
you leave your vehicle. Failure to follow
this instruction could result in personal
injury or death. WARNING:
If the parking brake is
fully released, but the brake warning
lamp remains illuminated, the brakes
may not be working properly. Have your
vehicle checked as soon as possible. WARNING:
Do not spin the wheels
at over 34 mph (55 km/h). The tires may
fail and injure a passenger or bystander.
209
Explorer (CTW), enUSA, Edition date: 202007, Second-Printing Four-Wheel Drive
(If Equipped)
Page 233 of 577

PRINCIPLE OF OPERATION
WARNING: To help avoid personal
injury, always use caution when in
reverse (R) and when using the sensing
system. WARNING:
The system may not
detect objects with surfaces that absorb
reflection. Always drive with due care
and attention. Failure to take care may
result in a crash. WARNING: Traffic control systems,
inclement weather, air brakes, external
motors and fans may affect the correct
operation of the sensing system. This
may cause reduced performance or false
alerts. WARNING:
The system may not
detect small or moving objects,
particularly those close to the ground.
Note: If your vehicle has MyKey ™, the
sensing system cannot be switched off
when a MyKey ™ is present.
See Principle
of Operation (page 64).
Note: Keep the sensors on the bumper or
fascia free from snow, ice and large
accumulations of dirt. If the sensors are
covered, the system ’s accuracy can be
affected. Do not clean the sensors with
sharp objects.
Note: If your vehicle sustains damage to
the bumper or fascia, leaving it misaligned
or bent, the sensing zone may be altered
causing inaccurate measurement of
obstacles or false alerts. Note:
Certain add-on devices installed
around the bumper or fascia may create
false alerts. For example, large trailer
hitches, bike or surfboard racks, license plate
brackets, bumper covers or any other device
that may block the normal detection zone
of the system. Remove the add-on device
to prevent false alerts.
Note: When you connect a trailer to your
vehicle, the rear parking aid may detect the
trailer and therefore provide an alert. Disable
the rear parking aid when you connect a
trailer to prevent the alert.
The sensing system warns the driver of
obstacles within a certain range of your
vehicle. The system turns on automatically
whenever you switch the ignition on.
You can switch the system off through the
touchscreen, information display or from
the pop-up message that appears once
you shift the transmission into reverse (R).
If your vehicle has a parking aid button, you
can switch the system off by pressing the
button.
If a fault is present in the system, a warning
message appears in the information
display. See Information Messages
(page 121).
REAR PARKING AID WARNING:
The system may not
detect objects with surfaces that absorb
reflection. Always drive with due care
and attention. Failure to take care may
result in a crash. WARNING:
The system may not
detect small or moving objects,
particularly those close to the ground.
230
Explorer (CTW), enUSA, Edition date: 202007, Second-Printing Parking Aids
Page 239 of 577
WARNING: You are responsible for
controlling your vehicle at all times. The
system is designed to be an aid and does
not relieve you of your responsibility to
drive with due care and attention. Failure
to follow this instruction could result in
the loss of control of your vehicle,
personal injury or death.
The system assists parking into and out of
parking spaces. It uses sensors to detect
parking spaces. The system then steers,
accelerates, brakes and shifts gear as
required to maneuver into or out of a
parking space.
Using Active Park Assist The parking button is near the
transmission selector on the
center console.
Press the parking button to bring up full
screen notifications. Press either the
parking button or the soft keys on the
display screen to switch between Parallel
Park In, Perpendicular Park In or Parallel
Park Out parking modes.
Driving into a Parking Space
Note: When parking perpendicularly, the
system backs your vehicle into parking
spaces.
1. Press the active park assist button.
Note: The system does not recognize
parking space lines and centers your vehicle
between objects.
Note: The system detects other vehicles
and curbs to find a parking space.
Note: The system searches for parallel
parking spaces on the passenger side. Press
the active park assist button again to make
the system search for perpendicular spaces. 2. Use the direction indicator lever to
search for a parking space on the driver
or passenger side of your vehicle.
3. Drive your vehicle approximately 3 ft
(1 m) away from and parallel to the
other parked vehicles when searching
for a parking space.
Note: A tone sounds and a message
appears in the information display when
active park assist finds a suitable parking
space.
4. Press and hold the brake pedal.
5. Release the steering wheel and shift into neutral (N).
6. Press and hold the active park assist button.
7. Release the brake pedal to allow the vehicle to park.
Note: When parallel parking between
objects, the system parks closer to the
object in front of your vehicle to allow easier
access to your luggage compartment.
Note: When perpendicular parking, the
system aligns the front end of your vehicle
with the object next to it.
Note: When perpendicular parking, if the
system detects only one object, it allows
enough distance to open the door on either
side.
Note: You can slow down your vehicle at
any time by pressing the brake pedal.
Note: When parking is complete the vehicle
shifts into park (P).
Leaving a Parking Space
The system assists leaving only parallel
parking spaces.
1. Press the active park assist button.
2. Use the direction indicator lever to choose the direction to leave.
3. Press and hold the brake pedal.
236
Explorer (CTW), enUSA, Edition date: 202007, Second-Printing Parking AidsE146186
Page 257 of 577
1. Select Settings.
2. Select
Driver Assist..
3. Select
Cruise Control.
4. Select
Normal. The cruise control indicator
replaces the adaptive cruise
control indicator if you select
normal cruise control. The gap setting does
not display, and the system does not
respond to lead vehicles. Automatic
braking remains active to maintain set
speed. The system remembers the last
setting when you start your vehicle.
SWITCHING LANE CENTERING
ON AND OFF
The cruise controls are on the steering
wheel. See
Cruise Control (page 83). Press the button.
The indicator appears in the information
display. When the system is on, the color
of the indicator changes to indicate the
system status. See
Adaptive Cruise
Control Indicators (page 253).
Note: Adaptive cruise control must be on
before you can switch lane centering on.
Activating Lane Centering
The system only activates when all of the
following occur:
• You have adaptive cruise control with
stop-and-go on.
• Your hands are on the steering wheel.
• The system detects both lane
markings.
Note: If it does not detect valid lane
markings, the system stays inactive until
valid markings are available. You can override the system at any time
by steering your vehicle.
System Alerts and Automatic
Cancellation
You must keep your hands on the steering
wheel at all times.
When the system is active and detects no
steering activity for a certain period of time,
the system alerts you to put your hands on
the steering wheel. If you do not react to
the warnings the system cancels and slows
your vehicle down to idle speeds while
maintaining steering control.
The system also alerts you if your vehicle
crosses lane markings without detected
steering activity.
Note:
The system may detect a light grip
or touch on the steering wheel as hands-off
driving.
When an external condition cancels the
system, for example, no lane markings
available, a tone sounds and a message
appears in the information display. If your vehicle starts to slow
down, you must provide steering
input to the wheel and press and
release the button to regain full system
performance.
Automatic cancellation can also occur if:
• The lane becomes too wide or too
narrow.
• The system cannot detect valid lane
markings.
• Lane markings are crossed.
Note: The system disables until the next
key cycle if your vehicle slows down due to
driver inactivity twice within a key cycle.
254
Explorer (CTW), enUSA, Edition date: 202007, Second-Printing Adaptive Cruise Control
(If Equipped)E71340 E262175
Page 264 of 577
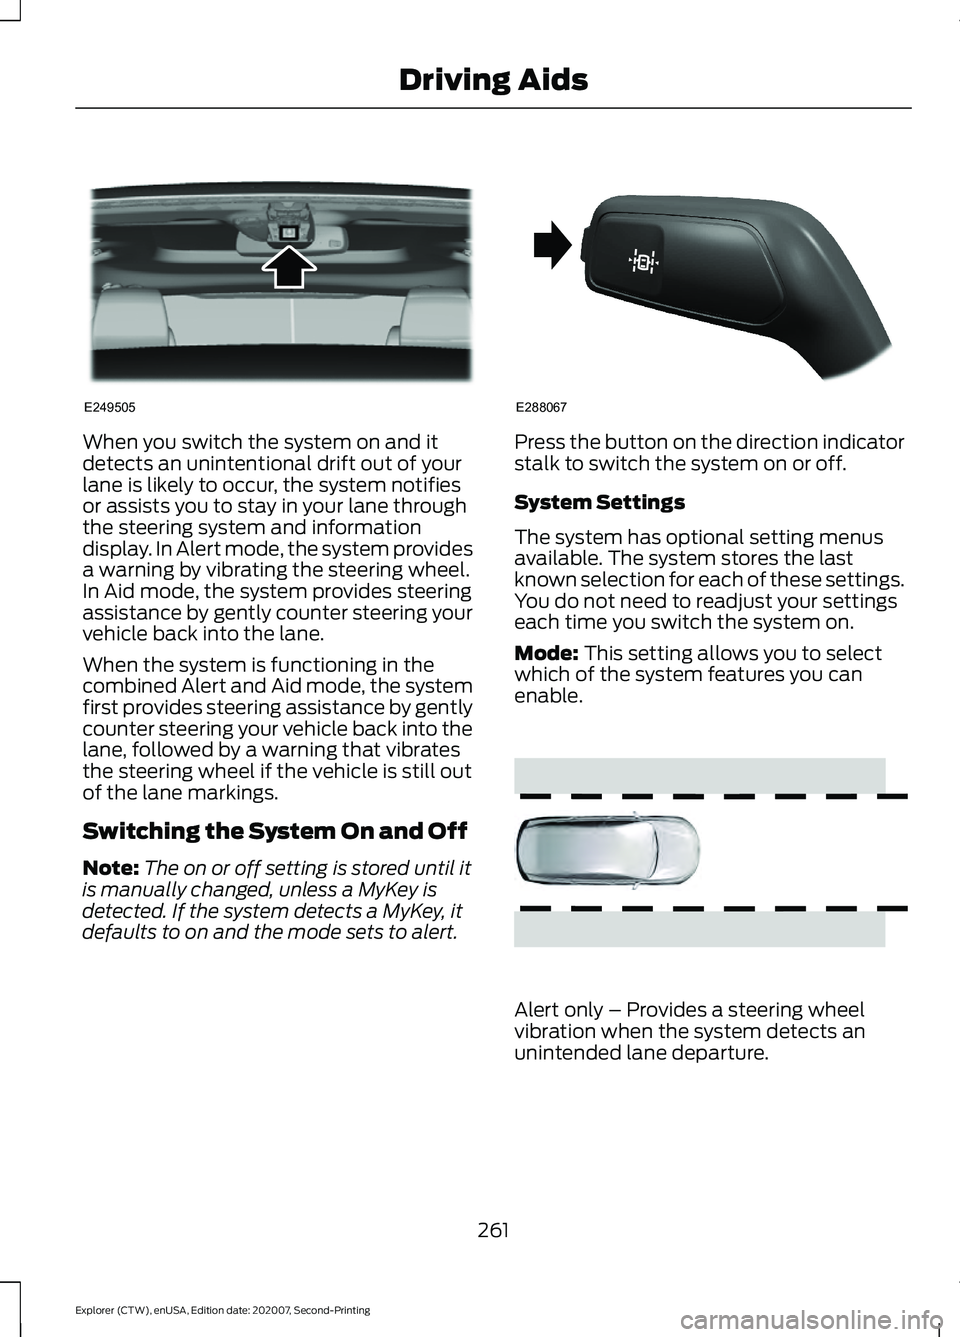
When you switch the system on and it
detects an unintentional drift out of your
lane is likely to occur, the system notifies
or assists you to stay in your lane through
the steering system and information
display. In Alert mode, the system provides
a warning by vibrating the steering wheel.
In Aid mode, the system provides steering
assistance by gently counter steering your
vehicle back into the lane.
When the system is functioning in the
combined Alert and Aid mode, the system
first provides steering assistance by gently
counter steering your vehicle back into the
lane, followed by a warning that vibrates
the steering wheel if the vehicle is still out
of the lane markings.
Switching the System On and Off
Note:
The on or off setting is stored until it
is manually changed, unless a MyKey is
detected. If the system detects a MyKey, it
defaults to on and the mode sets to alert. Press the button on the direction indicator
stalk to switch the system on or off.
System Settings
The system has optional setting menus
available. The system stores the last
known selection for each of these settings.
You do not need to readjust your settings
each time you switch the system on.
Mode: This setting allows you to select
which of the system features you can
enable. Alert only – Provides a steering wheel
vibration when the system detects an
unintended lane departure.
261
Explorer (CTW), enUSA, Edition date: 202007, Second-Printing Driving AidsE249505 E288067 E165515
Page 271 of 577
•
Box trailers that have a width greater
than 8.2 ft (2.5 m) could cause early
alerts when you pass a vehicle.
• Clam shell or V-Nose box trailers with
a width greater than
8.2 ft (2.5 m)
could cause delayed alerts when a
vehicle traveling the same speed as
your vehicle merges lanes.
System Errors
If the system detects a fault, a warning
lamp illuminates and a message displays.
See
Information Messages (page 121).
Switching the System On and Off
You can switch the blind spot information
system with trailer tow off by not selecting
a trailer the information display.
See
General Information (page 114). In this
case, the system turns off as long as a
trailer is attached to your vehicle. As soon
as you disconnect the trailer, the blind spot
information system becomes active.
When you switch the system off, a warning
lamp illuminates and the alert indicators
flash twice.
Note: The system remembers the last
trailer setting when you start your vehicle.
You cannot switch off the blind spot
information system with trailer tow when
using MyKey, but you can still change the
trailer settings.
See MyKey ™ (page 64).
To permanently switch the system off,
contact an authorized dealer. CROSS TRAFFIC ALERT WARNING:
Do not use the cross
traffic alert system as a replacement for
using the interior and exterior mirrors or
looking over your shoulder before
reversing out of a parking space. The
cross traffic alert system is not a
replacement for careful driving. WARNING:
The system may not
operate properly during severe weather
conditions, for example snow, ice, heavy
rain and spray. Always drive with due
care and attention. Failure to take care
may result in a crash.
The system alerts you of vehicles
approaching from the sides behind your
vehicle when you shift into reverse (R).
Using Cross Traffic Alert
The system detects vehicles that approach
at a speed between
4 mph (6 km/h) and
37 mph (60 km/h). Coverage decreases
when the sensors are partially, mostly or
fully obstructed. Slowly reversing helps
increase the coverage area and
effectiveness.
The system turns on when you start the
engine and you shift into reverse (R). The
system turns off when you shift out of
reverse (R).
268
Explorer (CTW), enUSA, Edition date: 202007, Second-Printing Driving Aids
Page 301 of 577
ROADSIDE ASSISTANCE
Vehicles Sold in the United States:
Getting Roadside Assistance
To fully assist you should you have a
vehicle concern, Ford Motor Company
offers a complimentary roadside
assistance program. This program is
separate from the New Vehicle Limited
Warranty.
The service is available:
•
24 hours a day, seven days a week.
• For the coverage period supplied with
your vehicle.
Roadside Assistance covers:
• A flat tire change with a good spare
(except vehicles supplied with a tire
inflation kit).
• Battery jump start.
• Lock-out assistance (key replacement
cost is the customer's responsibility).
• Fuel delivery — independent service
contractors, if not prohibited by state,
local or municipal law, shall deliver up
to 2 gal (8 L) of gasoline or 5 gal (20 L)
of diesel fuel to a disabled vehicle.
Roadside Assistance limits fuel delivery
service to two no-charge occurrences
within a 12-month period.
• Winch out — available within 100 ft
(30 m) of a paved or county
maintained road, no recoveries. •
Towing — independent service
contractors, if not prohibited by state,
local or municipal law, shall tow Ford
eligible vehicles to an authorized dealer
within
35 mi (56 km) of the
disablement location or to the nearest
authorized dealer. If a member
requests a tow to an authorized dealer
that is more than
35 mi (56 km) from
the disablement location, the member
shall be responsible for any mileage
costs in excess of
35 mi (56 km).
• Roadside Assistance includes up to
$200 for a towed trailer if the disabled
eligible vehicle requires service at the
nearest authorized dealer. If the towing
vehicle is operational but the trailer is
not, then the trailer does not qualify for
any roadside services.
Vehicles Sold in the United States:
Using Roadside Assistance
Complete the roadside assistance
identification card and place it in your
wallet for quick reference. This card is in
the Owner's Manual kit.
United States vehicle customers who
require Roadside Assistance, call
1-800-241-3673.
If you need to arrange roadside assistance
for yourself, Ford Motor Company
reimburses a reasonable amount for
towing to the nearest dealership within
35 mi (56 km)
. To obtain reimbursement
information, United States vehicle
customers call 1-800-241-3673.
Customers need to submit their original
receipts.
298
Explorer (CTW), enUSA, Edition date: 202007, Second-Printing Roadside Emergencies