2021 FORD ESCAPE warning
[x] Cancel search: warningPage 318 of 589

1. Exit the vehicle immediately.
2. Advise emergency assistance that an
electric or hybrid-electric vehicle is
involved.
3. As with any vehicle fire, do not inhale smoke, vapors or gas from the vehicle,
as they may be hazardous.
Post-Incident
1. Do not store a severely damaged vehicle with a lithium-ion battery inside
a structure or within 49 ft (15 m) of any
structure or vehicle.
2. Make sure that passenger and luggage
compartments remain ventilated.
3. Call emergency assistance if you observe leaking fluids, sparks, smoke
or flames, or hear gurgling or bubbling
from the high-voltage battery.
SWITCHING THE HAZARD
FLASHERS ON AND OFF
The hazard flashers operate when the
ignition is in any position, or if the key is not
in the ignition. The battery loses charge
and may have insufficient power to restart
your vehicle if your vehicle is in use or if the
key is not in the ignition. The flasher control is on the instrument
panel. Use your hazard flashers when your
vehicle is creating a safety hazard for other
road users.
Switch the hazard flashers on and all front
and rear direction indicators flash.
Press the button again to switch them off.
JUMP STARTING THE VEHICLE
Jump Starting Precautions
WARNING: Batteries normally
produce explosive gases which can
cause personal injury. Therefore, do not
allow flames, sparks or lighted
substances to come near the battery.
When working near the battery, always
shield your face and protect your eyes.
Always provide correct ventilation. WARNING:
Keep batteries out of
reach of children. Batteries contain
sulfuric acid. Avoid contact with skin,
eyes or clothing. Shield your eyes when
working near the battery to protect
against possible splashing of acid
solution. In case of acid contact with skin
or eyes, flush immediately with water for
a minimum of 15 minutes and get prompt
medical attention. If acid is swallowed,
call a physician immediately. WARNING:
Use only adequately
sized cables with insulated clamps. WARNING:
Make sure that the
cables are clear of any moving parts and
fuel delivery system parts. WARNING: Connect batteries with
only the same nominal voltage.
315
Escape (CTC) Canada/United States of America, Vehicles Built From: 02-11-2020, enUSA, Edition date: 202011, First-Printing Crash and Breakdown InformationA
B
A
12
203A
A E308147
Page 319 of 589

WARNING: If the engine is running
while the hood is open, stay clear of
moving engine components. Failure to
follow this warning could result in serious
personal injury or death.
Do not attempt to push-start an automatic
transmission vehicle. This could cause
transmission damage.
Do not disconnect the battery of the
disabled vehicle. This could damage your
vehicle's electrical system.
Preparing the Vehicle
Use only a 12 volt supply to start your
vehicle.
Park the booster vehicle close to the hood
of the disabled vehicle, making sure the
two vehicles do not touch.
Jump Starting the Vehicle -
Excluding: Hybrid Electric Vehicle
(HEV)/Plug-In Hybrid Electric
Vehicle (PHEV)
Connecting the Jumper Cables WARNING: Do not connect the
negative jumper cable to any other part
of your vehicle. Use the ground point.
Note: If you are using a jump pack or
booster box, follow the manufacturer's
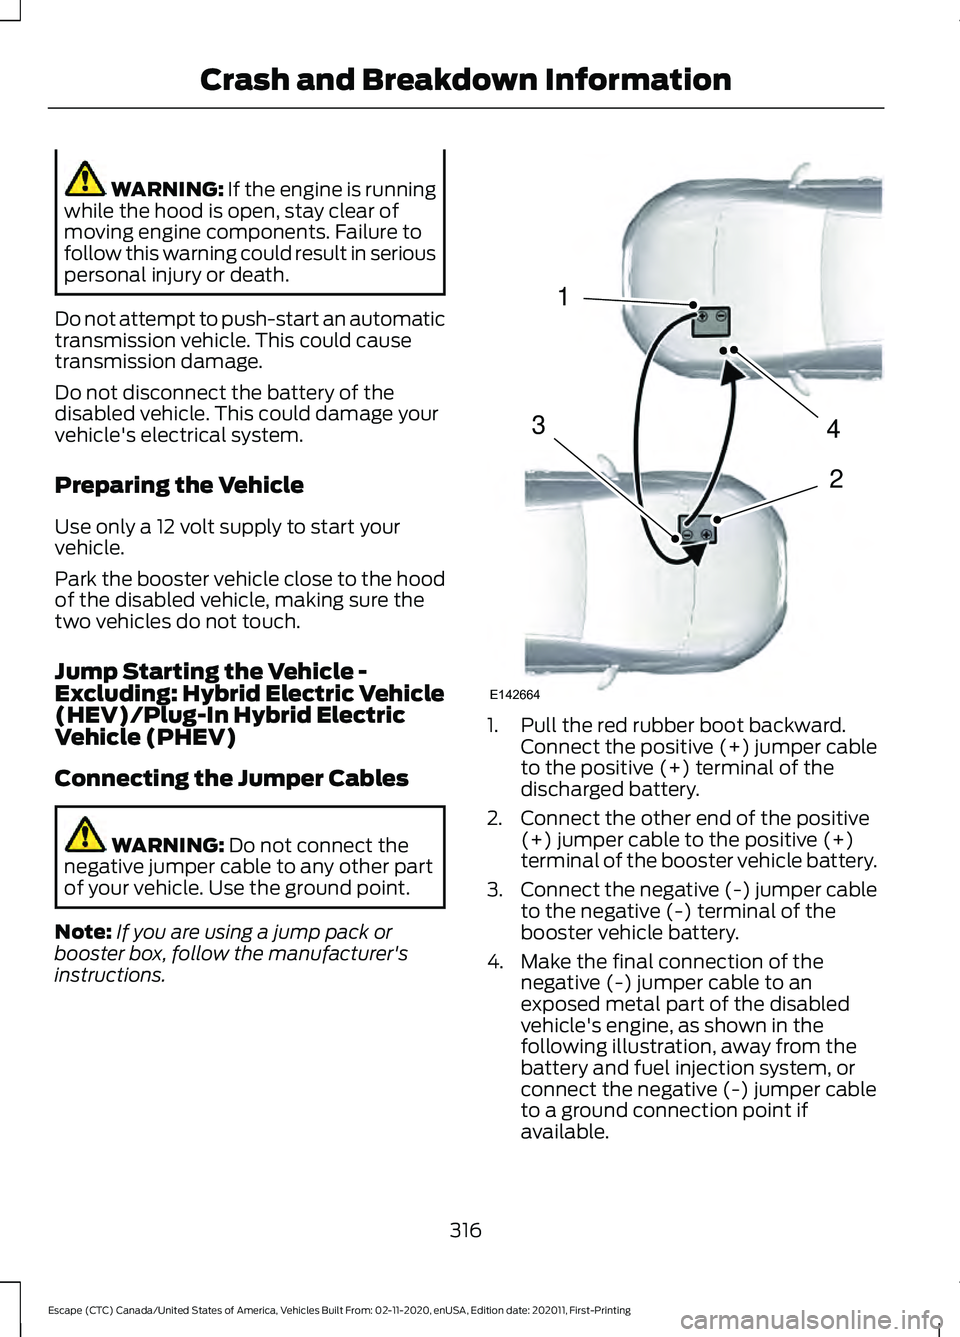
instructions. 1. Pull the red rubber boot backward.
Connect the positive (+) jumper cable
to the positive (+) terminal of the
discharged battery.
2. Connect the other end of the positive (+) jumper cable to the positive (+)
terminal of the booster vehicle battery.
3. Connect the negative (-) jumper cable
to the negative (-) terminal of the
booster vehicle battery.
4. Make the final connection of the negative (-) jumper cable to an
exposed metal part of the disabled
vehicle's engine, as shown in the
following illustration, away from the
battery and fuel injection system, or
connect the negative (-) jumper cable
to a ground connection point if
available.
316
Escape (CTC) Canada/United States of America, Vehicles Built From: 02-11-2020, enUSA, Edition date: 202011, First-Printing Crash and Breakdown Information4
2
1
3
E142664
Page 320 of 589

Starting the Engine
1.
Start the engine of the booster vehicle
and moderately rev the engine, or
gently press the accelerator to keep
the engine speed between 2000 and
3000 RPM, as shown in your
tachometer.
2. Start the engine of the disabled vehicle.
3. Once you start the disabled vehicle, run
both vehicle engines for an additional
three minutes before disconnecting the
jumper cables.
Removing the Jumper Cables
Remove the jumper cables in the reverse
order that they were connected.
Note: Do not switch the headlamps on
when disconnecting the cables. The peak
voltage could blow the bulbs. Jump Starting the Vehicle - Hybrid
Electric Vehicle (HEV)/Plug-In
Hybrid Electric Vehicle (PHEV)
Connecting the Jumper Cables WARNING: Do not connect the
negative jumper cable to any other part
of your vehicle. Use the ground point.
Note: If you are using a jump pack or
booster box, follow the manufacturer's
instructions. 1. Pull the red rubber boot backward.
Connect the positive (+) jumper cable
to the positive (+) terminal of the
discharged battery.
317
Escape (CTC) Canada/United States of America, Vehicles Built From: 02-11-2020, enUSA, Edition date: 202011, First-Printing Crash and Breakdown InformationE338624 4
2
1
3
E142664
Page 322 of 589

AUTOMATIC CRASH SHUTOFF
What Is Automatic Crash Shutoff
The automatic crash shutoff is designed
to stop the fuel going to the engine in the
event of a moderate or severe crash.
Note:
Not every impact causes a shutoff.
Automatic Crash Shutoff
Precautions WARNING: If your vehicle has been
involved in a crash, have the fuel system
checked. Failure to follow this instruction
could result in fire, personal injury or
death.
Re-Enabling Your Vehicle
1. Switch the ignition off.
2. Attempt to start your vehicle.
3. Switch the ignition off.
4. Attempt to start your vehicle.
Note: If your vehicle does not start after the
third attempt, have your vehicle checked as
soon as possible. TRANSPORTING THE VEHICLE
If you need to tow your vehicle, contact a
professional towing service or your
roadside assistance service provider.
Your manufacturer produces a towing
manual for all authorized tow truck
operators. Have your tow truck operator
refer to this manual for proper hook-up
and towing procedures.
We recommend the use of a wheel lift and
dollies or flatbed equipment to tow your
vehicle. Vehicle damage could occur if
towed incorrectly, or by any other means.
Front-wheel and rear-wheel drive vehicles
must have their designated drive wheels
off the ground regardless of towing
direction. Use tow dollies to prevent
damage to the transmission.
319
Escape (CTC) Canada/United States of America, Vehicles Built From: 02-11-2020, enUSA, Edition date: 202011, First-Printing Crash and Breakdown InformationE143886
Page 327 of 589

FUSE PRECAUTIONS
WARNING: Always disconnect the
battery before servicing high current
fuses. WARNING:
To reduce risk of
electrical shock, always replace the
cover to the power distribution box
before reconnecting the battery or
refilling fluid reservoirs. WARNING:
Always replace a fuse
with one that has the specified
amperage rating. Using a fuse with a
higher amperage rating can cause severe
wire damage and could start a fire.
UNDER HOOD FUSE BOX
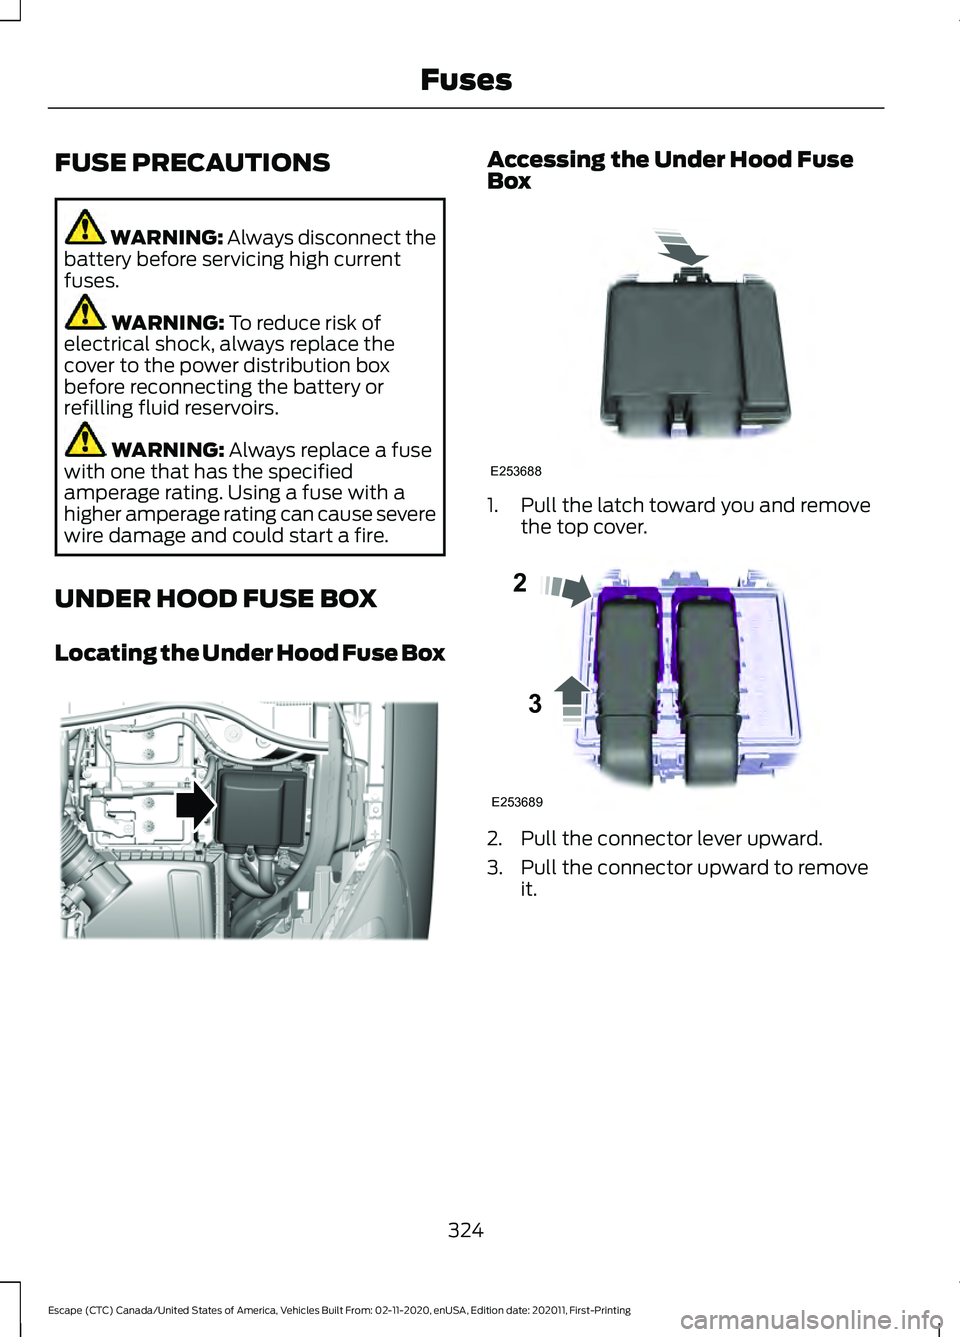
Locating the Under Hood Fuse Box Accessing the Under Hood Fuse
Box
1. Pull the latch toward you and remove
the top cover. 2. Pull the connector lever upward.
3. Pull the connector upward to remove
it.
324
Escape (CTC) Canada/United States of America, Vehicles Built From: 02-11-2020, enUSA, Edition date: 202011, First-Printing FusesE334436 E253688 E253689
2
3
Page 337 of 589

5. Support the hood with the strut.
Closing the Hood WARNING: Make sure that you fully
latch the hood before driving. Failure to
follow this instruction could result in
personal injury or death.
1. Remove the strut from the catch and secure it correctly in the clip.
2. Lower the hood and allow it to drop under its own weight for the last
10– 14 in (25– 35 cm)
.
Warning Lamps and Indicators This lamp illuminates when the
ignition is on and the hood is not
completely closed.
Information Messages Action
Message
Stop your vehicle as soon as it is safe to do so and
close the hood.
Hood Ajar
334
Escape (CTC) Canada/United States of America, Vehicles Built From: 02-11-2020, enUSA, Edition date: 202011, First-Printing MaintenanceE193263 E246598
Page 341 of 589

ENGINE OIL
Engine Oil Dipstick Overview
Minimum.
A
Maximum.
B
Checking the Engine Oil Level
1. Make sure that your vehicle is on level ground.
2. Check the oil level before starting the engine, or switch the engine off after
warming up and wait 10 minutes for
the oil to drain into the oil pan.
3. Remove the dipstick and wipe it with a clean, lint-free cloth.
4. Reinstall the dipstick and make sure it is fully seated.
5. Remove the dipstick again to check the
oil level.
Note: If the oil level is between the
maximum and minimum marks, the oil level
is acceptable. Do not add oil.
6. If the oil level is at the minimum mark, immediately add oil.
7. Reinstall the dipstick. Make sure it is fully seated.
Note: The oil consumption of new engines
reaches its normal level after approximately
3,000 mi (5,000 km). Adding Engine Oil WARNING: Do not remove the filler
cap when the engine is running. WARNING:
Do not add engine oil
when the engine is hot. Failure to follow
this instruction could result in personal
injury.
Do not use supplemental engine oil
additives because they are unnecessary
and could lead to engine damage that the
vehicle warranty may not cover.
1. Clean the area surrounding the engine oil filler cap before you remove it.
2. Remove the engine oil filler cap.
3. Add engine oil that meets our specifications. See
Capacities and
Specifications (page 396).
4. Reinstall the engine oil filler cap. Turn it clockwise until you feel a strong
resistance.
Note: Do not add oil further than the
maximum mark. Oil levels above the
maximum mark may cause engine damage.
Note: Immediately soak up any oil spillage
with an absorbent cloth.
Resetting the Engine Oil Change
Reminder
Use the information display controls on
the steering wheel to reset the oil change
reminder.
338
Escape (CTC) Canada/United States of America, Vehicles Built From: 02-11-2020, enUSA, Edition date: 202011, First-Printing MaintenanceAB
E264320
Page 342 of 589

From the main menu scroll to:
Action and description
Message
Press the right arrow button,
then from this menu scroll
to the following message.
Settings
Press the right arrow button,
then from this menu scroll
to the following message.
Conveni-
ence
Press the right arrow button,
then from this menu scroll
to the following message.
Oil Life
Reset
Press and hold the OK
button until the instrument
cluster displays the
following message.
Hold OK to
Reset
Reset Successful
When the oil change
reminder resets the instru-
ment cluster displays 100%.
Remaining Life
{00}%
If the instrument cluster
displays one of the following
messages, repeat the
process.
Not Reset
Reset Cancelled
Engine Oil Capacity and
Specification
For filling information, please refer to the
Capacities and Specifications section of
your owner's manual. See
Engine Oil
Capacity and Specification (page 396). CHECKING THE COOLANT
When the engine is cold, check the
concentration and level of the coolant at
the intervals listed in the scheduled
maintenance information. See Scheduled
Maintenance
(page 487).
Note: Make sure that the coolant level is
between the minimum and maximum marks
on the coolant reservoir.
Note: Coolant expands when it is hot. The
level may extend beyond the
MAX mark.
If the coolant level is at or below the
minimum mark, add prediluted coolant
immediately.
Maintain coolant concentration within
48% to 50%, which equates to a freeze
point between
-29°F (-34°C) and -35°F
(-37°C). Coolant concentration should be
checked using a refractometer. We do not
recommend the use of hydrometers or
coolant test strips for measuring coolant
concentration.
Adding Coolant WARNING:
Do not remove the
coolant reservoir cap when the engine is
on or the cooling system is hot. Wait 10
minutes for the cooling system to cool
down. Cover the coolant reservoir cap
with a thick cloth to prevent the
possibility of scalding and slowly remove
the cap. Failure to follow this instruction
could result in personal injury. WARNING:
Do not add engine
coolant when the engine is on or the
cooling system is hot. Failure to follow
this instruction could result in personal
injury. WARNING:
Do not add coolant
further than the MAX mark.
339
Escape (CTC) Canada/United States of America, Vehicles Built From: 02-11-2020, enUSA, Edition date: 202011, First-Printing Maintenance