Page 169 of 414
167
Group 1: from 9 to 18 kgIL3
RÖMER Duo Plus ISOFIX
Installed for ward facing.
Attached to the rings A , as well as ring B, known as the TOP TETHER,
using an upper strap.
3 positions of inclination of the shell.
IL4
FAIR G 0/1 S and its FWF ISOFIX base
Installed in the rear ward facing position using its ISOFIX base, which is attached to the rings A .
The base has a support leg.
6 positions of inclination of the shell.
This configuration is suitable for children weighing more than 13 kg.
These child seats can also be used on seats which are not fitted with ISOFIX mountings.
In this case, they must be attached to the vehicle seat using the three point seat belt.
Follow the instructions for fitting the child seat given in the seat manufacturer's installation guide.
6
Safety
Page 170 of 414

168
Locations for ISOFIX child seats
In accordance with European Regulations, this table indicates the options for installing ISOFIX child seats on seats in the vehicle fitted with ISOFIX
mountings.
In the case of universal and semi-universal ISOFIX child seats, the ISOFIX size category, determined by a letter between A and G, is indicated on the
child seat next to the ISOFIX logo.
Weight of the child / indicative age
Less than 10 kg (group 0)
Up to approx. 6
monthsLess than 10 kg
(group 0)
Less than 13 kg
(group 0+)
Up to approx. 1 year From 9 to 18 kg (group 1)
From approx. 1 to 3 years
Type of ISOFIX child seat infant car seat "rearward facing"
"rearward facing""forward facing"
ISOFIX size categor y F G C D E C D A B B1
Universal and semi-universal ISOFIX child
seats which can be installed on the outer
rear seat s X
XI L1IL2 X IUF
I UF:
s
eat suitable for the installation of an I sofix Universal seat, " For ward facing" secured using the
"Top Tether" upper strap.
IL-:
o
nly the child seats indicated can be installed using the ISOFIX mountings.
For advice on securing of the "Top Tether" upper strap, refer to the "ISOFIX mountings" section.
X: seat not suitable for the installation of an ISOFIX seat of the size category indicated. Remove and stow the head restraint
before installing a child seat with a
backrest on a passenger seat. Refit the
head restraint once the child seat has
been removed.
Safety
Page 171 of 414

169
The incorrect installation of a child seat in a
vehicle compromises the child's protection in
the event of an accident.
Remember to fasten the seat belts or the
child seat harnesses keeping the slack in
relation to the child's body to a minimum,
even for short journeys.
For optimum installation of the for ward
facing child seat, ensure that the back of the
child seat is in contact with the back of the
vehicle's seat and that the head restraint
does not cause any discomfort.
If the head restraint has to be removed,
ensure that it is stored or attached securely
to prevent it from being thrown around the
vehicle in the event of sharp braking.
Advice on child seats
Installing a booster cushion
The chest part of the seat belt must be
positioned on the child's shoulder without
touching the neck.
Ensure that the lap part of the seat belt
passes correctly over the child's thighs.
CITROËN recommends the use of a booster
seat which has a back, fitted with a seat belt
guide at shoulder level.
As a safety precaution, do not leave:
-
o
ne or more children alone and
unsupervised in a vehicle,
-
a c
hild or an animal in a vehicle which
is exposed to the sun, with the windows
closed,
-
t
he keys within reach of children inside
the vehicle.
Children at the front
The legislation on carrying a child on the
front passenger seat is specific to each
country. Refer to the legislation in force in
your country.
Deactivate the passenger's airbag when a
rear ward facing child seat is installed on the
front seat. Other wise, the child would risk
being seriously injured or killed if the airbag
were to inflate.
To prevent accidental opening of the doors,
use the Child lock.
Take care not to open the rear windows by
more than one third.
To protect young children from the rays of
the sun, fit side blinds on the rear windows.
6
Safety
Page 172 of 414
170
Child lock
Mechanical system to prevent opening of the rear doors using their interior controls.
The control is located on the edge of each rear door.
Child lock on
F Move the control A towards position 1.
Child lock off
F Move the control A towards position 2 .
Safety
Page 173 of 414

171
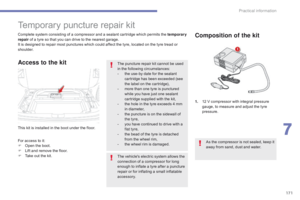
This kit is installed in the boot under the floor. Complete system consisting of a compressor and a sealant cartridge which permits the temporary
repair of a tyre so that you can drive to the nearest garage.
It is designed to repair most punctures which could affect the tyre, located on the tyre tread or
shoulder.
Temporary puncture repair kit
Access to the kit
For access to it:
F O pen the boot.
F
L
ift and remove the floor.
F
T
ake out the kit. The vehicle's electric system allows the
connection of a compressor for long
enough to inflate a tyre after a puncture
repair or for inflating a small inflatable
accessory.
Composition of the kit
1. 12 V compressor with integral pressure
gauge, to measure and adjust the tyre
pressure.
As the compressor is not sealed, keep it
away from sand, dust and water.
The puncture repair kit cannot be used
in the following circumstances:
-
t
he use-by date for the sealant
cartridge has been exceeded (see
the label on the cartridge),
-
m
ore than one tyre is punctured
while you have just one sealant
cartridge supplied with the kit,
-
t
he hole in the tyre exceeds 4 mm
in diameter,
-
t
he puncture is on the sidewall of
the tyre,
-
y
ou have continued to drive with a
flat tyre,
-
t
he bead of the tyre is detached
from the wheel rim,
-
t
he wheel rim is damaged.
7
Practical information
Page 174 of 414

172
After repairing the tyre, the speed
restriction sticker should be affixed to
the centre of vehicle's steering wheel to
remind you that this wheel must only be
used temporarily.
Do not exceed a speed of 50 mph
(80 km/h) when driving with a tyre
repaired using this type of kit.
Repair procedure
F Stop the vehicle in as safe a location as possible and on a level and stable sur face.
E
nsure that the tyre valve is not at the
bottom of the wheel, in contact with the
ground.
F
A
pply the parking brake.
F
P
lace the gear lever in position R for
vehicle with a manual gearbox, or in
position P for vehicles fitted with a CVT
gearbox.
F
S
witch off the ignition.
2.
S
ealant cartridge for the temporary repair
of a tyre.
3.
R
eplacement valve core.
4.
V
alve core removal/fitting tool.
5.
I
njection end-piece.
6.
S
peed limit sticker. F
R
emove the valve cap for the tyre to be
repaired and keep it in a clean place.
At temperatures below 0°C,
the
sealant product may thicken. Warm
the
cartridge inside the vehicle before
using it.
F
T
urn the valve core tool round, insert it in
the valve and unscrew and remove the
valve core.
K
eep the valve core in a clean place.
F
I
nsert the tyre valve core tool into the valve
and press on the tool to exhaust all of the
air from the tyre.
Practical information
Page 175 of 414

173
F Connect the injection end-piece to the valve of the tyre to be repaired.
F
P
ress several times on the sealant
cartridge (top down) with your hand, to
inject all of the product into the tyre.
F
R
emove the injection end-piece
F
R
efit the valve core and tighten it using the
tool provided.
Take care, this product is harmful (e.g. ethylene-glycol, colophony...) if swallowed and
causes irritation to the eyes.
Keep it out of reach of children.
The use-by date of the sealant is marked on the cartridge.
After use, do not discard the empty cartridge but take it to a CITROËN dealer (France) or
an authorised waste disposal site.
Don't forget to obtain a replacement cartridge; they are available from a CITROËN dealer
or a qualified workshop. F
C
heck that the compressor switch A is at
the " OFF" position.
F
U
ncoil the compressor pipe B.
F
C
onnect this pipe to the valve of the
repaired wheel.
F
C
onnect the compressor's electric plug to
the vehicle's 12 V socket (ignition switch in
position "ACC" or ACC mode).
F
S
tart the compressor by turning the
switch
A to the "ON" position to inflate
the tyre to the pressure indicated on the
tyre pressure label (see the "Identification
markings" section).
Avoid removing any foreign bodies
which have penetrated into the tyre.
F
S
hake the sealant cartridge, remove the
cap and screw on the injection end-piece.
7
Practical information
Page 176 of 414

174
F If the specified pressure has not been reached after about 10 minutes, this means
that the tyre is not repairable; contact a
CITROËN dealer or a qualified workshop
for roadside assistance.
F
R
emove the compressor and stow the kit.Do not operate the compressor for more
than 10 minutes continuously.
If the compressor seems extremely
hot, switch it off and disconnect it
immediately. Leave it to cool for at least
30 minutes.
As soon as possible after a repair using
the kit, go to a CITROËN dealer or a
qualified workshop.
Tell the technician that you have used
the kit. After checking, the technician
will advise you whether the tyre can be
repaired or must be replaced.
If the vehicle is fitted with under-
inflation detection, the under-inflation
warning lamp remains on until the
system has been reinitialised (see the
"Under-inflation detection" section). F
A
ffix the speed limit sticker to the centre of
the steering wheel.
F
D
rive off straight away at reduced speed
(50 mph [80 km/h] max) to spread the
sealant product within the tyre. F
A
fter about 6 miles (10 km) or 5 minutes,
stop and check the repair and the tyre
pressure using the compressor. If the
pressure has dropped slightly, inflate the
tyre again to the specified figure. Carry
out the same check after another 6 miles
(10 km) or 5 minutes: if the pressure
has not held at the specified figure, this
indicates that the puncture repair has not
sealed; contact a CITROËN dealer or a
qualified workshop for roadside assistance.
I
f the pressure is correct, carefully tighten
the tyre valve cap. You can drive at
reduced speed (50 mph - 80 km/h max)
to go to a
CITROËN dealer or a qualified
workshop.
Practical information