2021 CHRYSLER 300 fuel cap
[x] Cancel search: fuel capPage 8 of 268

6
DEPARTMENT OF TRANSPORTATION
UNIFORM TIRE QUALITY GRADES .. .................. 241
Treadwear ...................................................... 241
T raction Grades . . ........................................... 241
Temperature Grades . . ................................... 241
VEHICLE STORAGE . . ............................................ 242
BODYWORK .. ........................................................ 242
Protection From Atmospheric Agents ..
........ 242
Body And Underbody Maintenance. . ............ 242
Preserving The Bodywork . . ........................... 242
INTERIORS . . ......................................................... 243
Seats And Fabric Parts.. ................................ 243
Plastic And Coated Parts . . ............................ 243
Leather Surfaces . . ......................................... 244
Glass Surfaces . . ............................................ 244
TECHNICAL SPECIFICATIONS
VEHICLE IDENTIFICATION NUMBER (VIN)......... 245
BRAKE SYSTEM .. ................................................ 245
WHEEL AND TIRE TORQUE SPECIFICATIONS .. 245
Torque Specifications .. ................................. 245 FUEL REQUIREMENTS .
.
...................................... 246
3.6L Engine .. ................................................. 246
5.7L Engine . . ................................................. 246
Reformulated Gasoline . . ............................... 246
Materials Added To Fuel . . ............................. 246
Gasoline/Oxygenate Blends . . ....................... 247
Do Not Use E-85 In Non-Flex Fuel
Vehicles. ......................................................... 247
C
NG And LP Fuel System Modifications . . .... 247
Methylcyclopentadienyl Manganese
Tricarbonyl (MMT) In Gasoline. .
.................... 247
Fuel System Cautions . . ................................. 248
FLUID CAPACITIES . . ............................................ 248
ENGINE FLUIDS AND LUBRICANTS.. ................. 249
CHASSIS FLUIDS AND LUBRICANTS .. .............. 250
CUSTOMER ASSISTANCE
SUGGESTIONS FOR OBTAINING SERVICE
FOR YOUR VEHICLE .. ......................................... 251
Prepare For The Appointment .. .................... 251
Prepare A List . . .............................................. 251
Be Reasonable With Requests. . ................... 251IF YOU NEED ASSISTANCE .
.
.............................. 251
FCA US LLC Customer Center.. ..................... 251
FCA Canada Inc. Customer Center . . ............ 251
Mexico. ........................................................... 251
P uerto Rico And US Virgin Islands . . ............. 252
Customer Assistance For The Hearing Or
Speech Impaired
(TDD/TTY) . ..................................................... 252
S
ervice Contract . . ......................................... 252
WARRANTY INFORMATION . . .............................. 252
MOPAR® PARTS .. ............................................... 253
REPORTING SAFETY DEFECTS .. ........................ 253
In The 50 United States And
Washington, D.C.. .
......................................... 253
In Canada . ..................................................... 253
P
UBLICATION ORDER FORMS . . ........................ 253
GENERAL INFORMATION.. .................................. 254
Page 114 of 268
112 STARTING AND OPERATING
(Continued)
NOTE:
In certain cold conditions, ice may prevent the fuel
d oor
from opening. If this occurs, lightly push on
the fuel door to break the ice buildup and
re-release the fuel door using the inside release
button. Do not pry on the door.
3. T here is no fuel filler cap. Two flapper doors
i
nside the pipe seal the system.
4. Insert the fuel nozzle fully into the filler pipe – t
he nozzle opens and holds the flapper doors
while refueling.
5. F ill the vehicle with fuel – when the fuel nozzle
“
clicks” or shuts off the fuel tank is full.
6. Maintain nozzle in filler for five seconds to a
llow nozzle to drain.
7. Remove the fuel nozzle and close the fuel d
oor.
NOTE:
A funnel is provided (located in the trunk in the
s p
are tire area) to open the flapper doors to allow
for emergency refueling with a gas can.
EMERGENCY FUEL FILLER DOOR
R
ELEASE
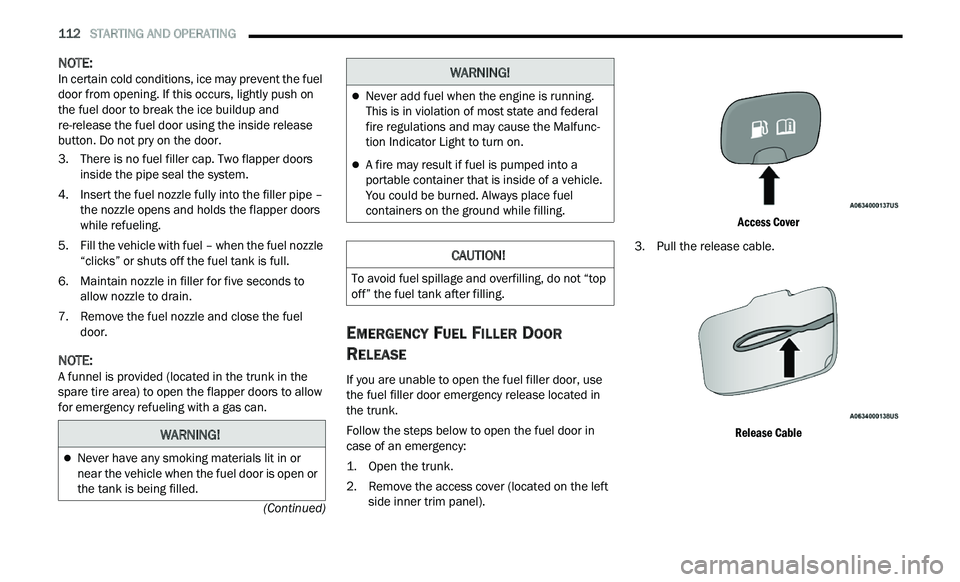
If you are unable to open the fuel filler door, use
the fuel filler door emergency release located in
the trunk.
Follow the steps below to open the fuel door in
c a
se of an emergency:
1. Open the trunk.
2
. R emove the access cover (located on the left
s
ide inner trim panel).
Access Cover
3. P ull the release cable.
R
elease Cable
WARNING!
Never have any smoking materials lit in or
near the vehicle when the fuel door is open or
the tank is being filled.
Never add fuel when the engine is running.
This is in violation of most state and federal
fire regulations and may cause the Malfunc -
tion Indicator Light to turn on.
A fire may result if fuel is pumped into a
portable container that is inside of a vehicle.
You could be burned. Always place fuel
containers on the ground while filling.
CAUTION!
To avoid fuel spillage and overfilling, do not “top
off” the fuel tank after filling.
WARNING!
Page 151 of 268

SAFETY 149
NOTE:
The TPMS is not intended to replace normal tire
care and maintenance or to provide warning of
a tire failure or condition.
The TPMS should not be used as a tire pressure
gauge while adjusting your tire pressure.
Driving on a significantly underinflated tire
causes the tire to overheat and can lead to tire
failure. Underinflation also reduces fuel effi
-
ciency and tire tread life, and may affect the
v e
hicle’s handling and stopping ability.
The TPMS is not a substitute for proper tire
maintenance, and it is the driver’s responsibility
to maintain correct tire pressure using an accu -
rate tire pressure gauge, even if underinflation
h a
s not reached the level to trigger illumination
of the TPMS Warning Light.
Seasonal temperature changes will affect tire
pressure, and the TPMS will monitor the actual
tire pressure in the tire.
The Tire Pressure Monitoring System (TPMS) uses
w i
reless technology with wheel rim mounted
electronic sensors to monitor tire pressure levels.
Sensors, mounted to each wheel as part of the
valve stem, transmit tire pressure readings to the
receiver module
Ú page 254.
NOTE:
It is particularly important for you to check the tire
p r
essure in all of the tires on your vehicle monthly
and to maintain the proper pressure.
The TPMS consists of the following components:
Receiver module.
Four Tire Pressure Monitoring System sensors.
Various Tire Pressure Monitoring System
messages, which display in the instrument
cluster.
Tire Pressure Monitoring System Warning Light.
Tire Pressure Monitoring System Low
Pressure Warnings
The Tire Pressure Monitoring System
(TPMS) Warning Light will illuminate in
t h
e instrument cluster and a chime will
sound when tire pressure is low in one or
more of the four active road tires. In addition, the
instrument cluster will display an “Inflate to XX”
message and a graphic showing the pressure
values of each tire with the low tire pressure values
shown in a different color.
CAUTION!
The TPMS has been optimized for the original
equipment tires and wheels. TPMS pressures
and warning have been established for the tire
size equipped on your vehicle. Undesirable
system operation or sensor damage may
result when using replacement equipment
that is not of the same size, type, and/or style.
The TPMS sensor is not designed for use on
aftermarket wheels and may contribute to a
poor overall system performance or sensor
damage. Customers are encouraged to use
Original Equipment Manufacturer (OEM)
wheels to ensure proper TPMS feature opera -
tion.
Using aftermarket tire sealants may cause the
Tire Pressure Monitoring System (TPMS)
sensor to become inoperable. After using an
aftermarket tire sealant it is recommended
that you take your vehicle to an authorized
dealer to have your sensor function checked.
After inspecting or adjusting the tire pressure
always reinstall the valve stem cap. This will
prevent moisture and dirt from entering the
valve stem, which could damage the TPMS
sensor.
6
Page 191 of 268
IN CASE OF EMERGENCY 189
REFUELING IN AN EMERGENCY –
IF EQUIPPED
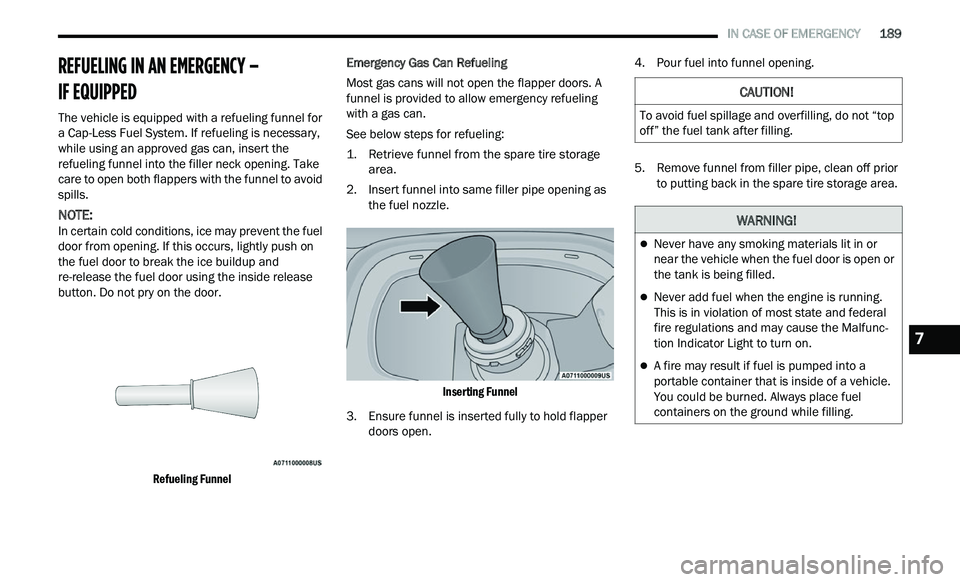
The vehicle is equipped with a refueling funnel for
a Cap-Less Fuel System. If refueling is necessary,
while using an approved gas can, insert the
refueling funnel into the filler neck opening. Take
care to open both flappers with the funnel to avoid
spills.
NOTE:
In certain cold conditions, ice may prevent the fuel
d oor
from opening. If this occurs, lightly push on
the fuel door to break the ice buildup and
re-release the fuel door using the inside release
button. Do not pry on the door.
Refueling Funnel
Emergency Gas Can Refueling
Most gas cans will not open the flapper doors. A
f
u
nnel is provided to allow emergency refueling
with a gas can.
See below steps for refueling:
1. Retrieve funnel from the spare tire storage a
rea.
2. Insert funnel into same filler pipe opening as t
he fuel nozzle.
Inserting Funnel
3. E nsure funnel is inserted fully to hold flapper
d
oors open. 4. Pour fuel into funnel opening.
5
. Remove funnel from filler pipe, clean off prior t
o putting back in the spare tire storage area.
CAUTION!
To avoid fuel spillage and overfilling, do not “top
off” the fuel tank after filling.
WARNING!
Never have any smoking materials lit in or
near the vehicle when the fuel door is open or
the tank is being filled.
Never add fuel when the engine is running.
This is in violation of most state and federal
fire regulations and may cause the Malfunc -
tion Indicator Light to turn on.
A fire may result if fuel is pumped into a
portable container that is inside of a vehicle.
You could be burned. Always place fuel
containers on the ground while filling.
7
Page 234 of 268
232 SERVICING AND MAINTENANCE
(Continued)
TIRES — GENERAL INFORMATION
Tire Pressure
Proper tire inflation pressure is essential to the
safe and satisfactory operation of your vehicle.
Four primary areas are affected by improper tire
pressure:
Safety
Fuel Economy
Tread Wear
Ride Comfort and Vehicle Stability
Safety Both underinflation and overinflation affect the
st
ability of the vehicle and can produce a feeling of
sluggish response or over responsiveness in the
steering.
NOTE:
Unequal tire pressures from side to side may
cause erratic and unpredictable steering
response.
Unequal tire pressure from side to side may
cause the vehicle to drift left or right.
Fuel Economy
Underinflated tires will increase tire rolling
r e
sistance resulting in higher fuel consumption.
Tread Wear
Improper cold tire inflation pressures can cause
a b
normal wear patterns and reduced tread life,
resulting in the need for earlier tire replacement. Ride Comfort And Vehicle Stability
Proper tire inflation contributes to a comfortable
r
i
de. Overinflation produces a jarring and
uncomfortable ride.
Tire Inflation Pressures
The proper cold tire inflation pressure is listed on
the driver's side B-pillar or rear edge of the driver's
side door.
At least once a month:
Check and adjust tire pressure with a good
quality pocket-type pressure gauge. Do not
make a visual judgement when determining
proper inflation. Tires may look properly inflated
even when they are underinflated.
Inspect tires for signs of tire wear or visible
damage.
Inflation pressures specified on the placard are
a l
ways “cold tire inflation pressure”. Cold tire
inflation pressure is defined as the tire pressure
after the vehicle has not been driven for at least
3 hours, or driven less than 1 mile (1.6 km) after
WARNING!
Improperly inflated tires are dangerous and
can cause collisions.
Underinflation increases tire flexing and can
result in overheating and tire failure.
Overinflation reduces a tire's ability to cushion
shock. Objects on the road and chuckholes
can cause damage that result in tire failure.
Overinflated or underinflated tires can affect
vehicle handling and can fail suddenly,
resulting in loss of vehicle control.
Unequal tire pressures can cause steering
problems. You could lose control of your
vehicle.
Unequal tire pressures from one side of the
vehicle to the other can cause the vehicle to
drift to the right or left.
Always drive with each tire inflated to the
recommended cold tire inflation pressure.
WARNING!
CAUTION!
After inspecting or adjusting the tire pressure,
always reinstall the valve stem cap. This will
prevent moisture and dirt from entering the
valve stem, which could damage the valve stem.
Page 250 of 268
248 TECHNICAL SPECIFICATIONS
FUEL SYSTEM CAUTIONS
NOTE:
Intentional tampering with the emissions control system can result in civil penalties being assessed against you.
FLUID CAPACITIES
CAUTION!
Follow these guidelines to maintain your vehicle’s performance:
The use of leaded gasoline is prohibited by Federal law. Using leaded gasoline can impair engine performance and damage the emissions control system.
An out-of-tune engine or certain fuel or ignition malfunctions can cause the catalytic converter to overheat. If you notice a pungent burning odor or some
light smoke, your engine may be out of tune or malfunctioning and may require immediate service. Contact an authorized dealer for service assistance.
The use of fuel additives, which are now being sold as octane enhancers, is not recommended. Most of these products contain high concentrations of meth -
anol. Fuel system damage or vehicle performance problems resulting from the use of such fuels or additives is not the responsibility of the manufacturer
a n
d may void or not be covered under the New Vehicle Limited Warranty.
US Metric
Fuel (Approximate)
All Engines 18.5 Gallons70 Liters
Engine Oil With Filter
3.6L Engine 6 Quarts5.6 Liters
5.7L Engine 7 Quarts6.6 Liters
Page 251 of 268
TECHNICAL SPECIFICATIONS 249
ENGINE FLUIDS AND LUBRICANTS
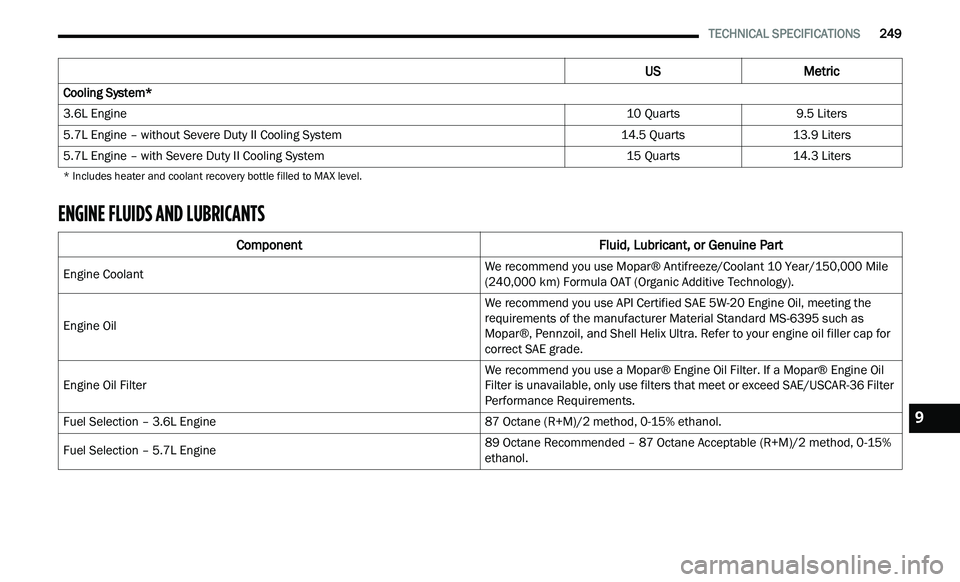
Cooling System*
3.6L Engine 10 Quarts9.5 Liters
5.7L Engine – without Severe Duty II Cooling System 14.5 Quarts13.9 Liters
5.7L Engine – with Severe Duty II Cooling System 15 Quarts14.3 Liters
* Includes heater and coolant recovery bottle filled to MAX level.
Component Fluid, Lubricant, or Genuine Part
Engine Coolant We recommend you use Mopar® Antifreeze/Coolant 10 Year/150,000 Mile
(
2
40,000 km) Formula OAT (Organic Additive Technology).
Engine Oil We recommend you use API Certified SAE 5W-20 Engine Oil, meeting the
r
e
quirements of the manufacturer Material Standard MS-6395 such as
Mopar®, Pennzoil, and Shell Helix Ultra. Refer to your engine oil filler cap for
correct SAE grade.
Engine Oil Filter We recommend you use a Mopar® Engine Oil Filter. If a Mopar® Engine Oil
F
i
lter is unavailable, only use filters that meet or exceed SAE/USCAR-36 Filter
Performance Requirements.
Fuel Selection – 3.6L Engine 87 Octane (R+M)/2 method, 0-15% ethanol.
Fuel Selection – 5.7L Engine 89 Octane Recommended – 87 Octane Acceptable (R+M)/2
method, 0-15%
et
hanol.
US Metric
9
Page 259 of 268

257
D
Daytime Running Lights...................................41Dealer Service...............................................202Deck Lid
Power Release............................................60Defroster, Windshield....................................177Diagnostic System, Onboard...........................79Dimmer SwitchHeadlight.....................................................41DipsticksOil (Engine)................................................201Disable Vehicle Towing..................................193DisposalAntifreeze (Engine Coolant).......................211Door Ajar..........................................................73Door Ajar Light.................................................73Door LocksAutomatic....................................................22Child-Protection Door Lock — Rear Doors....23Doors...............................................................19Driver’s Seat Back Tilt.....................................27DrivingThrough Flowing, Rising, Or Shallow
Standing Water
.....................................120
E
Electric Brake Control System.......................138Anti-Lock Brake System.............................137Electronic Roll Mitigation.................138, 142
Electric Remote Mirrors...................................35
Electronic Power Distribution Center (Fuses)...214
Electronic Speed Control (Cruise Control)........93Electronic Stability Control (ESC)..................139Electronic Throttle Control Warning Light.........73Emergency Gas Can Refueling......................189Emergency, In Case Of Freeing Vehicle When Stuck.....................192Hazard Warning Flasher...........................179Jacking.....................................................182Jump Starting..................................186, 187Towing......................................................193Emission Control System Maintenance...........79Engine..................................................199, 200Air Cleaner................................................203Block Heater................................................84Break-In Recommendations........................84Checking Oil Level....................................201Compartment..................................199, 200Compartment Identification......................199Coolant (Antifreeze).........................209, 249Cooling.....................................................209Exhaust Gas Caution................................178Fails To Start...............................................83Flooded, Starting.........................................83Fuel Requirements...................................246Jump Starting..................................186, 187Oil...........................................202, 248, 249Oil Filler Cap.............................................199Oil Filter....................................................203
Oil Selection....................................202, 248
Oil Synthetic..............................................203Overheating..............................................190Starting........................................................81Enhanced Accident Response
Feature................................................164, 194Ethanol..........................................................247Exhaust Gas Cautions...................................178Exhaust System...................................178, 208Exterior Lighting...............................................40Exterior Lights........................................40, 178
F
Filters Air Cleaner
................................................203Air Conditioning.................................50, 204Engine Oil........................................203, 249Engine Oil Disposal...................................203Flashers........................................................179Hazard Warning........................................179Turn Signals................................43, 78, 178Flash-To-Pass...................................................41Flooded Engine Starting...................................83Floor Console...................................................52Fluid Capacities............................................248Fluid Leaks....................................................178Fluid Level ChecksBrake........................................................212Cooling System.........................................209Engine Oil.................................................201
Transfer Case...........................................213
11