2021 CHRYSLER 300 instrument panel
[x] Cancel search: instrument panelPage 3 of 268
TABLE OF CONTENTS
1
2
3
4
5
6
7
8
9
10
11
1INTRODUCTION .. ............................................................................................................................ 7
2 GETTING TO KNOW YOUR VEHICLE . .
................................................................................12
3 GETTING TO KNOW YOUR INSTRUMENT PANEL . .
..................................................... 64
4 STARTING AND OPERATING .
.
................................................................................................81
5 MULTIMEDIA . .
.............................................................................................................................. 121
6 SAFETY . ........................................................................................................................................ 137
7 I
N CASE OF EMERGENCY . .
................................................................................................... 179
8 SERVICING AND MAINTENANCE . .
..................................................................................... 195
9 TECHNICAL SPECIFICATIONS . .
.......................................................................................... 245
10 CUSTOMER ASSISTANCE .
.
.................................................................................................... 251
11 INDEX . ............................................................................................................................................ 255
Page 5 of 268

3
EXTERIOR LIGHTS ................................................. 40
Headlight Switch.. .............................................40
Multifunction Lever . . ........................................40
Daytime Running Lights (DRLs). . .....................41
High/Low Beam Switch. . ..................................41
Automatic High Beam — If Equipped . . ...........41
Flash-To-Pass. . ..................................................41
Automatic Headlights . . ....................................41
Parking Lights . . ................................................41
Headlights On With Wipers . . ............................42
Adaptive Bi-Xenon High Intensity Discharge
Headlights — If Equipped . .
...............................42
Headlight Time Delay . . .....................................42
Lights-On Reminder . . .......................................42
Fog Lights — If Equipped . . ................................42
Turn Signals . . ....................................................43
Lane Change Assist — If Equipped . . ................43
INTERIOR LIGHTS . . ............................................... 43
Interior Courtesy Lights .. ..................................43
WINDSHIELD WIPERS AND WASHERS . . ............ 45
Windshield Wiper Operation .. ..........................45
Rain Sensing Wipers — If Equipped . . .............46
CLIMATE CONTROLS . . .......................................... 47
Automatic Climate Control Descriptions And
Functions . .........................................................47
A
utomatic Temperature Control (ATC) . . .........49
Climate Voice Commands. . ..............................50
Operating Tips . . ...............................................50 INTERIOR STORAGE AND EQUIPMENT .
.
............. 51
Storage..............................................................51
U SB/AUX Control . . ...........................................53
Lighted Cupholders — If Equipped . . ................53
Heated And Cooled Cupholders —
If Equipped . .
.....................................................53
Power Sunshade — If Equipped . . ....................54
Power Outlets . . .................................................54
WINDOWS . . ............................................................56
Power Window Controls .. .................................56
Automatic Window Features . . ........................56
Reset Auto-Up . . ................................................57
Window Lockout Switch . . .................................57
Wind Buffeting . . ...............................................57
PANORAMIC SUNROOF — IF EQUIPPED . . ...........58
Opening And Closing The Sunroof.. .................58
Pinch Protect Feature . . ....................................58
Venting Sunroof. . ..............................................59
Opening And Closing The Power Shade. . ........59
Sunroof Maintenance . . ....................................59
Ignition Off Operation. . .....................................59
HOOD . .....................................................................59
O pening The Hood.. ..........................................59
Closing The Hood . . ...........................................60
TRUNK . ...................................................................60
O pening The Trunk .. .........................................60
Closing The Trunk. . ...........................................60
Trunk Safety . . ...................................................61
Cargo Area Features . . .....................................61
LOAD LEVELING SYSTEM — IF EQUIPPED . . .......63
GETTING TO KNOW YOUR
INSTRUMENT PANEL
INSTRUMENT CLUSTER ........................................ 64
Instrument Cluster Descriptions .. .................. 66
INSTRUMENT CLUSTER DISPLAY . . ...................... 66
Location And Controls.. .................................... 66
Engine Oil Life Reset . . ..................................... 67
Instrument Cluster Display Selectable
Menu Items . .
.................................................... 68
Battery Saver On/Battery Saver Mode
Message — Electrical Load Reduction
Actions — If Equipped . .
.................................... 70
Programmable Features . . ................................ 71
WARNING LIGHTS AND MESSAGES . . ................. 71
Red Warning Lights .. ........................................72
Yellow Warning Lights . . .................................... 74
Yellow Indicator Lights . . ................................... 77
Green Indicator Lights . . ................................... 77
White Indicator Lights . . .................................... 78
Blue Indicator Lights . . ...................................... 78
ONBOARD DIAGNOSTIC SYSTEM — OBD II . . ...... 79
Onboard Diagnostic System
(OBD II) Cybersecurity . .
.................................... 79
EMISSIONS INSPECTION AND MAINTENANCE
PROGRAMS . .
.......................................................... 79
Page 28 of 268

26 GETTING TO KNOW YOUR VEHICLE
Uconnect System Support:
US residents visit www.DriveUconnect.com or
call: 1-877-855-8400 (24 hours a day 7 days a
w e
ek)
Canadian residents visit www.DriveUconnect.ca
or call: 1-800-465-2001 (English) or
1 -
800-387-9983 (French)
SiriusXM Guardian™ services support:
US residents visit www.driveuconnect.com/
sirius-xm-guardian or call: 1-844-796-4827
Canadian residents visit https://www.driveuco-
nnect.ca/en/sirius-xm-guardian or call:
1-877-324-9091
DRIVER MEMORY SETTINGS — IF EQUIPPED
This feature allows the driver to save up to two
different memory profiles for easy recall through a
memory switch. Each memory profile saves
desired position settings for the following features:
Driver seat
Easy Entry/Exit seat operation (if equipped)
Side mirrors
Power tilt and telescopic steering column (if
equipped)
A set of desired radio station presets
NOTE:
Your vehicle is equipped with two key fobs, each
can be linked to either memory position 1 or 2.
Be sure to program the radio presets prior to
programming the memory settings.
The memory settings switch is located on the
dr
iver’s door trim panel. The switch consists of
three buttons:
The set (S) button, which is used to activate the
memory save function.
The (1) and (2) buttons which are used to recall
either of two saved memory profiles.
Memory Switch
PROGRAMMING THE MEMORY FEATURE
To create a new memory profile, perform the
following:
NOTE:
Saving a new memory profile will erase the
s e
lected profile from memory.
1. Place the vehicle’s ignition in the ON/RUN p
osition (do not start the engine).
2. Adjust all memory profile settings to desired p
references (i.e., seat, side mirror, power tilt
and telescopic steering column [if equipped],
and radio station presets).
3. Push and release the set (S) button on the m
emory switch, and then push the desired
memory button (1 or 2) within five seconds.
The instrument cluster display will display
which memory position has been set.
NOTE:
Memory profiles can be set without the vehicle in
P A
RK, but the vehicle must be in PARK to recall a
memory profile.
Page 42 of 268
40 GETTING TO KNOW YOUR VEHICLE
EXTERIOR LIGHTS
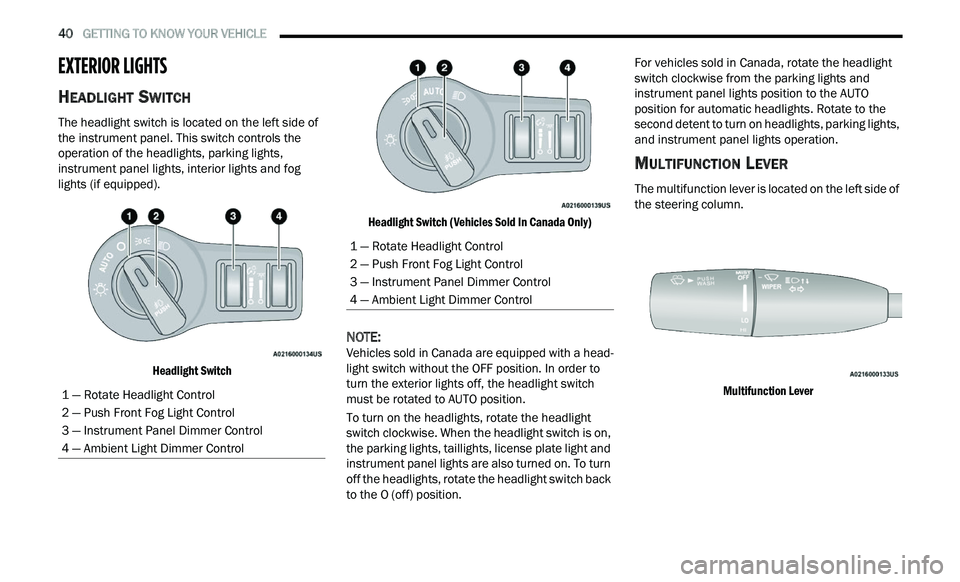
HEADLIGHT SWITCH
The headlight switch is located on the left side of
the instrument panel. This switch controls the
operation of the headlights, parking lights,
instrument panel lights, interior lights and fog
lights (if equipped).
Headlight Switch Headlight Switch (Vehicles Sold In Canada Only)
NOTE:
Vehicles sold in Canada are equipped with a head -
light switch without the OFF position. In order to
t u
rn the exterior lights off, the headlight switch
must be rotated to AUTO position.
To turn on the headlights, rotate the headlight
s w
itch clockwise. When the headlight switch is on,
the parking lights, taillights, license plate light and
instrument panel lights are also turned on. To turn
off the headlights, rotate the headlight switch back
to the O (off) position. For vehicles sold in Canada, rotate the headlight
sw
itch clockwise from the parking lights and
instrument panel lights position to the AUTO
position for automatic headlights. Rotate to the
second detent to turn on headlights, parking lights,
and instrument panel lights operation.
MULTIFUNCTION LEVER
The multifunction lever is located on the left side of
the steering column.
Multifunction Lever
1 — Rotate Headlight Control
2 — Push Front Fog Light Control
3 — Instrument Panel Dimmer Control
4 — Ambient Light Dimmer Control
1 — Rotate Headlight Control
2 — Push Front Fog Light Control
3 — Instrument Panel Dimmer Control
4 — Ambient Light Dimmer Control
Page 43 of 268
GETTING TO KNOW YOUR VEHICLE 41
DAYTIME RUNNING LIGHTS (DRLS)
The Daytime Running Lights will turn on when the
engine is started and will remain on unless the
headlights are turned to the on position, the
parking brake is applied, or the ignition is placed in
the OFF position.
NOTE:
For vehicles sold in Canada, the Daytime
Running Lights will automatically deactivate
when the front fog lights are turned on.
If allowed by law in the country in which the
vehicle was purchased, the Daytime Running
Lights can be turned on and off using the
Uconnect system
Ú page 122.
On some vehicles, the Daytime Running Lights
may deactivate or reduce intensity on one side
of the vehicle (when a turn signal is activated on
that side), or on both sides of the vehicle (when
the hazard warning lights are activated).
HIGH/LOW BEAM SWITCH
Push the multifunction lever toward the instrument
panel to switch the headlights to high beams.
Pulling the multifunction lever back will turn the
low beams on.
AUTOMATIC HIGH BEAM — IF EQUIPPED
The Automatic High Beam Headlamp Control
system provides increased forward lighting at night
by automating high beam control through the use
of a digital camera mounted on the inside rearview
mirror. This camera detects vehicle specific light
and automatically switches from high beams to low
beams until the approaching vehicle is out of view.
NOTE:
The Automatic High Beam Headlamp Control
can be turned on or off by selecting or dese
-
lecting “Auto High Beam” within Uconnect
Se
ttings Ú page 122, as well as turning the
headlight switch to the AUTO position.
Broken, muddy, or obstructed headlights and
taillights of vehicles in the field of view will
cause headlights to remain on longer (closer to
the vehicle). Also, dirt, film, and other obstruc -
tions on the windshield or camera lens will
c a
use the system to function improperly.
If the windshield or Automatic High Beam Head -
lamp Control mirror is replaced, the mirror must
b e
re-aimed to ensure proper performance. See
a local authorized dealer.
FLASH-TO-PASS
You can signal another vehicle with your headlights
by lightly pulling the multifunction lever toward you. This will cause the high beam headlights to turn on,
and remain on, until the lever is released.
AUTOMATIC HEADLIGHTS
This system automatically turns the headlights on
or off according to ambient light levels. To turn the
system on, rotate the headlight switch
counterclockwise to the AUTO position. When the
system is on, the headlight time delay feature is
also on. This means the headlights will stay on for
up to 90 seconds after placing the ignition in the
OFF position. The headlight time delay can be
programmed 0/30/60/90 seconds within
Uconnect Settings
Ú page 122.
To turn the automatic system off, move the
h e
adlight switch out of the AUTO position.
NOTE:
The engine must be running before the headlights
w i
ll come on in the automatic mode.
PARKING LIGHTS
To turn on the parking lights and instrument panel
lights, rotate the headlight switch clockwise. To
turn off the parking lights, rotate the headlight
switch back to the O (off) position.
NOTE:
For vehicles sold in Canada, rotate the headlight
s w
itch to the AUTO position to turn off the parking
lights.
2
Page 44 of 268
42 GETTING TO KNOW YOUR VEHICLE
HEADLIGHTS ON WITH WIPERS
If your vehicle is equipped with Automatic
Headlights, it also has this customer-
programmable feature. When your headlights are
in the automatic mode and the engine is running,
they will automatically turn on when the wiper
system is on. This feature is programmable
through the Uconnect system
Ú page 122.
NOTE:
When your headlights come on during the daytime,
t h
e instrument panel lights will automatically dim
to the lower nighttime intensity.
ADAPTIVE BI-XENON HIGH INTENSITY
D
ISCHARGE HEADLIGHTS —
I
F EQUIPPED
This system automatically swivels the headlight
beam pattern horizontally to provide increased
illumination in the direction the vehicle is being
steered.
NOTE:
Each time the Adaptive Headlight system is
turned on, the headlights will initialize by
performing a brief sequence of rotations.
The Adaptive Headlight system is active only
when the vehicle is moving forward. The Adaptive Headlight system can be turned on or
of
f
using the Uconnect system Ú page 122.
HEADLIGHT TIME DELAY
To assist when exiting the vehicle, the headlight
delay feature will leave the headlights on for up to
90 seconds. This delay is initiated when the
ignition is placed in the OFF position while the
headlight switch is on, and then the headlight
switch is cycled off within 45 seconds. Headlight
delay can be cancelled by either turning the
headlight switch on then off, or by placing the
ignition in the ON position.
NOTE:
This feature can be programmed through the
Uconnect system Ú page 122.
If you turn the headlights off before the ignition,
they will turn off in the normal manner.
LIGHTS-ON REMINDER
If the headlights or parking lights are on after the
ignition is placed in the OFF position, a chime will
sound to alert the driver when the driver's door is
opened.
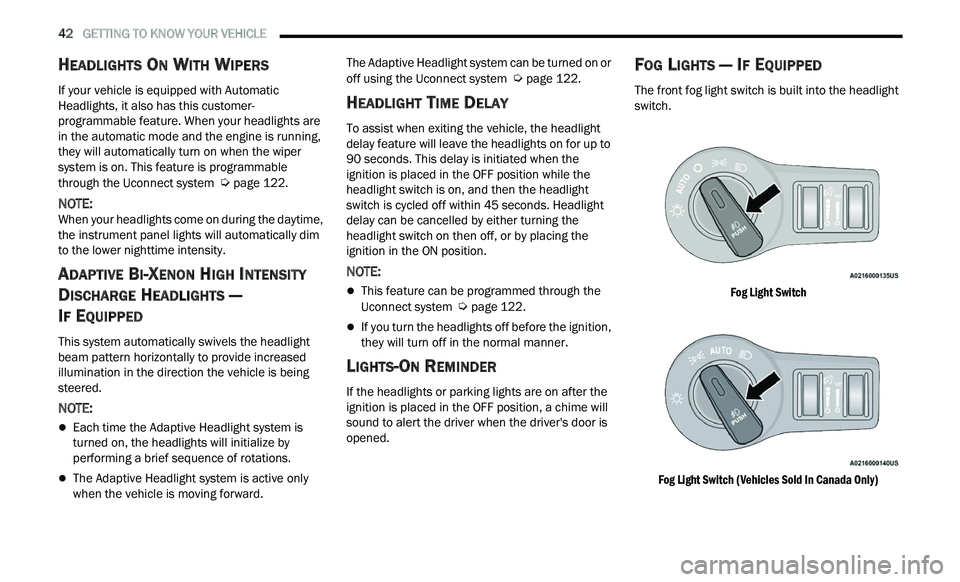
FOG LIGHTS — IF EQUIPPED
The front fog light switch is built into the headlight
switch.
Fog Light Switch
Fog Light Switch (Vehicles Sold In Canada Only)
Page 46 of 268
44 GETTING TO KNOW YOUR VEHICLE
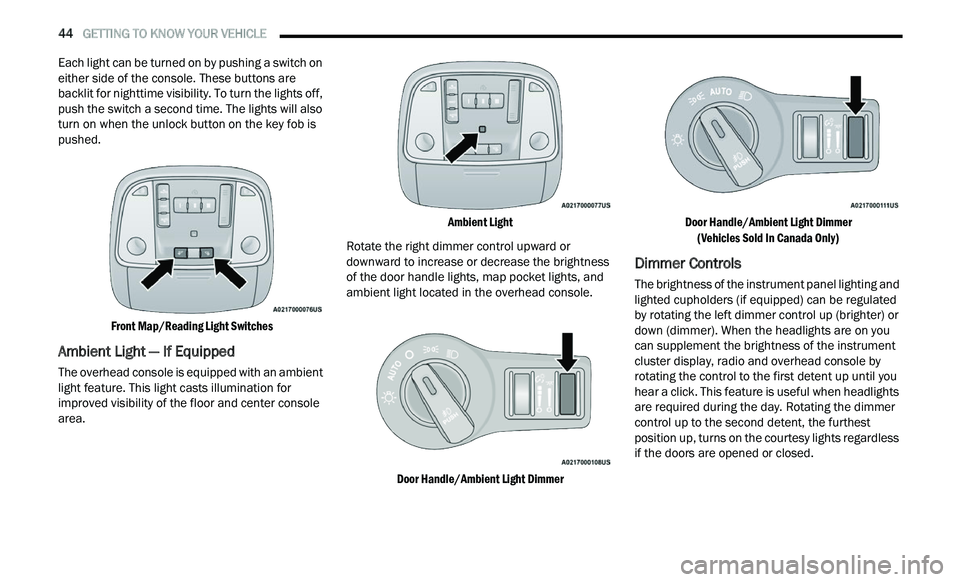
Each light can be turned on by pushing a switch on
either side of the console. These buttons are
backlit for nighttime visibility. To turn the lights off,
push the switch a second time. The lights will also
turn on when the unlock button on the key fob is
pushed.
Front Map/Reading Light Switches
Ambient Light — If Equipped
The overhead console is equipped with an ambient
light feature. This light casts illumination for
improved visibility of the floor and center console
area.
Ambient Light
Rotate the right dimmer control upward or
d ow
nward to increase or decrease the brightness
of the door handle lights, map pocket lights, and
ambient light located in the overhead console.
Door Handle/Ambient Light Dimmer Door Handle/Ambient Light Dimmer
(V
ehicles Sold In Canada Only)
Dimmer Controls
The brightness of the instrument panel lighting and
lighted cupholders (if equipped) can be regulated
by rotating the left dimmer control up (brighter) or
down (dimmer). When the headlights are on you
can supplement the brightness of the instrument
cluster display, radio and overhead console by
rotating the control to the first detent up until you
hear a click. This feature is useful when headlights
are required during the day. Rotating the dimmer
control up to the second detent, the furthest
position up, turns on the courtesy lights regardless
if the doors are opened or closed.
Page 47 of 268
GETTING TO KNOW YOUR VEHICLE 45
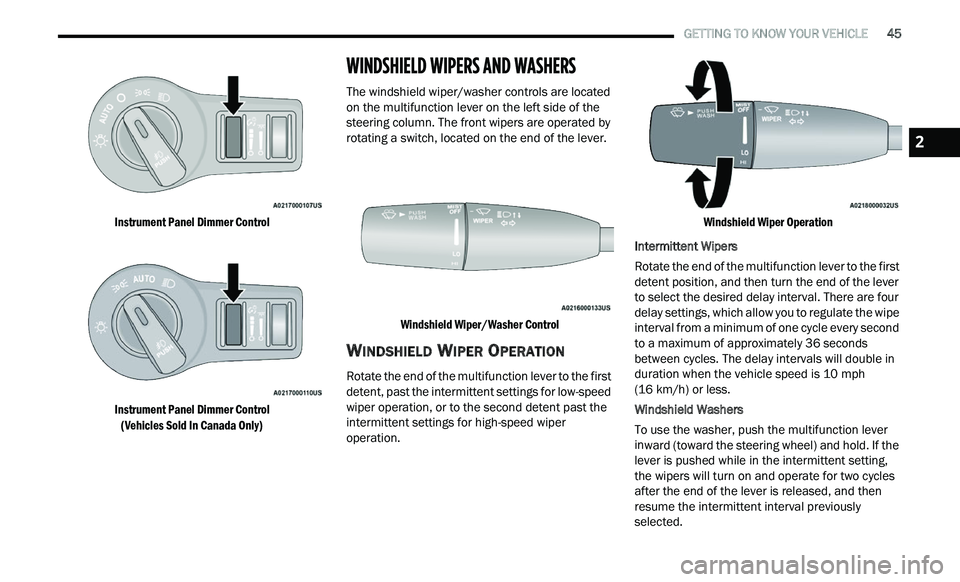
Instrument Panel Dimmer Control
Instrument Panel Dimmer Control
(V
ehicles Sold In Canada Only)
WINDSHIELD WIPERS AND WASHERS
The windshield wiper/washer controls are located
on the multifunction lever on the left side of the
steering column. The front wipers are operated by
rotating a switch, located on the end of the lever.
Windshield Wiper/Washer Control
WINDSHIELD WIPER OPERATION
Rotate the end of the multifunction lever to the first
detent, past the intermittent settings for low-speed
wiper operation, or to the second detent past the
intermittent settings for high-speed wiper
operation.
Windshield Wiper Operation
Intermittent Wipers
Rotate the end of the multifunction lever to the first
de
tent position, and then turn the end of the lever
to select the desired delay interval. There are four
delay settings, which allow you to regulate the wipe
interval from a minimum of one cycle every second
to a maximum of approximately 36 seconds
between cycles. The delay intervals will double in
duration when the vehicle speed is 10 mph
( 1
6 km/h) or less.
Windshield Washers
To use the washer, push the multifunction lever
i n
ward (toward the steering wheel) and hold. If the
lever is pushed while in the intermittent setting,
the wipers will turn on and operate for two cycles
after the end of the lever is released, and then
resume the intermittent interval previously
selected.
2