2021 CHRYSLER 300 clutch
[x] Cancel search: clutchPage 143 of 268
SAFETY 141
than 30 mph (48 km/h), see an authorized dealer
as
soon as possible to have the problem
diagnosed and corrected.
The ESC Activation/Malfunction Indicator Light
s t
arts to flash as soon as the tires lose traction and
the ESC system becomes active. The ESC
Activation/Malfunction Indicator Light also flashes
when TCS is active. If the ESC Activation/
Malfunction Indicator Light begins to flash during
acceleration, ease up on the accelerator and apply
as little throttle as possible. Be sure to adapt your
speed and driving to the prevailing road conditions.
The ESC OFF Indicator Light indicates the
customer has elected to have the
El
ectronic Stability Control (ESC) in a
reduced mode.
NOTE:
The ESC Activation/Malfunction Indicator Light
and the ESC OFF Indicator Light come on
momentarily each time the ignition is placed in
the ON position.
Each time the ignition is placed in the ON posi -
tion, the ESC system will be on even if it was
t u
rned off previously.
The ESC system will make buzzing or clicking
sounds when it is active. This is normal; the
sounds will stop when ESC becomes inactive
following the maneuver that caused the ESC
activation.
Hill Start Assist (HSA)
HSA is designed to mitigate roll back from a
complete stop while on an incline. If the driver
releases the brake while stopped on an incline,
HSA will continue to hold the brake pressure for a
short period. If the driver does not apply the
throttle before this time expires, the system will
release brake pressure and the vehicle will roll
down the hill as normal.
The following conditions must be met in order for
HS A
to activate:
The feature must be enabled.
The vehicle must be stopped.
The parking brake must be off.
The driver door must be closed.
The vehicle must be on a sufficient grade.
The gear selection must match vehicle uphill
direction (i.e., vehicle facing uphill is in forward
gear; vehicle backing uphill is in REVERSE gear).
HSA will work in REVERSE gear and all forward
gears. The system will not activate if the trans -
mission is in PARK or NEUTRAL. For vehicles
e q
uipped with a manual transmission, if the
clutch is pressed, HSA will remain active.
Disabling And Enabling HSA
This feature can be turned on or turned off. To
change the current setting using Uconnect
Settings, see
Ú page 122 for further information.
WARNING!
There may be situations where the Hill Start
Assist (HSA) will not activate and slight rolling
may occur, such as on minor hills or with a
loaded vehicle, or while pulling a trailer. HSA is
not a substitute for active driving involvement. It
is always the driver’s responsibility to be
attentive to distance to other vehicles, people,
and objects, and most importantly brake
operation to ensure safe operation of the vehicle
under all road conditions. Your complete
attention is always required while driving to
maintain safe control of your vehicle. Failure to
follow these warnings can result in a collision or
serious personal injury.
6
Page 179 of 268
SAFETY 177
(Continued)
(Continued)
Defroster
Check operation by selecting the defrost mode and
place the blower control on high speed. You should
be able to feel the air directed against the
windshield. See an authorized dealer for service if
your defroster is inoperable.
Floor Mat Safety Information
Always use floor mats designed to fit your vehicle.
Only use a floor mat that does not interfere with the
operation of the accelerator, brake or clutch
pedals. Only use a floor mat that is securely
attached using the floor mat fasteners so it cannot
slip out of position and interfere with the
accelerator, brake or clutch pedals or impair safe
operation of your vehicle in other ways.
PERIODIC SAFETY CHECKS YOU SHOULD
M
AKE OUTSIDE THE VEHICLE
Tires
Examine tires for excessive tread wear and uneven
wear patterns. Check for stones, nails, glass, or
other objects lodged in the tread or sidewall.
Inspect the tread for cuts and cracks. Inspect
sidewalls for cuts, cracks, and bulges. Check the
WARNING!
An improperly attached, damaged, folded, or
stacked floor mat, or damaged floor mat fasteners
may cause your floor mat to interfere with the
accelerator, brake, or clutch pedals and cause a
loss of vehicle control. To prevent SERIOUS
INJURY or DEATH:
ALWAYS securely attach your floor mat using
the floor mat fasteners. DO NOT install your
f l
oor mat upside down or turn your floor mat
over. Lightly pull to confirm mat is secured
using the floor mat fasteners on a regular basis.
ALWAYS REMOVE THE EXISTING FLOOR MAT
FROM THE VEHICLE before installing any
other floor mat. NEVER install or stack an addi -
tional floor mat on top of an existing floor mat.
ONLY install floor mats designed to fit your
vehicle. NEVER install a floor mat that cannot
be properly attached and secured to your
vehicle. If a floor mat needs to be replaced, only
use a FCA approved floor mat for the specific
make, model, and year of your vehicle.
ONLY use the driver’s side floor mat on the
driver’s side floor area. To check for interfer -
ence, with the vehicle properly parked with the
e n
gine off, fully depress the accelerator, the
brake, and the clutch pedal (if present) to check
for interference. If your floor mat interferes with
the operation of any pedal, or is not secure to
the floor, remove the floor mat from the vehicle
and place the floor mat in your trunk.
ONLY use the passenger’s side floor mat on the
passenger’s side floor area.
ALWAYS make sure objects cannot fall or slide
into the driver’s side floor area when the vehicle
is moving. Objects can become trapped under
accelerator, brake, or clutch pedals and could
cause a loss of vehicle control.
WARNING!
NEVER place any objects under the floor mat
(e.g., towels, keys, etc.). These objects could
change the position of the floor mat and may
cause interference with the accelerator, brake,
or clutch pedals.
If the vehicle carpet has been removed and
re-installed, always properly attach carpet to
the floor and check the floor mat fasteners are
secure to the vehicle carpet. Fully depress each
pedal to check for interference with the acceler -
ator, brake, or clutch pedals then re-install the
f l
oor mats.
It is recommended to only use mild soap and
water to clean your floor mats. After cleaning,
always check your floor mat has been properly
installed and is secured to your vehicle using
the floor mat fasteners by lightly pulling mat.
WARNING!
6
Page 194 of 268
192 IN CASE OF EMERGENCY
FREEING A STUCK VEHICLE
If your vehicle becomes stuck in mud, sand, or
snow, it can often be moved using a rocking
motion. Turn the steering wheel right and left to
clear the area around the front wheels. Then, shift
back and forth between DRIVE and REVERSE while
gently pressing the accelerator. Use the least
amount of accelerator pedal pressure that will
maintain the rocking motion, without spinning the
wheels or racing the engine.
NOTE:
For vehicles with automatic transmission: Shifts
between DRIVE and REVERSE can only be
achieved at wheel speeds of 5
mph (8 km/h) or
le
ss. Whenever the transmission remains in
NEUTRAL for more than two seconds, you must
press the brake pedal to engage DRIVE or
REVERSE.
Push the ESC OFF switch to place the Electronic
Stability Control (ESC) system in “Partial OFF”
mode, before rocking the vehicle
Ú page 139.
Once the vehicle has been freed, push the ESC
O F
F switch again to restore “ESC On” mode.CAUTION!
Racing the engine or spinning the wheels may
lead to transmission overheating and failure.
Allow the engine to idle with the transmission in
NEUTRAL for at least one minute after every five
rocking-motion cycles. This will minimize
overheating and reduce the risk of clutch or
transmission failure during prolonged efforts to
free a stuck vehicle.
WARNING!
Fast spinning tires can be dangerous. Forces
generated by excessive wheel speeds may cause
damage, or even failure, of the axle and tires. A
tire could explode and injure someone. Do not
spin your vehicle's wheels faster than 30 mph
(4
8 km/h) or for longer than 30 seconds
c o
ntinuously without stopping when you are
stuck and do not let anyone near a spinning
wheel, no matter what the speed.
CAUTION!
Racing the engine or spinning the wheels may
lead to transmission overheating and failure.
Allow the engine to idle with the transmission
in NEUTRAL for at least one minute after every
five rocking-motion cycles. This will minimize
overheating and reduce the risk of transmis -
sion failure during prolonged efforts to free a
s t
uck vehicle.
When “rocking” a stuck vehicle by shifting
between DRIVE and REVERSE, do not spin the
wheels faster than 15 mph (24 km/h), or
dr
ivetrain damage may result.
Revving the engine or spinning the wheels too
fast may lead to transmission overheating and
failure. It can also damage the tires. Do not
spin the wheels above 30 mph (48 km/h)
w h
ile in gear (no transmission shifting occur -
ring).
Page 217 of 268
SERVICING AND MAINTENANCE 215
CAUTION!
When installing the power distribution center cover, it is important to ensure the cover is properly positioned and fully latched. Failure to do so may allow
water to get into the power distribution center and possibly result in an electrical system failure.
When replacing a blown fuse, it is important to use only a fuse having the correct amperage rating. The use of a fuse with a rating other than indicated may
result in a dangerous electrical system overload. If a properly rated fuse continues to blow, it indicates a problem in the circuit that must be corrected.
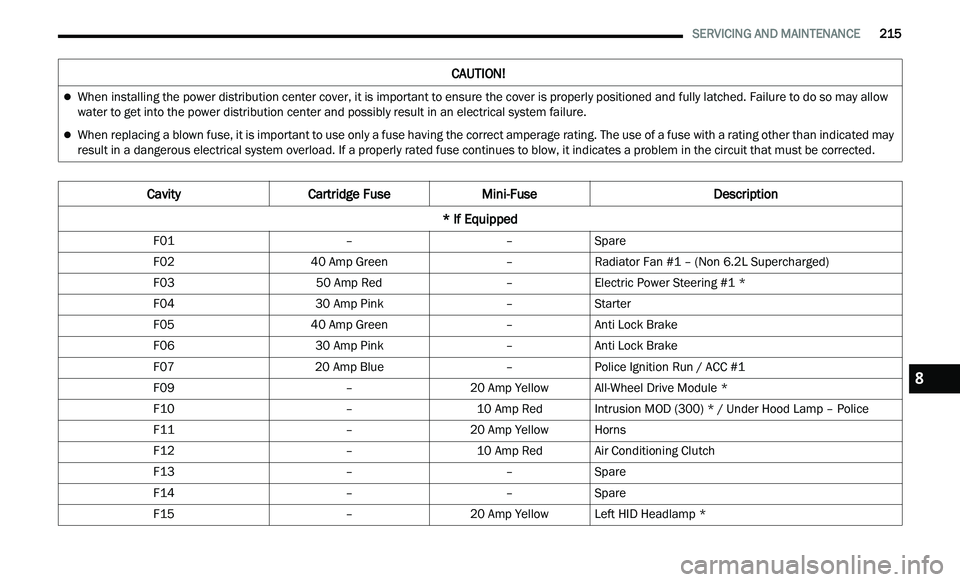
Cavity Cartridge Fuse Mini-Fuse Description
* If Equipped
F01 ––Spare
F02 40 Amp Green –Radiator Fan #1 – (Non 6.2L Supercharged)
F03 50 Amp Red –Electric Power Steering #1 *
F04 30 Amp Pink –Starter
F05 40 Amp Green –Anti Lock Brake
F06 30 Amp Pink –Anti Lock Brake
F07 20 Amp Blue –Police Ignition Run / ACC #1
F09 –20 Amp YellowAll-Wheel Drive Module *
F10 –10 Amp RedIntrusion MOD (300) * / Under Hood Lamp – Police
F11 –20 Amp YellowHorns
F12 –10 Amp RedAir Conditioning Clutch
F13 ––Spare
F14 ––Spare
F15 –20 Amp YellowLeft HID Headlamp *
8
Page 218 of 268
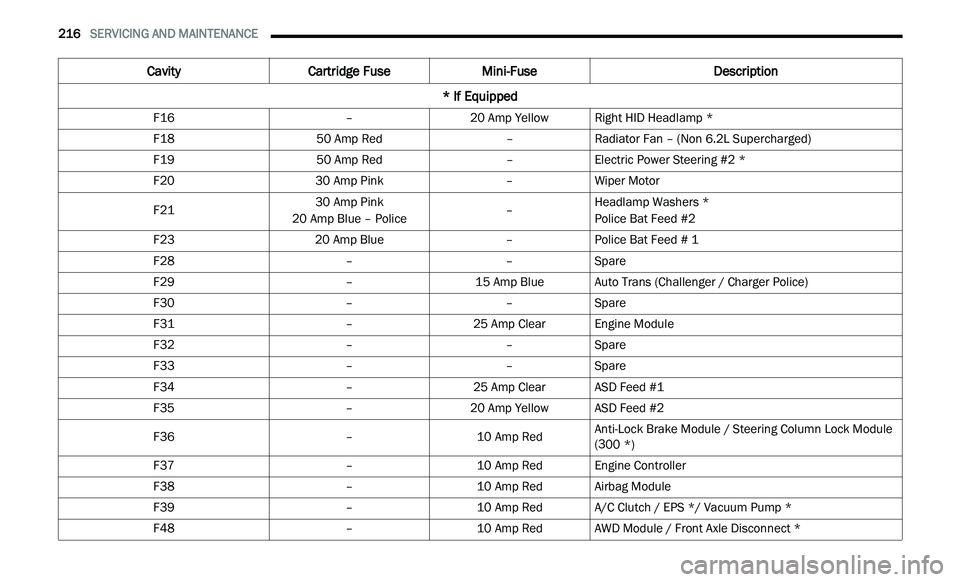
216 SERVICING AND MAINTENANCE
F16 –20 Amp YellowRight HID Headlamp *
F18 50 Amp Red –Radiator Fan – (Non 6.2L Supercharged)
F19 50 Amp Red –Electric Power Steering #2 *
F20 30 Amp Pink –Wiper Motor
F21 30 Amp Pink
20 Amp Blue – Police –Headlamp Washers *
Police Bat Feed #2
F23 20 Amp Blue –Police Bat Feed # 1
F28 ––Spare
F29 –15 Amp BlueAuto Trans (Challenger / Charger Police)
F30 ––Spare
F31 –25 Amp ClearEngine Module
F32 ––Spare
F33 ––Spare
F34 –25 Amp ClearASD Feed #1
F35 –20 Amp YellowASD Feed #2
F36 –10 Amp RedAnti-Lock Brake Module / Steering Column Lock Module
(
3
00 *)
F37 –10 Amp RedEngine Controller
F38 –10 Amp RedAirbag Module
F39 –10 Amp RedA/C Clutch / EPS */ Vacuum Pump *
F48 –10 Amp RedAWD Module / Front Axle Disconnect *
Cavity Cartridge Fuse Mini-Fuse Description
* If Equipped