2021 CHRYSLER 300 length
[x] Cancel search: lengthPage 25 of 268

GETTING TO KNOW YOUR VEHICLE 23
CHILD-PROTECTION DOOR LOCK
S
YSTEM — REAR DOORS
To provide a safer environment for small children
riding in the rear seats, the rear doors are
equipped with Child-Protection Door Lock system.
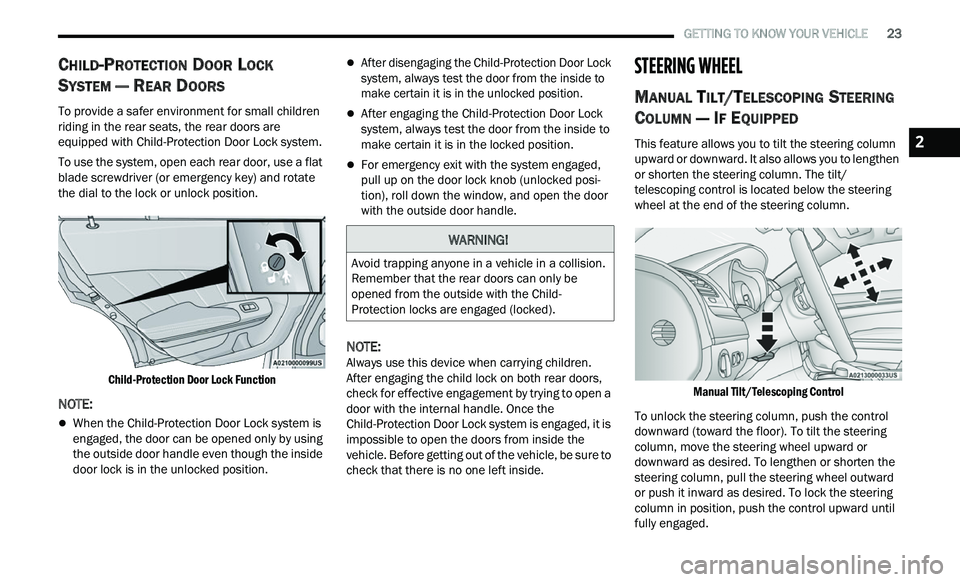
To use the system, open each rear door, use a flat
b l
ade screwdriver (or emergency key) and rotate
the dial to the lock or unlock position.
Child-Protection Door Lock Function
NOTE:
When the Child-Protection Door Lock system is
engaged, the door can be opened only by using
the outside door handle even though the inside
door lock is in the unlocked position.
After disengaging the Child-Protection Door Lock
system, always test the door from the inside to
make certain it is in the unlocked position.
After engaging the Child-Protection Door Lock
system, always test the door from the inside to
make certain it is in the locked position.
For emergency exit with the system engaged,
pull up on the door lock knob (unlocked posi -
tion), roll down the window, and open the door
w i
th the outside door handle.
NOTE:
Always use this device when carrying children.
A f
ter engaging the child lock on both rear doors,
check for effective engagement by trying to open a
door with the internal handle. Once the
Child-Protection Door Lock system is engaged, it is
impossible to open the doors from inside the
vehicle. Before getting out of the vehicle, be sure to
check that there is no one left inside.
STEERING WHEEL
MANUAL TILT/TELESCOPING STEERING
C
OLUMN — IF EQUIPPED
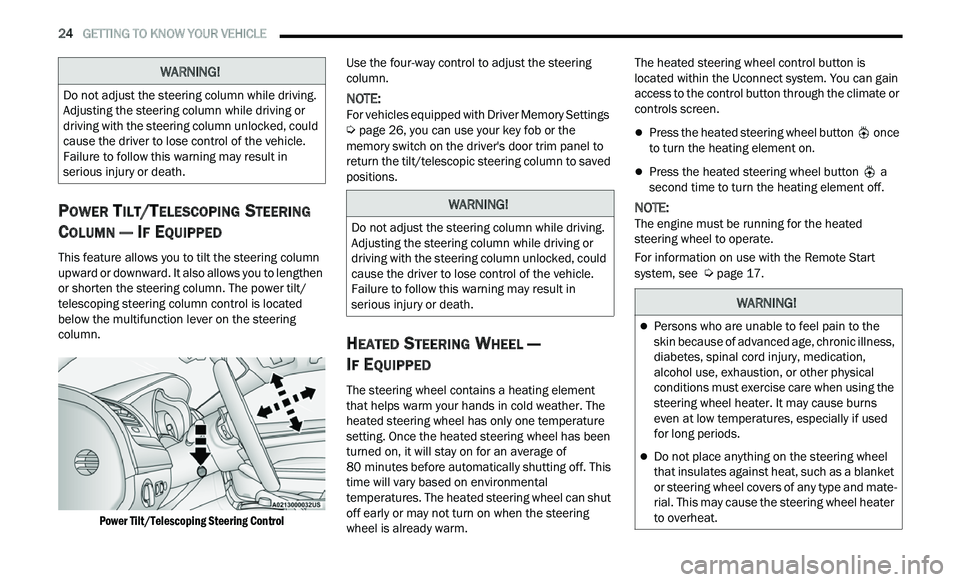
This feature allows you to tilt the steering column
upward or downward. It also allows you to lengthen
or shorten the steering column. The tilt/
telescoping control is located below the steering
wheel at the end of the steering column.
Manual Tilt/Telescoping Control
To unlock the steering column, push the control
dow
nward (toward the floor). To tilt the steering
column, move the steering wheel upward or
downward as desired. To lengthen or shorten the
steering column, pull the steering wheel outward
or push it inward as desired. To lock the steering
column in position, push the control upward until
fully engaged.
WARNING!
Avoid trapping anyone in a vehicle in a collision.
Remember that the rear doors can only be
opened from the outside with the Child-
Protection locks are engaged (locked).
2
Page 26 of 268

24 GETTING TO KNOW YOUR VEHICLE
POWER TILT/TELESCOPING STEERING
C
OLUMN — IF EQUIPPED
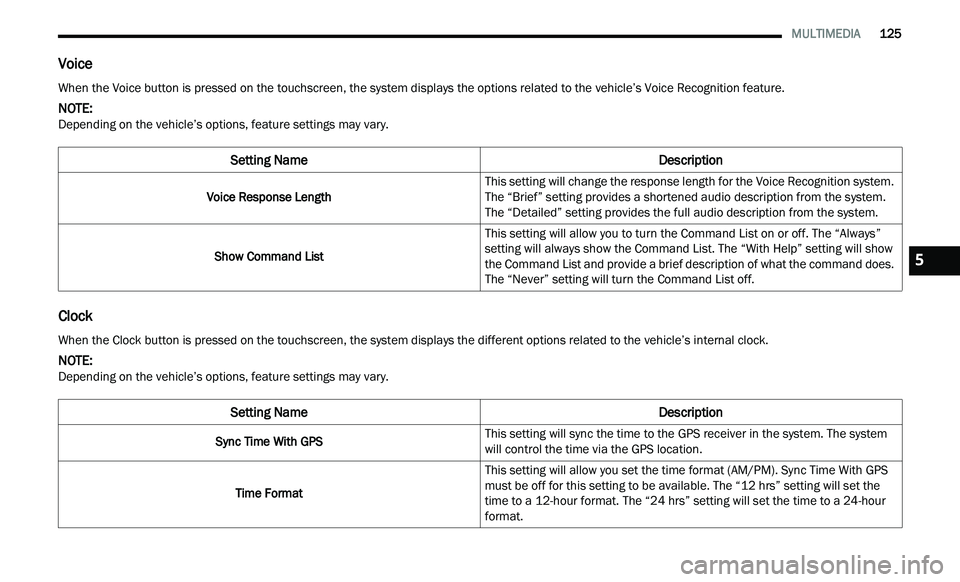
This feature allows you to tilt the steering column
upward or downward. It also allows you to lengthen
or shorten the steering column. The power tilt/
telescoping steering column control is located
below the multifunction lever on the steering
column.
Power Tilt/Telescoping Steering Control
Use the four-way control to adjust the steering
c
ol
umn.
NOTE:
For vehicles equipped with Driver Memory Settings
Ú page 26, you can use your key fob or the
memory switch on the driver's door trim panel to
r e
turn the tilt/telescopic steering column to saved
positions.
HEATED STEERING WHEEL —
I
F EQUIPPED
The steering wheel contains a heating element
that helps warm your hands in cold weather. The
heated steering wheel has only one temperature
setting. Once the heated steering wheel has been
turned on, it will stay on for an average of
80 minutes before automatically shutting off. This
t i
me will vary based on environmental
temperatures. The heated steering wheel can shut
off early or may not turn on when the steering
wheel is already warm. The heated steering wheel control button is
l
oc
ated within the Uconnect system. You can gain
access to the control button through the climate or
controls screen.
Press the heated steering wheel button once
to turn the heating element on.
Press the heated steering wheel button a
second time to turn the heating element off.
NOTE:
The engine must be running for the heated
s t
eering wheel to operate.
For information on use with the Remote Start
sy
stem, see Ú page 17.
WARNING!
Do not adjust the steering column while driving.
Adjusting the steering column while driving or
driving with the steering column unlocked, could
cause the driver to lose control of the vehicle.
Failure to follow this warning may result in
serious injury or death.
WARNING!
Do not adjust the steering column while driving.
Adjusting the steering column while driving or
driving with the steering column unlocked, could
cause the driver to lose control of the vehicle.
Failure to follow this warning may result in
serious injury or death.
WARNING!
Persons who are unable to feel pain to the
skin because of advanced age, chronic illness,
diabetes, spinal cord injury, medication,
alcohol use, exhaustion, or other physical
conditions must exercise care when using the
steering wheel heater. It may cause burns
even at low temperatures, especially if used
for long periods.
Do not place anything on the steering wheel
that insulates against heat, such as a blanket
or steering wheel covers of any type and mate
-
rial. This may cause the steering wheel heater
t o
overheat.
Page 58 of 268

56 GETTING TO KNOW YOUR VEHICLE
WINDOWS
POWER WINDOW CONTROLS
The window controls on the driver's door control all
the door windows.
Power Window Switches
The passenger door windows can also be operated
b y
using the single window controls on the
passenger door trim panel. The window controls
will operate only when the ignition is in the ACC or
ON/RUN position.
NOTE:
The power window switches will remain active for
u p
to 10 minutes after the ignition is placed in the
O F
F position. Opening either front door will cancel
this feature. The timing is programmable within
Uconnect Settings
Ú page 122.
AUTOMATIC WINDOW FEATURES
Auto-Down Feature
The driver and front passenger door power window
sw
itches have an Auto-Down feature. Push the
window switch down to the second detent, release,
and the window will go down automatically.
To stop the window from going all the way down
du
ring the Auto-Down operation, pull up or push
down on the switch briefly.
CAUTION!
Many accessories that can be plugged in draw
power from the vehicle's battery even when
not in use (i.e., cellular phones, etc.). Eventu -
ally, if plugged in long enough, the vehicle's
b a
ttery will discharge sufficiently to degrade
battery life and/or prevent the engine from
starting.
Accessories that draw higher power (i.e.,
coolers, vacuum cleaners, lights, etc.) will
degrade the battery even more quickly. Only
use these intermittently and with greater
caution.
After the use of high power draw accessories
or long periods of the vehicle not being started
(with accessories still plugged in), the vehicle
must be driven a sufficient length of time to
allow the alternator to recharge the vehicle's
battery.
Power outlets are designed for accessory
plugs only. Do not hang any type of accessory
or accessory bracket from the plug. Improper
use of the power outlet can cause damage.
WARNING!
Never leave children unattended in a vehicle, and
do not let children play with power windows. Do
not leave the key fob in or near the vehicle, or in a
location accessible to children, and do not leave
the ignition of a vehicle equipped with Keyless
Enter ‘n Go™ in the ACC or ON/RUN position.
Occupants, particularly unattended children, can
become entrapped by the windows while operat -
ing the power window switches. Such entrapment
m a
y result in serious injury or death.
Page 127 of 268

MULTIMEDIA 125
Voice
Clock
When the Voice button is pressed on the touchscreen, the system displays the options related to the vehicle’s Voice Recognition feature.
NOTE:
Depending on the vehicle’s options, feature settings may vary.
Setting Name Description
Voice Response LengthThis setting will change the response length for the Voice Recognition system.
T
h
e “Brief” setting provides a shortened audio description from the system.
The “Detailed” setting provides the full audio description from the system.
Show Command List This setting will allow you to turn the Command List on or off. The “Always”
se
tting will always show the Command List. The “With Help” setting will show
the Command List and provide a brief description of what the command does.
The “Never” setting will turn the Command List off.
When the Clock button is pressed on the touchscreen, the system displays the different options related to the vehicle’s internal clock.
NOTE:
Depending on the vehicle’s options, feature settings may vary.
Setting Name Description
Sync Time With GPSThis setting will sync the time to the GPS receiver in the system. The system
w
i
ll control the time via the GPS location.
Time Format This setting will allow you set the time format (AM/PM). Sync Time With GPS
m
u
st be off for this setting to be available. The “12 hrs” setting will set the
time to a 12-hour format. The “24 hrs” setting will set the time to a 24-hour
format.
5
Page 145 of 268

SAFETY 143
BSM Warning Light
The BSM detection zone covers approximately one
la
ne width on both sides of the vehicle 12 ft
( 3
.8 m). The zone length starts at the outside
r e
arview mirror and extends approximately 10 ft
( 3
m) beyond the rear fascia/bumper of the
v e
hicle. The BSM system monitors the detection
zones on both sides of the vehicle when the vehicle
speed reaches approximately 6 mph (10 km/h) or
h i
gher and will alert the driver of vehicles in these
areas.
NOTE:
The BSM system DOES NOT alert the driver
about rapidly approaching vehicles that are
outside the detection zones.
The BSM system detection zone DOES NOT
change if your vehicle is towing a trailer. There -
fore, visually verify the adjacent lane is clear for
b ot
h your vehicle and trailer before making a lane change. If the trailer or other object (i.e.,
bicycle, sports equipment) extends beyond the
side of your vehicle, this may result in the BSM
warning light randomly alerting on the trailer or
even remaining illuminated the entire time the
vehicle is in a forward gear
Ú page 122.
The Blind Spot Monitoring (BSM) system may
experience drop outs (blinking on and off) of the
side mirror warning indicator lamps when a
motorcycle or any small object remains at the
side of the vehicle for extended periods of time
(more than a couple of seconds).
The BSM system can become blocked if snow, ice,
mu
d, or other road contaminations accumulate on
the rear fascia/bumper where the radar sensors
are located. The system may also detect blockage
if the vehicle is operated in areas with extremely
low radar returns such as a desert or parallel to a
large elevation drop. If blockage is detected, a
“Blind Spot Temporarily Unavailable, Wipe Rear
Corners” message will display in the cluster, both
mirror lights will illuminate, and BSM and RCP
alerts will not occur. This is normal operation. The
system will automatically recover and resume
function when the condition clears. To minimize
system blockage, do not block the area of the rear
fascia/bumper where the radar sensors are
located with foreign objects (bumper stickers,
bicycle racks, etc.) and keep it clear of road
contaminations.
Sensor Location (Driver Side Shown)
The BSM system notifies the driver of objects in the
d e
tection zones by illuminating the BSM warning
light located in the outside mirrors in addition to
sounding an audible (chime) alert and reducing the
radio volume if the corresponding turn signal is
activated
Ú page 146.
The BSM system monitors the detection zone from
t h
ree different entry points (side, rear, front) while
driving to see if an alert is necessary. The BSM
system will issue an alert during these types of
zone entries.
6