2021 CHRYSLER 300 turn signal bulb
[x] Cancel search: turn signal bulbPage 45 of 268
GETTING TO KNOW YOUR VEHICLE 43
To activate the front fog lights, turn on the parking
lights or the low beam headlights and push the
headlight switch. To turn off the front fog lights,
either push the headlight switch a second time or
turn off the headlight switch.
NOTE:
The fog lights will operate with the low beam head -
lights or parking lights on. However, selecting the
h i
gh beam headlights will turn off the fog lights.
TURN SIGNALS
Move the multifunction lever up or down to
activate the turn signals. The arrows on each side
of the instrument cluster flash to show proper
operation.
NOTE:
If either light remains on and does not flash, or
there is a very fast flash rate, check for a defec -
tive outside light bulb.
A “Turn Signal On” message will appear in the
instrument cluster display and a continuous
chime will sound if the vehicle is driven more
than 1 mile (1.6 km) with either turn signal on.
LANE CHANGE ASSIST — IF EQUIPPED
Lightly push the multifunction lever up or down,
without moving beyond the detent, and the turn
signal will flash three times then automatically turn
off.
INTERIOR LIGHTS
The interior lights come on when a door is opened.
To protect the battery, the interior lights will turn off
au
tomatically 10 minutes after the ignition is
p l
aced in the OFF position. This will occur if the
interior lights were switched on manually or are on
because a door is open. The Battery Protection
also includes the glove compartment light and the
trunk light. To restore interior light operation after
automatic battery protection is enabled (lights off),
either place the ignition in the ON/RUN position, or
cycle the light switch.
INTERIOR COURTESY LIGHTS
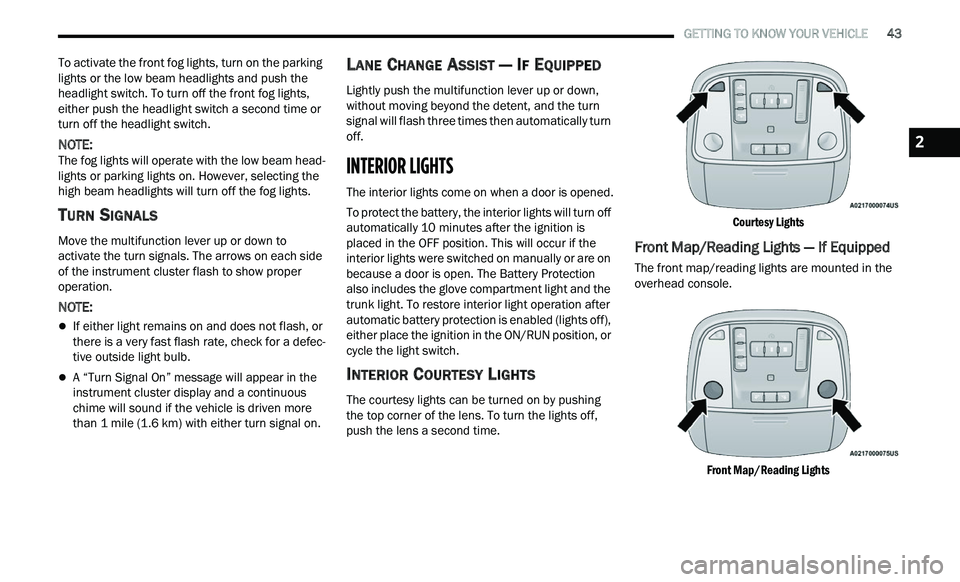
The courtesy lights can be turned on by pushing
the top corner of the lens. To turn the lights off,
push the lens a second time.
Courtesy Lights
Front Map/Reading Lights — If Equipped
The front map/reading lights are mounted in the
overhead console.
Front Map/Reading Lights
2
Page 77 of 268
GETTING TO KNOW YOUR INSTRUMENT PANEL 75
If the ABS light does not turn on when the ignition
is placed in the ON/RUN or ACC/ON/RUN position,
have the brake system inspected by an authorized
dealer.
Electronic Stability Control (ESC) Active
Warning Light — If Equipped
This warning light will indicate when the
Electronic Stability Control system is
Ac
tive. The ESC Indicator Light in the
instrument cluster will come on when the
ignition is placed in the ON/RUN or ACC/ON/RUN
position, and when ESC is activated. It should go
out with the engine running. If the ESC Indicator
Light comes on continuously with the engine
running, a malfunction has been detected in the
ESC system. If this warning light remains on after
several ignition cycles, and the vehicle has been
driven several miles (kilometers) at speeds greater
than 30 mph (48 km/h), see an authorized dealer
a s
soon as possible to have the problem
diagnosed and corrected.
The ESC OFF Indicator Light and the ESC Indi -
cator Light come on momentarily each time the
ig nition is placed in the ON/RUN or ACC/ON/
RUN position.
The ESC system will make buzzing or clicking
sounds when it is active. This is normal; the
sounds will stop when ESC becomes inactive.
This light will come on when the vehicle is in an
ESC event.
Electronic Stability Control (ESC) OFF
Warning Light — If Equipped
This warning light indicates the ESC is off.
Each time the ignition is turned to ON/
R U
N or ACC/ON/RUN, the ESC system
will be on, even if it was turned off previously.
Service LaneSense Warning Light —
If Equipped
This warning light will illuminate when the
LaneSense system is not operating and
r e
quires service. Please see an
authorized dealer.
LaneSense Warning Light — If Equipped
The LaneSense system provides the
driver with visual and steering torque
w a
rnings when the vehicle starts to drift
out of its lane unintentionally without the
use of a turn signal.
When the LaneSense system senses a lane drift
situation, the LaneSense indicator changes
from solid green to solid yellow.
When the LaneSense system senses the lane
has been approached and is in a lane departure
situation, the LaneSense indicator changes
from solid white/green to flashing yellow
Ú page 108.
Low Fuel Warning Light
When the fuel level reaches
approximately 1.9 gal (7.13 L), this light
wi
ll turn on and a single chime will sound.
Low Washer Fluid Warning Light —
If Equipped
This warning light will illuminate when the
windshield washer fluid is low
Ú page 201.
Engine Check/Malfunction Indicator
Warning Light (MIL)
The Engine Check/Malfunction Indicator
Light (MIL) is a part of an Onboard
Di
agnostic System called OBD II that
monitors engine and automatic
transmission control systems. This warning light
will illuminate when the ignition is in the ON/RUN
position before engine start. If the bulb does not
come on when turning the ignition switch from OFF
to ON/RUN, have the condition checked promptly.
Certain conditions, such as a loose or missing gas
c a
p, poor quality fuel, etc., may illuminate the light
after engine start. The vehicle should be serviced if
the light stays on through several typical driving
styles. In most situations, the vehicle will drive
normally and will not require towing.
3
Page 80 of 268

78 GETTING TO KNOW YOUR INSTRUMENT PANEL
LaneSense Indicator Light — If Equipped
The LaneSense indicator light illuminates
solid green when both lane markings
ha
ve been detected and the system is
“armed” and ready to provide visual and
torque warnings if an unintentional lane departure
occurs
Ú page 108.
Parking/Headlights On Indicator Light
This indicator light will illuminate when
the parking lights or headlights are
tu
rned on Ú page 40.
Sport Mode Indicator Light
This light will turn on when Sport Mode is
active.
Turn Signal Indicator Lights
When the left or right turn signal is
activated, the turn signal indicator will
f
l
ash independently and the
corresponding exterior turn signal lamps
will flash. Turn signals can be activated when the
multifunction lever is moved down (left) or up
(right).
NOTE:
A continuous chime will sound if the vehicle is
driven more than 1 mile (1.6 km) with either
t u
rn signal on.
Check for an inoperative outside light bulb if
either indicator flashes at a rapid rate.
ECO Mode Indicator Light — If Equipped
This light will turn on when ECO mode is
active.
WHITE INDICATOR LIGHTS
Adaptive Cruise Control (ACC) Ready Light
— If Equipped
This light will turn on when ACC has been
turned on, but is not set Ú page 94.
Cruise Control Ready Indicator Light
This indicator light will illuminate when
the cruise control is ready, but not set
Ú page 92.
LaneSense Indicator Light — If Equipped
When the LaneSense system is ON, but
not armed, the LaneSense indicator light
il
luminates solid white. This occurs when
only left, right, or neither lane line has
been detected. If a single lane line is detected, the
system is ready to provide only visual warnings if
an unintentional lane departure occurs on the
detected lane line
Ú page 108.
BLUE INDICATOR LIGHTS
High Beam Indicator Light
This indicator light will illuminate to
indicate that the high beam headlights are
on
. With the low beams activated, push
the multifunction lever forward (toward the
front of the vehicle) to turn on the high beams. Pull
the multifunction lever rearward (toward the rear of
the vehicle) to turn off the high beams. If the high
beams are off, pull the lever toward you for a
temporary high beam on, "flash to pass" scenario.
Page 224 of 268
222 SERVICING AND MAINTENANCE
Replacing Exterior Bulbs
HIGH INTENSITY DISCHARGE (HID) HEAD -
LAMPS — IF EQUIPPED
The headlamps are a type of high voltage
discharge tube. High voltage can remain in the
circuit even with the headlamp switch off and the
ignition turned to the OFF position. Because of this,
you should not attempt to service a headlamp bulb yourself. If a headlamp bulb fails, take your vehicle
to an authorized dealer for service.
NOTE:
On vehicles equipped with HID headlamps, when
t h
e headlamps are turned on, there is a blue hue
to the lights. This diminishes and becomes more
white after approximately 10 seconds, as the
system charges.
Exterior Bulbs
Bulb Name Bulb Number
Low Beam/High Beam (Bi-Halogen Headlamp) 9005HL+
Low Beam/High Beam (Bi-Xenon Headlamp) D3S (Serviced at an authorized dealer)
Front Turn Signal Lamp PSY24WSV
Front Park Lamp LED (Serviced at an authorized dealer)
Daytime Running Lamp LED (Serviced at an authorized dealer)
Front Fog Lamp – If Equipped LED (Serviced at an authorized dealer)
Front Side marker Lamp LED (Serviced at an authorized dealer)
Rear Tail/Stop/Turn Lamp LED (Serviced at an authorized dealer)
Rear Side marker Lamp LED (Serviced at an authorized dealer)
Backup Lamp LED (Serviced at an authorized dealer)
Center High Mounted Stop Lamp (CHMSL) LED (Serviced at an authorized dealer)
License LED (Serviced at an authorized dealer)
WARNING!
A transient high voltage occurs at the bulb
sockets of HID headlamps when the headlamp
switch is turned ON. It may cause serious
electrical shock or electrocution if not serviced
properly. See an authorized dealer for service.
Page 225 of 268
SERVICING AND MAINTENANCE 223
BI-HALOGEN LOW BEAM AND HIGH BEAM
HEADLAMP — IF EQUIPPED
See steps below to replace:
1. O pen the hood.
NOTE:
Removal of the air cleaner filter housing may be
n e
cessary prior to replacing bulbs in the headlamp
assembly on the driver side of the vehicle.
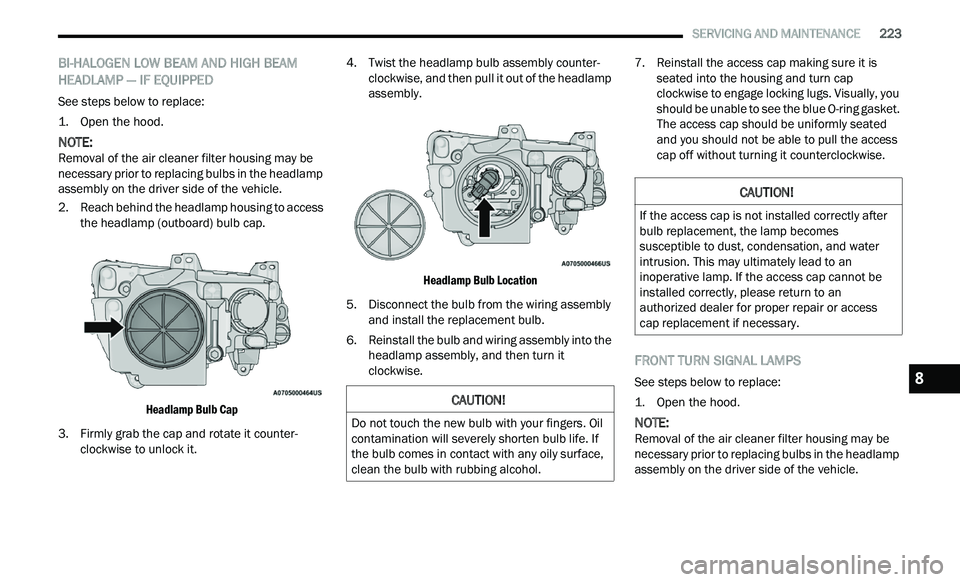
2. R each behind the headlamp housing to access
t
he headlamp (outboard) bulb cap.
Headlamp Bulb Cap
3. F irmly grab the cap and rotate it counter -
c
lockwise to unlock it. 4. Twist the headlamp bulb assembly counter
-
c
lockwise, and then pull it out of the headlamp
a s
sembly.
Headlamp Bulb Location
5. D isconnect the bulb from the wiring assembly
a
nd install the replacement bulb.
6. Reinstall the bulb and wiring assembly into the h
eadlamp assembly, and then turn it
clockwise. 7. Reinstall the access cap making sure it is
s
eated into the housing and turn cap
clockwise to engage locking lugs. Visually, you
should be unable to see the blue O-ring gasket.
The access cap should be uniformly seated
and you should not be able to pull the access
cap off without turning it counterclockwise.
FRONT TURN SIGNAL LAMPS
See steps below to replace:
1. O pen the hood.
NOTE:
Removal of the air cleaner filter housing may be
n e
cessary prior to replacing bulbs in the headlamp
assembly on the driver side of the vehicle.
CAUTION!
Do not touch the new bulb with your fingers. Oil
contamination will severely shorten bulb life. If
the bulb comes in contact with any oily surface,
clean the bulb with rubbing alcohol.
CAUTION!
If the access cap is not installed correctly after
bulb replacement, the lamp becomes
susceptible to dust, condensation, and water
intrusion. This may ultimately lead to an
inoperative lamp. If the access cap cannot be
installed correctly, please return to an
authorized dealer for proper repair or access
cap replacement if necessary.
8
Page 226 of 268
224 SERVICING AND MAINTENANCE
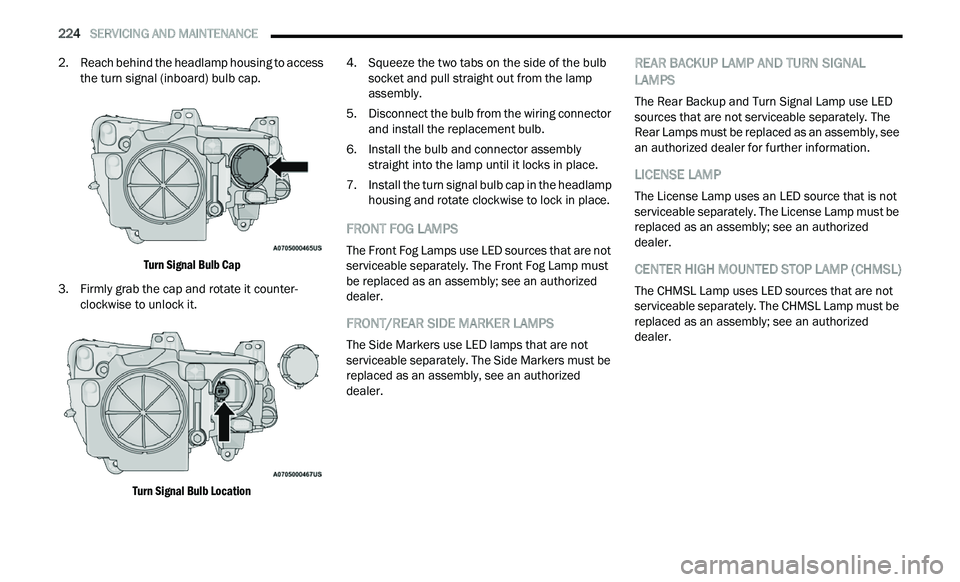
2. Reach behind the headlamp housing to access
the turn signal (inboard) bulb cap.
Turn Signal Bulb Cap
3. F irmly grab the cap and rotate it counter -
c
lockwise to unlock it.
Turn Signal Bulb Location
4. S
queeze the two tabs on the side of the bulb
s
ocket and pull straight out from the lamp
assembly.
5. D isconnect the bulb from the wiring connector
a
nd install the replacement bulb.
6. Install the bulb and connector assembly s
traight into the lamp until it locks in place.
7. Install the turn signal bulb cap in the headlamp h
ousing and rotate clockwise to lock in place.
FRONT FOG LAMPS
The Front Fog Lamps use LED sources that are not
serviceable separately. The Front Fog Lamp must
be replaced as an assembly; see an authorized
dealer.
FRONT/REAR SIDE MARKER LAMPS
The Side Markers use LED lamps that are not
serviceable separately. The Side Markers must be
replaced as an assembly, see an authorized
dealer.
REAR BACKUP LAMP AND TURN SIGNAL
LAMPS
The Rear Backup and Turn Signal Lamp use LED
sources that are not serviceable separately. The
Rear Lamps must be replaced as an assembly, see
an authorized dealer for further information.
LICENSE LAMP
The License Lamp uses an LED source that is not
serviceable separately. The License Lamp must be
replaced as an assembly; see an authorized
dealer.
CENTER HIGH MOUNTED STOP LAMP (CHMSL)
The CHMSL Lamp uses LED sources that are not
serviceable separately. The CHMSL Lamp must be
replaced as an assembly; see an authorized
dealer.
Page 261 of 268

259
Keyless Enter 'n Go™................................20, 81Enter The Trunk...........................................13Passive Entry...............................................20Passive Entry Programming.........................20Keys.................................................................12Replacement...............................................14
L
Lane Change And Turn Signals........................43Lane Change Assist.........................................43LaneSense....................................................108Lap/Shoulder Belts.......................................153Latches..........................................................178Hood...........................................................59Lead Free Gasoline........................................246Leaks, Fluid...................................................178Life Of Tires...................................................234Light Bulbs...........................................178, 221Lights.............................................................178Air Bag.......................................72, 158, 176Automatic Headlights..................................41Brake Assist Warning................................140Brake Warning...................................72, 245Bulb Replacement.....................................221Cruise...................................................77, 78Daytime Running.........................................41Dimmer Switch, Headlight....................40, 41Engine Temperature Warning......................73Exterior......................................................178
Fog..............................................................42Hazard Warning Flasher...........................179Headlight Switch..........................................40Headlights...................................40, 42, 222Headlights On With Wipers..........................42High Beam...................................................41High Beam/Low Beam Select......................41Instrument Cluster.......................................40Intensity Control..........................................44Interior.........................................................43License.....................................................224Lights On Reminder.....................................42Malfunction Indicator (Check Engine)..........75Map.............................................................43Park......................................................41, 78Passing........................................................41Reading.......................................................43Seat Belt Reminder.....................................73Security Alarm.............................................74Service.....................................................221Traction Control........................................140Turn Signals.........................40, 43, 78, 178Vanity Mirror................................................34Warning Instrument Cluster
Descriptions.....................................73, 78Load Leveling System......................................63Load Shed Battery Saver On............................70Load Shed Electrical Load Reduction..............70
Load Shed Intelligent Battery Sensor...............70Loading Vehicle.............................................113Capacities.................................................113Tires..........................................................229Locks Auto Unlock.................................................22Automatic Door............................................22Child Protection...........................................23Power Door..................................................20Low Tire Pressure System.............................148Lubrication, Body..........................................206Lug Nuts........................................................245
M
Maintenance Free Battery............................201Maintenance Schedule........................195, 196Malfunction Indicator Light (Check Engine).....75ManualPark Release............................................190Service......................................................253Media Hub.......................................................53Memory Feature (Memory Seats).....................27Memory Seat....................................................27Memory Seats And Radio.................................27Methanol.......................................................247Mirrors.............................................................34Electric Powered..........................................35Electric Remote...........................................35Heated.........................................................36
11
Page 263 of 268

261
Remote Keyless Entry
Arm The Alarm.............................................18Unlatch The Trunk.......................................13Remote StartingExit Remote Start Mode..............................17Uconnect Customer Programmable
Features..................................................17Uconnect Settings.......................................17Remote Trunk Release....................................60Replacement Bulbs.......................................221Replacement Keys...........................................14Replacement Tires.........................................235Reporting Safety Defects...............................253Restraints, Child............................................166Restraints, Head.......................................32, 33Rocking Vehicle When Stuck.........................192Rotation, Tires...............................................240
S
Safety Checks Inside Vehicle.........................176Safety Checks Outside Vehicle......................177Safety Defects, Reporting..............................253Safety Information, Tire.................................225Safety Tips.....................................................176Safety, Exhaust Gas.......................................178Schedule, Maintenance.......................195, 196Seat Belt Reminder.........................................73Seat Belts............................................152, 176Adjustable Shoulder Belt...........................156
Adjustable Upper Shoulder Anchorage......156
Adjustable Upper Shoulder Belt
Anchorage............................................156Automatic Locking Retractor (ALR)...........157Child Restraints........................................166Energy Management Feature...................157Extender...................................................156Front Seat...............................152, 153, 155Inspection.................................................176Lap/Shoulder Belt Operation....................155Lap/Shoulder Belt Untwisting...................155Lap/Shoulder Belts..................................153Operating Instructions..............................155Pregnant Women......................................157Pretensioners...........................................157Rear Seat.................................................153Reminder..................................................152Seat Belt Extender....................................156Seat Belt Pretensioner.............................157Untwisting Procedure...............................155Seat Belts Maintenance...............................243Seats.................................................27, 29, 30Adjustment...........................................27, 29Easy Entry....................................................30Head Restraints....................................32, 33Heated.........................................................30Height Adjustment.......................................28Power..........................................................28Rear Folding................................................27Seatback Release.......................................27
Tilting....................................................27, 28
Vented.........................................................31Ventilated....................................................31Security Alarm...........................................18, 74Arm The System...........................................18Selection Of Coolant (Antifreeze)..................249Sentry Key (Immobilizer)..................................14Sentry Key Replacement..................................14Service Assistance........................................251Service Contract............................................252Service Manuals...........................................253Shifting.............................................................85Automatic Transmission.......................85, 87Shoulder Belts..............................................153Side View Mirror Adjustment............................35Signals, Turn...................................43, 78, 178Snow Chains (Tire Chains)............................239Snow Tires....................................................236Spare Tires..................................183, 236, 237Spark Plugs...................................................249Specifications Fuel (Gasoline)..........................................249Oil.............................................................249Speed ControlAccel/Decel.................................................93Accel/Decel (ACC Only)................................97Cancel..........................................................94Resume.......................................................94Set...............................................................93Speed Control (Cruise Control)...........92, 93, 94
Sport Mode......................................................91
11