2021 CHRYSLER 300 brakes
[x] Cancel search: brakesPage 83 of 268
81
(Continued)
STARTING AND OPERATING
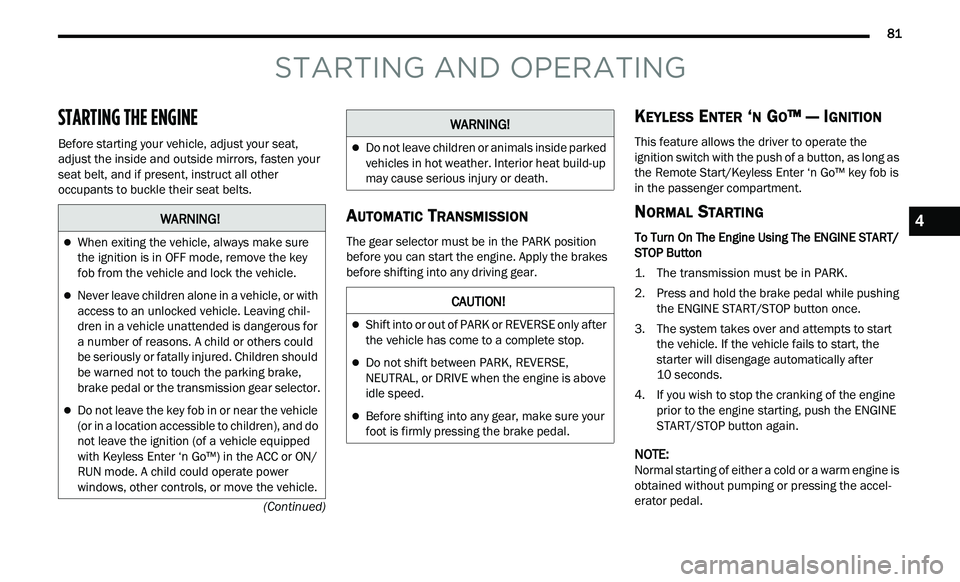
STARTING THE ENGINE
Before starting your vehicle, adjust your seat,
adjust the inside and outside mirrors, fasten your
seat belt, and if present, instruct all other
occupants to buckle their seat belts.
AUTOMATIC TRANSMISSION
The gear selector must be in the PARK position
before you can start the engine. Apply the brakes
before shifting into any driving gear.
KEYLESS ENTER ‘N GO™ — IGNITION
This feature allows the driver to operate the
ignition switch with the push of a button, as long as
the Remote Start/Keyless Enter ‘n Go™ key fob is
in the passenger compartment.
NORMAL STARTING
To Turn On The Engine Using The ENGINE START/
STOP Button
1. The transmission must be in PARK.
2
. P ress and hold the brake pedal while pushing
t
he ENGINE START/STOP button once.
3. The system takes over and attempts to start t
he vehicle. If the vehicle fails to start, the
starter will disengage automatically after
10 seconds.
4. I f you wish to stop the cranking of the engine
p
rior to the engine starting, push the ENGINE
START/STOP button again.
NOTE:
Normal starting of either a cold or a warm engine is
ob t
ained without pumping or pressing the accel -
erator pedal.
WARNING!
When exiting the vehicle, always make sure
the ignition is in OFF mode, remove the key
fob from the vehicle and lock the vehicle.
Never leave children alone in a vehicle, or with
access to an unlocked vehicle. Leaving chil -
dren in a vehicle unattended is dangerous for
a
number of reasons. A child or others could
be seriously or fatally injured. Children should
be warned not to touch the parking brake,
brake pedal or the transmission gear selector.
Do not leave the key fob in or near the vehicle
(or in a location accessible to children), and do
not leave the ignition (of a vehicle equipped
with Keyless Enter ‘n Go™) in the ACC or ON/
RUN mode. A child could operate power
windows, other controls, or move the vehicle.
Do not leave children or animals inside parked
vehicles in hot weather. Interior heat build-up
may cause serious injury or death.
CAUTION!
Shift into or out of PARK or REVERSE only after
the vehicle has come to a complete stop.
Do not shift between PARK, REVERSE,
NEUTRAL, or DRIVE when the engine is above
idle speed.
Before shifting into any gear, make sure your
foot is firmly pressing the brake pedal.
WARNING!
4
Page 89 of 268
STARTING AND OPERATING 87
BRAKE TRANSMISSION SHIFT
I
NTERLOCK (BTSI) SYSTEM
This vehicle is equipped with BTSI that holds the
transmission gear selector in PARK unless the
brakes are applied. To shift the transmission out of
PARK, the engine must be running and the brake
pedal must be pressed. The brake pedal must also
be pressed to shift from NEUTRAL into DRIVE or
REVERSE when the vehicle is stopped or moving at
low speeds.
8-SPEED AUTOMATIC TRANSMISSION
The transmission is controlled using a rotary
electronic gear selector located on the center
console. The transmission gear range (PRNDL/S)
is displayed both above the gear selector and in
the instrument cluster. To select a gear range,
simply rotate the gear selector. To access the L or
S position, push down on the gear selector and
then rotate it. You must also press the brake pedal
to shift the transmission out of PARK (or NEUTRAL,
when the vehicle is stopped or moving at low
speeds). To shift past multiple gear ranges at once
(such as PARK to DRIVE), simply rotate the gear
selector to the appropriate detent. Select the
DRIVE range for normal driving.
NOTE:
In the event of a mismatch between the gear
s e
lector position and the actual transmission gear
(for example, driver selects PARK while driving),
the position indicator will blink continuously until
the selector is returned to the proper position, or
the requested shift can be completed.
The electronically-controlled transmission adapts
it
s shift schedule based on driver inputs, along
with environmental and road conditions. The
transmission electronics are self-calibrating;
therefore, the first few shifts on a new vehicle may
be somewhat abrupt. This is a normal condition,
and precision shifts will develop within a few
hundred miles (kilometers).
Only shift from DRIVE to PARK or REVERSE when
t h
e accelerator pedal is released and the vehicle is
stopped. Be sure to keep your foot on the brake
pedal when shifting between these gears.
Standard Gear Selector
The standard transmission gear selector has
P A
RK, REVERSE, NEUTRAL, DRIVE, and LOW shift
positions. Using the LOW position manually
downshifts the transmission to a lower gear based
on vehicle speed.
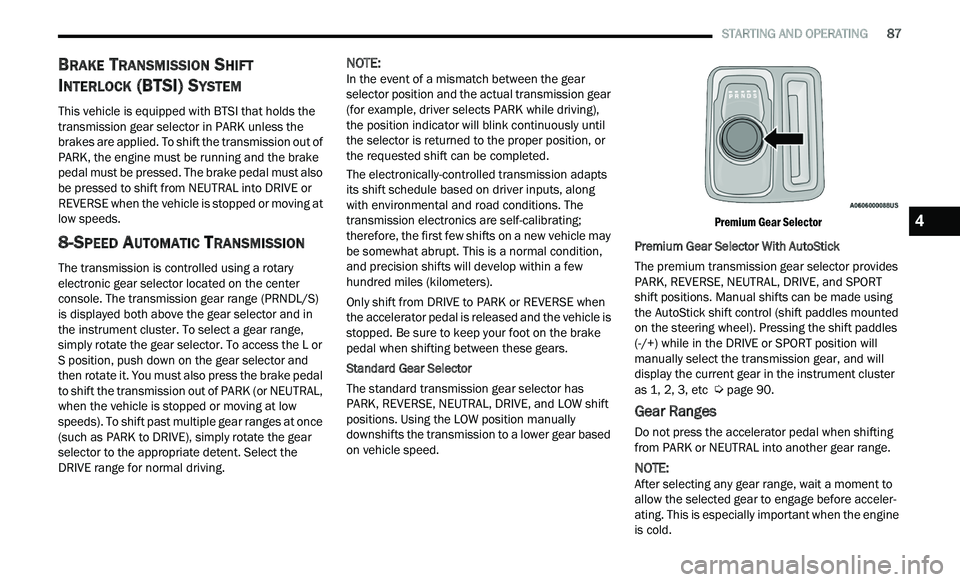
Premium Gear Selector
Premium Gear Selector With AutoStick
The premium transmission gear selector provides
P A
RK, REVERSE, NEUTRAL, DRIVE, and SPORT
shift positions. Manual shifts can be made using
the AutoStick shift control (shift paddles mounted
on the steering wheel). Pressing the shift paddles
(-/+) while in the DRIVE or SPORT position will
manually select the transmission gear, and will
display the current gear in the instrument cluster
as 1, 2, 3, etc
Ú page 90.
Gear Ranges
Do not press the accelerator pedal when shifting
from PARK or NEUTRAL into another gear range.
NOTE:
After selecting any gear range, wait a moment to
a l
low the selected gear to engage before acceler -
ating. This is especially important when the engine
i s
cold.
4
Page 97 of 268
STARTING AND OPERATING 95
Adaptive Cruise Control (ACC) Operation
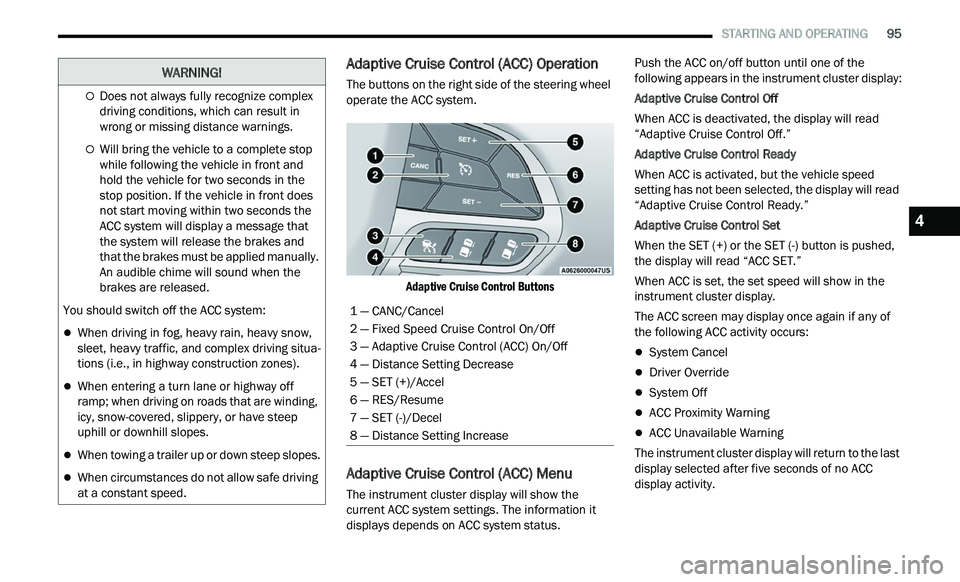
The buttons on the right side of the steering wheel
operate the ACC system.
Adaptive Cruise Control Buttons
Adaptive Cruise Control (ACC) Menu
The instrument cluster display will show the
current ACC system settings. The information it
displays depends on ACC system status. Push the ACC on/off button until one of the
f
ol
lowing appears in the instrument cluster display:
Adaptive Cruise Control Off
When ACC is deactivated, the display will read
“ A
daptive Cruise Control Off.”
Adaptive Cruise Control Ready
When ACC is activated, but the vehicle speed
s e
tting has not been selected, the display will read
“Adaptive Cruise Control Ready.”
Adaptive Cruise Control Set
When the SET (+) or the SET (-) button is pushed,
t h
e display will read “ACC SET.”
When ACC is set, the set speed will show in the
in
strument cluster display.
The ACC screen may display once again if any of
th
e following ACC activity occurs:
System Cancel
Driver Override
System Off
ACC Proximity Warning
ACC Unavailable Warning
The instrument cluster display will return to the last
d i
splay selected after five seconds of no ACC
display activity.
Does not always fully recognize complex
driving conditions, which can result in
wrong or missing distance warnings.
Will bring the vehicle to a complete stop
while following the vehicle in front and
hold the vehicle for two seconds in the
stop position. If the vehicle in front does
not start moving within two seconds the
ACC system will display a message that
the system will release the brakes and
that the brakes must be applied manually.
An audible chime will sound when the
brakes are released.
You should switch off the ACC system:
When driving in fog, heavy rain, heavy snow,
sleet, heavy traffic, and complex driving situa -
tions (i.e., in highway construction zones).
When entering a turn lane or highway off
ramp; when driving on roads that are winding,
icy, snow-covered, slippery, or have steep
uphill or downhill slopes.
When towing a trailer up or down steep slopes.
When circumstances do not allow safe driving
at a constant speed.
WARNING!
1 — CANC/Cancel
2 — Fixed Speed Cruise Control On/Off
3 — Adaptive Cruise Control (ACC) On/Off
4 — Distance Setting Decrease
5 — SET (+)/Accel
6 — RES/Resume
7 — SET (-)/Decel
8 — Distance Setting Increase
4
Page 98 of 268
96 STARTING AND OPERATING
Activating Adaptive Cruise Control (ACC)
The minimum set speed for the ACC system is
20 mph (32 km/h).
When the system is turned on and in the ready
s t
ate, the instrument cluster displays “ACC Ready.”
When the system is off, the instrument cluster
di
splay will read “Adaptive Cruise Control (ACC)
Off.”
NOTE:
You cannot engage ACC under the following condi -
tions:
When the brakes are applied
When the parking brake is applied
When the gear selector is in PARK, REVERSE or
NEUTRAL
When the vehicle speed is below the minimum
speed range
When the brakes are overheated
When the driver’s door is open at low speeds
When the driver’s seat belt is unbuckled at low
speeds
When there is a stationary vehicle in front of
your vehicle in close proximity
To Activate/Deactivate
Push and release the Adaptive Cruise Control
(ACC) on/off button. The ACC menu in the
instrument cluster displays “ACC Ready.”
To turn the system off, push and release the
A d
aptive Cruise Control (ACC) on/off button again.
At this time, the system will turn off and the
instrument cluster displays “Adaptive Cruise
Control (ACC) Off.”
To Set A Desired ACC Speed
When the vehicle reaches the speed desired, push
the SET (+) button or the SET (-) button and
release. The instrument cluster display will show
the set speed.
NOTE:
Fixed Speed Cruise Control can be used without
A C
C enabled. To change between the different
modes, push the ACC on/off button which turns
the ACC and the Fixed Speed Cruise Control off.
Pushing the Fixed Speed Cruise Control on/off button will result in turning on (changing to) Fixed
Speed Cruise Control mode.
If ACC is set when the vehicle speed is
be
low
20 mph (32 km/h), the set speed will default to
2 0
mph (32 km/h).
NOTE:
Fixed Speed Cruise Control cannot be set below
2 0
mph (32 km/h).
If either system is set when the vehicle speed is
a b
ove 20 mph (32 km/h), the set speed shall be
t h
e current speed of the vehicle.
NOTE:
Keeping your foot on the accelerator pedal can
cause the vehicle to continue to accelerate
beyond the set speed. If this occurs, the
message “DRIVER OVERRIDE” will display in the
instrument cluster display.
WARNING!
Leaving the Adaptive Cruise Control (ACC)
system on when not in use is dangerous. You
could accidentally set the system or cause it to
go faster than you want. You could lose control
and have a collision. Always leave the system off
when you are not using it.
WARNING!
In Fixed Speed Cruise Control mode, the system
will not react to vehicles ahead. In addition, the
proximity warning does not activate and no
alarm will sound even if you are too close to the
vehicle ahead since neither the presence of the
vehicle ahead nor the vehicle-to-vehicle distance
is detected. Be sure to maintain a safe distance
between your vehicle and the vehicle ahead.
Always be aware which mode is selected.
Page 100 of 268

98 STARTING AND OPERATING
When ACC Is Active:
NOTE:
When you use the SET (-) button to decelerate, if
the engine’s braking power does not slow the
vehicle sufficiently to reach the set speed, the
brake system will automatically slow the
vehicle.
The ACC system applies the brake down to a full
stop when following the vehicle in front. If your
vehicle follows the vehicle in front to a standstill,
your vehicle will release the brakes two seconds
after coming to a full stop.
The ACC will bring the vehicle to a complete stop
while following a vehicle in front and hold the
vehicle for two seconds in the stop position. If
the vehicle in front does not start moving within
two seconds, the ACC system will display a
message that the system will release the brakes
and that the brakes must be applied manually.
An audible chime will sound when the brakes
are released.
The ACC system maintains set speed when
driving uphill and downhill. However, a slight
speed change on moderate hills is normal. In
addition, downshifting may occur while climbing
uphill or descending downhill. This is normal
operation and necessary to maintain set speed.
When driving uphill and downhill, the ACC
system will cancel if the braking temperature
exceeds normal range (overheated).
Setting The Following Distance In ACC
The specified following distance for ACC can be set
by varying the distance setting between four bars
(longest), three bars (long), two bars (medium) and
one bar (short). Using this distance setting and the
vehicle speed, ACC calculates and sets the
distance to the vehicle ahead. This distance
setting displays in the instrument cluster display.
Distance Settings
To increase the distance setting, push the
D i
stance Setting Increase button and release.
Each time the button is pushed, the distance
setting increases by one bar (longer). To decrease the distance setting, push the
D
i
stance Setting Decrease button and release.
Each time the button is pushed, the distance
setting decreases by one bar (shorter).
If there is no vehicle ahead, the vehicle will
ma
intain the set speed. If a slower moving vehicle
is detected in the same lane, the instrument
cluster display will show the ACC Set With Target
Detected Indicator Light, and the system will adjust
the vehicle speed automatically to maintain the
distance setting, regardless of the set speed.
The vehicle will then maintain the set distance
u n
til:
The vehicle ahead accelerates to a speed above
the set speed.
The vehicle ahead moves out of your lane or
view of the sensor.
The distance setting is changed.
The system disengages Ú page 96.
The maximum braking applied by ACC is limited;
h ow
ever, the driver can always apply the brakes
manually, if necessary.
NOTE:
The brake lights will illuminate whenever the ACC
s y
stem applies the brakes.
A Proximity Warning will alert the driver if ACC
pr
edicts that its maximum braking level is not
sufficient to maintain the set distance. If this
1 — Longest Distance Setting (Four Bars)
2 — Medium Distance Setting (Two Bars)
3 — Long Distance Setting (Three Bars)
4 — Short Distance Setting (One Bar)
Page 101 of 268

STARTING AND OPERATING 99
occurs, a visual alert “BRAKE” will flash in the
instrument cluster display and a chime will sound
while ACC continues to apply its maximum braking
capacity.
NOTE:
The “BRAKE!” screen in the instrument cluster
d i
splay is a warning for the driver to take action
and does not necessarily mean that the Forward
Collision Warning system is applying the brakes
autonomously.
Overtake Aid
When driving with ACC engaged and following a
vehicle, the system will provide an additional
acceleration up to the ACC set speed to assist in
passing the vehicle. This additional acceleration is
triggered when the driver utilizes the left turn
signal (Lane Change Assist feature included) and
will only be active when passing on the left hand
side. Switching lanes will not impact the ACC
system if the driver is already traveling at the set
speed.
ACC Operation At Stop
In the event that the ACC system brings your
vehicle to a standstill while following the vehicle in
front, your vehicle will resume motion without any
driver interaction if the vehicle in front starts
moving within two seconds of your vehicle coming
to a standstill. If the vehicle in front does not start moving within
t
w
o seconds of your vehicle coming to a standstill,
the ACC with Stop system will cancel and the
brakes will release. A cancel message will display
on the instrument cluster display and produce a
warning chime. Driver intervention will be required
at this moment.
While ACC with Stop is holding your vehicle at a
s t
andstill, if the driver seat belt is unbuckled or the
driver door is opened, the ACC with Stop system
will cancel and the brakes will release. A cancel
message will display on the instrument cluster
display and produce a warning chime. Driver
intervention will be required at this moment.
Display Warnings And Maintenance
“WIPE FRONT RADAR SENSOR IN FRONT OF
VEHICLE” WARNING
The “ACC/FCW Unavailable Wipe Front Radar
Sensor” warning will display and a chime will
indicate when conditions temporarily limit system
performance. This most often occurs at times of poor visibility,
s
u
ch as in snow or heavy rain. The ACC system may
also become temporarily blinded due to
obstructions, such as mud, dirt or ice. In these
cases, the instrument cluster will display the above
message and the system will deactivate.
This message can sometimes be displayed while
d r
iving in highly reflective areas (i.e. ice and snow,
or tunnels with reflective tiles). The ACC system will
recover after the vehicle has left these areas.
Under rare conditions, when the radar is not
tracking any vehicles or objects in its path this
warning may temporarily occur.
NOTE:
If the “ACC/FCW Unavailable Wipe Front Radar
S e
nsor” warning is active, Fixed Speed Cruise
Control is still available.
If weather conditions are not a factor, the driver
s h
ould examine the sensor. It may require cleaning
or removal of an obstruction. The sensor is located
in the center of the vehicle behind the lower grille.
To keep the ACC system operating properly, it is
im
portant to note the following maintenance items:
Always keep the sensor clean. Carefully wipe the
sensor lens with a soft cloth. Be careful not to
damage the sensor lens.
Do not remove any screws from the sensor.
Doing so could cause an ACC system malfunc -
tion or failure and require a sensor realignment.
WARNING!
When the ACC system is resumed, the driver
must ensure that there are no pedestrians,
vehicles or objects in the path of the vehicle.
Failure to follow these warnings can result in a
collision and death or serious personal injury.
4
Page 103 of 268
STARTING AND OPERATING 101
OFFSET DRIVING
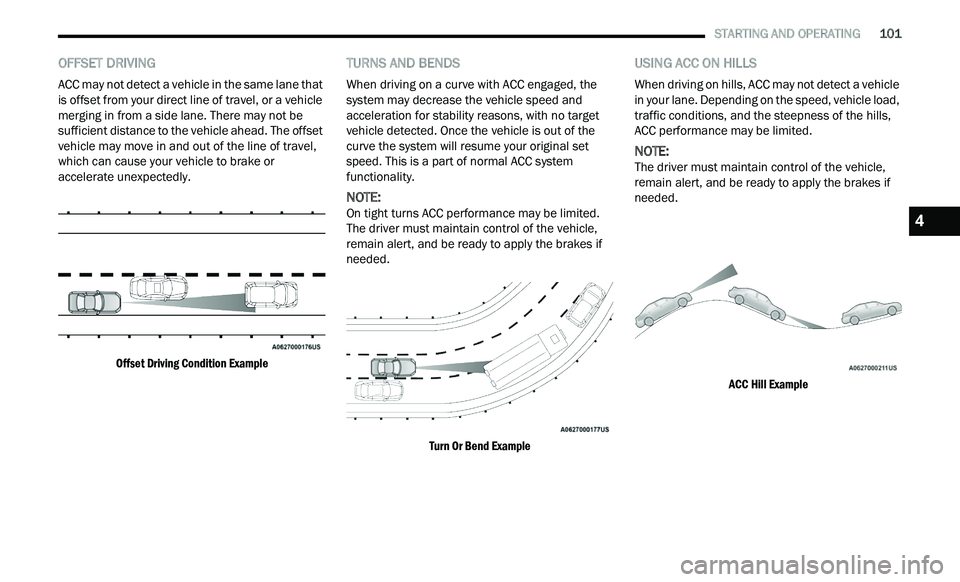
ACC may not detect a vehicle in the same lane that
is offset from your direct line of travel, or a vehicle
merging in from a side lane. There may not be
sufficient distance to the vehicle ahead. The offset
vehicle may move in and out of the line of travel,
which can cause your vehicle to brake or
accelerate unexpectedly.
Offset Driving Condition Example
TURNS AND BENDS
When driving on a curve with ACC engaged, the
system may decrease the vehicle speed and
acceleration for stability reasons, with no target
vehicle detected. Once the vehicle is out of the
curve the system will resume your original set
speed. This is a part of normal ACC system
functionality.
NOTE:
On tight turns ACC performance may be limited.
T h
e driver must maintain control of the vehicle,
remain alert, and be ready to apply the brakes if
needed.
Turn Or Bend Example
USING ACC ON HILLS
When driving on hills, ACC may not detect a vehicle
in your lane. Depending on the speed, vehicle load,
traffic conditions, and the steepness of the hills,
ACC performance may be limited.
NOTE:
The driver must maintain control of the vehicle,
r e
main alert, and be ready to apply the brakes if
needed.
ACC Hill Example
4
Page 104 of 268
102 STARTING AND OPERATING
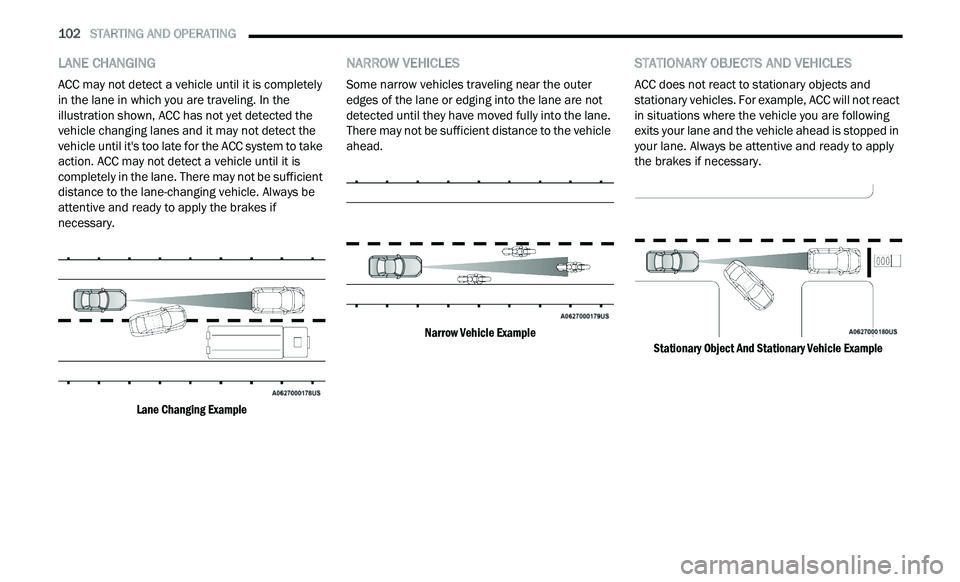
LANE CHANGING
ACC may not detect a vehicle until it is completely
in the lane in which you are traveling. In the
illustration shown, ACC has not yet detected the
vehicle changing lanes and it may not detect the
vehicle until it's too late for the ACC system to take
action. ACC may not detect a vehicle until it is
completely in the lane. There may not be sufficient
distance to the lane-changing vehicle. Always be
attentive and ready to apply the brakes if
necessary.
Lane Changing Example
NARROW VEHICLES
Some narrow vehicles traveling near the outer
edges of the lane or edging into the lane are not
detected until they have moved fully into the lane.
There may not be sufficient distance to the vehicle
ahead.
Narrow Vehicle Example
STATIONARY OBJECTS AND VEHICLES
ACC does not react to stationary objects and
stationary vehicles. For example, ACC will not react
in situations where the vehicle you are following
exits your lane and the vehicle ahead is stopped in
your lane. Always be attentive and ready to apply
the brakes if necessary.
Stationary Object And Stationary Vehicle Example