2021 ALFA ROMEO STELVIO tow
[x] Cancel search: towPage 140 of 280
STARTING AND OPERATING
138
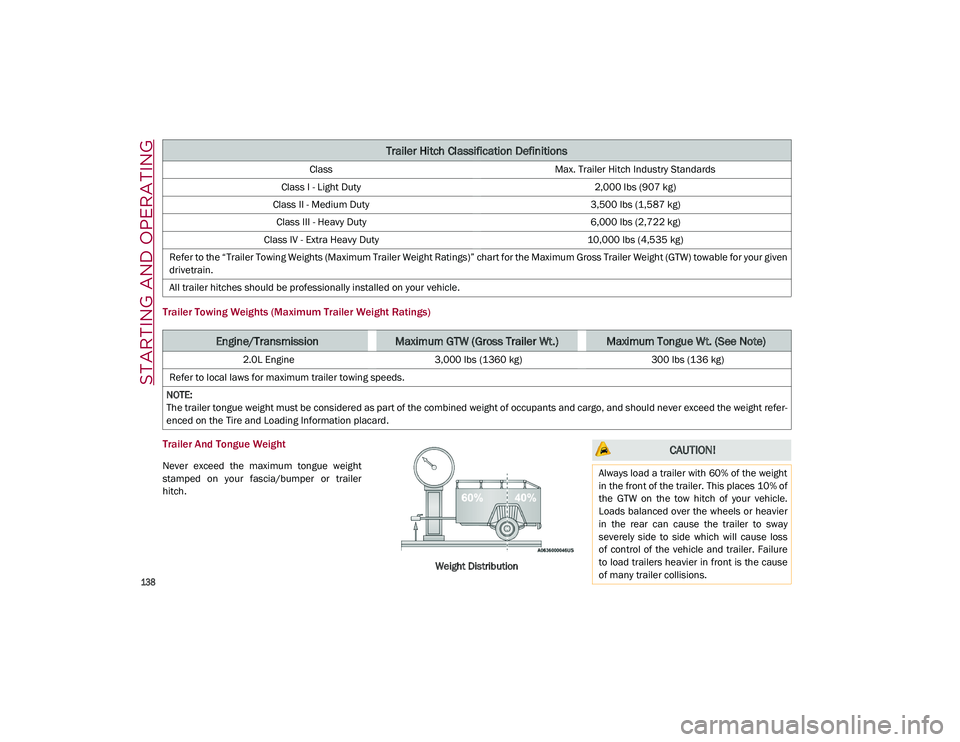
Trailer Towing Weights (Maximum Trailer Weight Ratings)
Trailer And Tongue Weight
Never exceed the maximum tongue weight
stamped on your fascia/bumper or trailer
hitch.Weight Distribution
Trailer Hitch Classification Definitions
ClassMax. Trailer Hitch Industry Standards
Class I - Light Duty 2,000 lbs (907 kg)
Class II - Medium Duty 3,500 lbs (1,587 kg)
Class III - Heavy Duty 6,000 lbs (2,722 kg)
Class IV - Extra Heavy Duty 10,000 lbs (4,535 kg)
Refer to the “Trailer Towing Weights (Maximum Trailer Weight Ratings)” chart for the Maximum Gross Trailer Weight (GTW) towable for your given
drivetrain.
All trailer hitches should be professionally installed on your vehicle.
Engine/TransmissionMaximum GTW (Gross Trailer Wt.)Maximum Tongue Wt. (See Note)
2.0L Engine 3,000 lbs (1360 kg) 300 lbs (136 kg)
Refer to local laws for maximum trailer towing speeds.
NOTE:
The trailer tongue weight must be considered as part of the combined weight of occupants and cargo, and should never exceed the weight refer -
enced on the Tire and Loading Information placard.
CAUTION!
Always load a trailer with 60% of the weight
in the front of the trailer. This places 10% of
the GTW on the tow hitch of your vehicle.
Loads balanced over the wheels or heavier
in the rear can cause the trailer to sway
severely side to side which will cause loss
of control of the vehicle and trailer. Failure
to load trailers heavier in front is the cause
of many trailer collisions.
21_GU_OM_EN_USC_t.book Page 138
Page 141 of 280
139
(Continued)
Consider the following items when computing
the weight on the rear axle of the vehicle:
The tongue weight of the trailer.
The weight of any other type of cargo or
equipment put in or on your vehicle.
The weight of the driver and all passengers.
NOTE:
Remember that everything put into or on the
trailer adds to the load on your vehicle. Also,
additional factory-installed options or
dealer-installed options must be considered
as part of the total load on your vehicle. Refer
to the “Tire And Loading Information” placard
for the maximum combined weight of occu -
pants and cargo for your vehicle.
Towing Requirements
To promote proper break-in of your new
vehicle drivetrain components, the following
guidelines are recommended:
Towing Requirements — Tires
Do not attempt to tow a trailer while using a
compact spare tire.
Do not drive more than 50 mph (80 km/h)
when towing while using a full size spare
tire.
Proper tire inflation pressures are essential
to the safe and satisfactory operation of
your vehicle.
Check the trailer tires for proper tire infla -
tion pressures before trailer usage.
Check for signs of tire wear or visible tire
damage before towing a trailer.
Replacing tires with a higher load carrying
capacity will not increase the vehicle's
GVWR and GAWR limits.
For proper tire inflation procedures
Ú
page 233.
WARNING!
Improper towing can lead to a collision.
Follow these guidelines to make your trailer
towing as safe as possible:
Make certain that the load is secured in
the trailer and that it will not shift during
travel. When trailering cargo that is not
fully secured, dynamic load shifts can
occur that may be difficult for the driver to
control. You could lose control of your
vehicle and have a collision.
When hauling cargo, or towing a trailer, do
not overload your vehicle or trailer. Over -
loading can cause a loss of control, poor
performance, or damage to brakes, axle,
engine, transmission, steering, suspen -
sion, chassis structure, or tires.
Safety chains must always be used
between your vehicle and trailer. Always
connect the chains to the frame or hook
retainers of the vehicle hitch. Cross the
chains under the trailer tongue and allow
enough slack for turning corners.
Vehicles with trailers should not be parked
on a grade. When parking, apply the
parking brake on the tow vehicle. Put the
tow vehicle transmission in PARK. Always
block or "chock" the trailer wheels.
GCWR must not be exceeded.
Total weight must be distributed between
the tow vehicle and the trailer such that
the following four ratings are not
exceeded:
• GVWR
• GTW
• GAWR
• Tongue weight rating for the trailer
hitch utilized.
WARNING! (Continued) CAUTION!
Do not tow a trailer at all during the first
500 miles (805 km) the new vehicle is
driven. The engine, axle or other parts
could be damaged.
Then, during the first 500 miles (805 km)
that a trailer is towed, do not drive over
50 mph (80 km/h) and do not make
starts at full throttle. This helps the engine
and other parts of the vehicle wear in at
the heavier loads.
21_GU_OM_EN_USC_t.book Page 139
Page 142 of 280
STARTING AND OPERATING
140
Towing Requirements — Trailer Brakes
Do not interconnect the hydraulic brake
system or vacuum system of your vehicle
with that of the trailer. This could cause
inadequate braking and possible personal
injury.
An electronically actuated trailer brake
controller is required when towing a trailer
with electronically actuated brakes. When
towing a trailer equipped with a hydraulic
surge actuated brake system, an electronic
brake controller is not required.
Trailer brakes are recommended for trailers
over 1,000 lbs (453 kg) and required for
trailers in excess of 2,000 lbs (907 kg).
Towing Requirements — Trailer Lights And
Wiring
Whenever you pull a trailer, regardless of the
trailer size, stoplights and turn signals on the
trailer are required for motoring safety.
The Trailer Tow Package may include a four-
and seven-pin wiring harness. Use a factory
approved trailer harness and connector.
NOTE:
Do not cut or splice wiring into the vehicle’s
wiring harness.
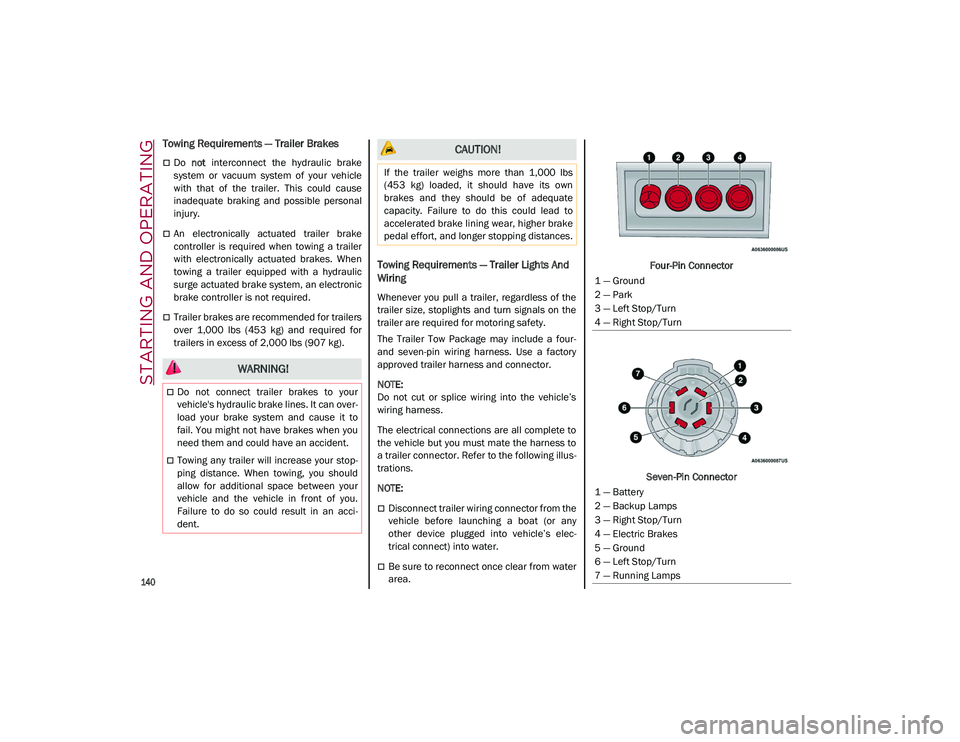
The electrical connections are all complete to
the vehicle but you must mate the harness to
a trailer connector. Refer to the following illus -
trations.
NOTE:
Disconnect trailer wiring connector from the
vehicle before launching a boat (or any
other device plugged into vehicle’s elec -
trical connect) into water.
Be sure to reconnect once clear from water
area. Four-Pin Connector
Seven-Pin Connector
WARNING!
Do not connect trailer brakes to your
vehicle's hydraulic brake lines. It can over -
load your brake system and cause it to
fail. You might not have brakes when you
need them and could have an accident.
Towing any trailer will increase your stop -
ping distance. When towing, you should
allow for additional space between your
vehicle and the vehicle in front of you.
Failure to do so could result in an acci -
dent.
CAUTION!
If the trailer weighs more than 1,000 lbs
(453 kg) loaded, it should have its own
brakes and they should be of adequate
capacity. Failure to do this could lead to
accelerated brake lining wear, higher brake
pedal effort, and longer stopping distances.
1 — Ground
2 — Park
3 — Left Stop/Turn
4 — Right Stop/Turn
1 — Battery
2 — Backup Lamps
3 — Right Stop/Turn
4 — Electric Brakes
5 — Ground
6 — Left Stop/Turn
7 — Running Lamps
21_GU_OM_EN_USC_t.book Page 140
Page 143 of 280
141
Towing Tips
Before setting out on a trip, practice turning,
stopping, and backing up the trailer in an area
located away from heavy traffic.
Automatic Transmission
Select the DRIVE range when towing. The
transmission controls include a drive strategy
to avoid frequent shifting when towing.
However, if frequent shifting does occur while
in DRIVE, you can use the AutoStick shift
control to manually select a lower gear.
NOTE:
Using a lower gear while operating the vehicle
under heavy loading conditions will improve
performance and extend transmission life by
reducing excessive shifting and heat build-up.
This action will also provide better engine
braking.
Cruise Control — If Equipped
Do not use on hilly terrain or with heavy
loads.
When using the Cruise Control, if you expe-
rience speed drops greater than 10 mph
(16 km/h), disengage until you can get back
to cruising speed.
Use Cruise Control in flat terrain and with
light loads to maximize fuel efficiency.
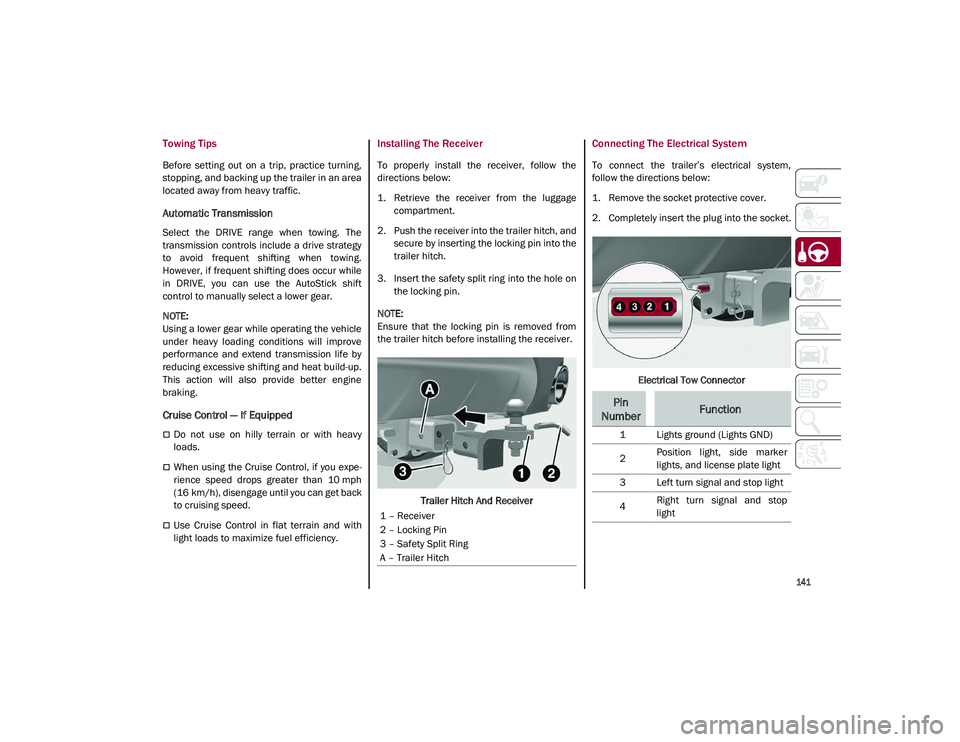
Installing The Receiver
To properly install the receiver, follow the
directions below:
1. Retrieve the receiver from the luggage compartment.
2. Push the receiver into the trailer hitch, and secure by inserting the locking pin into the
trailer hitch.
3. Insert the safety split ring into the hole on the locking pin.
NOTE:
Ensure that the locking pin is removed from
the trailer hitch before installing the receiver.
Trailer Hitch And Receiver
Connecting The Electrical System
To connect the trailer’s electrical system,
follow the directions below:
1. Remove the socket protective cover.
2. Completely insert the plug into the socket.
Electrical Tow Connector
1 – Receiver
2 – Locking Pin
3 – Safety Split Ring
A – Trailer Hitch
Pin
NumberFunction
1 Lights ground (Lights GND)
2 Position light, side marker
lights, and license plate light
3 Left turn signal and stop light
4 Right turn signal and stop
light
21_GU_OM_EN_USC_t.book Page 141
Page 152 of 280
SAFETY
150
For the operation of the DAA, LDW, LKA, HAS,
TJA, ACC, ISC, or TSR systems, see
Ú
page 86.
NOTE:
When driving on two-way roads where there is
no lane dividing center line (e.g. on unpaved
roads), the use of the ABSA, HAS, TJA, and LKA
systems is strongly discouraged as the system
could detect the entire road as single-lane
dividing lines.
NOTE:
The driving assistance systems are designed
to aid in driving the car. The driver must always
maintain a sufficient level of attention to the
traffic and road conditions and control the
trajectory of the car.
Blind Spot Monitoring (BSM) System — If
Equipped
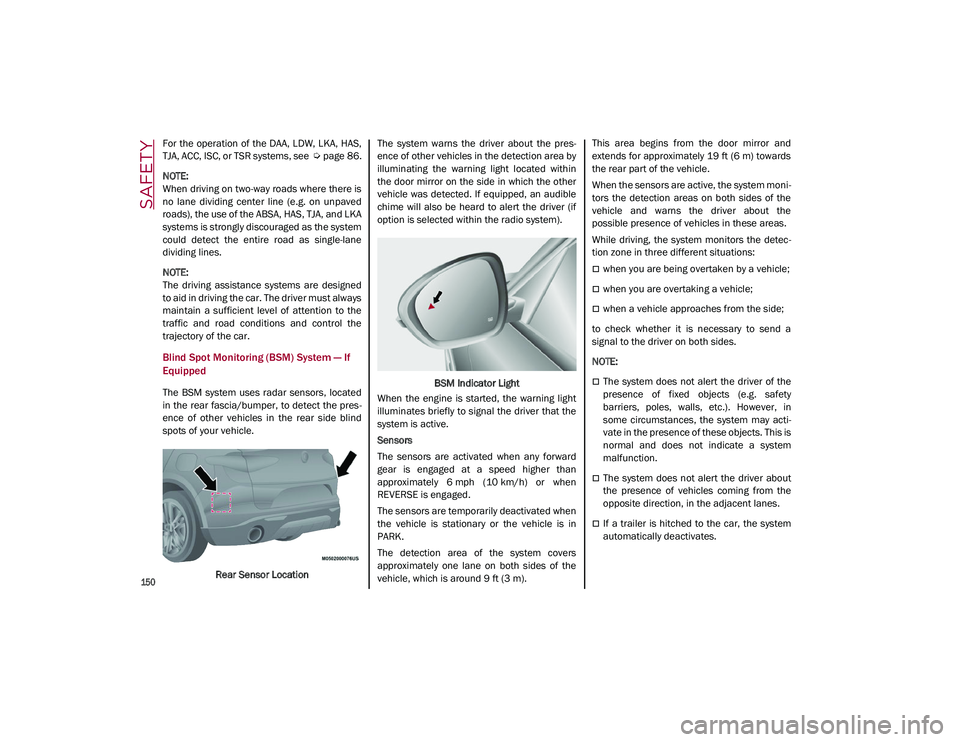
The BSM system uses radar sensors, located
in the rear fascia/bumper, to detect the pres -
ence of other vehicles in the rear side blind
spots of your vehicle.
Rear Sensor Location The system warns the driver about the pres
-
ence of other vehicles in the detection area by
illuminating the warning light located within
the door mirror on the side in which the other
vehicle was detected. If equipped, an audible
chime will also be heard to alert the driver (if
option is selected within the radio system).
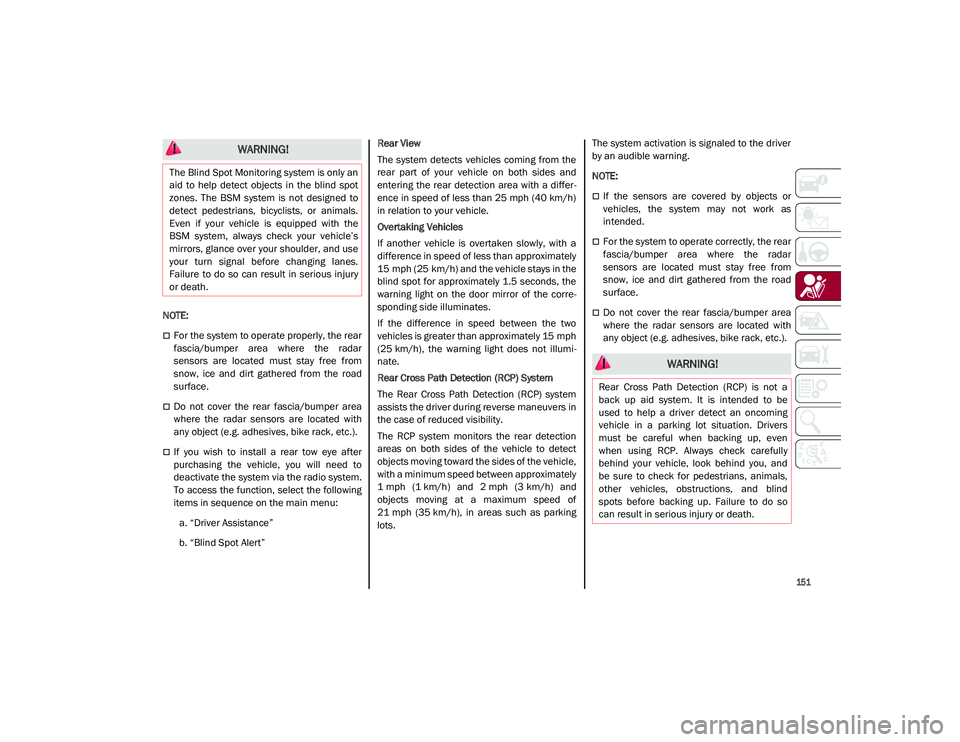
BSM Indicator Light
When the engine is started, the warning light
illuminates briefly to signal the driver that the
system is active.
Sensors
The sensors are activated when any forward
gear is engaged at a speed higher than
approximately 6 mph (10 km/h) or when
REVERSE is engaged.
The sensors are temporarily deactivated when
the vehicle is stationary or the vehicle is in
PARK.
The detection area of the system covers
approximately one lane on both sides of the
vehicle, which is around 9 ft (3 m). This area begins from the door mirror and
extends for approximately 19 ft (6 m) towards
the rear part of the vehicle.
When the sensors are active, the system moni
-
tors the detection areas on both sides of the
vehicle and warns the driver about the
possible presence of vehicles in these areas.
While driving, the system monitors the detec -
tion zone in three different situations:
when you are being overtaken by a vehicle;
when you are overtaking a vehicle;
when a vehicle approaches from the side;
to check whether it is necessary to send a
signal to the driver on both sides.
NOTE:
The system does not alert the driver of the
presence of fixed objects (e.g. safety
barriers, poles, walls, etc.). However, in
some circumstances, the system may acti -
vate in the presence of these objects. This is
normal and does not indicate a system
malfunction.
The system does not alert the driver about
the presence of vehicles coming from the
opposite direction, in the adjacent lanes.
If a trailer is hitched to the car, the system
automatically deactivates.
21_GU_OM_EN_USC_t.book Page 150
Page 153 of 280
151
NOTE:
For the system to operate properly, the rear
fascia/bumper area where the radar
sensors are located must stay free from
snow, ice and dirt gathered from the road
surface.
Do not cover the rear fascia/bumper area
where the radar sensors are located with
any object (e.g. adhesives, bike rack, etc.).
If you wish to install a rear tow eye after
purchasing the vehicle, you will need to
deactivate the system via the radio system.
To access the function, select the following
items in sequence on the main menu:a. “Driver Assistance”
b. “Blind Spot Alert” Rear View
The system detects vehicles coming from the
rear part of your vehicle on both sides and
entering the rear detection area with a differ
-
ence in speed of less than 25 mph (40 km/h)
in relation to your vehicle.
Overtaking Vehicles
If another vehicle is overtaken slowly, with a
difference in speed of less than approximately
15 mph (25 km/h) and the vehicle stays in the
blind spot for approximately 1.5 seconds, the
warning light on the door mirror of the corre -
sponding side illuminates.
If the difference in speed between the two
vehicles is greater than approximately 15 mph
(25 km/h), the warning light does not illumi -
nate.
Rear Cross Path Detection (RCP) System
The Rear Cross Path Detection (RCP) system
assists the driver during reverse maneuvers in
the case of reduced visibility.
The RCP system monitors the rear detection
areas on both sides of the vehicle to detect
objects moving toward the sides of the vehicle,
with a minimum speed between approximately
1 mph (1 km/h) and 2 mph (3 km/h) and objects moving at a maximum speed of
21 mph (35 km/h), in areas such as parking
lots. The system activation is signaled to the driver
by an audible warning.
NOTE:
If the sensors are covered by objects or
vehicles, the system may not work as
intended.
For the system to operate correctly, the rear
fascia/bumper area where the radar
sensors are located must stay free from
snow, ice and dirt gathered from the road
surface.
Do not cover the rear fascia/bumper area
where the radar sensors are located with
any object (e.g. adhesives, bike rack, etc.).
WARNING!
The Blind Spot Monitoring system is only an
aid to help detect objects in the blind spot
zones. The BSM system is not designed to
detect pedestrians, bicyclists, or animals.
Even if your vehicle is equipped with the
BSM system, always check your vehicle’s
mirrors, glance over your shoulder, and use
your turn signal before changing lanes.
Failure to do so can result in serious injury
or death.
WARNING!
Rear Cross Path Detection (RCP) is not a
back up aid system. It is intended to be
used to help a driver detect an oncoming
vehicle in a parking lot situation. Drivers
must be careful when backing up, even
when using RCP. Always check carefully
behind your vehicle, look behind you, and
be sure to check for pedestrians, animals,
other vehicles, obstructions, and blind
spots before backing up. Failure to do so
can result in serious injury or death.
21_GU_OM_EN_USC_t.book Page 151
Page 155 of 280
153
The sensors are activated when any forward
gear is engaged at a speed higher than about
6 mph (10 km/h), or when REVERSE (R) is
engaged.
The sensors are temporarily deactivated when
the car is stationary and in PARK (P).
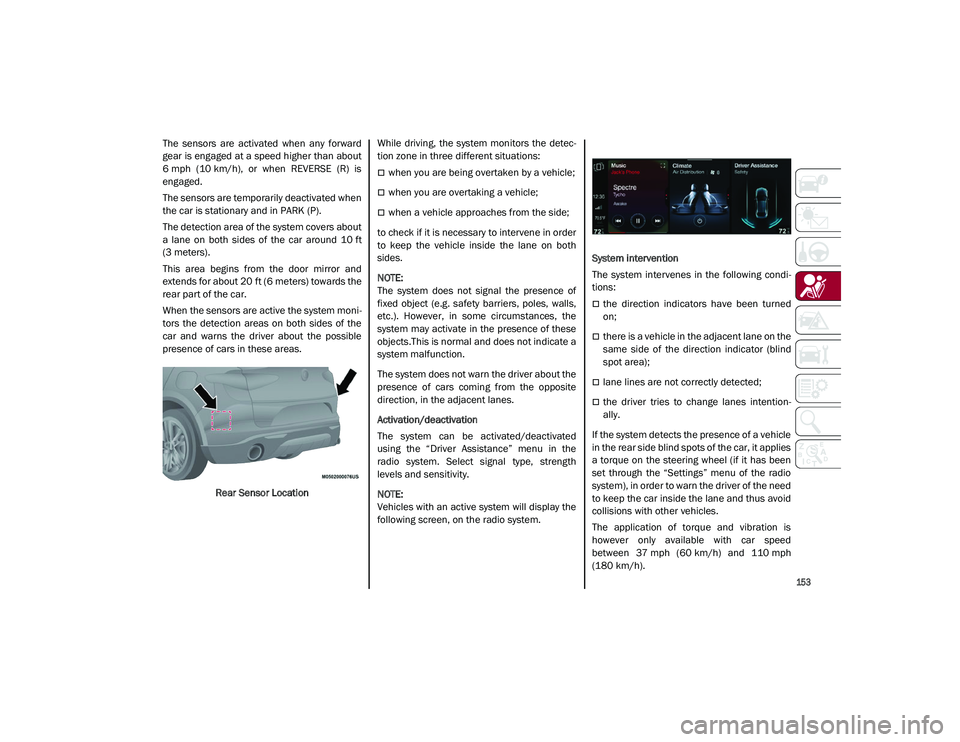
The detection area of the system covers about
a lane on both sides of the car around 10 ft
(3 meters).
This area begins from the door mirror and
extends for about 20 ft (6 meters) towards the
rear part of the car.
When the sensors are active the system moni-
tors the detection areas on both sides of the
car and warns the driver about the possible
presence of cars in these areas.
Rear Sensor Location While driving, the system monitors the detec
-
tion zone in three different situations:
when you are being overtaken by a vehicle;
when you are overtaking a vehicle;
when a vehicle approaches from the side;
to check if it is necessary to intervene in order
to keep the vehicle inside the lane on both
sides.
NOTE:
The system does not signal the presence of
fixed object (e.g. safety barriers, poles, walls,
etc.). However, in some circumstances, the
system may activate in the presence of these
objects.This is normal and does not indicate a
system malfunction.
The system does not warn the driver about the
presence of cars coming from the opposite
direction, in the adjacent lanes.
Activation/deactivation
The system can be activated/deactivated
using the “Driver Assistance” menu in the
radio system. Select signal type, strength
levels and sensitivity.
NOTE:
Vehicles with an active system will display the
following screen, on the radio system. System intervention
The system intervenes in the following condi
-
tions:
the direction indicators have been turned
on;
there is a vehicle in the adjacent lane on the
same side of the direction indicator (blind
spot area);
lane lines are not correctly detected;
the driver tries to change lanes intention -
ally.
If the system detects the presence of a vehicle
in the rear side blind spots of the car, it applies
a torque on the steering wheel (if it has been
set through the “Settings” menu of the radio
system), in order to warn the driver of the need
to keep the car inside the lane and thus avoid
collisions with other vehicles.
The application of torque and vibration is
however only available with car speed
between 37 mph (60 km/h) and 110 mph
(180 km/h).
21_GU_OM_EN_USC_t.book Page 153
Page 157 of 280
155
After 15 seconds with the hands removed
from the steering wheel, the LKA system will
be deactivated and a dedicated message will
be shown on the instrument cluster display. A
short acoustic signal will sound in this case.
In any of the situations above where the hands
are removed from the steering wheel for more
than 6 seconds, it is necessary to reposition
the hands on the steering wheel.
Changing The System Sensitivity
The system's sensitivity can be set through the
radio system. Select the “Driver Assistance”
menu and then select “Comfort”. Sensitivity
“High” or “Low” can be selected.
Rear Cross Path Detection (RCP) System
The Rear Cross Path Detection (RCP) system
assists the driver during reverse maneuvers in
the case of reduced visibility.
When the ABSA system is active, the RCP
system monitors the rear detection areas on
both sides of the vehicle to detect objects
moving towards the sides of the vehicle at a
minimum speed between 0.6 mph and 2 mph
(1 km/h and 3km/h) from objects moving at a
maximum speed of 22 mph (35 km/h).
These are generally occurrences that happen
in parking areas.
The system activation is signaled to the driver
by means of a visual and audible warning.
NOTE:
If the sensors are covered by objects or vehi-
cles, the system may not work as intended. Changing the system sensitivity
To change the sensitivity and the strength of
the torque intervention on the steering wheel,
refer to “Settings” of the radio system
Ú
page 268.
Driver Attention Assist (DAA) System — If
Equipped
The Driver Attention Assist (DAA) system
detects when the driver is feeling fatigued and
warns the driver to pull over and take a break.
To Activate/Deactivate
The DAA system can be activated and deacti -
vated through the radio system by selecting
the following in order:
1. “Driver Assistance”
2. “Driver Attention Assist”
System Intervention
Using information from the front camera, the
system implements two operating logics:
The first operating logic takes the driving
style into account, observing the road and
detecting to what extent the driver can
continue driving with few lane crossing
events.
The second operating logic measures the
time spent behind the wheel with the
vehicle speed above 40 mph (60 km/h) and below 110 mph (180 km/h). If the“Standard” option is selected, in these
conditions, the “Dozy Driver” message may
appear after three hours of driving. If the
“Early” option is selected and these condi -
tions occur, the “Dozy Driver” message will
be displayed after two hours of driving.
NOTE:
If the conditions described above are not
detected continuously during the entire driving
period, the “Dozy Driver” message may be
displayed later than two or three hours. If the
driving style indicates that the driver is unable
to follow the road trajectory and respect the
horizontal lane markings, the red symbol will
appear on the instrument cluster display to
suggest that the driver should stop for a break.
An audible signal will also sound.
If the driver accepts the suggestion provided
by the system by pushing the MENU button on
the multifunction lever, the message will
WARNING!
The DAA System is an aid for driving and
does not relieve the driver of the
responsibility of driving the vehicle. If you
experience fatigue while driving, pull over
safely for a break without waiting for the
DAA to intervene. Only return to the road
when you are in the right physical and
mental condition to prevent endangering
yourself and other drivers.
21_GU_OM_EN_USC_t.book Page 155