2021 ALFA ROMEO STELVIO center console
[x] Cancel search: center consolePage 93 of 280
91
(Continued)
Disengaging The EPB Manually
In order to manually release the parking brake,
the ignition should be in the ACC mode. Press
the brake pedal, and then push the switch on
the center console briefly.
Noise may be heard from the rear of the
vehicle, and a slight movement of the brake
pedal may be detected during disengagement.
After disengaging the EPB, the BRAKE warning
light on the instrument cluster display and the
light on the switch will turn off.
If the BRAKE warning light on the instrument
cluster display remains on with the EPB disen-
gaged, this indicates a fault: in this case,
contact an authorized dealer.
NOTE:
Always engage the EPB when parking the
vehicle to prevent injury or damage caused
by the unexpected movement of the vehicle.
Never use gear position PARK (P) instead of
the EPB.
Electric Park Brake (EPB) Operating Modes
The EPB may operate as follows:
“Dynamic Operating Mode”: this mode is
activated by pulling the switch repeatedly
while driving.
“Static Engagement and Release Mode”:
with the vehicle stationary, the EPB can be
activated by pulling the switch on the center
console once. Push the switch and the
brake pedal at the same time to disengage
the brake.
“Drive Away Release” — if equipped: the
EPB will automatically disengage with the
driver side seat belt fastened and the detec
-
tion of an action performed by the driver to move the vehicle (DRIVE [D] or REVERSE
[R]). This feature can be turned on or off in
the Information and Entertainment System.
NOTE:
If the car is equipped with carbon-ceramic
brake discs, it is necessary to fasten the seat
belts or turn off the EPB before starting to
avoid damages to the ceramic brake discs.
“Safe Hold”: if the vehicle speed is lower
than 1.9 mph (3 km/h), the gear selector is
not in PARK (P) position and the driver's
intention of leaving the vehicle is detected,
the EPB will automatically engage to hold
the vehicle in safety conditions.
“Auto Park Brake”: if the vehicle speed is
below 1.9 mph (3 km/h), the EPB will auto -
matically engage when the gear selector is
in PARK (P) position. The light on the switch
located on the center console switches on
together with the BRAKE warning light on
the instrument cluster display when the
parking brake is engaged and applied to the
wheels. Each automatic parking brake
engagement can be canceled by pushing
the switch on the center console and at the
same time moving the gear selector for the
transmission to position PARK (P).
Safe Hold
Safe Hold is a safety function that automati -
cally engages the EPB in the event of a
dangerous condition for the vehicle.
WARNING!
Never leave children alone in a vehicle, or
with access to an unlocked vehicle.
Allowing children to be in a vehicle unat -
tended is dangerous for a number of
reasons. A child or others could be seri -
ously or fatally injured. Children should be
warned not to touch the parking brake,
brake pedal or the gear selector.
Do not leave the key fob in or near the
vehicle or in a location accessible to chil -
dren. A child could operate power
windows, other controls, or move the
vehicle.
Be sure the parking brake is fully disen -
gaged before driving; failure to do so can
lead to brake failure and a collision.
Always fully apply the parking brake when
leaving your vehicle, or it may roll and
cause damage or injury.
WARNING! (Continued)
21_GU_OM_EN_USC_t.book Page 91
Page 94 of 280
STARTING AND OPERATING
92
(Continued)
The EPB engages automatically to prevent
vehicle movement if:
The vehicle speed is below 2 mph (3 km/h).
A transmission operating mode different
from PARK (P) is activated.
The driver's seat belt is not fastened.
The driver side door is open.
No attempts to apply pressure on the brake
pedal have been detected.
The vehicle is parked on roads with a slope
of more than 4%.
The “Safe Hold” function can be temporarily
disabled by pushing the EPB switch located on
the center console and the brake pedal at the
same time, with the vehicle stationary and the
driver side door open.
Once disabled, the function will activate again
when the vehicle speed reaches 12 mph
(20 km/h) or the ignition is cycled to OFF and
then to ACC.
AUTOMATIC TRANSMISSION
The vehicle is equipped with an electronically
controlled 8-speed automatic transmission
where gear shifting automatically takes place,
depending on the vehicle usage instanta -
neous parameters (vehicle speed, grade, and
accelerator pedal position).
Manual gear shifting can still occur thanks to
the “Sequential” mode position for the gear
selector.
WARNING!
It is dangerous to shift out of PARK or
NEUTRAL if the engine speed is higher
than idle speed. If your foot is not firmly
pressing the brake pedal, the vehicle
could accelerate quickly forward or in
reverse. You could lose control of the
vehicle and hit someone or something.
Only shift into gear when the engine is
idling normally and your foot is firmly
pressing the brake pedal.
Unintended movement of a vehicle could
injure those in or near the vehicle. As with
all vehicles, you should never exit a
vehicle while the engine is running. Before
exiting a vehicle, always apply the parking
brake, shift the transmission into PARK,
and turn the ignition OFF. When the igni -
tion is in the OFF mode, the transmission
is locked in PARK, securing the vehicle
against unwanted movement.
When leaving the vehicle, always make
sure the ignition is in the OFF mode,
remove the key fob from the vehicle, and
lock the vehicle.
Never leave children alone in a vehicle, or
with access to an unlocked vehicle.
Allowing children to be in a vehicle unat -
tended is dangerous for a number of
reasons. A child or others could be seri -
ously or fatally injured. Children should be
warned not to touch the parking brake,
brake pedal or the transmission gear
selector.
Do not leave the key fob in or near the
vehicle (or in a location accessible to chil -
dren), and do not leave the ignition in the
ON/RUN or ACC mode. A child could
operate power windows, other controls, or
move the vehicle.
CAUTION!
Damage to the transmission may occur if
the following precautions are not observed:
Shift into or out of PARK or REVERSE only
after the vehicle has come to a complete
stop.
Do not shift between PARK, REVERSE,
NEUTRAL, or DRIVE when the engine is
above idle speed.
Before shifting into any gear, make sure
your foot is firmly pressing the brake
pedal.
WARNING! (Continued)
21_GU_OM_EN_USC_t.book Page 92
Page 95 of 280
93
Display
The following information is shown on the
dedicated area of the display:
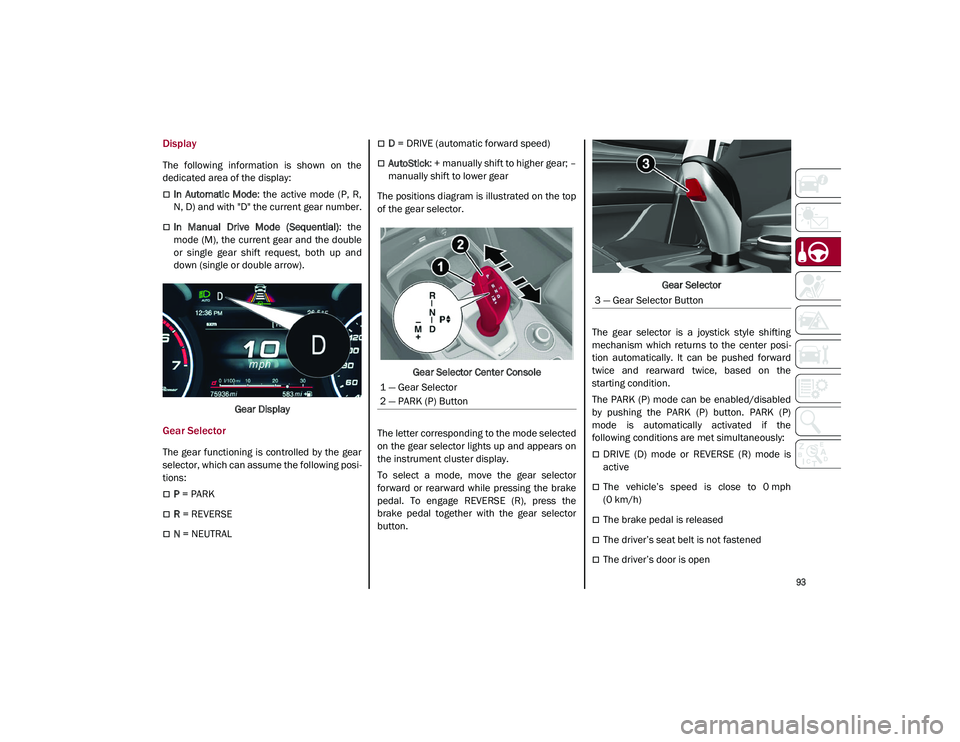
In Automatic Mode: the active mode (P, R,
N, D) and with "D" the current gear number.
In Manual Drive Mode (Sequential) : the
mode (M), the current gear and the double
or single gear shift request, both up and
down (single or double arrow).
Gear Display
Gear Selector
The gear functioning is controlled by the gear
selector, which can assume the following posi -
tions:
P = PARK
R = REVERSE
N = NEUTRAL
D = DRIVE (automatic forward speed)
AutoStick : + manually shift to higher gear; –
manually shift to lower gear
The positions diagram is illustrated on the top
of the gear selector.
Gear Selector Center Console
The letter corresponding to the mode selected
on the gear selector lights up and appears on
the instrument cluster display.
To select a mode, move the gear selector
forward or rearward while pressing the brake
pedal. To engage REVERSE (R), press the
brake pedal together with the gear selector
button. Gear Selector
The gear selector is a joystick style shifting
mechanism which returns to the center posi -
tion automatically. It can be pushed forward
twice and rearward twice, based on the
starting condition.
The PARK (P) mode can be enabled/disabled
by pushing the PARK (P) button. PARK (P)
mode is automatically activated if the
following conditions are met simultaneously:
DRIVE (D) mode or REVERSE (R) mode is
active
The vehicle’s speed is close to 0 mph
(0 km/h)
The brake pedal is released
The driver’s seat belt is not fastened
The driver’s door is open
1 — Gear Selector
2 — PARK (P) Button
3 — Gear Selector Button
21_GU_OM_EN_USC_t.book Page 93
Page 100 of 280
STARTING AND OPERATING
98
ALFA DNA SELECTOR
Alfa DNA System
This vehicle is equipped with an Alfa DNA
system selector (located on the center
console). There are up to four modes of opera-
tion to be selected according to driving style
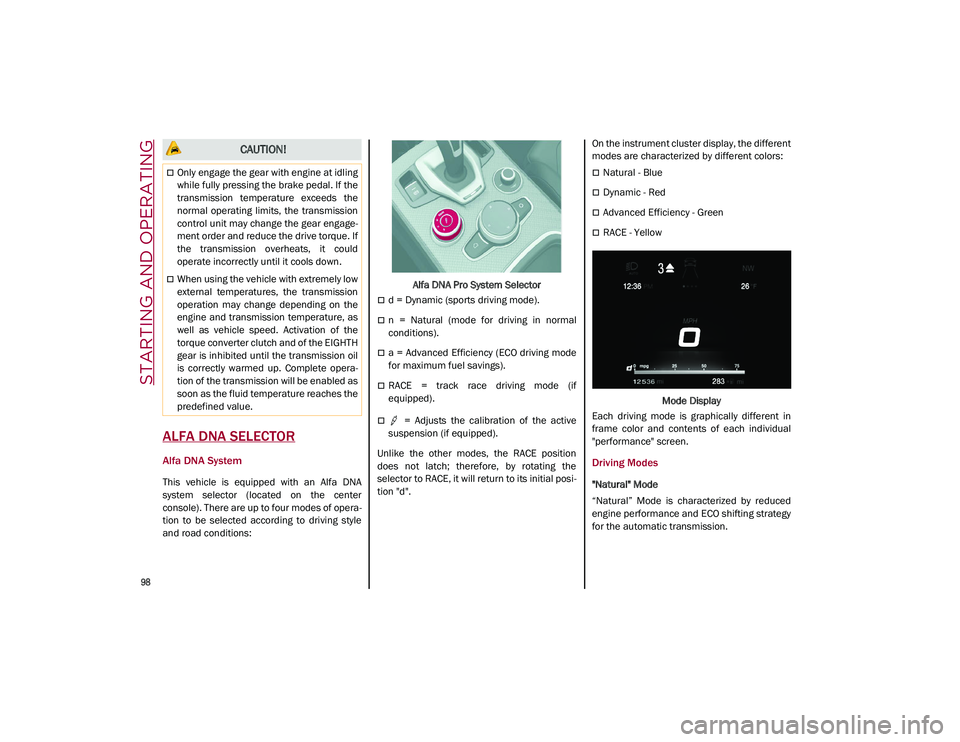
and road conditions: Alfa DNA Pro System Selector
d = Dynamic (sports driving mode).
n = Natural (mode for driving in normal
conditions).
a = Advanced Efficiency (ECO driving mode
for maximum fuel savings).
RACE = track race driving mode (if
equipped).
= Adjusts the calibration of the active
suspension (if equipped).
Unlike the other modes, the RACE position
does not latch; therefore, by rotating the
selector to RACE, it will return to its initial posi -
tion "d". On the instrument cluster display, the different
modes are characterized by different colors:
Natural - Blue
Dynamic - Red
Advanced Efficiency - Green
RACE - Yellow
Mode Display
Each driving mode is graphically different in
frame color and contents of each individual
"performance" screen.
Driving Modes
"Natural" Mode
“Natural” Mode is characterized by reduced
engine performance and ECO shifting strategy
for the automatic transmission.
CAUTION!
Only engage the gear with engine at idling
while fully pressing the brake pedal. If the
transmission temperature exceeds the
normal operating limits, the transmission
control unit may change the gear engage -
ment order and reduce the drive torque. If
the transmission overheats, it could
operate incorrectly until it cools down.
When using the vehicle with extremely low
external temperatures, the transmission
operation may change depending on the
engine and transmission temperature, as
well as vehicle speed. Activation of the
torque converter clutch and of the EIGHTH
gear is inhibited until the transmission oil
is correctly warmed up. Complete opera -
tion of the transmission will be enabled as
soon as the fluid temperature reaches the
predefined value.
21_GU_OM_EN_USC_t.book Page 98
Page 199 of 280

197
13. Rotate the extension lever clockwise untilthe round pin on the jack engages in the
hole in the lifting block located about
6 inches (15 cm) from the outside edge of
the body. The lifting points are marked by
triangles visible on the plastic body
panel.
Jacking Point Indicators
14. Raise the vehicle by turning the jack screw clockwise, using the swivel wrench. Raise
the vehicle only until the tire just clears the
surface and enough clearance is obtained
to install the compact spare tire. Minimum
tire lift provides maximum stability. 15. Remove the five wheel bolts and take the
wheel off.
16. Make sure the contact surfaces between compact spare tire and hub are clean so
that the fastening bolts will not come
loose.
17. Fit the compact spare tire by inserting the first wheel bolt for two threads into the
hole closest to the valve.
18. Take the wheel wrench and tighten the wheel bolts.
19. Inflate the compact spare tire by removing the cap from its inflation valve and
screwing on the compressor inflation hose
fitting. 20. Make sure that the switch on the
compressor is in the (off) O position, open
the liftgate and insert the plug into the
power socket in the cargo area, or on the
center console and start the engine. Place
the on/off switch in the (on) I position.
Attaching Compressor To Tire
21. Inflate the compact spare tire to a pres -
sure of 43.5 psi (3 bar).
NOTE:
If spare tire is overinflated, be sure to lower
the psi in the tire to the recommended amount
by using the deflation button on the air
compressor.
22. Operate the wheel wrench on the jack to lower the vehicle.
CAUTION!
Do not attempt to raise the vehicle by
jacking on locations other than those
indicated in the Jacking Instructions for this
vehicle.
WARNING!
Raising the vehicle higher than necessary
can make the vehicle less stable. It could
slip off the jack and hurt someone near it.
Raise the vehicle only enough to remove
the tire.
CAUTION!
Be sure to mount the spare tire with the
valve stem facing outward. The vehicle
could be damaged if the spare tire is
mounted incorrectly.
6 — Air Compressor
7 — Pressure Gauge
8 — Power Button
21_GU_OM_EN_USC_t.book Page 197
Page 202 of 280
IN CASE OF EMERGENCY
200
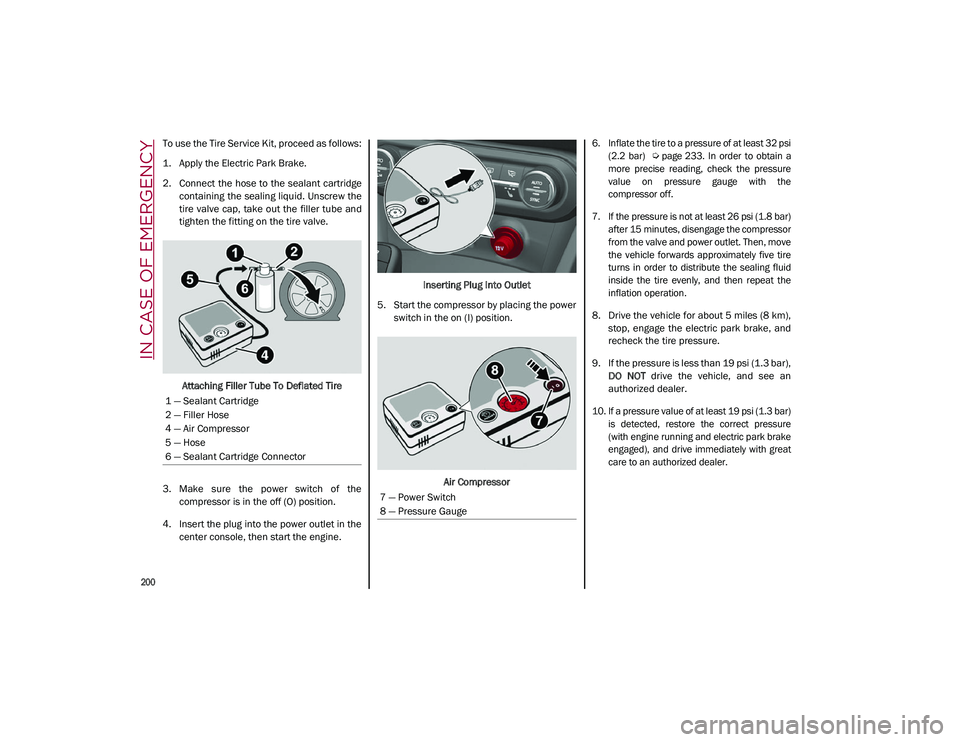
To use the Tire Service Kit, proceed as follows:
1. Apply the Electric Park Brake.
2. Connect the hose to the sealant cartridgecontaining the sealing liquid. Unscrew the
tire valve cap, take out the filler tube and
tighten the fitting on the tire valve.
Attaching Filler Tube To Deflated Tire
3. Make sure the power switch of the compressor is in the off (O) position.
4. Insert the plug into the power outlet in the center console, then start the engine. Inserting Plug Into Outlet
5. Start the compressor by placing the power switch in the on (I) position.
Air Compressor
6. Inflate the tire to a pressure of at least 32 psi
(2.2 bar)
Ú page 233. In order to obtain a
more precise reading, check the pressure
value on pressure gauge with the
compressor off.
7. If the pressure is not at least 26 psi (1.8 bar) after 15 minutes, disengage the compressor
from the valve and power outlet. Then, move
the vehicle forwards approximately five tire
turns in order to distribute the sealing fluid
inside the tire evenly, and then repeat the
inflation operation.
8. Drive the vehicle for about 5 miles (8 km), stop, engage the electric park brake, and
recheck the tire pressure.
9. If the pressure is less than 19 psi (1.3 bar), DO NOT drive the vehicle, and see an
authorized dealer.
10. If a pressure value of at least 19 psi (1.3 bar) is detected, restore the correct pressure
(with engine running and electric park brake
engaged), and drive immediately with great
care to an authorized dealer.
1 — Sealant Cartridge
2 — Filler Hose
4 — Air Compressor
5 — Hose
6 — Sealant Cartridge Connector
7 — Power Switch
8 — Pressure Gauge
21_GU_OM_EN_USC_t.book Page 200